2010 MERCEDES-BENZ R320 tow
[x] Cancel search: towPage 271 of 364
Vehicle equipment ............................
270
Where will I find ...? .......................... 270
Vehicle status messages in the
multifunction display ....................... 274
What to do if … .................................. 299
Unlocking/locking manually ...........308
Resetting activated NECK-PRO
active front head restraints .............310
Replacing SmartKey batteries ......... 310
Replacing bulbs ................................. 312
Replacing wiper blades ....................317
Flat tire .............................................. 319
Bleeding the fuel system (diesel
engine only) ....................................... 331
AdBlue ®
(diesel engine only) ...........331
Battery ............................................... 333
Jump starting .................................... 336
Towing the vehicle ............................338
Fuses .................................................. 340 269Practical hints
251_AKB; 4; 52, en-US
d2ureepe,
Version: 2.11.8.1 2009-03-23T09:22:52+01:00 - Seite 269
Page 272 of 364
Vehicle equipment
i This Operator’s Manual describes all
features, standard or optional, potentially
available for your vehicle at the time of
purchase. Please be aware that your
vehicle might not be equipped with all
features described in this manual. Where will I find ...?
First aid kit
i Check expiration dates and contents for
completeness at least once a year and
replace missing/expired items.
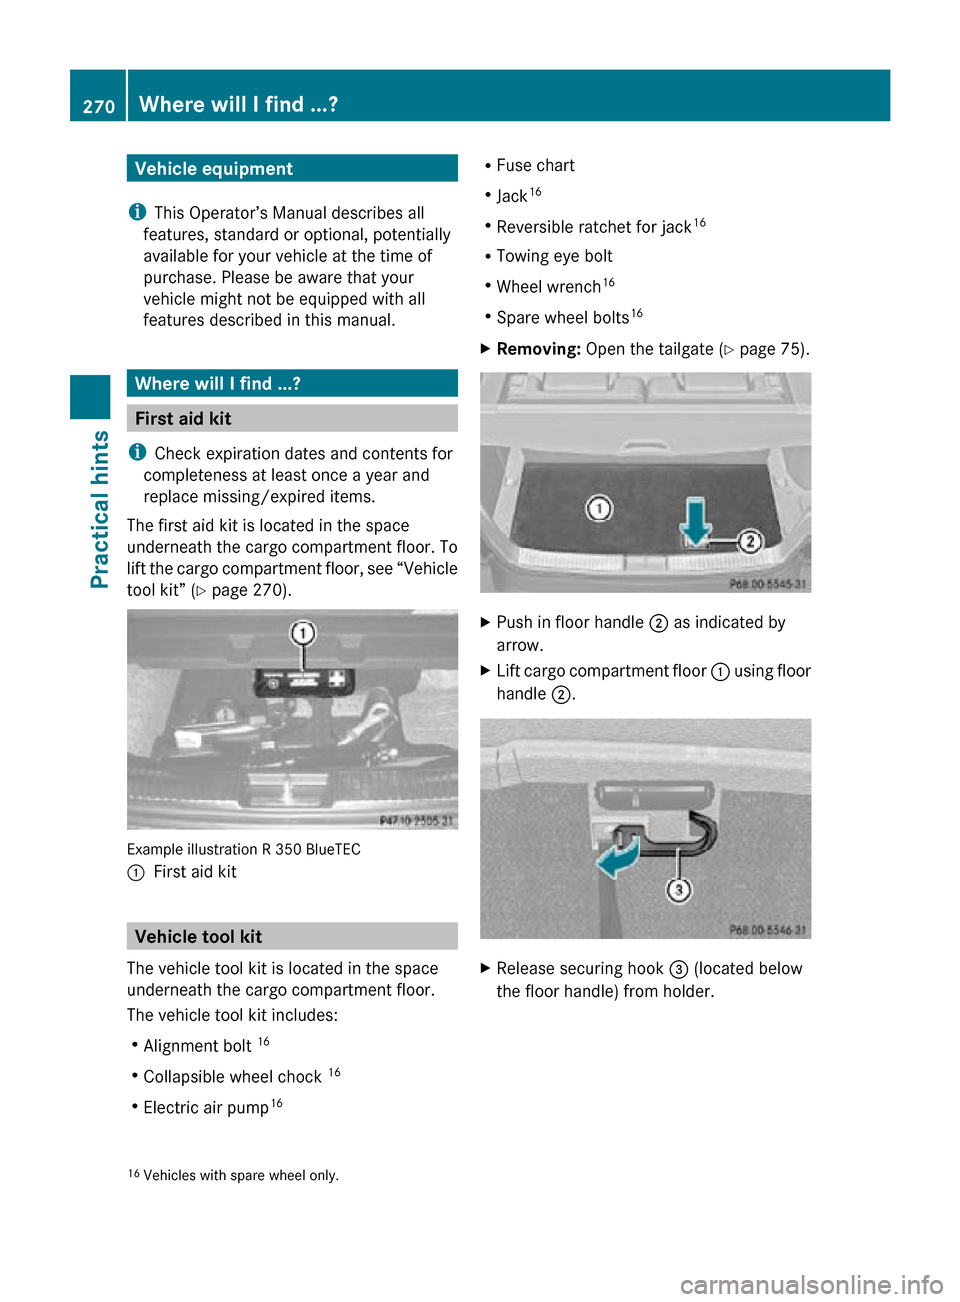
The first aid kit is located in the space
underneath the cargo compartment floor. To
lift the cargo compartment floor, see “Vehicle
tool kit” (Y page 270). Example illustration R 350 BlueTEC
:
First aid kit Vehicle tool kit
The vehicle tool kit is located in the space
underneath the cargo compartment floor.
The vehicle tool kit includes:
R Alignment bolt 16
R Collapsible wheel chock 16
R Electric air pump 16 R
Fuse chart
R Jack 16
R Reversible ratchet for jack 16
R Towing eye bolt
R Wheel wrench 16
R Spare wheel bolts 16
X Removing: Open the tailgate ( Y page 75). X
Push in floor handle ; as indicated by
arrow.
X Lift cargo compartment floor : using floor
handle ;. X
Release securing hook = (located below
the floor handle) from holder.
16 Vehicles with spare wheel only. 270
Where will I find ...?Practical hints
251_AKB; 4; 52, en-US
d2ureepe,
Version: 2.11.8.1 2009-03-23T09:22:52+01:00 - Seite 270
Page 273 of 364
X
Engage securing hook = on upper cargo
compartment lip ?.
! With the cargo compartment cover blind
installed behind the third-row seats,
disengage cargo compartment cover blind
and flip it forward. Otherwise the strap of
the securing hook could damage the cargo
compartment cover blind.
! To prevent damage, always disengage the
securing hook from upper cargo
compartment lip and lower the cargo
compartment floor before closing the
tailgate.
Vehicles without spare wheel i
Vehicles without spare wheel are not
factory-equipped with the tools required for
a wheel change such as a jack or a wheel
wrench. Some tools required for a wheel
change are specific to your vehicle.
Contact an authorized Mercedes-Benz
Center to obtain the tools approved for
your vehicle. The illustration shows the
vehicle retrofitted with the necessary tools
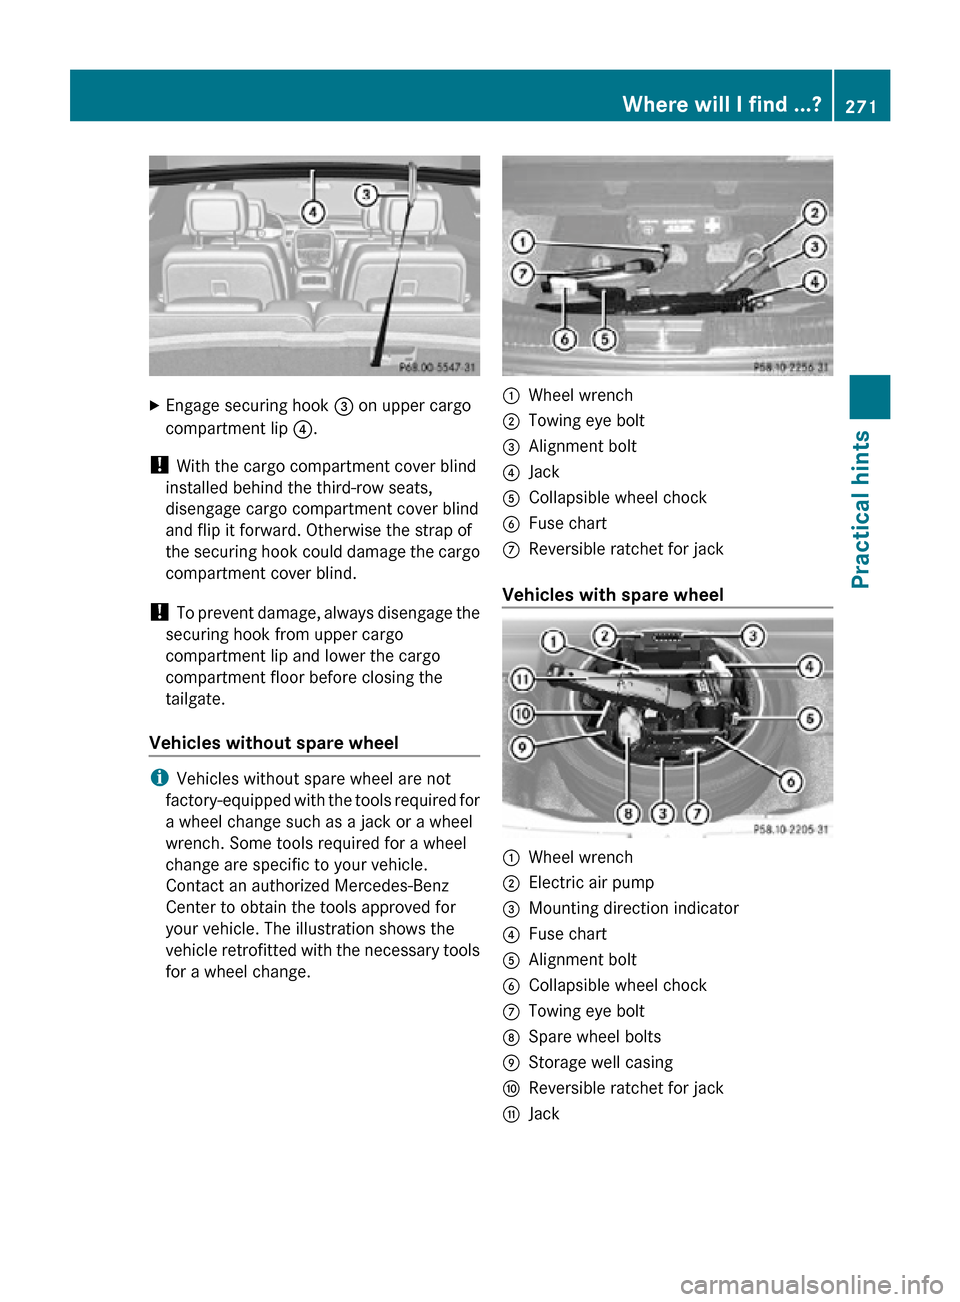
for a wheel change. :
Wheel wrench
; Towing eye bolt
= Alignment bolt
? Jack
A Collapsible wheel chock
B Fuse chart
C Reversible ratchet for jack
Vehicles with spare wheel :
Wheel wrench
; Electric air pump
= Mounting direction indicator
? Fuse chart
A Alignment bolt
B Collapsible wheel chock
C Towing eye bolt
D Spare wheel bolts
E Storage well casing
F Reversible ratchet for jack
G Jack Where will I find ...?
271Practical hints
251_AKB; 4; 52, en-US
d2ureepe, Version: 2.11.8.1 2009-03-23T09:22:52+01:00 - Seite 271 Z
Page 275 of 364
X
Removing: Open the tailgate ( Y page 75).
X Lift the cargo compartment floor and
secure it on the upper cargo compartment
lip ( Y page 270).
! To prevent damage, always disengage the
securing hook from upper cargo
compartment lip and lower the cargo
compartment floor before closing the
tailgate.
X Remove the jack from the vehicle tool kit
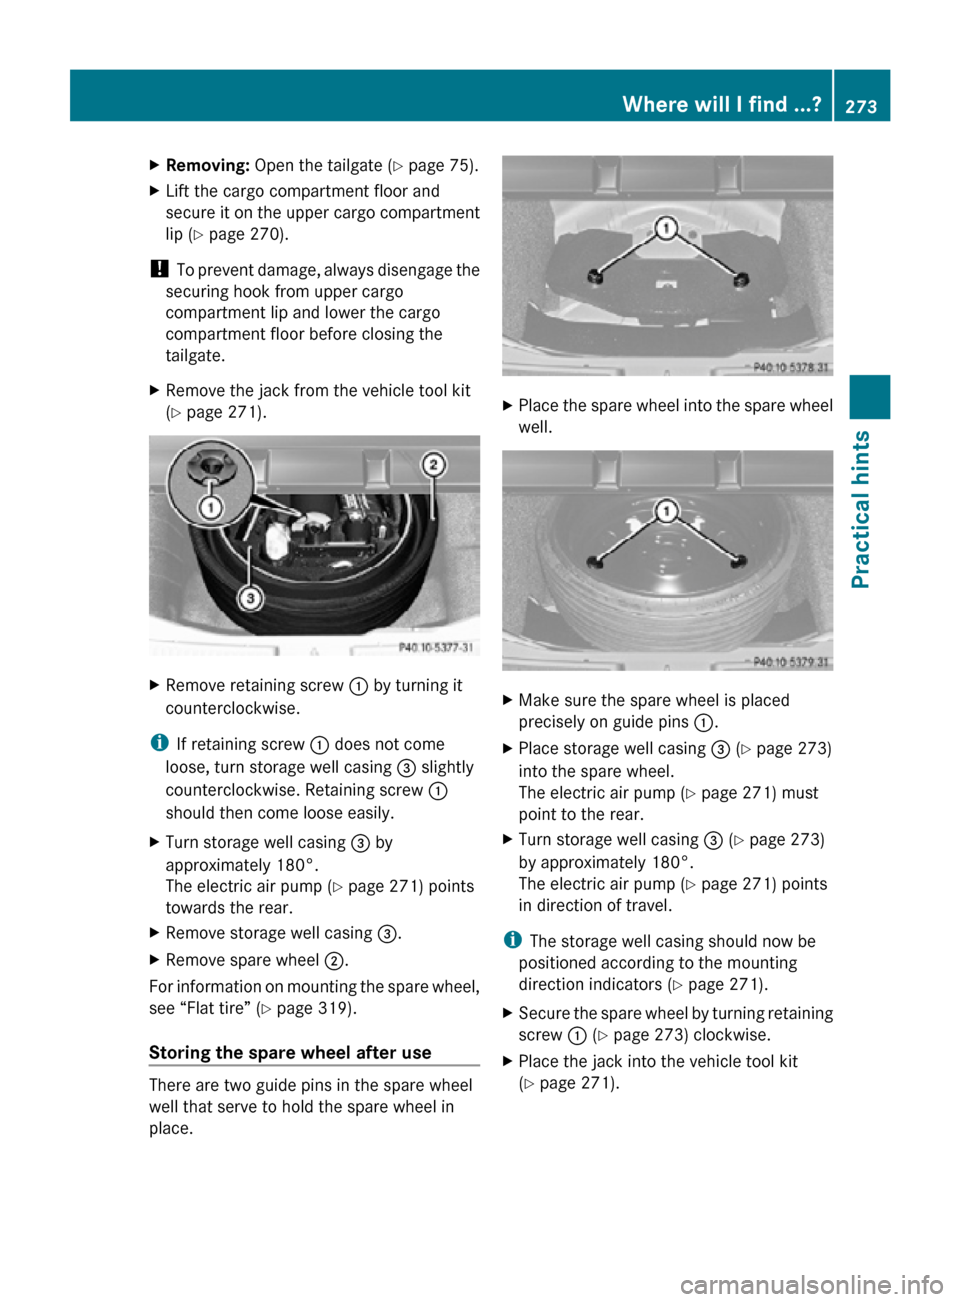
(Y page 271). X
Remove retaining screw : by turning it
counterclockwise.
i If retaining screw : does not come
loose, turn storage well casing = slightly
counterclockwise. Retaining screw :
should then come loose easily.
X Turn storage well casing = by
approximately 180°.
The electric air pump ( Y page 271) points
towards the rear.
X Remove storage well casing =.
X Remove spare wheel ;.
For information on mounting the spare wheel,
see “Flat tire” ( Y page 319).
Storing the spare wheel after use There are two guide pins in the spare wheel
well that serve to hold the spare wheel in
place. X
Place the spare wheel into the spare wheel
well. X
Make sure the spare wheel is placed
precisely on guide pins :.
X Place storage well casing = (Y page 273)
into the spare wheel.
The electric air pump ( Y page 271) must
point to the rear.
X Turn storage well casing = (Y page 273)
by approximately 180°.
The electric air pump ( Y page 271) points
in direction of travel.
i The storage well casing should now be
positioned according to the mounting
direction indicators (Y page 271).
X Secure the spare wheel by turning retaining
screw : (Y page 273) clockwise.
X Place the jack into the vehicle tool kit
(Y page 271). Where will I find ...?
273Practical hints
251_AKB; 4; 52, en-US
d2ureepe, Version: 2.11.8.1 2009-03-23T09:22:52+01:00 - Seite 273 Z
Page 312 of 364
In case the central locking system does not
release the fuel filler flap, you can open it
manually.
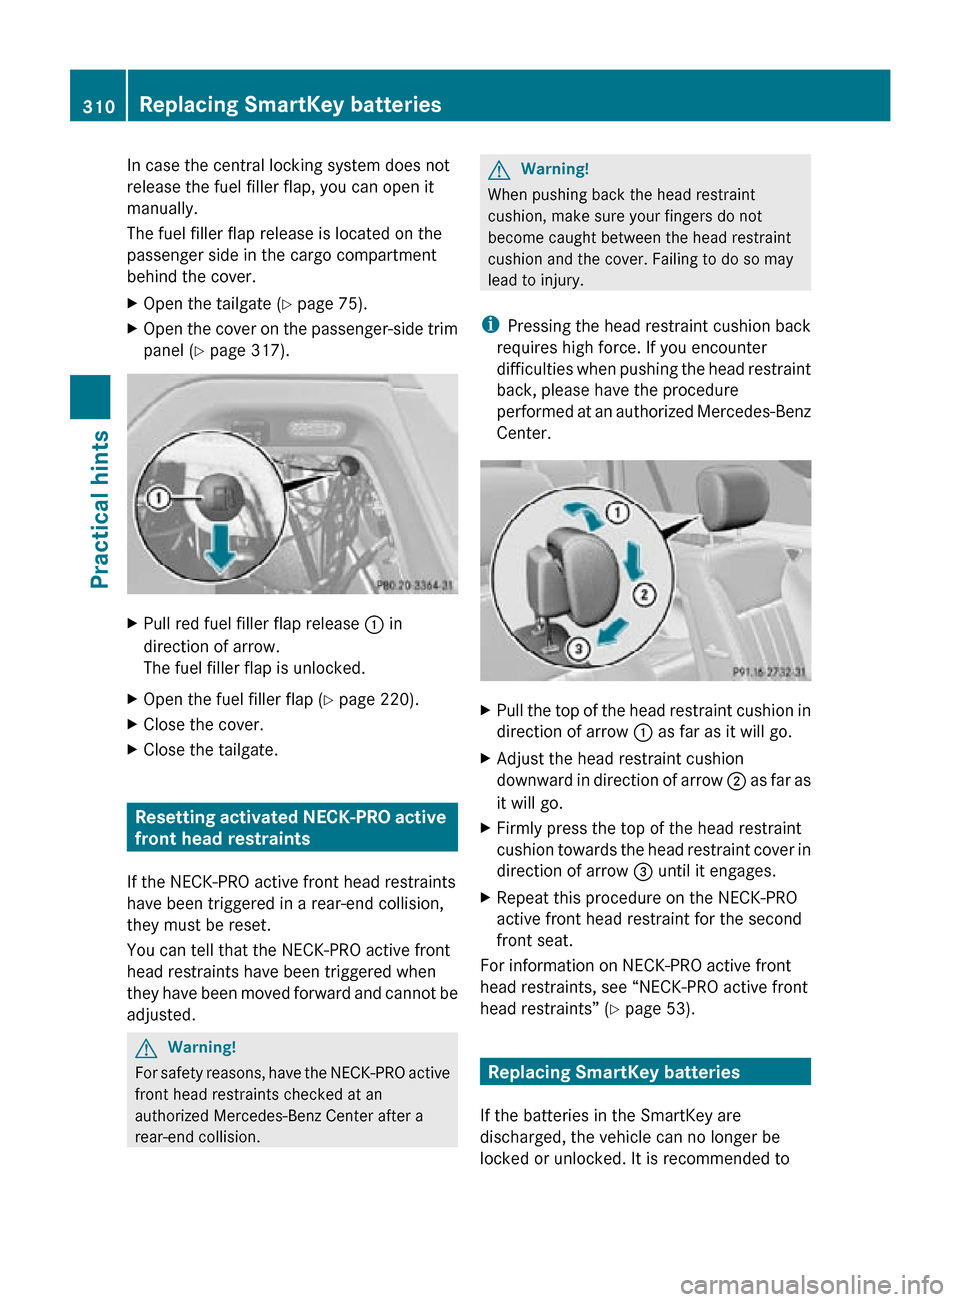
The fuel filler flap release is located on the
passenger side in the cargo compartment
behind the cover.
X
Open the tailgate ( Y page 75).
X Open the cover on the passenger-side trim
panel ( Y page 317). X
Pull red fuel filler flap release : in
direction of arrow.
The fuel filler flap is unlocked.
X Open the fuel filler flap ( Y page 220).
X Close the cover.
X Close the tailgate. Resetting activated NECK-PRO active
front head restraints
If the NECK-PRO active front head restraints
have been triggered in a rear-end collision,
they must be reset.
You can tell that the NECK-PRO active front
head restraints have been triggered when
they have been moved forward and cannot be
adjusted. G
Warning!
For safety reasons, have the NECK-PRO active
front head restraints checked at an
authorized Mercedes-Benz Center after a
rear-end collision. G
Warning!
When pushing back the head restraint
cushion, make sure your fingers do not
become caught between the head restraint
cushion and the cover. Failing to do so may
lead to injury.
i Pressing the head restraint cushion back
requires high force. If you encounter
difficulties when pushing the head restraint
back, please have the procedure
performed at an authorized Mercedes-Benz
Center. X
Pull the top of the head restraint cushion in
direction of arrow : as far as it will go.
X Adjust the head restraint cushion
downward in direction of arrow ; as far as
it will go.
X Firmly press the top of the head restraint
cushion towards the head restraint cover in
direction of arrow = until it engages.
X Repeat this procedure on the NECK-PRO
active front head restraint for the second
front seat.
For information on NECK-PRO active front
head restraints, see “NECK-PRO active front
head restraints” ( Y page 53). Replacing SmartKey batteries
If the batteries in the SmartKey are
discharged, the vehicle can no longer be
locked or unlocked. It is recommended to 310
Replacing SmartKey batteriesPractical hints
251_AKB; 4; 52, en-US
d2ureepe,
Version: 2.11.8.1 2009-03-23T09:22:52+01:00 - Seite 310
Page 321 of 364
Installing wiper blades
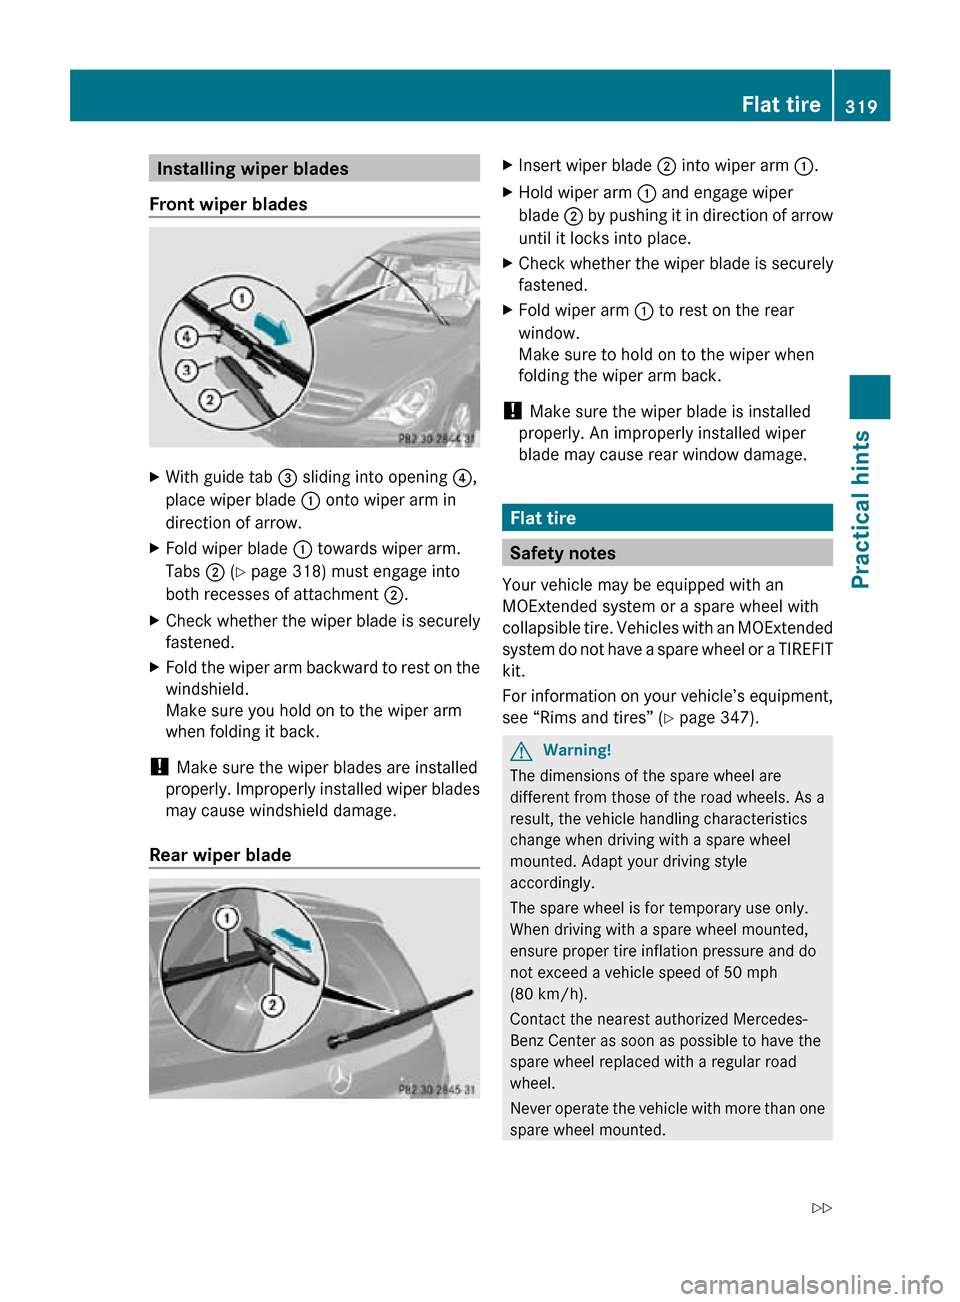
Front wiper blades X
With guide tab = sliding into opening ?,
place wiper blade : onto wiper arm in
direction of arrow.
X Fold wiper blade : towards wiper arm.
Tabs ; (Y page 318) must engage into
both recesses of attachment ;.
X Check whether the wiper blade is securely
fastened.
X Fold the wiper arm backward to rest on the
windshield.
Make sure you hold on to the wiper arm
when folding it back.
! Make sure the wiper blades are installed
properly. Improperly installed wiper blades
may cause windshield damage.
Rear wiper blade X
Insert wiper blade ; into wiper arm :.
X Hold wiper arm : and engage wiper
blade ; by pushing it in direction of arrow
until it locks into place.
X Check whether the wiper blade is securely
fastened.
X Fold wiper arm : to rest on the rear
window.
Make sure to hold on to the wiper when
folding the wiper arm back.
! Make sure the wiper blade is installed
properly. An improperly installed wiper
blade may cause rear window damage. Flat tire
Safety notes
Your vehicle may be equipped with an
MOExtended system or a spare wheel with
collapsible tire. Vehicles with an MOExtended
system do not have a spare wheel or a TIREFIT
kit.
For information on your vehicle’s equipment,
see “Rims and tires” ( Y page 347). G
Warning!
The dimensions of the spare wheel are
different from those of the road wheels. As a
result, the vehicle handling characteristics
change when driving with a spare wheel
mounted. Adapt your driving style
accordingly.
The spare wheel is for temporary use only.
When driving with a spare wheel mounted,
ensure proper tire inflation pressure and do
not exceed a vehicle speed of 50 mph
(80 km/h).
Contact the nearest authorized Mercedes-
Benz Center as soon as possible to have the
spare wheel replaced with a regular road
wheel.
Never operate the vehicle with more than one
spare wheel mounted. Flat tire
319Practical hints
251_AKB; 4; 52, en-US
d2ureepe, Version: 2.11.8.1 2009-03-23T09:22:52+01:00 - Seite 319 Z
Page 338 of 364
Only use a battery charge unit with a
maximum charging voltage of 14.8 V.
X
Charge battery in accordance with the
instructions of the battery charger
manufacturer. Jump starting
G
Warning!
Failure to follow these directions will cause
damage to the electronic components, and
can lead to a battery explosion and severe
injury or death.
Never
lean over batteries while connecting or
jump starting. You might get injured.
Battery fluid contains sulfuric acid. Do not
allow this fluid to come in contact with eyes,
skin or clothing. In case it does, immediately
flush affected area with water, and seek
medical help if necessary.
A battery will also produce hydrogen gas,
which is flammable and explosive. Keep
flames or sparks away from battery, avoid
improper connection of jumper cables,
smoking, etc.
Attempting to jump start a frozen battery can
result in it exploding, causing personal injury.
Read all instructions before proceeding.
! Do not tow-start the vehicle. You could
otherwise seriously damage the automatic
transmission which is not covered by the
Mercedes-Benz Limited Warranty.
! Jump starting should only be performed
using the jump-start terminals located in
the engine compartment.
Avoid repeated and lengthy starting
attempts.
Do not attempt to start the engine using a
battery quick-charge unit. If the engine does not run after several
unsuccessful starting attempts, have it
checked at the nearest authorized
Mercedes-Benz Center.
Excessive unburned fuel generated by
repeated failed starting attempts may
damage the catalytic converter
17
and may
present a fire risk.
Make sure the jumper cables do not have
loose or missing insulation.
Make sure the cable clamps do not touch
any
other metal part while the other end is
still attached to a battery.
If the battery is discharged, the engine can be
started with jumper cables and the fully
charged battery of another vehicle or an
equivalent starter pack. Observe the
following:
R Access to the battery is not possible on all
vehicles. If you cannot access the battery
of the other vehicle, provide jump start
power by an external battery or starter
pack.
R Jump starting should only be performed
when the engine and catalytic converter 18
are cold.
R Do not start the engine if the battery is
frozen. Let the battery thaw out first.
R Only jump start from batteries with the
same voltage rating (12 V). Jump starting
with a more powerful battery could damage
the vehicle’s electrical system. Such
damage will not be covered by the
Mercedes-Benz Limited Warranty.
R Only use jumper cables with sufficient
cross-section and insulated terminal
clamps.
R Always make sure the jumper cables are
not on or near pulleys, fans or other parts
17 Vehicles with gasoline engine only.
18 Vehicles with gasoline engine only. 336
Jump starting
Practical hints
251_AKB; 4; 52, en-US
d2ureepe,
Version: 2.11.8.1 2009-03-23T09:22:52+01:00 - Seite 336
Page 340 of 364
X
Slide cover A back onto negative terminal
B.
X Have the battery checked at the nearest
authorized Mercedes-Benz Center. Towing the vehicle
Safety notes
Mercedes-Benz
recommends that the vehicle
be transported with all wheels off the ground
using flatbed or appropriate wheel lift/dolly
equipment. This method is preferable to other
types of towing.
! To prevent damage during transport, do
not tie down vehicle by its chassis or
suspension parts.
If circumstances do not permit the
recommended towing methods, the vehicle
may be towed with all wheels on the ground
only so far as necessary to have the vehicle
moved to a safe location where the
recommended towing methods can be
employed.
! Before towing the vehicle observe the
following instructions:
R Do not tow-start the vehicle. You could
otherwise seriously damage the
automatic transmission which is not
covered by the Mercedes-Benz Limited
Warranty.
R Do not tow with sling-type equipment.
Towing with sling-type equipment over
bumpy roads will damage radiator and
supports.
R Towing of the vehicle should only be
done using the properly installed towing
eye bolt. Never attach a tow cable, tow
rope or tow rod to the vehicle chassis,
frame or suspension parts.
! Do not tow with one axle raised. Doing so
could damage the transfer case, which is
not covered by the Mercedes-Benz Limited Warranty. All wheels must be on or off the
ground.
Observe instructions for towing the
vehicle with all wheels on the ground. G
Warning!
With the engine not running, there is no power
assistance for the brake and steering
systems. In this case, it is important to keep
in mind that a considerably higher degree of
effort is necessary to brake and steer the
vehicle. Adapt your driving accordingly.
! Avoid pulling the vehicle abruptly or
diagonally, since it could result in damage
to the chassis alignment.
! Do not use the towing eye bolt for
recovery,
as this could damage the vehicle.
If in doubt, recover the vehicle with a crane.
i If the battery is disconnected or
discharged
R the SmartKey will not turn in the starter
switch
R the automatic transmission will remain in
park position P
For more information see “Battery”
(Y page 333) or “Jump starting”
(Y page 336). Installing towing eye bolt
Depending on whether you are towing a
vehicle
or you are being towed, the towing eye
bolt can be screwed into threaded holes
which are located behind covers on each
bumper.
The towing eye bolt is supplied with the
vehicle tool kit, located in the cargo
compartment underneath the cargo
compartment floor (Y page 270).
X Take the towing eye bolt out of the space
underneath the cargo compartment floor. 338
Towing the vehicle
Practical hints
251_AKB; 4; 52, en-US
d2ureepe,
Version: 2.11.8.1 2009-03-23T09:22:52+01:00 - Seite 338