2010 MERCEDES-BENZ R320 tow
[x] Cancel search: towPage 158 of 364
X
Close all doors and the tailgate.
X Start the engine.
When indicator lamp ; is on:
X Press switch :.
Indicator lamp ; flashes. The vehicle
adjusts to the highway level.
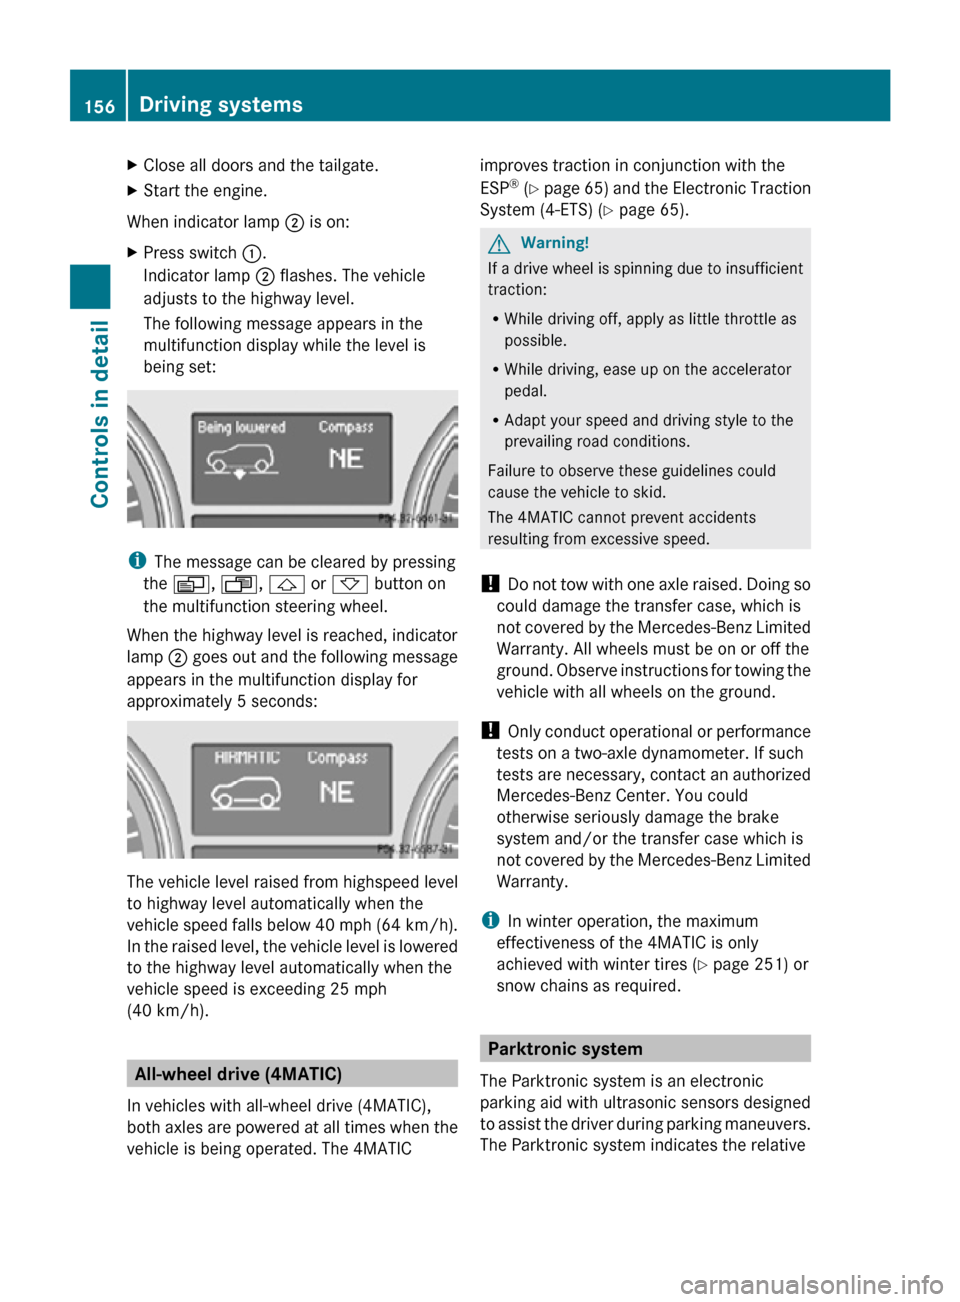
The following message appears in the
multifunction display while the level is
being set: i
The message can be cleared by pressing
the V, U, & or * button on
the multifunction steering wheel.
When the highway level is reached, indicator
lamp ; goes out and the following message
appears in the multifunction display for
approximately 5 seconds: The vehicle level raised from highspeed level
to highway level automatically when the
vehicle speed falls below 40 mph (64 km/h).
In the raised level, the vehicle level is lowered
to the highway level automatically when the
vehicle speed is exceeding 25 mph
(40 km/h).
All-wheel drive (4MATIC)
In vehicles with all-wheel drive (4MATIC),
both axles are powered at all times when the
vehicle is being operated. The 4MATIC improves traction in conjunction with the
ESP
®
(Y page 65) and the Electronic Traction
System (4-ETS) (Y page 65). G
Warning!
If a drive wheel is spinning due to insufficient
traction:
R While driving off, apply as little throttle as
possible.
R While driving, ease up on the accelerator
pedal.
R Adapt your speed and driving style to the
prevailing road conditions.
Failure to observe these guidelines could
cause the vehicle to skid.
The 4MATIC cannot prevent accidents
resulting from excessive speed.
! Do not tow with one axle raised. Doing so
could damage the transfer case, which is
not covered by the Mercedes-Benz Limited
Warranty. All wheels must be on or off the
ground. Observe instructions for towing the
vehicle with all wheels on the ground.
! Only conduct operational or performance
tests on a two-axle dynamometer. If such
tests are necessary, contact an authorized
Mercedes-Benz Center. You could
otherwise seriously damage the brake
system and/or the transfer case which is
not covered by the Mercedes-Benz Limited
Warranty.
i In winter operation, the maximum
effectiveness of the 4MATIC is only
achieved with winter tires ( Y page 251) or
snow chains as required. Parktronic system
The Parktronic system is an electronic
parking aid with ultrasonic sensors designed
to assist the driver during parking maneuvers.
The Parktronic system indicates the relative 156
Driving systemsControls in detail
251_AKB; 4; 52, en-US
d2ureepe,
Version: 2.11.8.1 2009-03-23T09:22:52+01:00 - Seite 156
Page 161 of 364
R
Front area: An intermittent acoustic
warning lasting a maximum of 2 seconds
will sound as the first red distance segment
illuminates. A constant acoustic warning
lasting a maximum of 2 seconds will sound
for the second red distance segment. The
signal is canceled when the automatic
transmission is shifted into park
position P or the parking brake is engaged.
R Rear area: An intermittent acoustic
warning lasting a maximum of 2 seconds
will sound as the first red distance segment
illuminates. A constant acoustic warning
lasting a maximum of 2 seconds will sound
for the second red distance segment. The
signal is canceled when the automatic
transmission is shifted into drive
position D, or park position P, or the
parking brake is engaged.
Switching the Parktronic system on/
off The Parktronic system switches on
automatically when the ignition is switched
on.
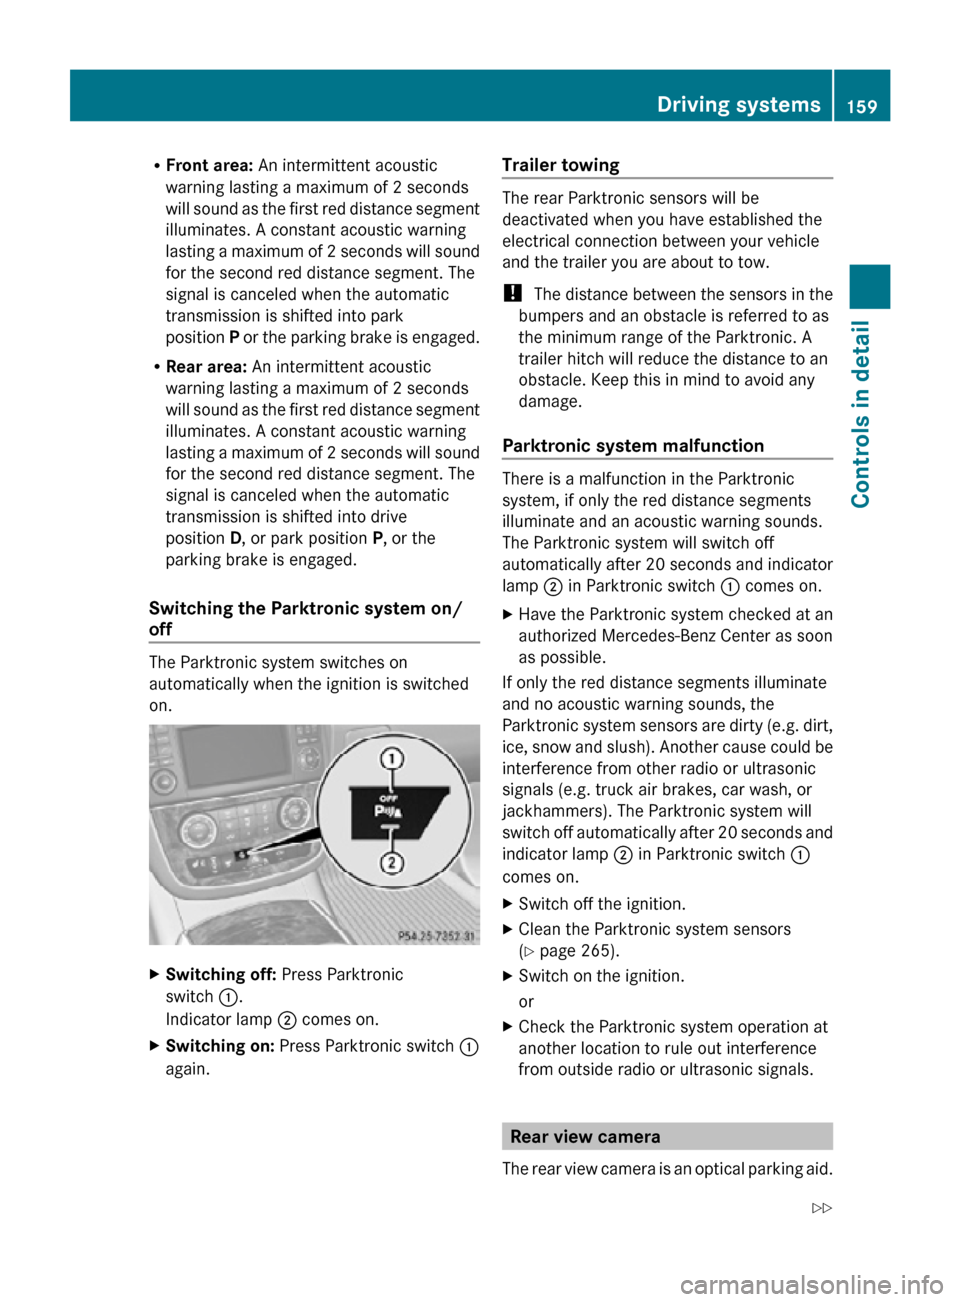
X
Switching off: Press Parktronic
switch :.
Indicator lamp ; comes on.
X Switching on: Press Parktronic switch :
again. Trailer towing The rear Parktronic sensors will be
deactivated when you have established the
electrical connection between your vehicle
and the trailer you are about to tow.
!
The distance between the sensors in the
bumpers and an obstacle is referred to as
the minimum range of the Parktronic. A
trailer hitch will reduce the distance to an
obstacle. Keep this in mind to avoid any
damage.
Parktronic system malfunction There is a malfunction in the Parktronic
system, if only the red distance segments
illuminate and an acoustic warning sounds.
The Parktronic system will switch off
automatically after 20 seconds and indicator
lamp
; in Parktronic switch : comes on.
X Have the Parktronic system checked at an
authorized Mercedes-Benz Center as soon
as possible.
If only the red distance segments illuminate
and no acoustic warning sounds, the
Parktronic system sensors are dirty (e.g. dirt,
ice, snow and slush). Another cause could be
interference from other radio or ultrasonic
signals (e.g. truck air brakes, car wash, or
jackhammers). The Parktronic system will
switch off automatically after 20 seconds and
indicator lamp ; in Parktronic switch :
comes on.
X Switch off the ignition.
X Clean the Parktronic system sensors
(Y page 265).
X Switch on the ignition.
or
X Check the Parktronic system operation at
another location to rule out interference
from outside radio or ultrasonic signals. Rear view camera
The rear view camera is an optical parking aid. Driving systems
159Controls in detail
251_AKB; 4; 52, en-US
d2ureepe, Version: 2.11.8.1 2009-03-23T09:22:52+01:00 - Seite 159 Z
Page 189 of 364
vehicle occupants unless the items are
securely fastened in the vehicle.
To help avoid personal injury during a collision
or sudden maneuver, exercise care when
transporting cargo. Do not pile luggage or
cargo higher than the seat backrests.
The cargo compartment is the preferred place
to carry objects. Always use cargo tie-down
rings, and if so equipped, always use the cargo
net when transporting cargo.
Never drive a vehicle with the tailgate open.
Deadly carbon monoxide (CO) gases may
enter vehicle interior resulting in
unconsciousness and death.
Load distribution The Gross Vehicle Weight (GVW) is the weight
of the vehicle including:
R
fuel
R tools
R spare wheel
R installed accessories R
passengers
R luggage/cargo
It must never exceed the load limit and the
Gross Vehicle Weight Rating (GVWR) for your
vehicle. The load limit and the GVWR are
specified on the placard located on the
driver’s door B-pillar ( Y page 236).
In addition, the load must be distributed so
that the weight on each axle never exceeds
the Gross Axle Weight Rating (GAWR) for the
front and rear axle. The GVWR and GAWR for
your vehicle are indicated on the certification
label located on the driver’s door B-pillar
(Y page 236).
For more information, see “Tire and Loading
Information” ( Y page 237).
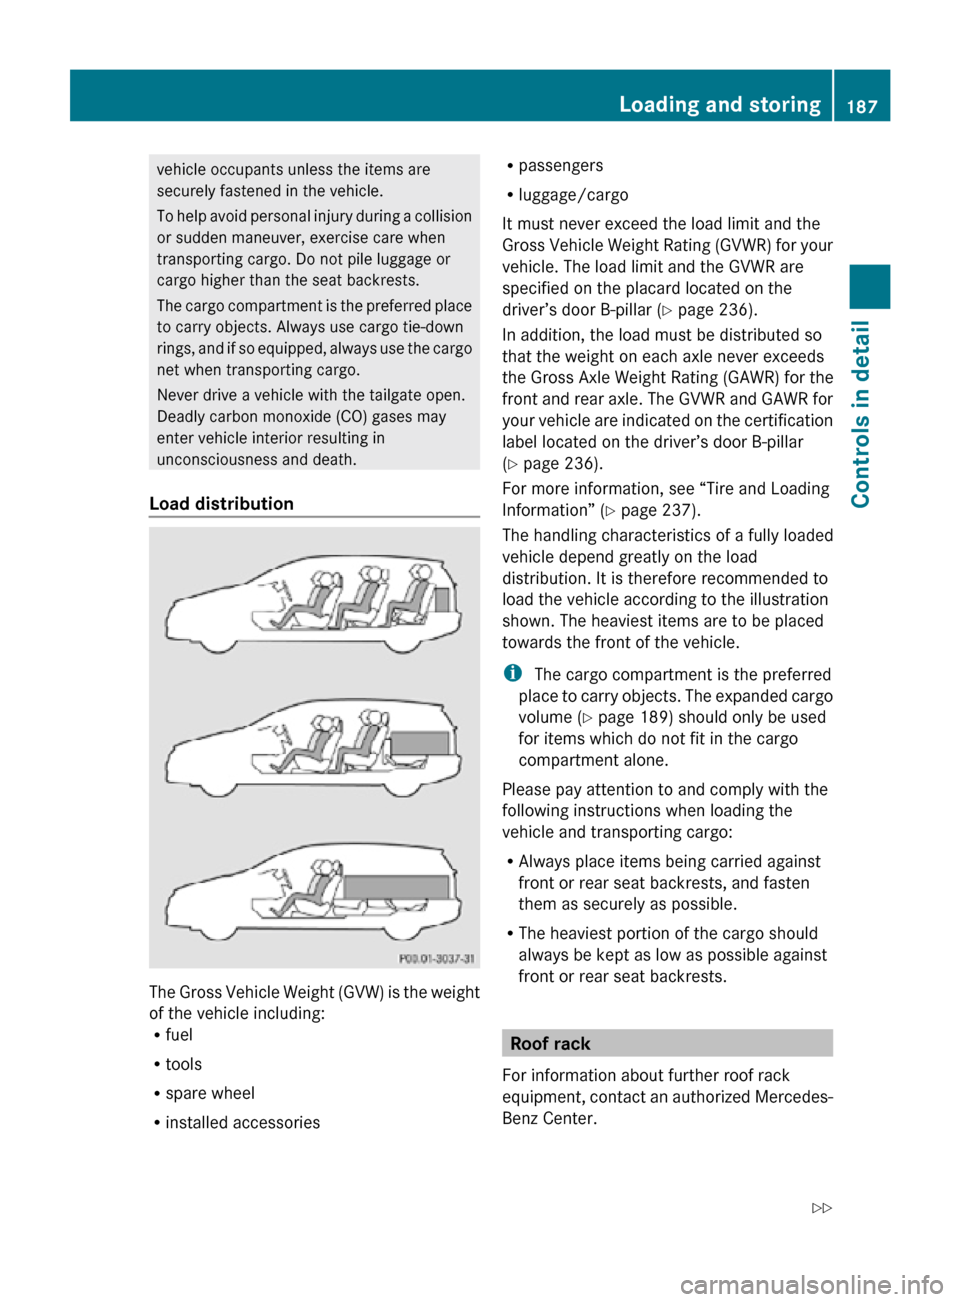
The handling characteristics of a fully loaded
vehicle depend greatly on the load
distribution. It is therefore recommended to
load the vehicle according to the illustration
shown. The heaviest items are to be placed
towards the front of the vehicle.
i The cargo compartment is the preferred
place to carry objects. The expanded cargo
volume ( Y page 189) should only be used
for items which do not fit in the cargo
compartment alone.
Please pay attention to and comply with the
following instructions when loading the
vehicle and transporting cargo:
R Always place items being carried against
front or rear seat backrests, and fasten
them as securely as possible.
R The heaviest portion of the cargo should
always be kept as low as possible against
front or rear seat backrests. Roof rack
For information about further roof rack
equipment, contact an authorized Mercedes-
Benz Center. Loading and storing
187Controls in detail
251_AKB; 4; 52, en-US
d2ureepe, Version: 2.11.8.1 2009-03-23T09:22:52+01:00 - Seite 187 Z
Page 195 of 364
maneuvers, or in an accident. If you slide
under it, the belt would apply force at the
abdomen or neck. That could cause serious
or even fatal injuries.
! When returning the seats to their original
position, it is important to proceed in the
following order:
R third-row seats
R outboard second-row seats
R second-row middle seat (7-seat vehicles)
Otherwise, you could damage the seats.
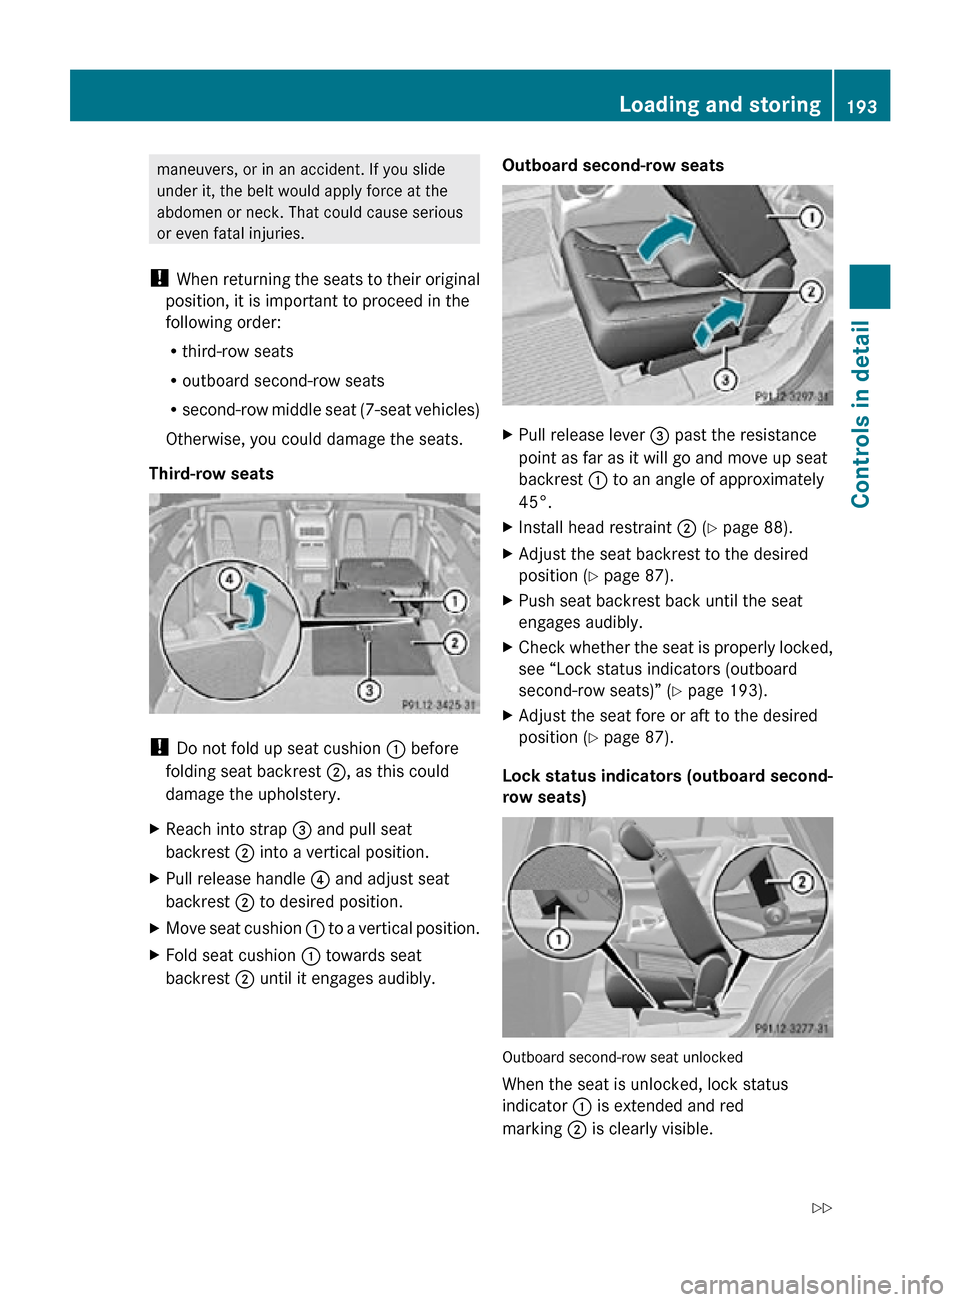
Third-row seats !
Do not fold up seat cushion : before
folding seat backrest ;, as this could
damage the upholstery.
X Reach into strap = and pull seat
backrest ; into a vertical position.
X Pull release handle ? and adjust seat
backrest ; to desired position.
X Move seat cushion : to a vertical position.
X Fold seat cushion : towards seat
backrest ; until it engages audibly. Outboard second-row seats X
Pull release lever = past the resistance
point as far as it will go and move up seat
backrest : to an angle of approximately
45°.
X Install head restraint ; (Y page 88).
X Adjust the seat backrest to the desired
position (Y page 87).
X Push seat backrest back until the seat
engages audibly.
X Check whether the seat is properly locked,
see “Lock status indicators (outboard
second-row seats)” ( Y page 193).
X Adjust the seat fore or aft to the desired
position (Y page 87).
Lock status indicators (outboard second-
row seats) Outboard second-row seat unlocked
When the seat is unlocked, lock status
indicator : is extended and red
marking ; is clearly visible. Loading and storing
193Controls in detail
251_AKB; 4; 52, en-US
d2ureepe, Version: 2.11.8.1 2009-03-23T09:22:52+01:00 - Seite 193 Z
Page 203 of 364
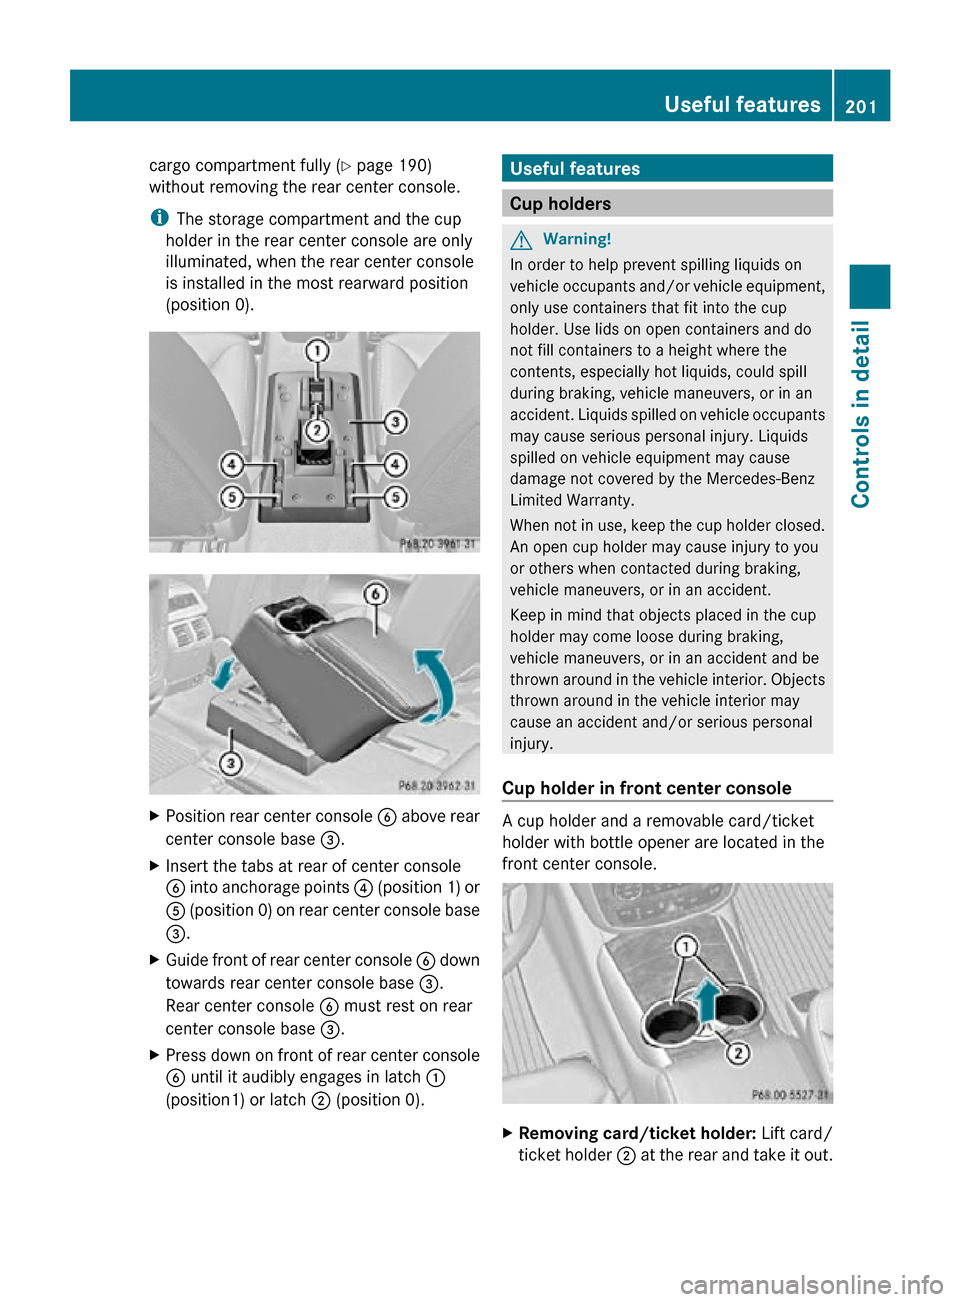
cargo compartment fully (
Y page 190)
without removing the rear center console.
i The storage compartment and the cup
holder in the rear center console are only
illuminated, when the rear center console
is installed in the most rearward position
(position 0). X
Position rear center console B above rear
center console base =.
X Insert the tabs at rear of center console
B into anchorage points ? (position 1) or
A (position 0) on rear center console base
=.
X Guide front of rear center console B down
towards rear center console base =.
Rear center console B must rest on rear
center console base =.
X Press down on front of rear center console
B until it audibly engages in latch :
(position1) or latch ; (position 0). Useful features
Cup holders
G
Warning!
In order to help prevent spilling liquids on
vehicle occupants and/or vehicle equipment,
only use containers that fit into the cup
holder. Use lids on open containers and do
not fill containers to a height where the
contents, especially hot liquids, could spill
during braking, vehicle maneuvers, or in an
accident. Liquids spilled on vehicle occupants
may cause serious personal injury. Liquids
spilled on vehicle equipment may cause
damage not covered by the Mercedes-Benz
Limited Warranty.
When not in use, keep the cup holder closed.
An open cup holder may cause injury to you
or others when contacted during braking,
vehicle maneuvers, or in an accident.
Keep in mind that objects placed in the cup
holder may come loose during braking,
vehicle maneuvers, or in an accident and be
thrown around in the vehicle interior. Objects
thrown around in the vehicle interior may
cause an accident and/or serious personal
injury.
Cup holder in front center console A cup holder and a removable card/ticket
holder with bottle opener are located in the
front center console.
X
Removing card/ticket holder: Lift card/
ticket holder ; at the rear and take it out. Useful features
201Controls in detail
251_AKB; 4; 52, en-US
d2ureepe, Version: 2.11.8.1 2009-03-23T09:22:52+01:00 - Seite 201 Z
Page 212 of 364

The Response Center will automatically
contact local emergency officials with the
vehicle’s approximate location if they receive
an automatic SOS signal and cannot make
voice contact with the vehicle occupants.
Roadside Assistance button X
Open the telephone tray ( Y page 198).X
Press and hold Roadside Assistance
button : for longer than 2 seconds.
A call to a Mercedes-Benz Roadside
Assistance dispatcher will be initiated. The
indicator lamp in Roadside Assistance
button : will flash while the call is in
progress. The message Connecting
Call will appear in the multifunction
display and the COMAND system is muted.
When the connection is established, the
message Call Connected appears in the
multifunction display. The Tele Aid system will
transmit data generating the vehicle
identification number, model, color and
location (subject to availability of cellular and
GPS signals).
i The COMAND system display indicates
that a Tele Aid call is in progress. While the
call is connected you can change to the
navigation menu by pressing the NAVI
button on the COMAND system. Spoken
commands are not available.
A voice connection between the Roadside
Assistance dispatcher and the occupants of
the vehicle will be established. X
Describe the nature of the need for
assistance.
The Mercedes-Benz Roadside Assistance
dispatcher will either dispatch a qualified
Mercedes-Benz technician or arrange to tow
your vehicle to the nearest authorized
Mercedes-Benz Center. For services such as
labor and/or towing, charges may apply.
Refer to the Roadside Assistance manual for
more information.
Sign and Drive services (USA only):
Services such as a jump start, a few gallons
of fuel or the replacement of a flat tire with
the vehicle spare tire are obtainable at no
charge.
i If the indicator lamp in Roadside
Assistance button : is flashing
continuously and there was no voice
connection to the Response Center
established, then the Tele Aid system could
not initiate a Roadside Assistance call (e.g.
the relevant cellular phone network is not
available). The message Call Failed
appears in the multifunction display.
X Terminating calls: Press button ~ on
the multifunction steering wheel.
or
X Press the respective button for ending a
telephone call on the COMAND system.
Information button X
Open the telephone tray ( Y page 198).210
Useful featuresControls in detail
251_AKB; 4; 52, en-US
d2ureepe,
Version: 2.11.8.1 2009-03-23T09:22:52+01:00 - Seite 210
Page 223 of 364
drained completely. Contact an authorized
Mercedes-Benz Center to have the fuel
system drained completely.
! Gasoline engine:
To prevent damage to the catalytic
converters, only use premium unleaded
gasoline in this vehicle.
Any noticeable irregularities in engine
operation should be repaired promptly.
Otherwise, excessive unburned fuel may
reach the catalytic converter, causing it to
overheat and potentially start a fire.
! Diesel engine:
When filling the diesel fuel tank using fuel
containers, place a filling filter, a suede
cloth or a clean flannel cloth as a filter.
Otherwise, particles from the fuel container
could clog the fuel lines and/or the diesel
injection system.
! Diesel engine:
The engine is more susceptible to wear and
damage if you use
R marine diesel fuel
R heating oil
R additives
The exhaust aftertreatment device will be
seriously damaged if you use any other
diesel fuel than ULTRA-LOW SULFUR
HIGHWAY DIESEL FUEL (15 ppm SULFUR
MAXIMUM).
The use of such non-approved fuels and/or
special additives is not covered by the
Mercedes-Benz Limited Warranty.
i Gasoline engine:
Only use premium unleaded gasoline with
a minimum Posted Octane Rating of 91
(average of 96 RON/86 MON).
Information on gasoline quality can
normally be found on the fuel pump. Please
contact gas station personnel in case
labels on the pump cannot be found. For more information on gasoline, see
“Premium unleaded gasoline (gasoline
engine)” (
Y page 353), see “Fuel
requirements” ( Y page 353), or contact an
authorized Mercedes-Benz Center, or visit
www.mbusa.com (USA only).
i Diesel engine:
Only use commercially available vehicular
ULTRA-LOW SULFUR DIESEL FUEL
(15 ppm SULFUR MAXIMUM). Information
on diesel quality can normally be found on
the fuel pump. Please contact gas station
personnel in case labels on the pump
cannot be found.
For more information on diesel fuels, see
“Fuel requirements” (Y page 353), or
contact an authorized Mercedes-Benz
Center, or visit www.mbusa.com (USA
only).
i Diesel engine:
If you have driven the vehicle until the tank
is empty, the fuel system needs to be bled
(Y page 331).
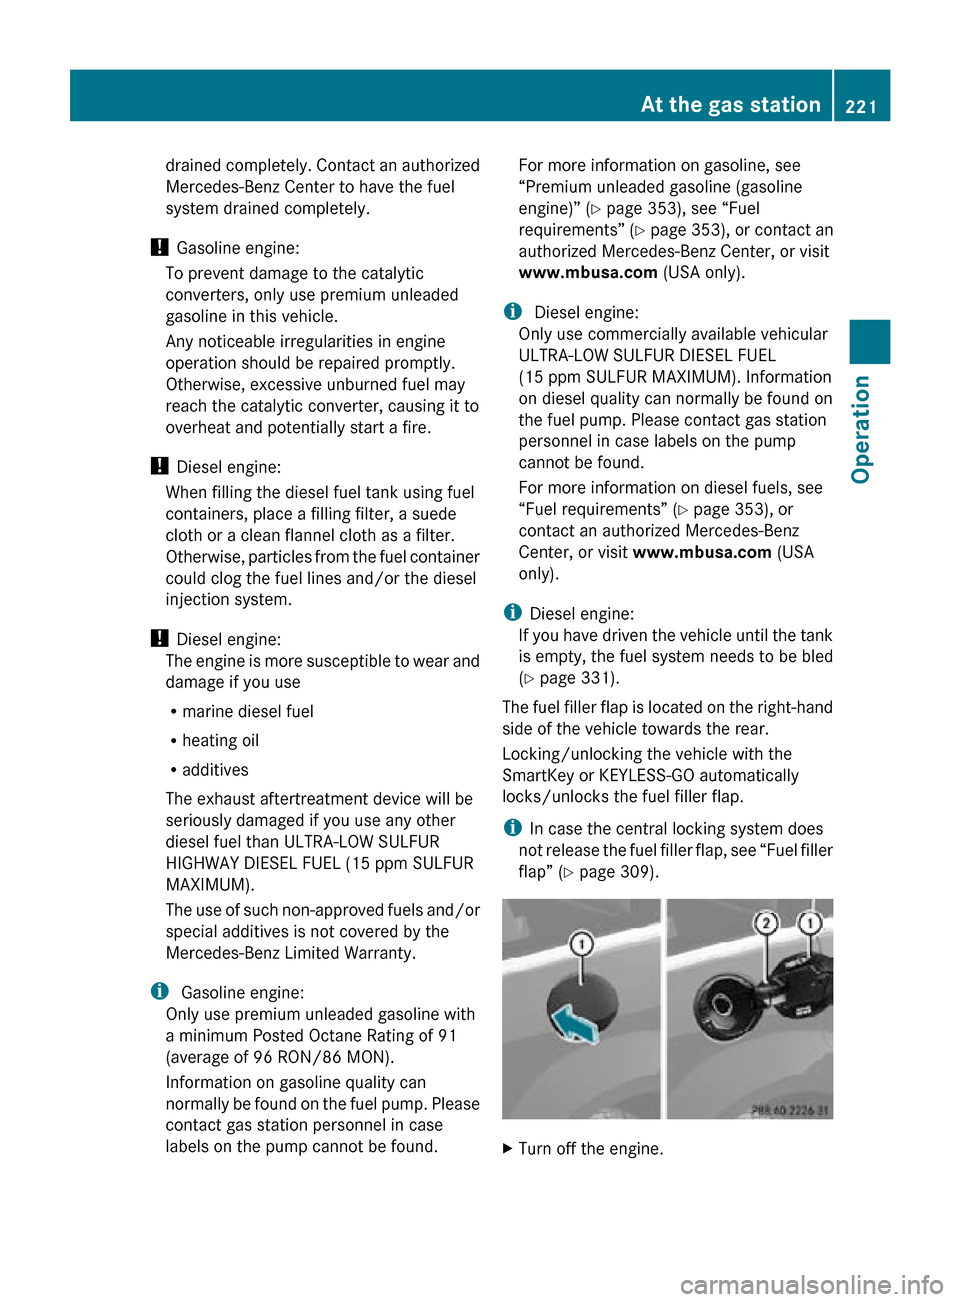
The fuel filler flap is located on the right-hand
side of the vehicle towards the rear.
Locking/unlocking the vehicle with the
SmartKey or KEYLESS-GO automatically
locks/unlocks the fuel filler flap.
i In case the central locking system does
not release the fuel filler flap, see “Fuel filler
flap” (Y page 309). X
Turn off the engine. At the gas station
221Operation
251_AKB; 4; 52, en-US
d2ureepe, Version: 2.11.8.1 2009-03-23T09:22:52+01:00 - Seite 221 Z
Page 229 of 364
Brake fluid level
! If you find that the brake fluid in the brake
fluid reservoir has fallen to the minimum
mark or below, have the brake system
checked for brake pad thickness and leaks
immediately. Contact an authorized
Mercedes-Benz Center immediately. Do
not add brake fluid as this will not solve the
problem. For more information, see
“Practical hints”.
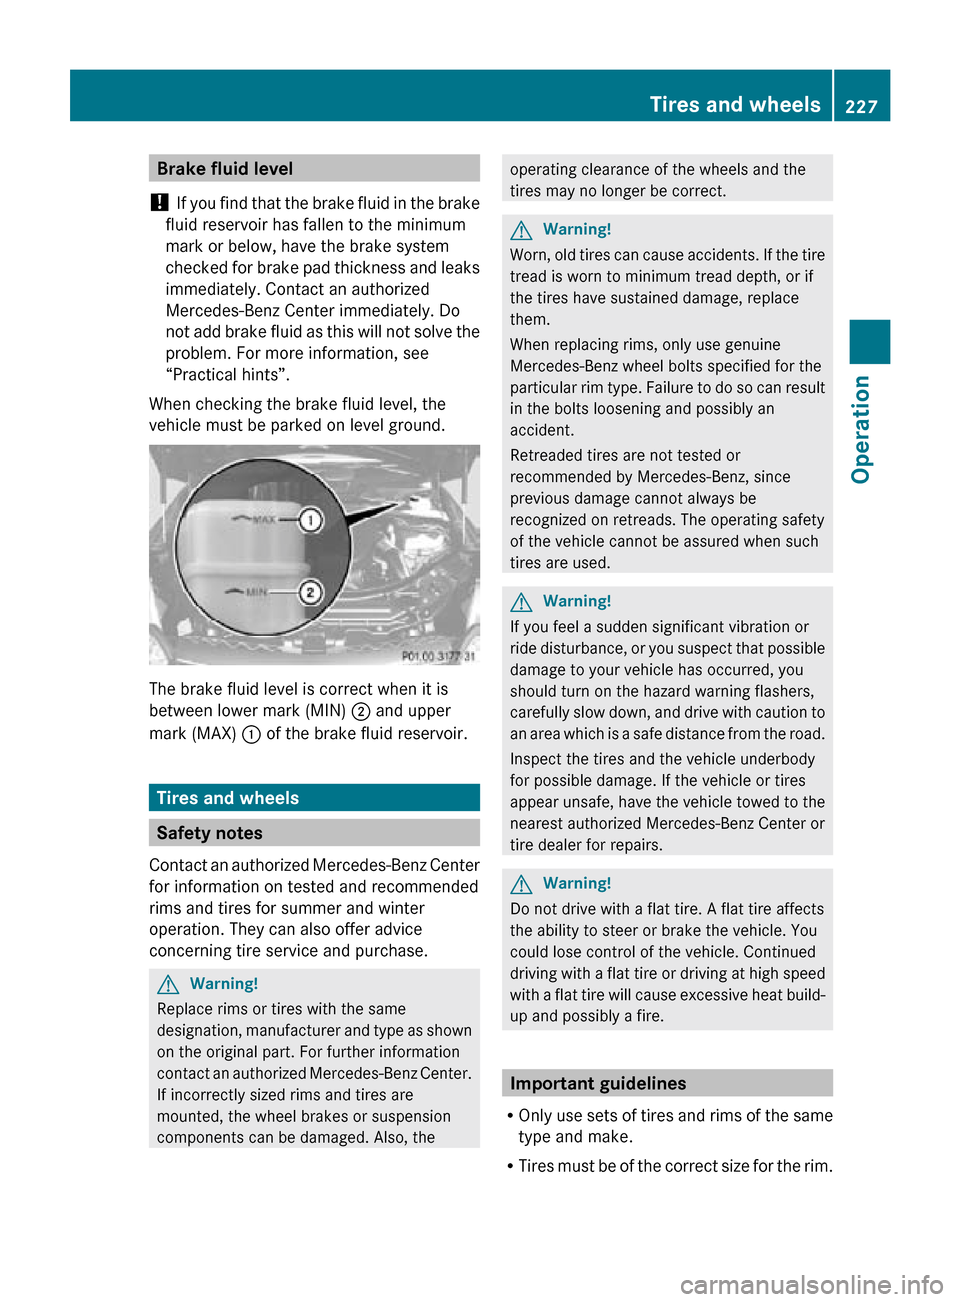
When checking the brake fluid level, the
vehicle must be parked on level ground. The brake fluid level is correct when it is
between lower mark (MIN)
; and upper
mark (MAX) : of the brake fluid reservoir. Tires and wheels
Safety notes
Contact an authorized Mercedes-Benz Center
for information on tested and recommended
rims and tires for summer and winter
operation. They can also offer advice
concerning tire service and purchase. G
Warning!
Replace rims or tires with the same
designation, manufacturer and type as shown
on the original part. For further information
contact an authorized Mercedes-Benz Center.
If incorrectly sized rims and tires are
mounted, the wheel brakes or suspension
components can be damaged. Also, the operating clearance of the wheels and the
tires may no longer be correct.
G
Warning!
Worn, old tires can cause accidents. If the tire
tread is worn to minimum tread depth, or if
the tires have sustained damage, replace
them.
When replacing rims, only use genuine
Mercedes-Benz wheel bolts specified for the
particular rim type. Failure to do so can result
in the bolts loosening and possibly an
accident.
Retreaded tires are not tested or
recommended by Mercedes-Benz, since
previous damage cannot always be
recognized on retreads. The operating safety
of the vehicle cannot be assured when such
tires are used. G
Warning!
If you feel a sudden significant vibration or
ride disturbance, or you suspect that possible
damage to your vehicle has occurred, you
should turn on the hazard warning flashers,
carefully slow down, and drive with caution to
an area which is a safe distance from the road.
Inspect the tires and the vehicle underbody
for possible damage. If the vehicle or tires
appear unsafe, have the vehicle towed to the
nearest authorized Mercedes-Benz Center or
tire dealer for repairs. G
Warning!
Do not drive with a flat tire. A flat tire affects
the ability to steer or brake the vehicle. You
could lose control of the vehicle. Continued
driving with a flat tire or driving at high speed
with a flat tire will cause excessive heat build-
up and possibly a fire. Important guidelines
R Only use sets of tires and rims of the same
type and make.
R Tires must be of the correct size for the rim. Tires and wheels
227Operation
251_AKB; 4; 52, en-US
d2ureepe, Version: 2.11.8.1 2009-03-23T09:22:52+01:00 - Seite 227 Z