2010 MERCEDES-BENZ R320 tow
[x] Cancel search: towPage 68 of 364

circumstances described below. Disabling
the system will reduce vehicle stability in
driving maneuvers.
Do not switch off the ESP
®
when a spare
wheel is mounted.
To improve the vehicle’s traction, switch off
the ESP ®
. This allows the drive wheels to spin
and thus cut into surfaces for better grip, for
example
R when driving with snow chains
R in deep snow
R in sand or gravel G
Warning!
Switch on the ESP ®
immediately if the
aforementioned circumstances do not apply
anymore. Otherwise the ESP ®
will not
stabilize the vehicle when it is starting to skid
or a wheel is spinning.
When you switch off the ESP ®
,
R the ESP ®
does not stabilize the vehicle
R the engine output is not limited, which
allows the drive wheels to spin and thus cut
into surfaces for better grip
R the 4-ETS will still apply the brakes to a
spinning wheel
R the ESP ®
continues to operate when you
are braking
R the cruise control or the Distronic system
cannot be activated
R the cruise control or the Distronic system
switch off if activated
i When the ESP ®
is switched off and one or
more drive wheels are spinning, the ESP ®
warning lamp d in the instrument
cluster flashes. However, the ESP ®
will
then not stabilize the vehicle. X
With the engine running, press ESP ®
switch : until the ESP ®
warning lamp
d in the instrument cluster comes on.
The ESP ®
is switched off. G
Warning!
When the ESP ®
warning lamp d is
illuminated continuously, the ESP ®
is
switched off or is not operational due to a
malfunction. Vehicle stability in standard
driving maneuvers is reduced.
Adapt your speed and driving to the prevailing
road conditions and to the non-operating
status of the ESP ®
.
! Avoid spinning of a drive wheel for an
extended period with the ESP ®
switched
off. This may cause serious damage to the
drivetrain which is not covered by the
Mercedes-Benz Limited Warranty.
Switching on the ESP ® X
Press ESP ®
switch : until the ESP ®
warning lamp d in the instrument
cluster goes out.
You are now again in normal driving mode
with the ESP ®
switched on.
ESP ®
trailer stabilization If the trailer you are towing should begin to
sway, the rig can only be stabilized by
immediately applying the brakes hard.
Steering during this maneuver will not help to
stabilize the rig.66
Driving safety systemsSafety and security
251_AKB; 4; 52, en-US
d2ureepe,
Version: 2.11.8.1 2009-03-23T09:22:52+01:00 - Seite 66
Page 76 of 364
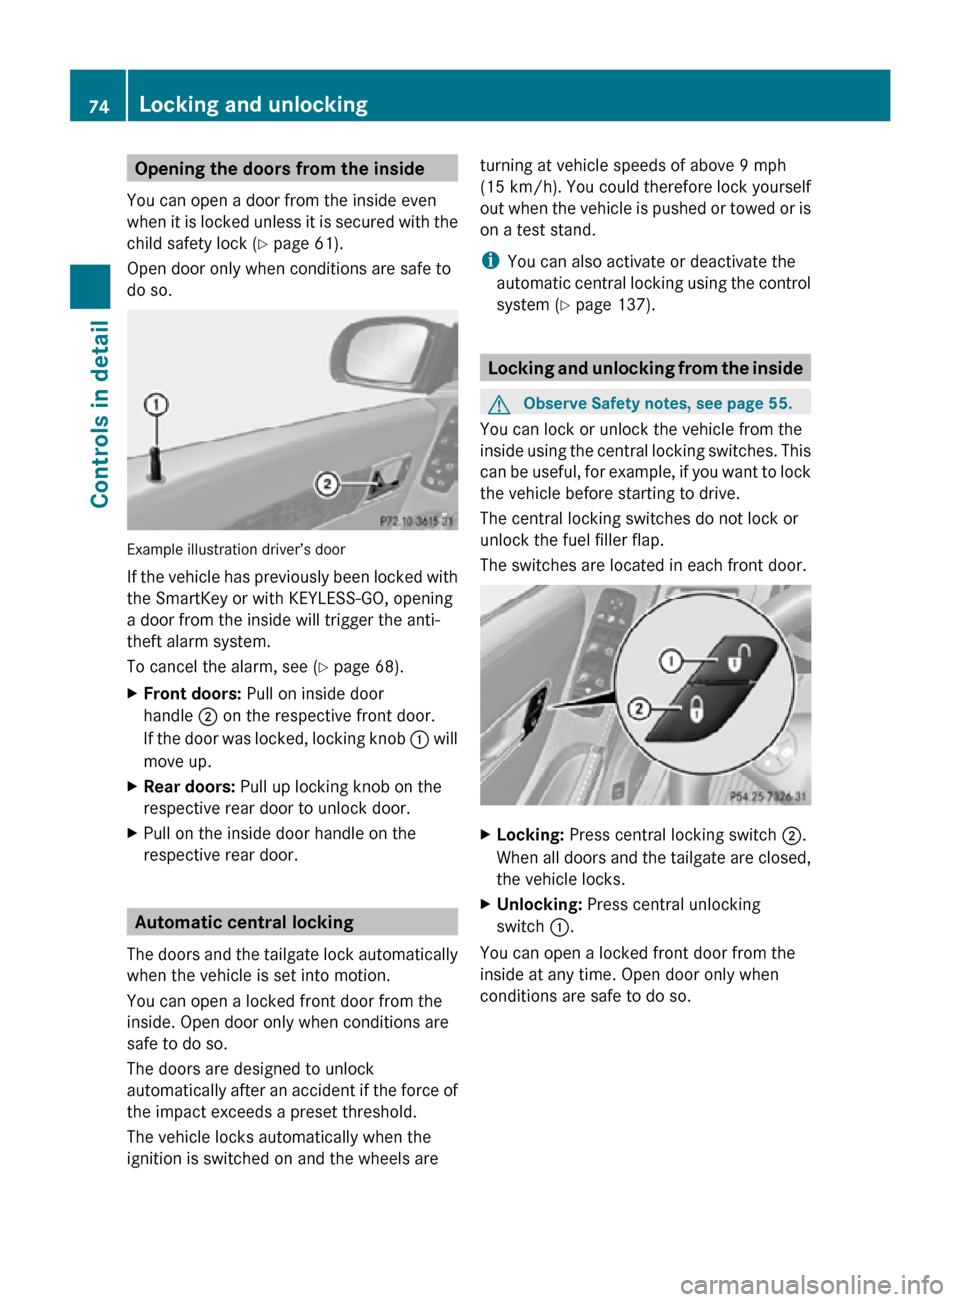
Opening the doors from the inside
You can open a door from the inside even
when it is locked unless it is secured with the
child safety lock ( Y page 61).
Open door only when conditions are safe to
do so. Example illustration driver’s door
If the vehicle has previously been locked with
the SmartKey or with KEYLESS-GO, opening
a door from the inside will trigger the anti-
theft alarm system.
To cancel the alarm, see (
Y page 68).
X Front doors: Pull on inside door
handle ; on the respective front door.
If the door was locked, locking knob : will
move up.
X Rear doors: Pull up locking knob on the
respective rear door to unlock door.
X Pull on the inside door handle on the
respective rear door. Automatic central locking
The doors and the tailgate lock automatically
when the vehicle is set into motion.
You can open a locked front door from the
inside. Open door only when conditions are
safe to do so.
The doors are designed to unlock
automatically after an accident if the force of
the impact exceeds a preset threshold.
The vehicle locks automatically when the
ignition is switched on and the wheels are turning at vehicle speeds of above 9 mph
(15 km/h). You could therefore lock yourself
out when the vehicle is pushed or towed or is
on a test stand.
i
You can also activate or deactivate the
automatic central locking using the control
system (Y page 137). Locking and unlocking from the inside
G
Observe Safety notes, see page 55.
You can lock or unlock the vehicle from the
inside using the central locking switches. This
can be useful, for example, if you want to lock
the vehicle before starting to drive.
The central locking switches do not lock or
unlock the fuel filler flap.
The switches are located in each front door. X
Locking: Press central locking switch ;.
When all doors and the tailgate are closed,
the vehicle locks.
X Unlocking: Press central unlocking
switch :.
You can open a locked front door from the
inside at any time. Open door only when
conditions are safe to do so. 74
Locking and unlockingControls in detail
251_AKB; 4; 52, en-US
d2ureepe,
Version: 2.11.8.1 2009-03-23T09:22:52+01:00 - Seite 74
Page 91 of 364
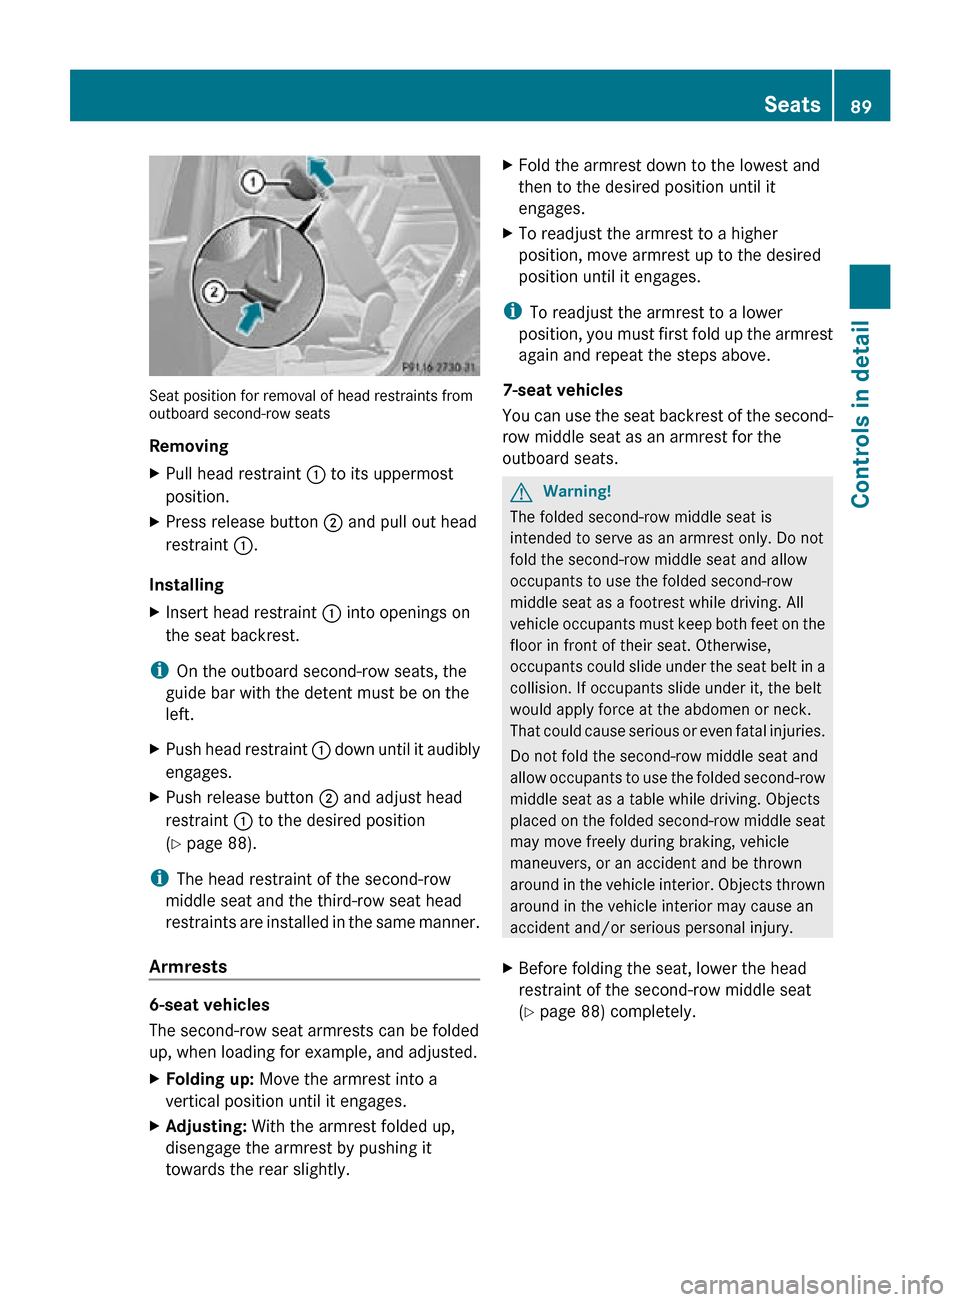
Seat position for removal of head restraints from
outboard second-row seats
Removing
X
Pull head restraint : to its uppermost
position.
X Press release button ; and pull out head
restraint :.
Installing
X Insert head restraint : into openings on
the seat backrest.
i On the outboard second-row seats, the
guide bar with the detent must be on the
left.
X Push head restraint : down until it audibly
engages.
X Push release button ; and adjust head
restraint : to the desired position
(Y page 88).
i The head restraint of the second-row
middle seat and the third-row seat head
restraints are installed in the same manner.
Armrests 6-seat vehicles
The second-row seat armrests can be folded
up, when loading for example, and adjusted.
X
Folding up: Move the armrest into a
vertical position until it engages.
X Adjusting: With the armrest folded up,
disengage the armrest by pushing it
towards the rear slightly. X
Fold the armrest down to the lowest and
then to the desired position until it
engages.
X To readjust the armrest to a higher
position, move armrest up to the desired
position until it engages.
i To readjust the armrest to a lower
position, you must first fold up the armrest
again and repeat the steps above.
7-seat vehicles
You can use the seat backrest of the second-
row middle seat as an armrest for the
outboard seats. G
Warning!
The folded second-row middle seat is
intended to serve as an armrest only. Do not
fold the second-row middle seat and allow
occupants to use the folded second-row
middle seat as a footrest while driving. All
vehicle occupants must keep both feet on the
floor in front of their seat. Otherwise,
occupants could slide under the seat belt in a
collision. If occupants slide under it, the belt
would apply force at the abdomen or neck.
That could cause serious or even fatal injuries.
Do not fold the second-row middle seat and
allow occupants to use the folded second-row
middle seat as a table while driving. Objects
placed on the folded second-row middle seat
may move freely during braking, vehicle
maneuvers, or an accident and be thrown
around in the vehicle interior. Objects thrown
around in the vehicle interior may cause an
accident and/or serious personal injury.
X Before folding the seat, lower the head
restraint of the second-row middle seat
(Y page 88) completely. Seats
89Controls in detail
251_AKB; 4; 52, en-US
d2ureepe, Version: 2.11.8.1 2009-03-23T09:22:52+01:00 - Seite 89 Z
Page 96 of 364
Interior rear view mirror
X Adjust the interior rear view mirror
manually.
Interior rear view mirror, antiglare
position X
Tilt the mirror to the antiglare position by
moving lever : towards the windshield.
The interior rear view mirror is dimmed. Exterior rear view mirrors
G
Warning!
Exercise care when using the passenger-side
exterior rear view mirror. The mirror surface
is convex (outwardly curved surface for a
wider field of view). Objects in mirror are
closer than they appear. Check your interior
rear view mirror and glance over your
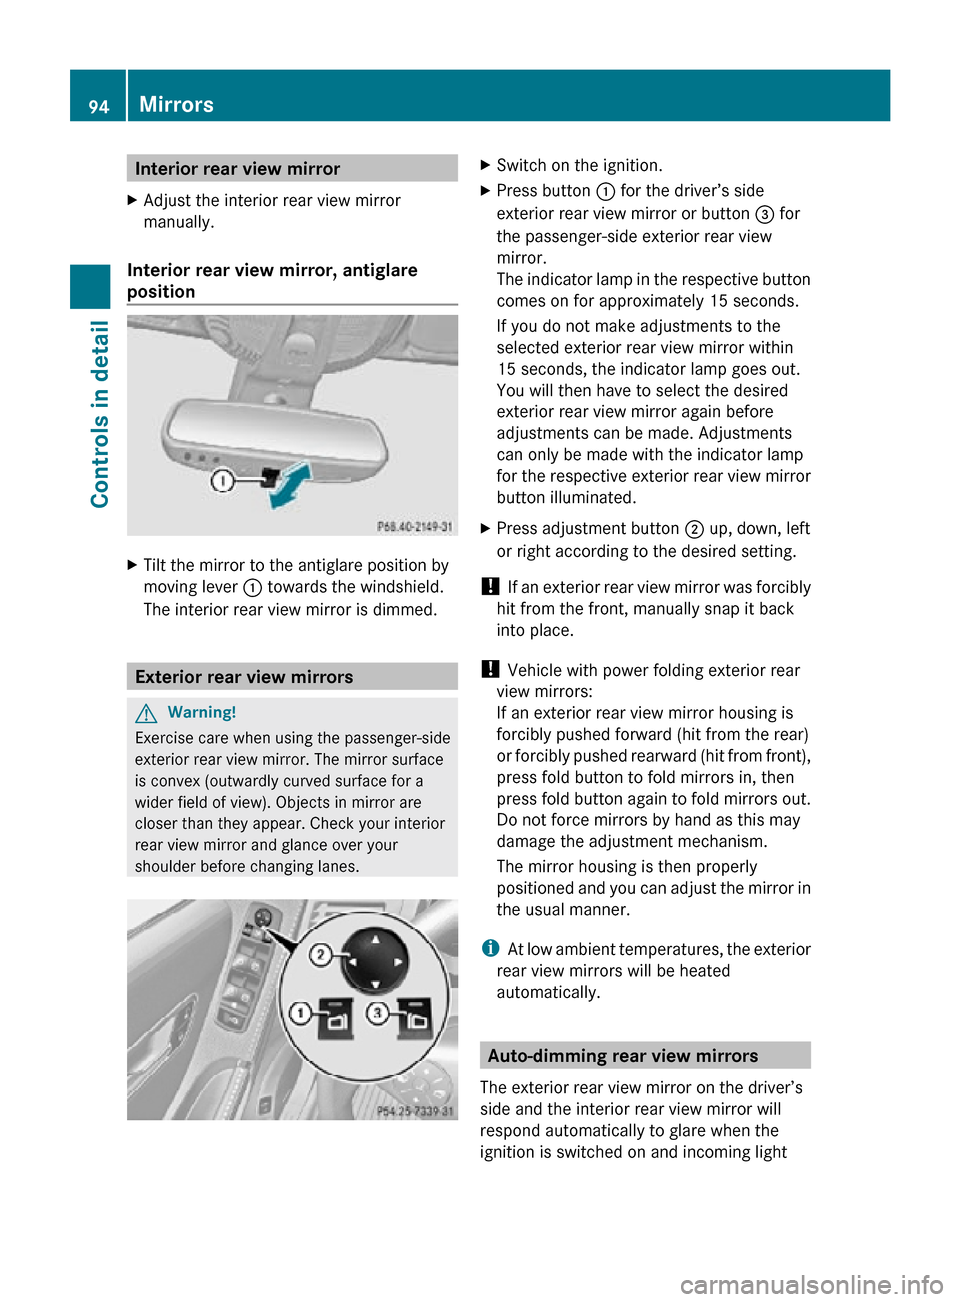
shoulder before changing lanes. X
Switch on the ignition.
X Press button : for the driver’s side
exterior rear view mirror or button = for
the passenger-side exterior rear view
mirror.
The indicator lamp in the respective button
comes on for approximately 15 seconds.
If you do not make adjustments to the
selected exterior rear view mirror within
15 seconds, the indicator lamp goes out.
You will then have to select the desired
exterior rear view mirror again before
adjustments can be made. Adjustments
can only be made with the indicator lamp
for the respective exterior rear view mirror
button illuminated.
X Press adjustment button ; up, down, left
or right according to the desired setting.
! If an exterior rear view mirror was forcibly
hit from the front, manually snap it back
into place.
! Vehicle with power folding exterior rear
view mirrors:
If an exterior rear view mirror housing is
forcibly pushed forward (hit from the rear)
or forcibly pushed rearward (hit from front),
press fold button to fold mirrors in, then
press fold button again to fold mirrors out.
Do not force mirrors by hand as this may
damage the adjustment mechanism.
The mirror housing is then properly
positioned and you can adjust the mirror in
the usual manner.
i At low ambient temperatures, the exterior
rear view mirrors will be heated
automatically. Auto-dimming rear view mirrors
The exterior rear view mirror on the driver’s
side and the interior rear view mirror will
respond automatically to glare when the
ignition is switched on and incoming light 94
MirrorsControls in detail
251_AKB; 4; 52, en-US
d2ureepe,
Version: 2.11.8.1 2009-03-23T09:22:52+01:00 - Seite 94
Page 116 of 364
Parking
G
Warning!
Do not park this vehicle in areas where
combustible materials such as grass, hay or
leaves can come into contact with the hot
exhaust system. These materials could be
ignited and cause a vehicle fire.
Vehicle movement may result in serious
personal injury or damage to the vehicle or
vehicle drivetrain. Therefore, always do the
following before turning off the engine and
leaving the vehicle:
R Keep right foot on the brake pedal.
R Engage the parking brake.
R Shift the automatic transmission into park
position P.
R Slowly release the brake pedal.
R When parked on an incline, always turn the
front wheels towards the road curb.
R Turn the SmartKey in the starter switch to
position 0 and remove the SmartKey from
the starter switch, or press the KEYLESS-
GO start/stop button.
R Take the SmartKey with you and lock the
vehicle when leaving.
Parking brake G
Warning!
Engaging the parking brake while the vehicle
is in motion can cause the rear wheels to lock
up. You could lose control of the vehicle and
cause an accident. In addition, the vehicle’s
brake lights do not light up when the parking
brake is engaged. G
Warning!
When leaving the vehicle, always remove the
SmartKey from the starter switch, take it with
you, and lock the vehicle. Do not leave
children unattended in the vehicle, or with
access to an unlocked vehicle. Children could
release the parking brake and/or shift the automatic transmission out of park position
P, either of which could result in an accident
and/or serious personal injury.
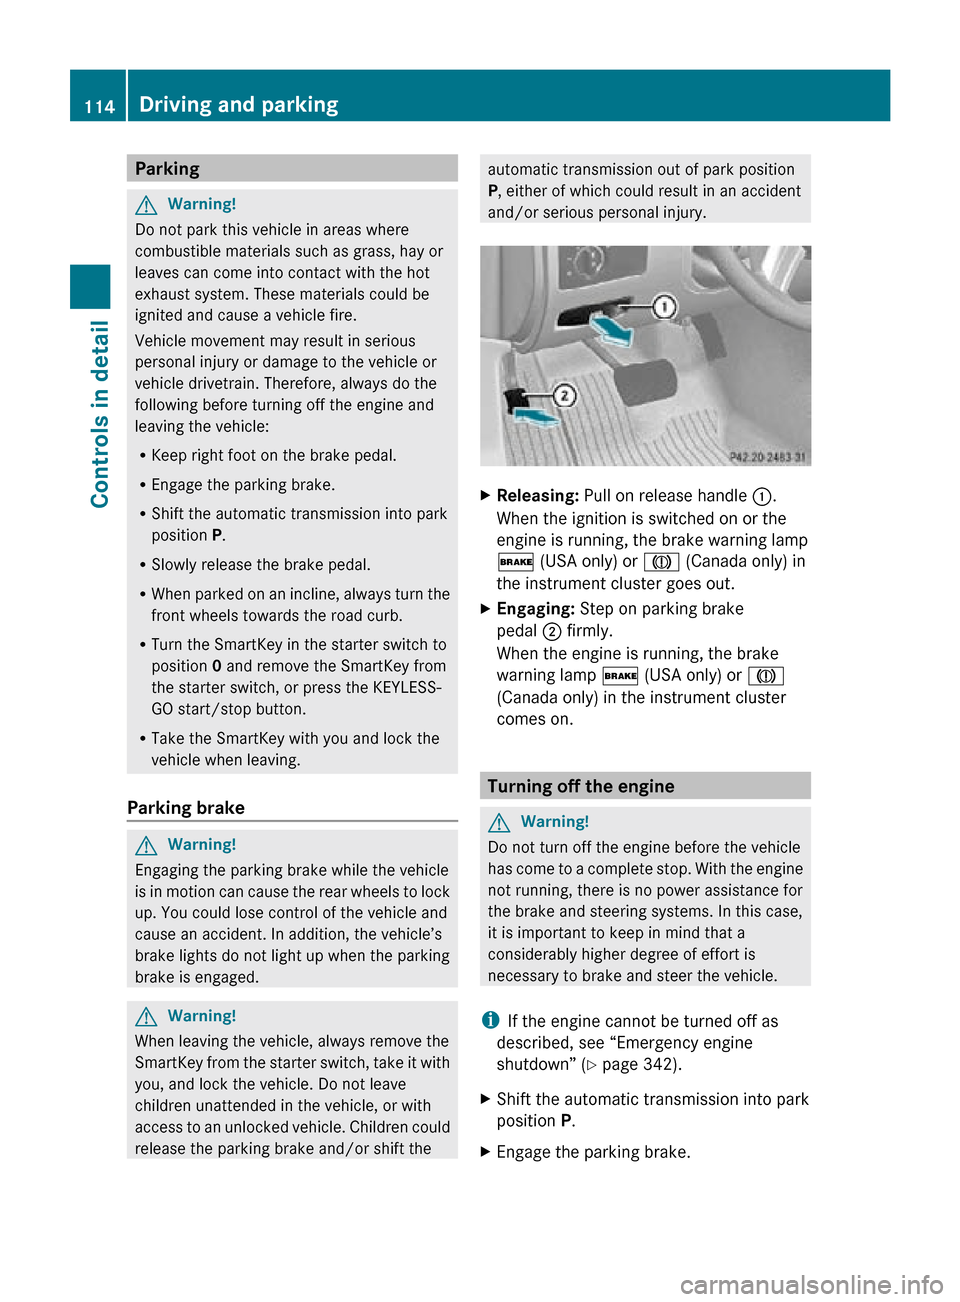
X
Releasing: Pull on release handle :.
When the ignition is switched on or the
engine is running, the brake warning lamp
$ (USA only) or J (Canada only) in
the instrument cluster goes out.
X Engaging: Step on parking brake
pedal ; firmly.
When the engine is running, the brake
warning lamp $ (USA only) or J
(Canada only) in the instrument cluster
comes on. Turning off the engine
G
Warning!
Do not turn off the engine before the vehicle
has come to a complete stop. With the engine
not running, there is no power assistance for
the brake and steering systems. In this case,
it is important to keep in mind that a
considerably higher degree of effort is
necessary to brake and steer the vehicle.
i If the engine cannot be turned off as
described, see “Emergency engine
shutdown” ( Y page 342).
X Shift the automatic transmission into park
position P.
X Engage the parking brake. 114
Driving and parkingControls in detail
251_AKB; 4; 52, en-US
d2ureepe,
Version: 2.11.8.1 2009-03-23T09:22:52+01:00 - Seite 114
Page 121 of 364
Effect
A
Neutral position
No power is transmitted from the
engine to the drive axle. When the
brakes
are released, the vehicle can
be moved freely (pushed or towed).
To avoid damage to the
transmission, never shift the
automatic transmission into neutral
position N while driving.
Exception: If the ESP ®
is switched
off or malfunctioning, shift the
automatic transmission into neutral
position N if the vehicle is in danger
of skidding.
! Coasting the vehicle, or driving
for any other reason with the
automatic transmission in neutral
position N can result in
transmission damage that is not
covered by the Mercedes-Benz
Limited Warranty. 7
Drive position
The automatic transmission shifts
automatically. All forward gears are
available.
Driving tips
Kickdown Use the kickdown when you want maximum
acceleration.
X
U.S. vehicles: Fully depress the
accelerator pedal.
Depending on the engine speed the
automatic transmission shifts into a lower
gear.
X Canada vehicles:
Depress the accelerator
pedal past the point of resistance.
Depending on the engine speed the
automatic transmission shifts into a lower
gear. Rocking the vehicle Rocking the vehicle by shifting the automatic
transmission directly between drive position
D and reverse gear
R can help free a vehicle
stuck in mud or snow. The engine control
system of this vehicle electronically limits
directly shifting the automatic transmission
between drive position D and reverse gear R
to
very low speeds, i.e. approximately 5 mph
(9 km/h). To shift the automatic transmission
directly between drive position D and reverse
gear R, move the gear selector lever up or
down past the resistance point.
Working on the vehicle G
Warning!
When working on the vehicle, engage the
parking brake and shift the automatic
transmission into park position P. Otherwise
the
vehicle could roll away which could result
in an accident and/or serious personal injury.
Towing a trailer X
When you tow a trailer, shift into a lower
gear range manually if the automatic
transmission hunts between gears on
inclines.
A
lower gear range and reduction of speed
reduces the potential to overload or to
overheat the engine.
For more information on trailer towing, see
“Trailer towing”
(Y page 256). Gear ranges
With the automatic transmission in drive
position D, you can limit or extend the gear
range, see “One-touch gearshifting”
(Y page 120). Automatic transmission
119
Controls in detail
251_AKB; 4; 52, en-US
d2ureepe, Version: 2.11.8.1 2009-03-23T09:22:52+01:00 - Seite 119 Z
Page 155 of 364
X
Activating/deactivating: Activate or
deactivate the distance warning function in
the control system (Y page 138).
When activated, the distance warning
function indicator Ä appears in the
multifunction display. Hill-start assist system
G
Warning!
The hill-start assist system is not designed to
function as a parking brake. It does not
prevent the vehicle from moving when parked
on an incline.
Always engage the parking brake in addition
to shifting the automatic transmission into
park position P.
On uphill grades, the hill-start assist system
maintains the pressure in the brake system
for approximately 1 second after you have
released the brake pedal. Therefore, you can
start off smoothly without the vehicle moving
immediately after releasing the brake pedal.
X Depress the brake pedal.
X Shift the automatic transmission into drive
position D or reverse gear R.
X Release the brake pedal.
X Carefully depress the accelerator pedal.
The hill-start assist system is inactive
R when starting off on a level road or downhill
grades
R with the automatic transmission in neutral
position N
R with the parking brake engaged
R if the ESP ®
has switched off due to a
malfunction Rear-axle level control
The rear-axle level control adjusts the vehicle
level for the rear axle. The rear-axle level
control is beneficial because it keeps the vehicle level at the rear axle constant,
independent of the load.
i
Observe the information on towing a
trailer, see “Trailer towing” ( Y page 256). AIRMATIC
The AIRMATIC lets you select the chassis and
suspension setup. The chassis and
suspension setup adjusts the damping
behavior and the ride height for your vehicle.
The AIRMATIC consists of two components.
The Adaptive Damping System (ADS)
(Y page 153) and the vehicle level control
(Y page 154). Adaptive Damping System (ADS)
The Adaptive Damping System (ADS) is
controlled electronically and operates
continuously. It adjusts the damping
characteristics to the current operating and
driving conditions. The damping is adjusted
individually for each wheel. Driving safety and
tire comfort are increased.
The fine tuning of the damping is dependent
on:
R your driving style
R road surface conditions
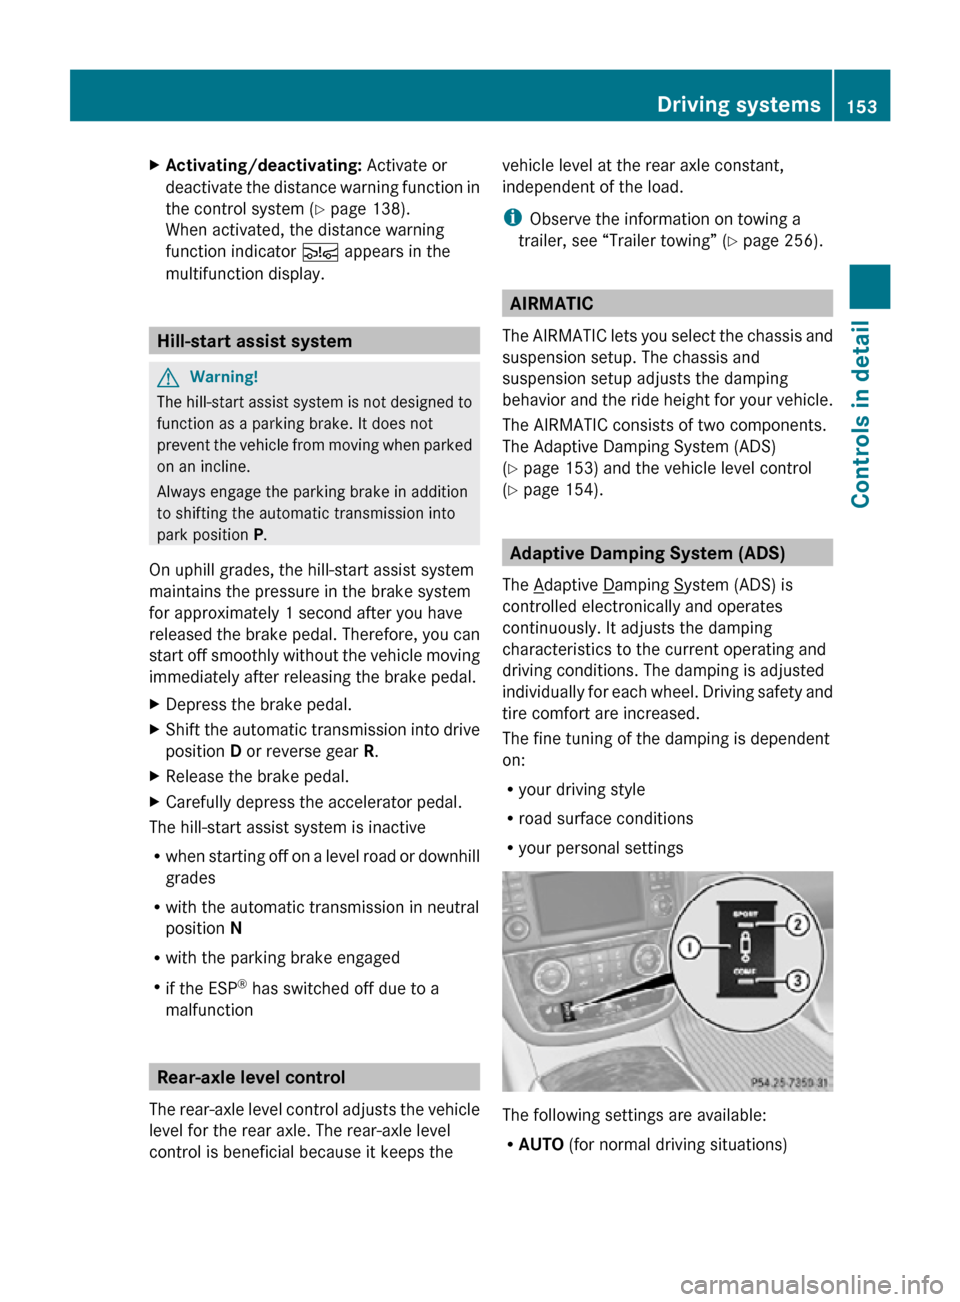
R your personal settings The following settings are available:
R
AUTO (for normal driving situations) Driving systems
153Controls in detail
251_AKB; 4; 52, en-US
d2ureepe, Version: 2.11.8.1 2009-03-23T09:22:52+01:00 - Seite 153 Z
Page 157 of 364
i
The third available level is the highspeed
level that is set automatically.
The following is the approximate change in
ride height for each of the level settings: Level Ride height
Raised level +1.97 in (50 mm)
Highway
level +/-0 in (0 mm)
Highspeed
level -0.78 in (-20 mm)
i
The vehicle is lowered to the highspeed
level automatically if the vehicle speed is
above 70 mph (112 km/h) or if the vehicle
speed stays between 60 mph (96 km/h)
and 70 mph (112 km/h) for
approximately 20 seconds.
i The highspeed level is not available when
towing a trailer. For more information on
towing a trailer, see “Trailer towing”
(Y page 256).
i Obey local speed limits. Use prudent
driving speeds appropriate to prevailing
conditions.
Raised level Only select the raised level if appropriate for
the driving situation encountered. Otherwise
the fuel consumption may increase and/or
the handling characteristics of the vehicle
may be unfavorable.
i
You can select the raised level at speeds
up to 25 mph (40 km/h). At higher speeds,
the message Á Level Selection
Not Permitted appears in the
multifunction display.
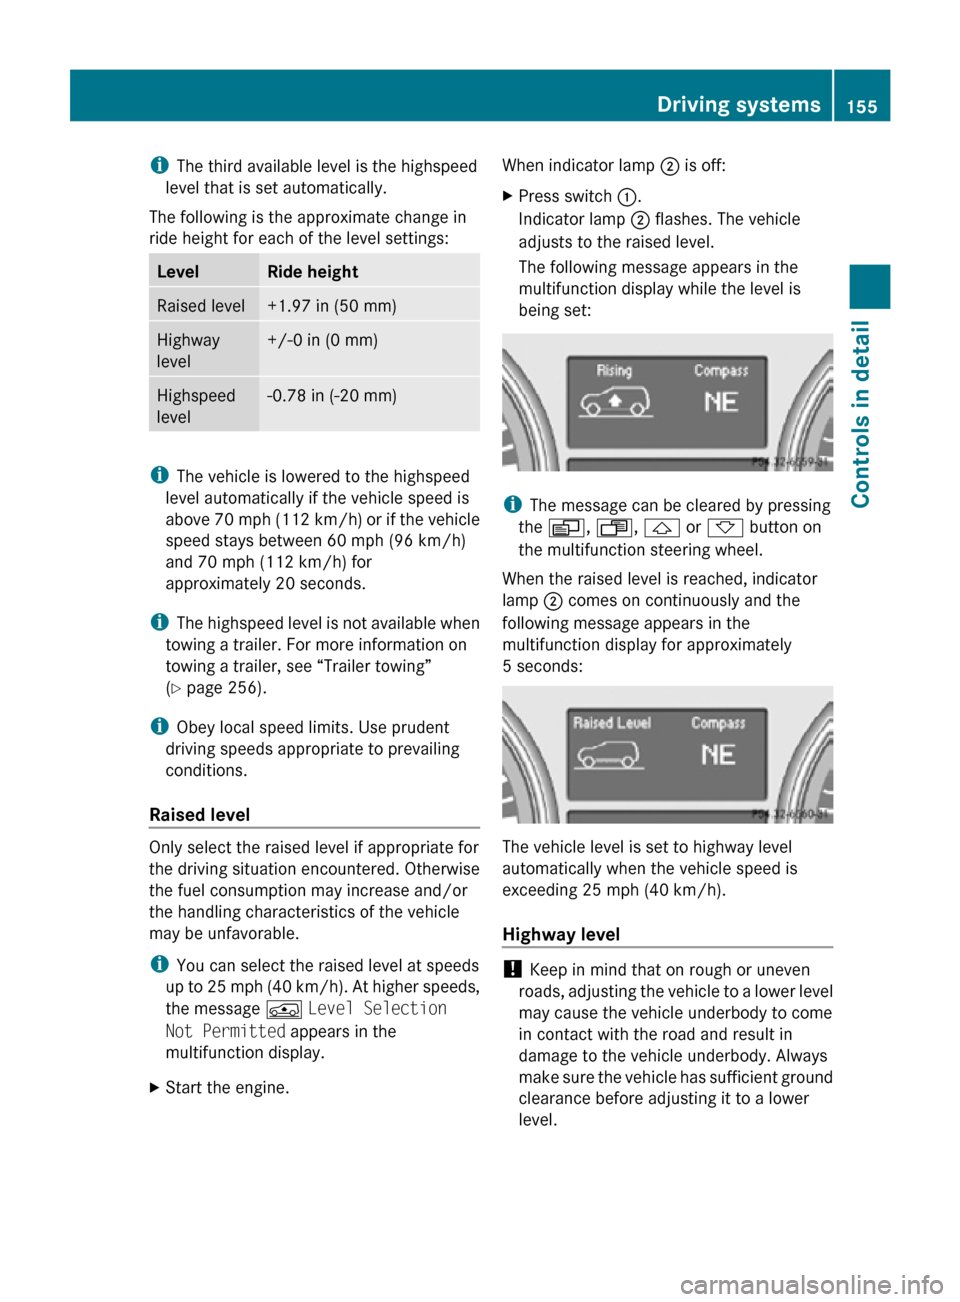
X Start the engine. When indicator lamp
; is off:
X Press switch :.
Indicator lamp ; flashes. The vehicle
adjusts to the raised level.
The following message appears in the
multifunction display while the level is
being set: i
The message can be cleared by pressing
the V, U, & or * button on
the multifunction steering wheel.
When the raised level is reached, indicator
lamp ; comes on continuously and the
following message appears in the
multifunction display for approximately
5 seconds: The vehicle level is set to highway level
automatically when the vehicle speed is
exceeding 25 mph (40 km/h).
Highway level
!
Keep in mind that on rough or uneven
roads, adjusting the vehicle to a lower level
may cause the vehicle underbody to come
in contact with the road and result in
damage to the vehicle underbody. Always
make sure the vehicle has sufficient ground
clearance before adjusting it to a lower
level. Driving systems
155Controls in detail
251_AKB; 4; 52, en-US
d2ureepe, Version: 2.11.8.1 2009-03-23T09:22:52+01:00 - Seite 155 Z