2010 MERCEDES-BENZ R320 service
[x] Cancel search: servicePage 263 of 364
Maintenance service indicator
message
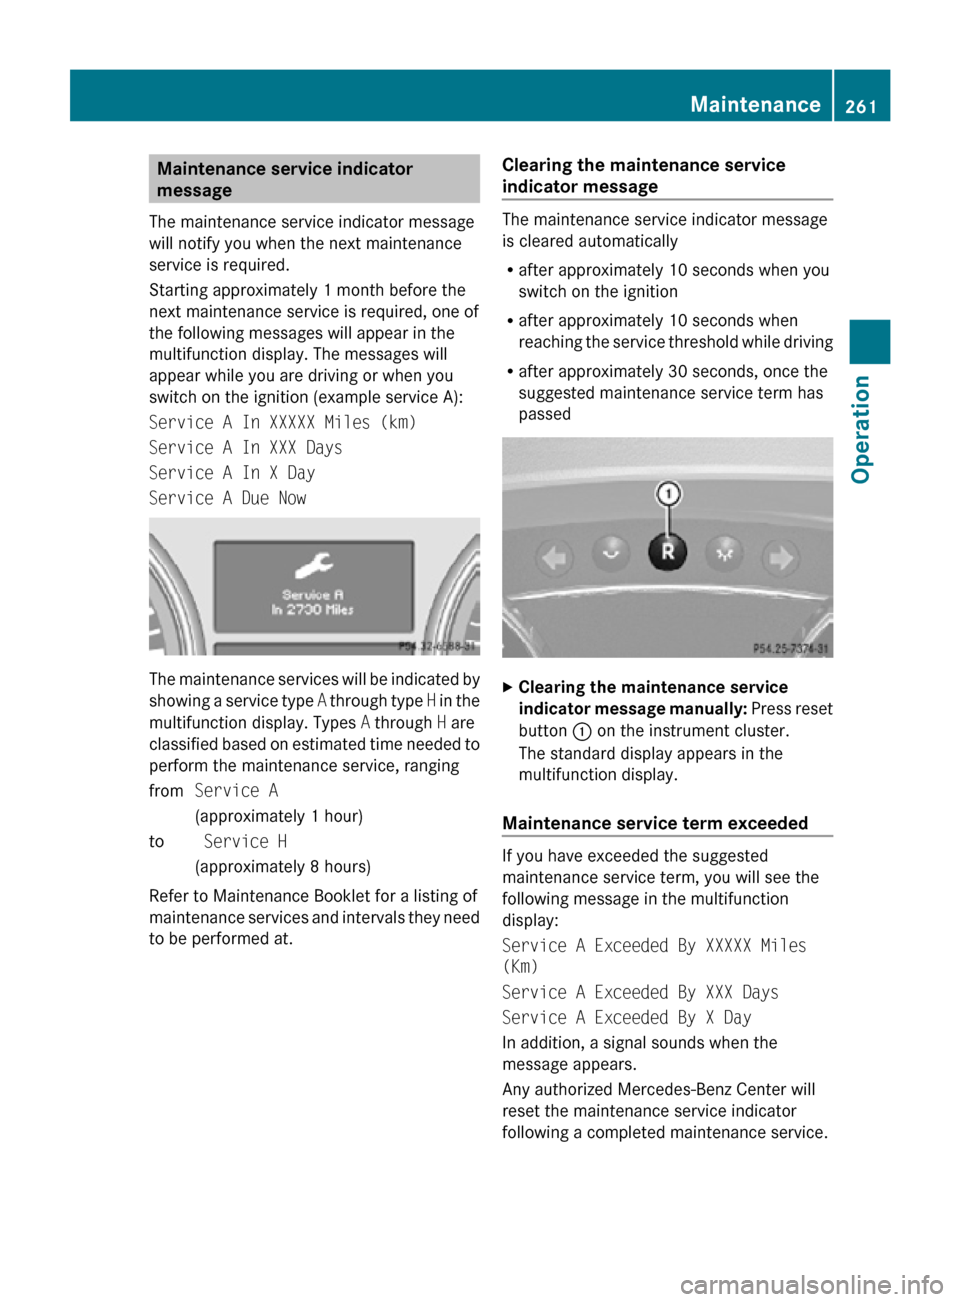
The maintenance service indicator message
will notify you when the next maintenance
service is required.
Starting approximately 1 month before the
next maintenance service is required, one of
the following messages will appear in the
multifunction display. The messages will
appear while you are driving or when you
switch on the ignition (example service A):
Service A In XXXXX Miles (km)
Service A In XXX Days
Service A In X Day
Service A Due Now The maintenance services will be indicated by
showing a service type
A through type H in the
multifunction display. Types A through H are
classified based on estimated time needed to
perform the maintenance service, ranging
from Service A
(approximately 1 hour)
to Service H
(approximately 8 hours)
Refer to Maintenance Booklet for a listing of
maintenance services and intervals they need
to be performed at. Clearing the maintenance service
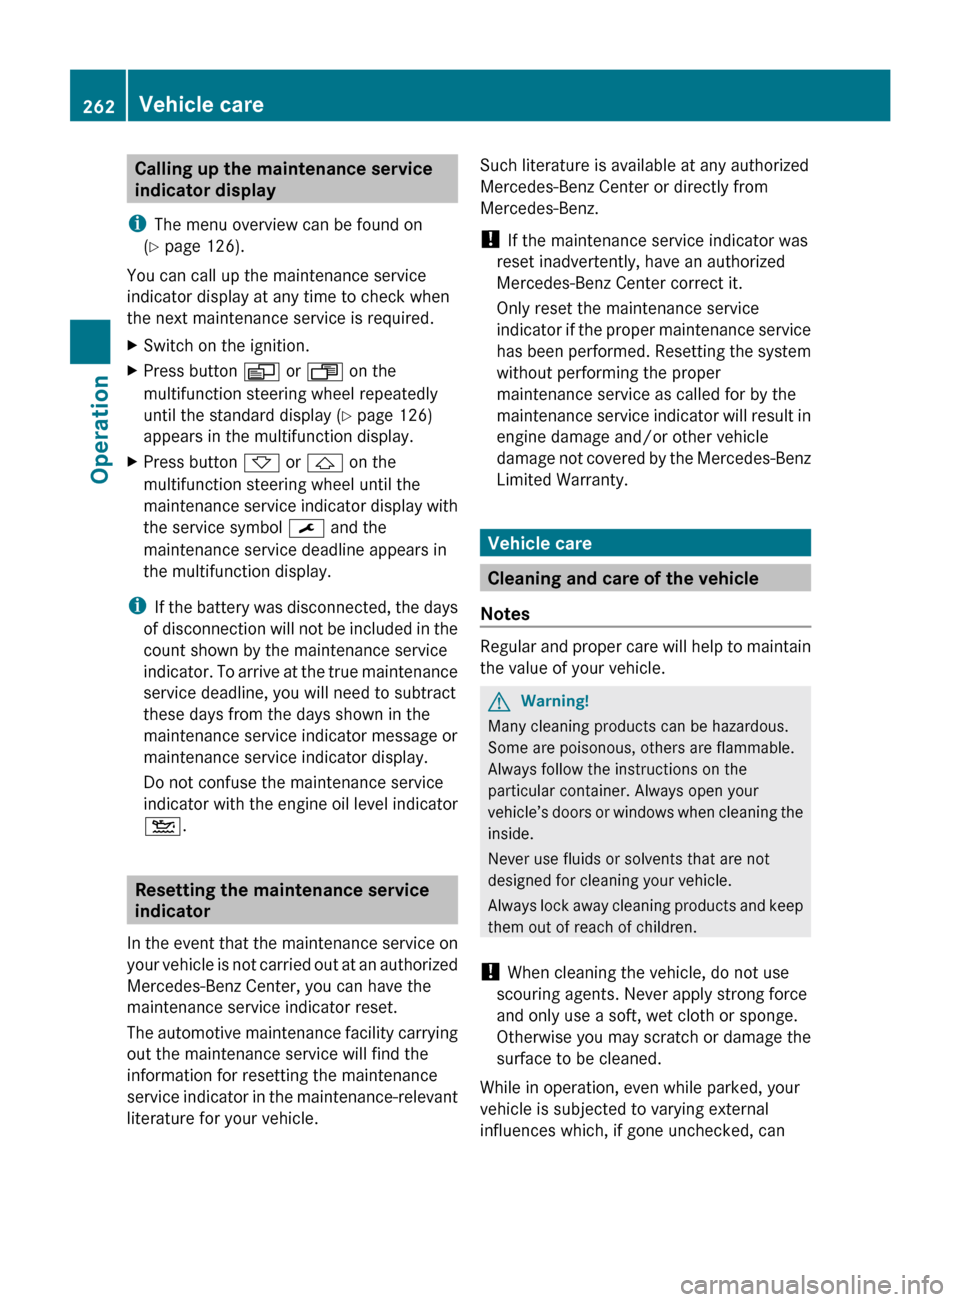
indicator message The maintenance service indicator message
is cleared automatically
R
after approximately 10 seconds when you
switch on the ignition
R after approximately 10 seconds when
reaching the service threshold while driving
R after approximately 30 seconds, once the
suggested maintenance service term has
passed X
Clearing the maintenance service
indicator message manually: Press reset
button : on the instrument cluster.
The standard display appears in the
multifunction display.
Maintenance service term exceeded If you have exceeded the suggested
maintenance service term, you will see the
following message in the multifunction
display:
Service A Exceeded By XXXXX Miles
(Km)
Service A Exceeded By XXX Days
Service A Exceeded By X Day
In addition, a signal sounds when the
message appears.
Any authorized Mercedes-Benz Center will
reset the maintenance service indicator
following a completed maintenance service. Maintenance
261Operation
251_AKB; 4; 52, en-US
d2ureepe, Version: 2.11.8.1 2009-03-23T09:22:52+01:00 - Seite 261 Z
Page 264 of 364
Calling up the maintenance service
indicator display
i The menu overview can be found on
(Y page 126).
You can call up the maintenance service
indicator display at any time to check when
the next maintenance service is required.
X Switch on the ignition.
X Press button V or U on the
multifunction steering wheel repeatedly
until the standard display
(Y page 126)
appears in the multifunction display.
X Press button * or & on the
multifunction steering wheel until the
maintenance
service indicator display with
the service symbol ¯ and the
maintenance service deadline appears in
the multifunction display.
i If
the battery was disconnected, the days
of disconnection will not be included in the
count shown by the maintenance service
indicator. To arrive at the true maintenance
service deadline, you will need to subtract
these days from the days shown in the
maintenance service indicator message or
maintenance service indicator display.
Do not confuse the maintenance service
indicator with the engine oil level indicator
4. Resetting the maintenance service
indicator
In
the event that the maintenance service on
your vehicle is not carried out at an authorized
Mercedes-Benz Center, you can have the
maintenance service indicator reset.
The automotive maintenance facility carrying
out the maintenance service will find the
information for resetting the maintenance
service indicator in the maintenance-relevant
literature for your vehicle. Such literature is available at any authorized
Mercedes-Benz Center or directly from
Mercedes-Benz.
!
If the maintenance service indicator was
reset inadvertently, have an authorized
Mercedes-Benz Center correct it.
Only reset the maintenance service
indicator
if the proper maintenance service
has been performed. Resetting the system
without performing the proper
maintenance service as called for by the
maintenance service indicator will result in
engine damage and/or other vehicle
damage not covered by the Mercedes-Benz
Limited Warranty. Vehicle care
Cleaning and care of the vehicle
Notes Regular and proper care will help to maintain
the value of your vehicle.
G
Warning!
Many cleaning products can be hazardous.
Some are poisonous, others are flammable.
Always follow the instructions on the
particular container. Always open your
vehicle’s
doors or windows when cleaning the
inside.
Never use fluids or solvents that are not
designed for cleaning your vehicle.
Always lock away cleaning products and keep
them out of reach of children.
! When cleaning the vehicle, do not use
scouring agents. Never apply strong force
and only use a soft, wet cloth or sponge.
Otherwise you may scratch or damage the
surface to be cleaned.
While in operation, even while parked, your
vehicle is subjected to varying external
influences which, if gone unchecked, can 262
Vehicle care
Operation
251_AKB; 4; 52, en-US
d2ureepe,
Version: 2.11.8.1 2009-03-23T09:22:52+01:00 - Seite 262
Page 289 of 364
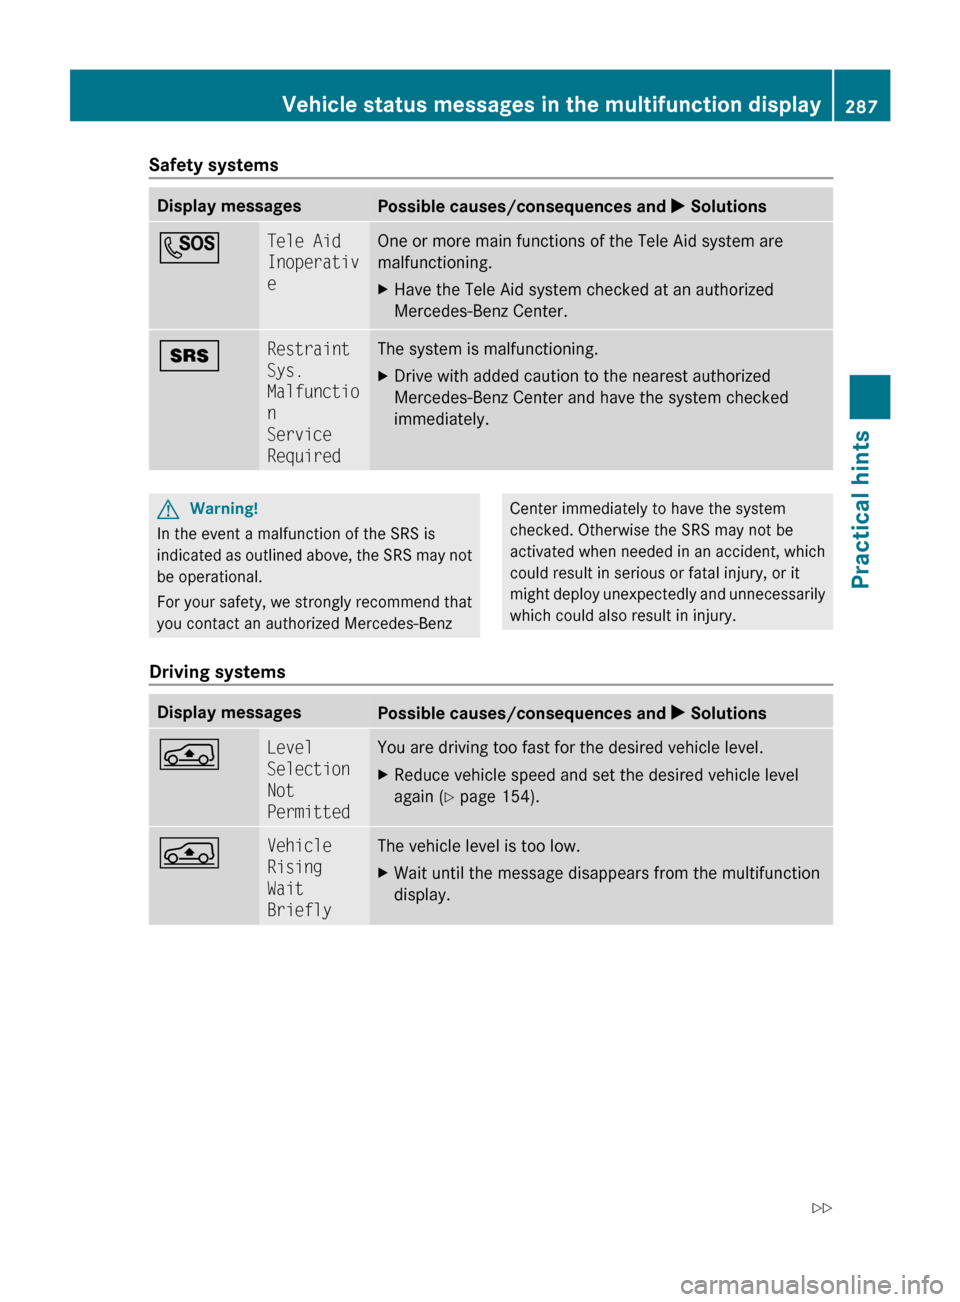
Safety systems
Display messages
Possible causes/consequences and
X SolutionsG Tele Aid
Inoperativ
e One or more main functions of the Tele Aid system are
malfunctioning.
X
Have the Tele Aid system checked at an authorized
Mercedes-Benz Center. + Restraint
Sys.
Malfunctio
n
Service
Required The system is malfunctioning.
X
Drive with added caution to the nearest authorized
Mercedes-Benz Center and have the system checked
immediately. G
Warning!
In the event a malfunction of the SRS is
indicated as outlined above, the SRS may not
be operational.
For your safety, we strongly recommend that
you contact an authorized Mercedes-Benz Center immediately to have the system
checked. Otherwise the SRS may not be
activated
when needed in an accident, which
could result in serious or fatal injury, or it
might deploy unexpectedly and unnecessarily
which could also result in injury.
Driving systems Display messages
Possible causes/consequences and
X SolutionsÁ Level
Selection
Not
Permitted You are driving too fast for the desired vehicle level.
X
Reduce vehicle speed and set the desired vehicle level
again ( Y page 154). Á Vehicle
Rising
Wait
Briefly The vehicle level is too low.
X
Wait until the message disappears from the multifunction
display. Vehicle status messages in the multifunction display
287
Practical hints
251_AKB; 4; 52, en-US
d2ureepe,Version: 2.11.8.1 2009-03-23T09:22:52+01:00 - Seite 287 Z
Page 295 of 364
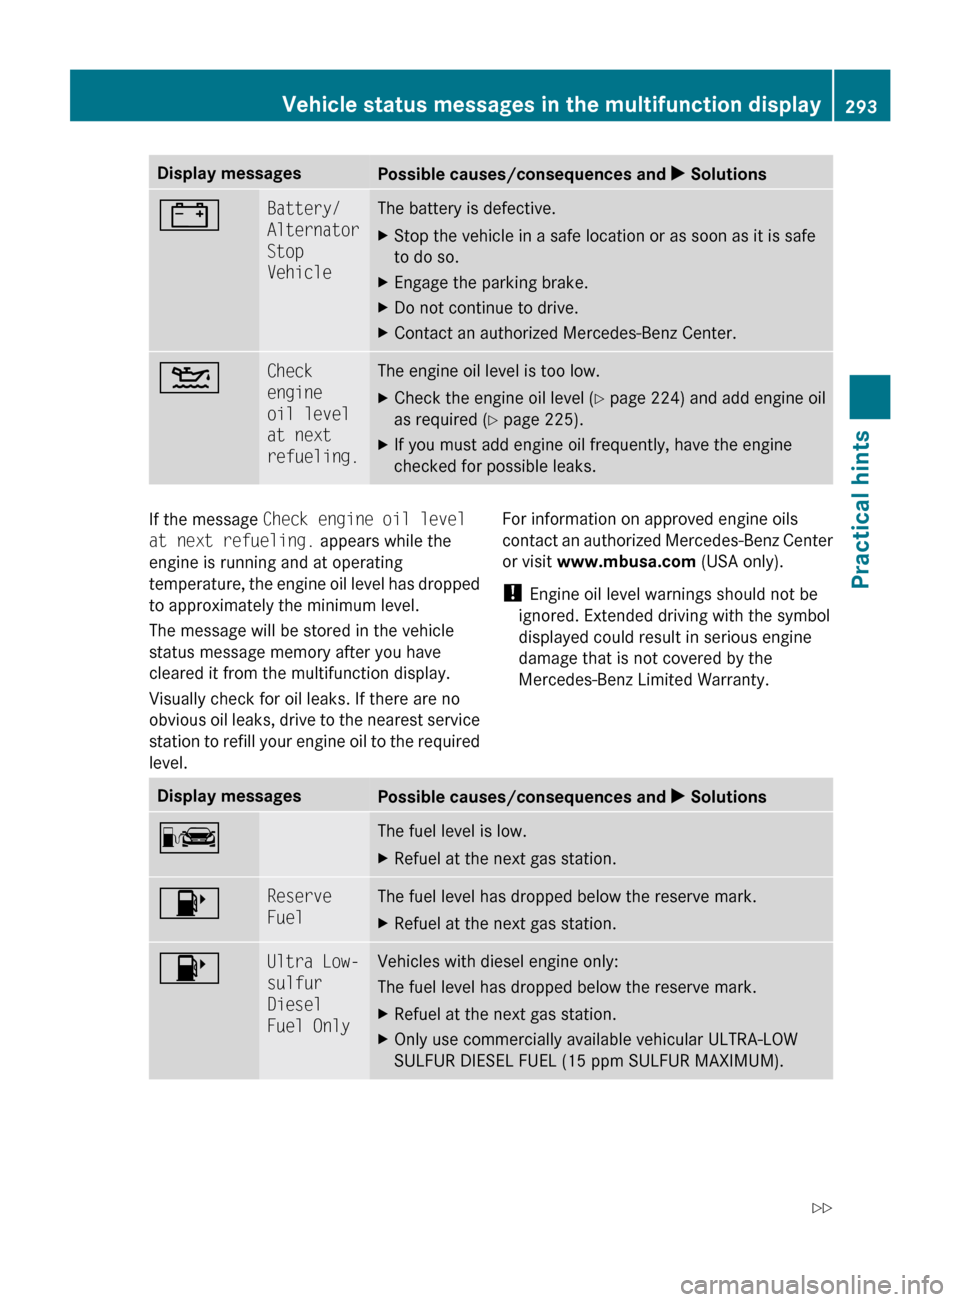
Display messages
Possible causes/consequences and
X Solutions# Battery/
Alternator
Stop
Vehicle The battery is defective.
X
Stop the vehicle in a safe location or as soon as it is safe
to do so.
X Engage the parking brake.
X Do not continue to drive.
X Contact an authorized Mercedes-Benz Center. 4 Check
engine
oil level
at next
refueling. The engine oil level is too low.
X
Check the engine oil level ( Y page 224) and add engine oil
as required ( Y page 225).
X If you must add engine oil frequently, have the engine
checked for possible leaks. If the message Check engine oil level
at next refueling. appears while the
engine is running and at operating
temperature,
the engine oil level has dropped
to approximately the minimum level.
The message will be stored in the vehicle
status message memory after you have
cleared it from the multifunction display.
Visually check for oil leaks. If there are no
obvious oil leaks, drive to the nearest service
station to refill your engine oil to the required
level. For information on approved engine oils
contact
an authorized Mercedes-Benz Center
or visit www.mbusa.com (USA only).
! Engine oil level warnings should not be
ignored. Extended driving with the symbol
displayed could result in serious engine
damage that is not covered by the
Mercedes-Benz Limited Warranty. Display messages
Possible causes/consequences and
X SolutionsC The fuel level is low.
X
Refuel at the next gas station. 8 Reserve
Fuel The fuel level has dropped below the reserve mark.
X
Refuel at the next gas station. 8 Ultra Low-
sulfur
Diesel
Fuel Only Vehicles with diesel engine only:
The fuel level has dropped below the reserve mark.
X
Refuel at the next gas station.
X Only use commercially available vehicular ULTRA-LOW
SULFUR DIESEL FUEL (15 ppm SULFUR MAXIMUM). Vehicle status messages in the multifunction display
293
Practical hints
251_AKB; 4; 52, en-US
d2ureepe,Version: 2.11.8.1 2009-03-23T09:22:52+01:00 - Seite 293 Z
Page 332 of 364
X
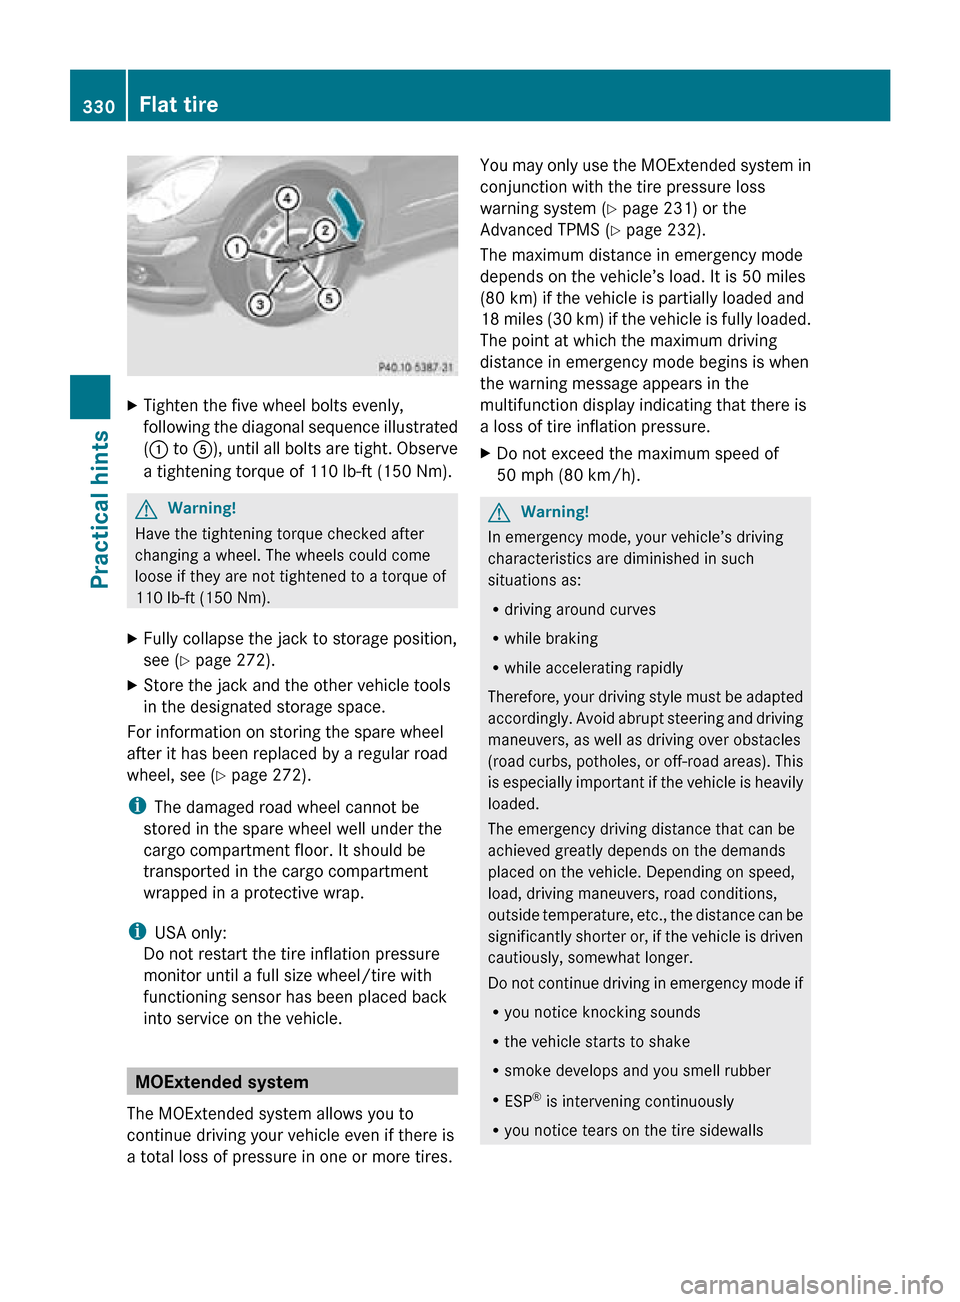
Tighten the five wheel bolts evenly,
following the diagonal sequence illustrated
(: to A), until all bolts are tight. Observe
a tightening torque of 110 lb-ft (150 Nm). G
Warning!
Have the tightening torque checked after
changing a wheel. The wheels could come
loose if they are not tightened to a torque of
110 lb-ft (150 Nm).
X Fully collapse the jack to storage position,
see ( Y page 272).
X Store the jack and the other vehicle tools
in the designated storage space.
For information on storing the spare wheel
after it has been replaced by a regular road
wheel, see ( Y page 272).
i The damaged road wheel cannot be
stored in the spare wheel well under the
cargo compartment floor. It should be
transported in the cargo compartment
wrapped in a protective wrap.
i USA only:
Do not restart the tire inflation pressure
monitor until a full size wheel/tire with
functioning sensor has been placed back
into service on the vehicle. MOExtended system
The MOExtended system allows you to
continue driving your vehicle even if there is
a total loss of pressure in one or more tires. You may only use the MOExtended system in
conjunction with the tire pressure loss
warning system (
Y page 231) or the
Advanced TPMS (Y page 232).
The maximum distance in emergency mode
depends on the vehicle’s load. It is 50 miles
(80 km) if the vehicle is partially loaded and
18 miles (30 km) if the vehicle is fully loaded.
The point at which the maximum driving
distance in emergency mode begins is when
the warning message appears in the
multifunction display indicating that there is
a loss of tire inflation pressure.
X Do not exceed the maximum speed of
50 mph (80 km/h). G
Warning!
In emergency mode, your vehicle’s driving
characteristics are diminished in such
situations as:
R driving around curves
R while braking
R while accelerating rapidly
Therefore, your driving style must be adapted
accordingly. Avoid abrupt steering and driving
maneuvers, as well as driving over obstacles
(road curbs, potholes, or off-road areas). This
is especially important if the vehicle is heavily
loaded.
The emergency driving distance that can be
achieved greatly depends on the demands
placed on the vehicle. Depending on speed,
load, driving maneuvers, road conditions,
outside temperature, etc., the distance can be
significantly shorter or, if the vehicle is driven
cautiously, somewhat longer.
Do not continue driving in emergency mode if
R you notice knocking sounds
R the vehicle starts to shake
R smoke develops and you smell rubber
R ESP ®
is intervening continuously
R you notice tears on the tire sidewalls 330
Flat tirePractical hints
251_AKB; 4; 52, en-US
d2ureepe,
Version: 2.11.8.1 2009-03-23T09:22:52+01:00 - Seite 330
Page 333 of 364
After driving in emergency mode, you must
have the rims inspected by an authorized
Mercedes-Benz Center to check if they are
suitable for further use. The failed tire must
be replaced in any case.
When replacing individual or all tires on the
vehicle, make sure only tires marked with
“MOExtended” are mounted in the size
specified for your vehicle
(Y page 347). Bleeding the fuel system (diesel
engine only)
Driving
the vehicle until the fuel tank is empty
is not recommended. Otherwise, air may be
sucked into the fuel system. If this happens,
the malfunction indicator lamp = (USA
only) or ; (Canada only) comes on and the
engine may not start immediately after
refueling the vehicle.
After refueling:
X Make sure the automatic transmission is in
park position P.
The gear position indicator in the
multifunction display should be on P.
X Do not depress the accelerator.
X If necessary, remove the KEYLESS-GO
start/stop button from the starter switch.
X Turn the SmartKey in the starter switch to
position 2 for at least 10 seconds.
X Return the SmartKey in the starter switch
to position 0.
X Turn the SmartKey in the starter switch to
position 3
and hold it there for a maximum
of 40 seconds or until the engine runs
surge-free.
If the engine does not start:
X Wait for approximately 2 minutes.
X Turn the SmartKey in the starter switch to
position 3
and hold it there for a maximum
of 40 seconds or until the engine runs
surge-free. If the engine still does not start, do not make
any further attempts to start the engine.
Contact
an authorized Mercedes-Benz Center
or call Roadside Assistance ( Y page 210).
i When the malfunction indicator lamp
= (USA only) or ; (Canada only) in
the instrument cluster has been illuminated
for the above condition, it will remain
illuminated until the engine was cycled on
and off four times in a row. AdBlue
®
(diesel engine only)
The BlueTEC exhaust gas aftertreatment
system requires a reducing agent (AdBlue ®
)
in order to function properly. Refilling with
AdBlue ®
is part of the regular maintenance
service work. A tankful of AdBlue ®
should
suffice until the next maintenance service
under normal driving conditions.
When the AdBlue ®
tank is low, the message
Check Additive See Operator’s
Manual appears in the multifunction display.
When the AdBlue ®
level drops to the
minimum level, the message Remaining
Starts: 20 appears in the multifunction
display.
i When
the message Remaining Starts:
20 appears in the multifunction display, you
can start the engine 20 more times. If you
do not add AdBlue ®
, the engine cannot be
started beyond that point. Fill the
AdBlue ®
tank with approximately 1 gal
(3.79 l) AdBlue ®
(corresponds to
approximately 2 AdBlue ®
refill containers)
or have the AdBlue ®
tank filled by an
authorized Mercedes-Benz Center.
i For refilling outside the maintenance
service intervals, refill the AdBlue ®
tank
with approximately 1 gal (3.79 l) AdBlue ®
(corresponds to approximately 2 AdBlue ®
refill containers). AdBlue
®
(diesel engine only) 331
Practical hints
251_AKB; 4; 52, en-US
d2ureepe,
Version: 2.11.8.1 2009-03-23T09:22:52+01:00 - Seite 331 Z
Page 334 of 364
Always use the particular AdBlue
®
refill
containers for refilling outside the
maintenance service interval. Contact an
authorized Mercedes-Benz Center or call
Roadside Assistance if necessary
(Y page 210).
Additional information on BlueTEC exhaust
gas aftertreatment and AdBlue ®
is available
at any authorized Mercedes-Benz Center. Refilling with AdBlue
®
G
Warning!
Make sure
R AdBlue ®
does not come into contact with
skin, eyes, or clothing
R to keep AdBlue ®
out of the reach of children
If you and/or others have come into contact
with AdBlue ®
:
R If AdBlue ®
has gotten into contact with
eyes, flush with plenty of water immediately
and seek medical help.
R Clean affected skin immediately with plenty
of water.
R If AdBlue ®
was swallowed, rinse mouth
immediately with plenty of water and drink
plenty of water. Consult a physician. G
Warning!
When opening the filler cap of the AdBlue ®
tank ammonia gas vapors may escape. Refill
AdBlue ®
in a well ventilated area only.
Ammonia gas vapors have a pungent odor and
are particularly irritating for your skin,
mucous membranes, and eyes. Inhaling
ammonia gas vapors will cause burning eyes,
nose, and throat, as well as coughing and
watering eyes.
! Only use AdBlue ®
complying with
ISO 22241. Do not add additives to
AdBlue ®
and do not dilute AdBlue ®
with water. Otherwise, the BlueTEC exhaust gas
aftertreatment system could be damaged.
Damage caused by using additives or
diluting with water are not covered by the
Mercedes-Benz Limited Warranty.
! Rinse surfaces that have come into
contact with AdBlue ®
, or remove AdBlue ®
with a moist cloth and cold water
immediately. If AdBlue ®
has crystallized
already, use cold water and a sponge.
AdBlue ®
residues will crystallize and soil
the affected surfaces.
! AdBlue ®
is not a fuel additive and must
not be added to the diesel fuel tank. If
AdBlue ®
reaches the diesel fuel tank, the
engine could be damaged which is not
covered by the Mercedes-Benz Limited
Warranty.
For more information on AdBlue ®
, see
(Y page 354).
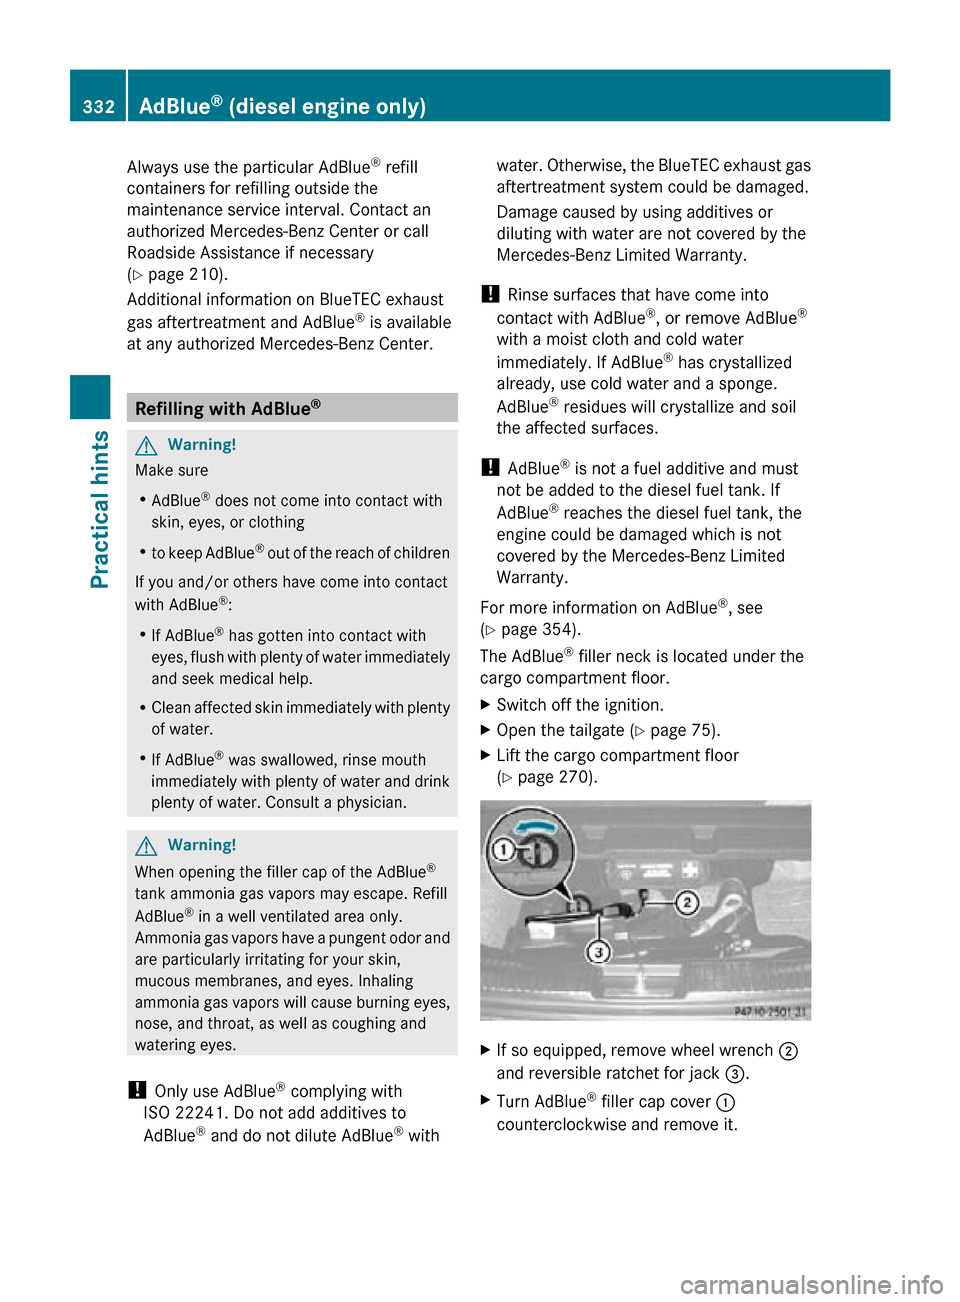
The AdBlue ®
filler neck is located under the
cargo compartment floor.
X Switch off the ignition.
X Open the tailgate ( Y page 75).
X Lift the cargo compartment floor
(Y page 270). X
If so equipped, remove wheel wrench ;
and reversible ratchet for jack =.
X Turn AdBlue ®
filler cap cover :
counterclockwise and remove it. 332
AdBlue ®
(diesel engine only)Practical hints
251_AKB; 4; 52, en-US
d2ureepe, Version: 2.11.8.1 2009-03-23T09:22:52+01:00 - Seite 332
Page 335 of 364
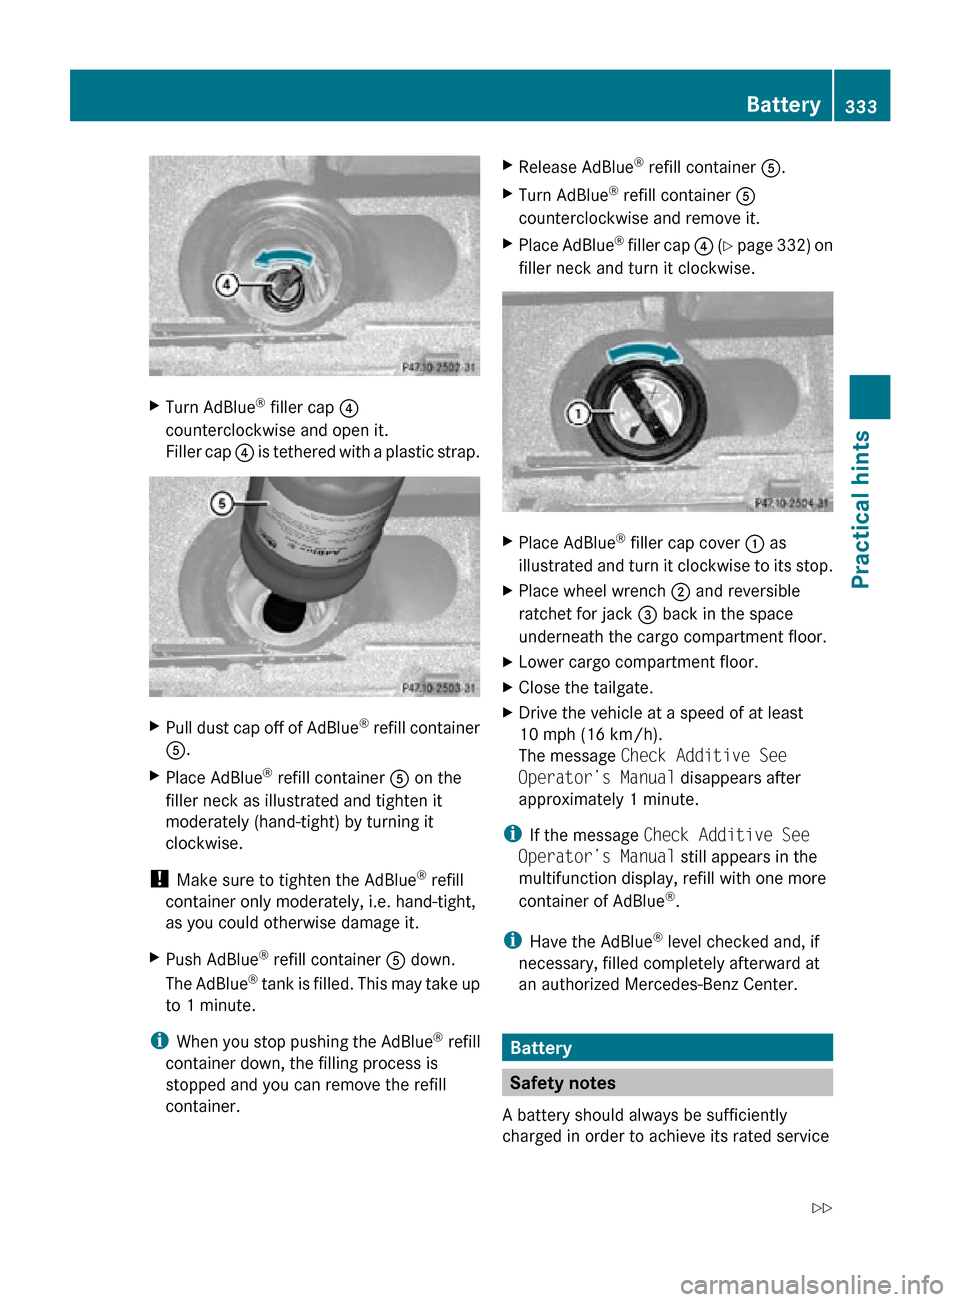
X
Turn AdBlue ®
filler cap ?
counterclockwise and open it.
Filler cap ? is tethered with a plastic strap. X
Pull dust cap off of AdBlue ®
refill container
A.
X Place AdBlue ®
refill container A on the
filler neck as illustrated and tighten it
moderately (hand-tight) by turning it
clockwise.
! Make sure to tighten the AdBlue ®
refill
container only moderately, i.e. hand-tight,
as you could otherwise damage it.
X Push AdBlue ®
refill container A down.
The AdBlue ®
tank is filled. This may take up
to 1 minute.
i When you stop pushing the AdBlue ®
refill
container down, the filling process is
stopped and you can remove the refill
container. X
Release AdBlue ®
refill container A.
X Turn AdBlue ®
refill container A
counterclockwise and remove it.
X Place AdBlue ®
filler cap ? (Y page 332) on
filler neck and turn it clockwise. X
Place AdBlue ®
filler cap cover : as
illustrated and turn it clockwise to its stop.
X Place wheel wrench ; and reversible
ratchet for jack = back in the space
underneath the cargo compartment floor.
X Lower cargo compartment floor.
X Close the tailgate.
X Drive the vehicle at a speed of at least
10 mph (16 km/h).
The message Check Additive See
Operator’s Manual disappears after
approximately 1 minute.
i If the message Check Additive See
Operator’s Manual still appears in the
multifunction display, refill with one more
container of AdBlue ®
.
i Have the AdBlue ®
level checked and, if
necessary, filled completely afterward at
an authorized Mercedes-Benz Center. Battery
Safety notes
A battery should always be sufficiently
charged in order to achieve its rated service Battery
333Practical hints
251_AKB; 4; 52, en-US
d2ureepe, Version: 2.11.8.1 2009-03-23T09:22:52+01:00 - Seite 333 Z