2010 MERCEDES-BENZ R320 hood release
[x] Cancel search: hood releasePage 29 of 364
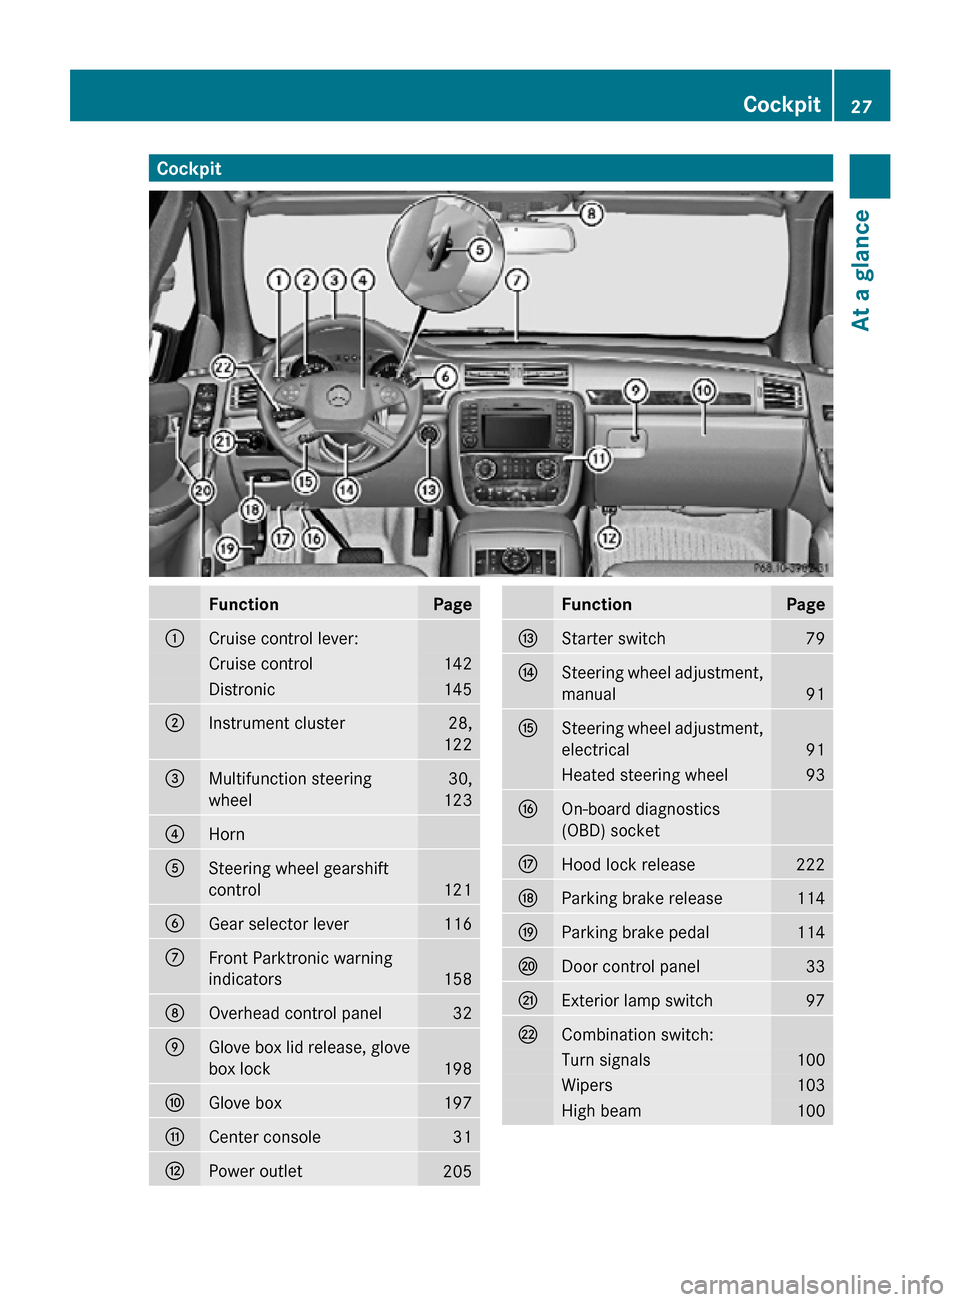
Cockpit
Function Page
:
Cruise control lever:
Cruise control 142
Distronic 145
;
Instrument cluster 28,
122 =
Multifunction steering
wheel 30,
123 ?
Horn
A
Steering wheel gearshift
control
121
B
Gear selector lever 116
C
Front Parktronic warning
indicators
158
D
Overhead control panel 32
E
Glove box lid release, glove
box lock
198
F
Glove box 197
G
Center console 31
H
Power outlet
205 Function Page
I
Starter switch 79
J
Steering wheel adjustment,
manual
91
K
Steering wheel adjustment,
electrical
91
Heated steering wheel 93
L
On-board diagnostics
(OBD) socket
M
Hood lock release 222
N
Parking brake release 114
O
Parking brake pedal 114
P
Door control panel 33
Q
Exterior lamp switch 97
R
Combination switch:
Turn signals 100
Wipers 103
High beam 100Cockpit
27At a glance
251_AKB; 4; 52, en-US
d2ureepe, Version: 2.11.8.1 2009-03-23T09:22:52+01:00 - Seite 27 Z
Page 224 of 364
i
Leaving the engine running and the fuel
filler cap open can cause the yellow fuel
tank
reserve warning lamp to flash and the
malfunction indicator lamp ! (USA
only) or ; (Canada only) to illuminate.
For more information, see also “Practical
hints” (Y page 305).
X Remove the SmartKey from the starter
switch.
KEYLESS-GO: Open the driver’s door (this
puts the starter switch in position 0, same
as with the SmartKey removed from the
starter switch). The driver’s door then can
be closed again.
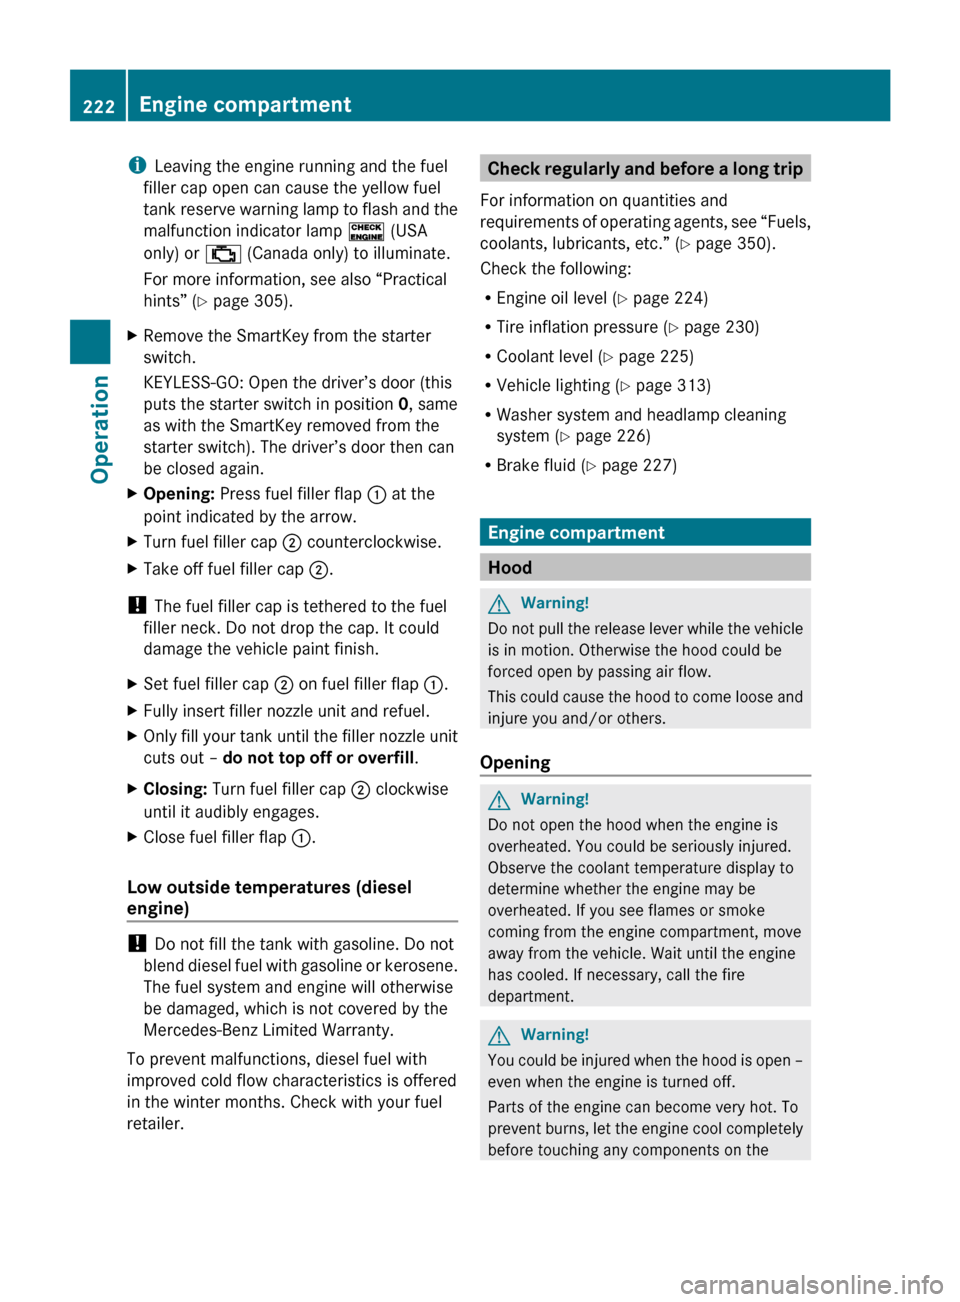
X Opening: Press fuel filler flap : at the
point indicated by the arrow.
X Turn fuel filler cap ; counterclockwise.
X Take off fuel filler cap ;.
! The fuel filler cap is tethered to the fuel
filler neck. Do not drop the cap. It could
damage the vehicle paint finish.
X Set fuel filler cap ; on fuel filler flap :.
X Fully insert filler nozzle unit and refuel.
X Only fill your tank until the filler nozzle unit
cuts out – do not top off or overfill .
X Closing: Turn fuel filler cap ; clockwise
until it audibly engages.
X Close fuel filler flap :.
Low outside temperatures (diesel
engine) !
Do not fill the tank with gasoline. Do not
blend
diesel fuel with gasoline or kerosene.
The fuel system and engine will otherwise
be damaged, which is not covered by the
Mercedes-Benz Limited Warranty.
To prevent malfunctions, diesel fuel with
improved cold flow characteristics is offered
in the winter months. Check with your fuel
retailer. Check regularly and before a long trip
For information on quantities and
requirements
of operating agents, see “Fuels,
coolants, lubricants, etc.” (Y page 350).
Check the following:
R Engine oil level ( Y page 224)
R Tire inflation pressure ( Y page 230)
R Coolant level ( Y page 225)
R Vehicle lighting ( Y page 313)
R Washer system and headlamp cleaning
system (Y page 226)
R Brake fluid ( Y page 227) Engine compartment
Hood
G
Warning!
Do not pull the release lever while the vehicle
is in motion. Otherwise the hood could be
forced open by passing air flow.
This
could cause the hood to come loose and
injure you and/or others.
Opening G
Warning!
Do not open the hood when the engine is
overheated. You could be seriously injured.
Observe the coolant temperature display to
determine whether the engine may be
overheated. If you see flames or smoke
coming from the engine compartment, move
away from the vehicle. Wait until the engine
has cooled. If necessary, call the fire
department. G
Warning!
You could be injured when the hood is open –
even when the engine is turned off.
Parts of the engine can become very hot. To
prevent
burns, let the engine cool completely
before touching any components on the 222
Engine compartment
Operation
251_AKB; 4; 52, en-US
d2ureepe,
Version: 2.11.8.1 2009-03-23T09:22:52+01:00 - Seite 222
Page 225 of 364
vehicle. Comply with all relevant safety
precautions.
G
Warning!
To help prevent personal injury, stay clear of
moving parts when the hood is open and the
engine is running.
The radiator fan may continue to run for
approximately 30 seconds or may even
restart after the engine has been turned off.
Stay clear of fan blades. G
Warning!
Vehicles with gasoline engine:
The engine is equipped with a transistorized
ignition system. Because of the high voltage
it is dangerous to touch any components
(ignition coils, spark plug sockets, diagnostic
socket) of the ignition system
R with the engine running
R while starting the engine
R when the ignition is switched on and the
engine is turned manually G
Warning!
Vehicles with diesel engine:
The engine is equipped with a high-voltage
electronic control unit for the injection
system. Because of the high voltage it is
dangerous to touch any components of the
injection system (injectors, electrical wires)
R with the engine running
R while starting the engine
R when the ignition is switched on X
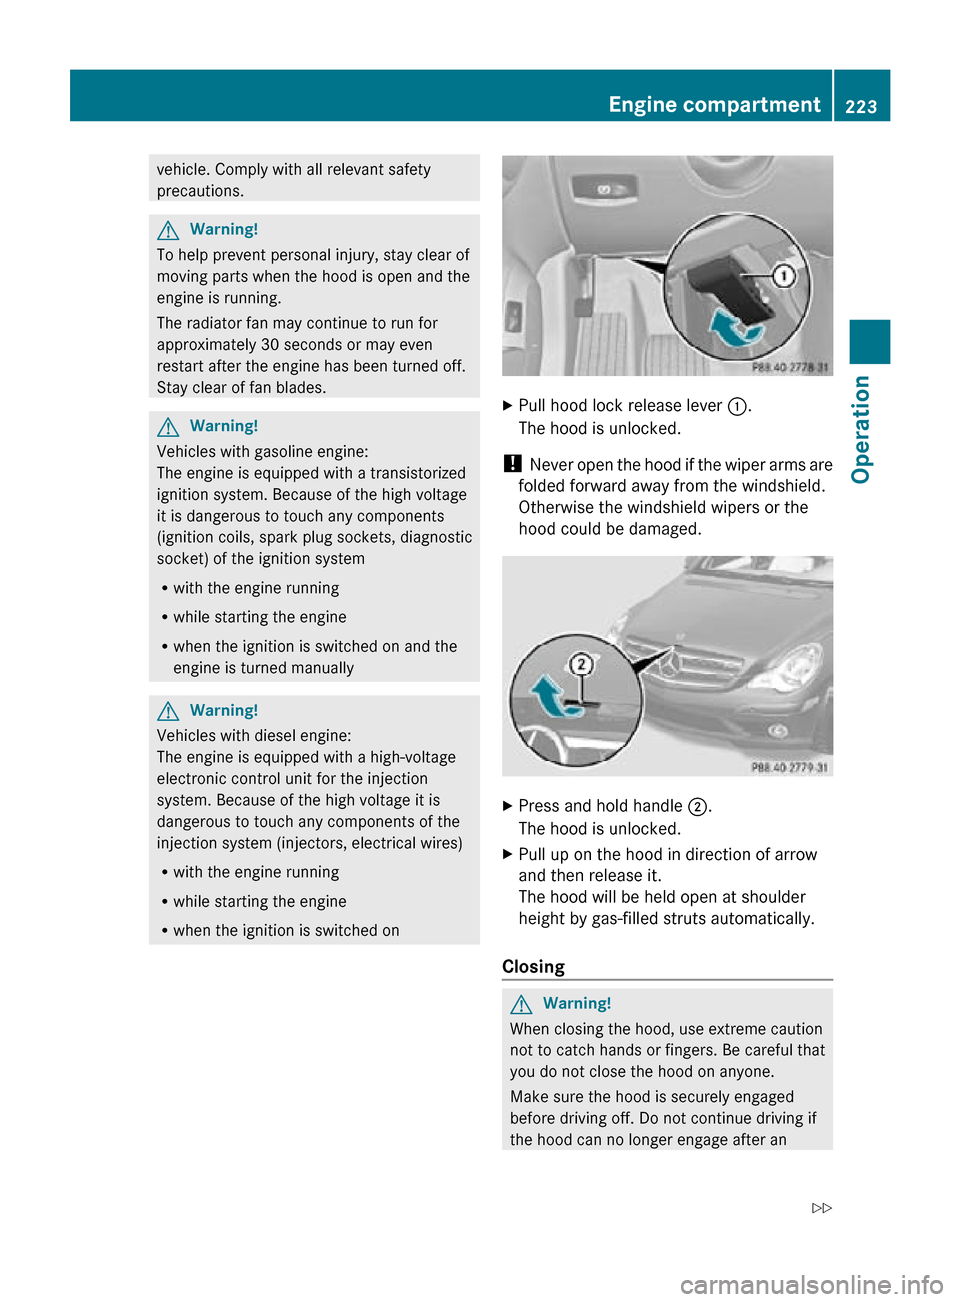
Pull hood lock release lever :.
The hood is unlocked.
! Never open the hood if the wiper arms are
folded forward away from the windshield.
Otherwise the windshield wipers or the
hood could be damaged. X
Press and hold handle ;.
The hood is unlocked.
X Pull up on the hood in direction of arrow
and then release it.
The hood will be held open at shoulder
height by gas-filled struts automatically.
Closing G
Warning!
When closing the hood, use extreme caution
not to catch hands or fingers. Be careful that
you do not close the hood on anyone.
Make sure the hood is securely engaged
before driving off. Do not continue driving if
the hood can no longer engage after an Engine compartment
223Operation
251_AKB; 4; 52, en-US
d2ureepe, Version: 2.11.8.1 2009-03-23T09:22:52+01:00 - Seite 223 Z
Page 268 of 364
Cleaning the rear view camera lens
X
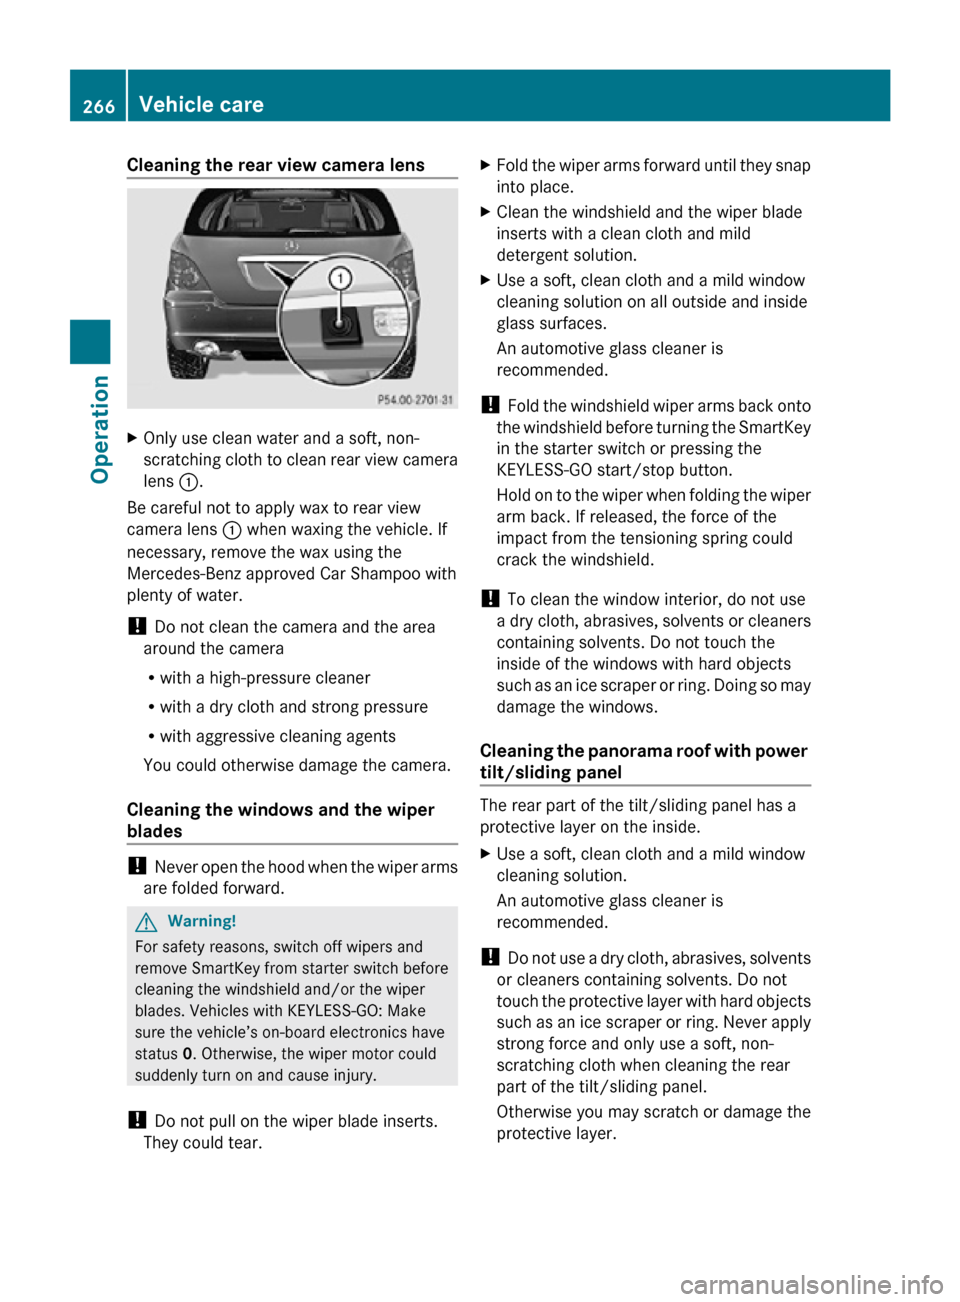
Only use clean water and a soft, non-
scratching cloth to clean rear view camera
lens :.
Be careful not to apply wax to rear view
camera lens : when waxing the vehicle. If
necessary, remove the wax using the
Mercedes-Benz approved Car Shampoo with
plenty of water.
! Do not clean the camera and the area
around the camera
R with a high-pressure cleaner
R with a dry cloth and strong pressure
R with aggressive cleaning agents
You could otherwise damage the camera.
Cleaning the windows and the wiper
blades !
Never open the hood when the wiper arms
are folded forward. G
Warning!
For safety reasons, switch off wipers and
remove SmartKey from starter switch before
cleaning the windshield and/or the wiper
blades. Vehicles with KEYLESS-GO: Make
sure the vehicle’s on-board electronics have
status 0. Otherwise, the wiper motor could
suddenly turn on and cause injury.
! Do not pull on the wiper blade inserts.
They could tear. X
Fold the wiper arms forward until they snap
into place.
X Clean the windshield and the wiper blade
inserts with a clean cloth and mild
detergent solution.
X Use a soft, clean cloth and a mild window
cleaning solution on all outside and inside
glass surfaces.
An automotive glass cleaner is
recommended.
! Fold the windshield wiper arms back onto
the windshield before turning the SmartKey
in the starter switch or pressing the
KEYLESS-GO start/stop button.
Hold on to the wiper when folding the wiper
arm back. If released, the force of the
impact from the tensioning spring could
crack the windshield.
! To clean the window interior, do not use
a dry cloth, abrasives, solvents or cleaners
containing solvents. Do not touch the
inside of the windows with hard objects
such as an ice scraper or ring. Doing so may
damage the windows.
Cleaning the panorama roof with power
tilt/sliding panel The rear part of the tilt/sliding panel has a
protective layer on the inside.
X
Use a soft, clean cloth and a mild window
cleaning solution.
An automotive glass cleaner is
recommended.
! Do not use a dry cloth, abrasives, solvents
or cleaners containing solvents. Do not
touch the protective layer with hard objects
such as an ice scraper or ring. Never apply
strong force and only use a soft, non-
scratching cloth when cleaning the rear
part of the tilt/sliding panel.
Otherwise you may scratch or damage the
protective layer. 266
Vehicle careOperation
251_AKB; 4; 52, en-US
d2ureepe,
Version: 2.11.8.1 2009-03-23T09:22:52+01:00 - Seite 266
Page 320 of 364
G
Warning!
Wiper blades are components that are subject
to wear and tear. Replace the wiper blades
twice a year, preferably in the spring and fall.
Otherwise the windows will not be wiped
properly. As a result, you may not be able to
observe surrounding traffic conditions and
could cause an accident.
! Never open the hood when a front wiper
arm is folded forward.
Hold on to the wiper when folding a wiper
arm back. If released, the force of the
impact from the tensioning spring could
crack the windshield or the rear window.
Do not allow a wiper arm to contact the
windshield glass or the rear window
without a wiper blade inserted.
Mercedes-Benz recommends that you have
this work carried out at an authorized
Mercedes-Benz Center.
X Remove the SmartKey from the starter
switch.
Vehicles with KEYLESS-GO:
X Make sure the vehicle’s on-board
electronics have status 0 (Y page 80). Removing wiper blades
Front wiper blades !
Do not pull on the wiper blade inserts.
They could tear.
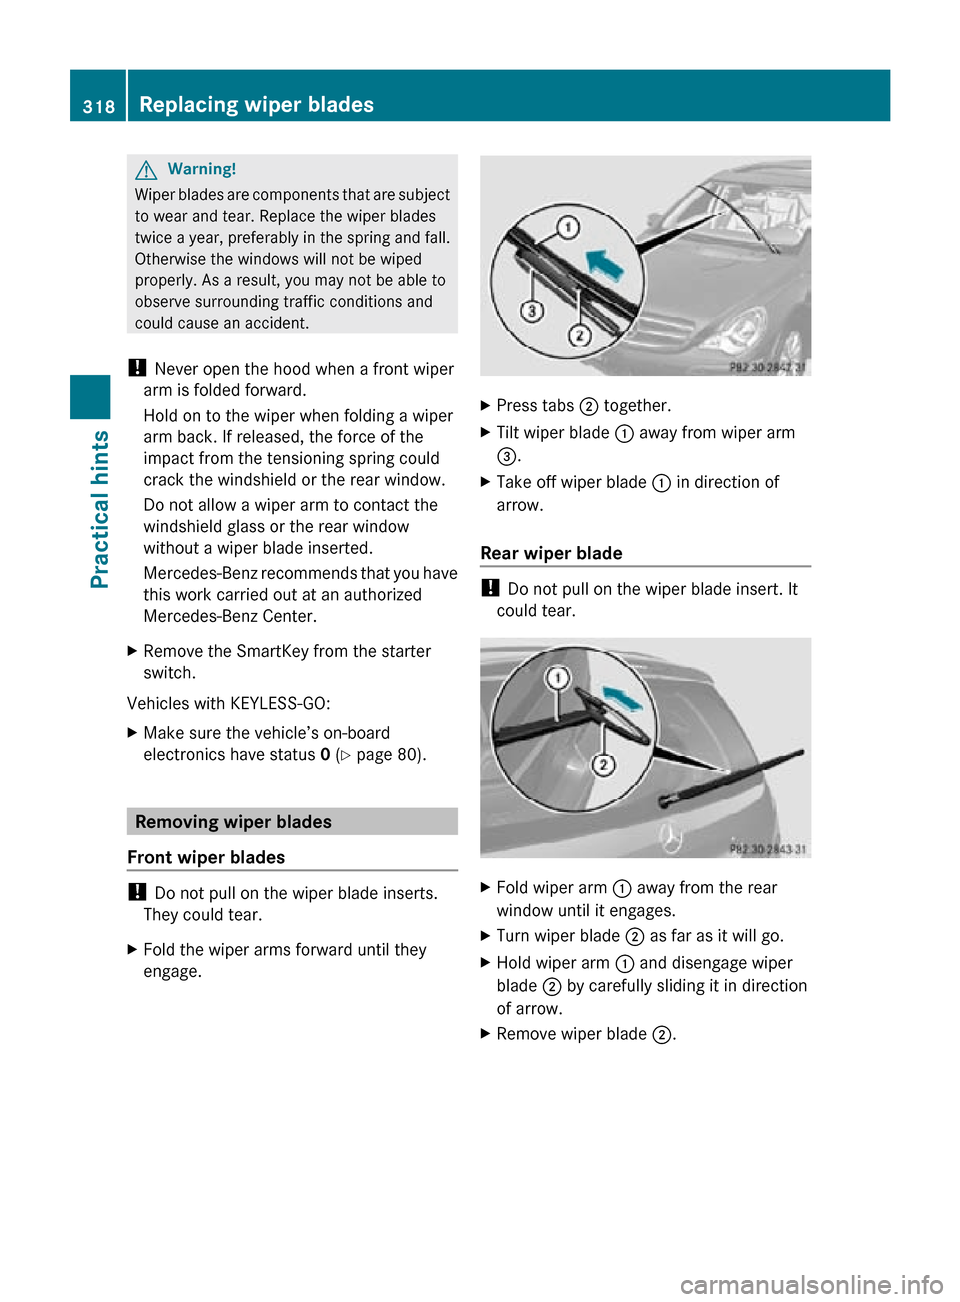
X Fold the wiper arms forward until they
engage. X
Press tabs ; together.
X Tilt wiper blade : away from wiper arm
=.
X Take off wiper blade : in direction of
arrow.
Rear wiper blade !
Do not pull on the wiper blade insert. It
could tear. X
Fold wiper arm : away from the rear
window until it engages.
X Turn wiper blade ; as far as it will go.
X Hold wiper arm : and disengage wiper
blade ; by carefully sliding it in direction
of arrow.
X Remove wiper blade ;.318
Replacing wiper bladesPractical hints
251_AKB; 4; 52, en-US
d2ureepe,
Version: 2.11.8.1 2009-03-23T09:22:52+01:00 - Seite 318
Page 343 of 364
A blown fuse must be replaced by an
appropriate spare fuse (recognizable by its
color or the fuse rating given on the fuse) of
the amperage recommended in the fuse
chart. Any Mercedes-Benz Center will be glad
to advise you on this subject.
i
In case of a blown fuse contact Roadside
Assistance or an authorized Mercedes-
Benz Center.
If a newly inserted fuse blows again, have the
cause determined and rectified by an
authorized Mercedes-Benz Center.
The fuse chart is located in the cargo
compartment with the vehicle tool kit
(Y page 270). The fuse chart explains the fuse
allocation and fuse amperages. Before replacing fuses
X Engage the parking brake.
X Make sure the automatic transmission is in
park position P.
The transmission position indicator in the
multifunction display should be on P.
X Switch off all electrical consumers.
X Turn off the engine.
X Remove the SmartKey from the starter
switch.
X Vehicles with KEYLESS-GO: Open the
driver’s door (this puts the starter switch in
position 0, same as with the SmartKey
removed from the starter switch). The
driver’s door then can be closed again. Fuse box in passenger compartment
! Do not use sharp objects such as a
screwdriver to open the fuse box cover in
the dashboard. You could damage the fuse
box cover or the dashboard.
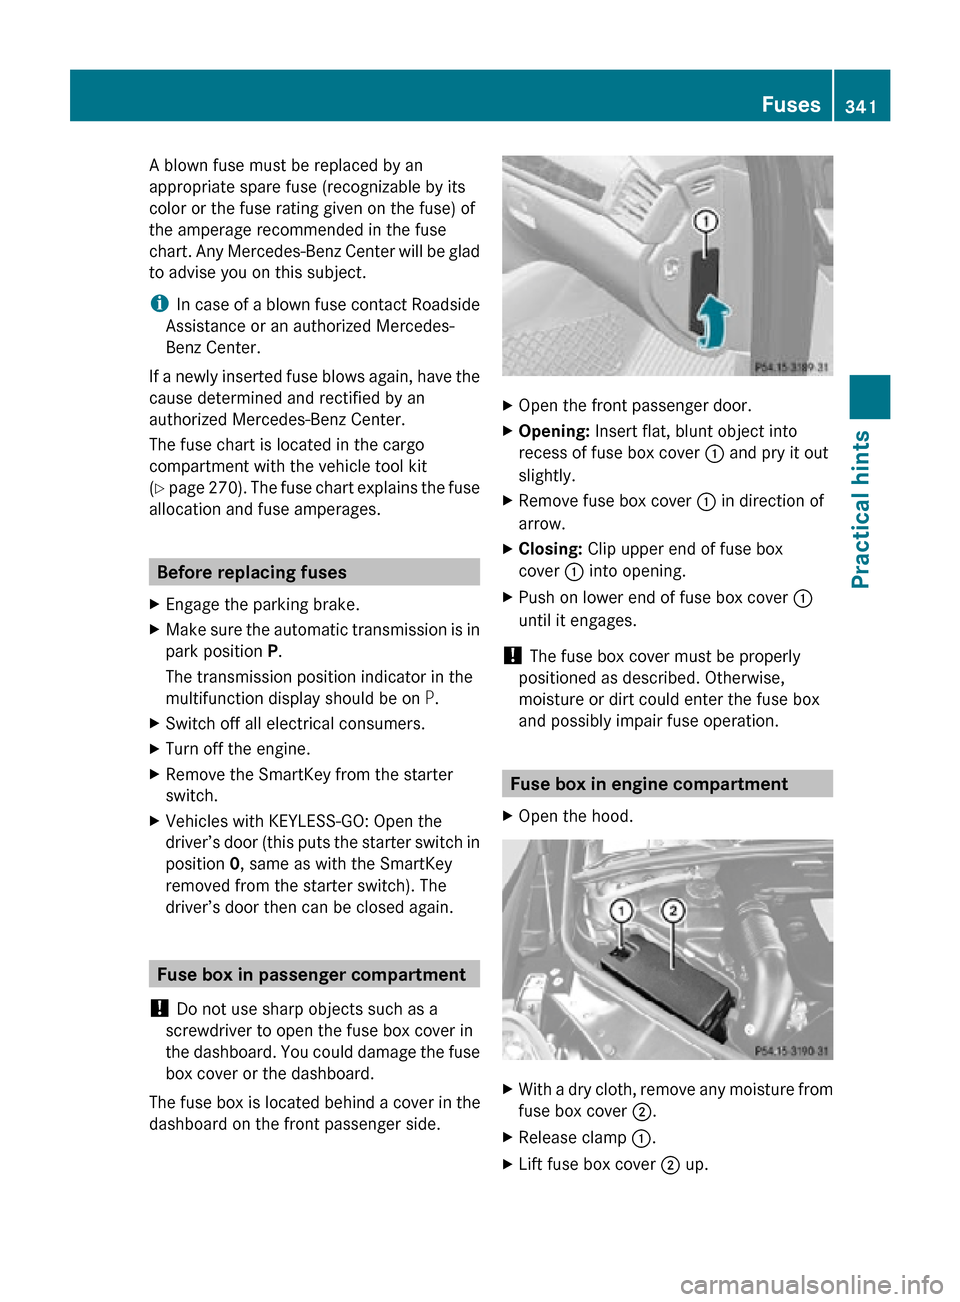
The fuse box is located behind a cover in the
dashboard on the front passenger side. X
Open the front passenger door.
X Opening: Insert flat, blunt object into
recess of fuse box cover : and pry it out
slightly.
X Remove fuse box cover : in direction of
arrow.
X Closing: Clip upper end of fuse box
cover : into opening.
X Push on lower end of fuse box cover :
until it engages.
! The fuse box cover must be properly
positioned as described. Otherwise,
moisture or dirt could enter the fuse box
and possibly impair fuse operation. Fuse box in engine compartment
X Open the hood. X
With a dry cloth, remove any moisture from
fuse box cover ;.
X Release clamp :.
X Lift fuse box cover ; up. Fuses
341Practical hints
251_AKB; 4; 52, en-US
d2ureepe, Version: 2.11.8.1 2009-03-23T09:22:52+01:00 - Seite 341 Z