2010 MERCEDES-BENZ R320 buttons
[x] Cancel search: buttonsPage 15 of 364

SmartKey with KEYLESS-GO
..........289
SRS ................................................ 287
Tailgate
.......................................... 288
Tail lamps ...................................... 297
Tele Aid .......................................... 287
Tire inflation pressure ............283, 298
Tire pressure monitor .................... 283
Tires ...................................... 283, 298
Trailer brake lamps ........................297
Trailer tail lamps ............................ 297
Trailer turn signal lamps ................297
Turn signals ................................... 298
Washer fluid ................................... 290
Multifunction steering wheel
Adjustment ...................................... 91
Buttons .......................................... 123
Cleaning ......................................... 267
Easy-entry/exit feature ...........92, 137
Gearshift control ............................ 121
Heating ............................................ 93
Memory function .............................. 96
Overview .......................................... 30N
Navigation menu ............................... 129
Navigation system see Separate operating instructions
NECK-PRO active front head
restraints ............................................. 53
Resetting ....................................... 310
Nets, parcel ....................................... 188
Night security illumination .............. 135
Normal occupant weight .................. 250
Number, vehicle identification
(VIN) ................................................... 345O
Occupant Classification System see
OCS (Occupant Classification
System)
Occupant distribution ....................... 250
Occupant safety Air bags ........................................... 37
BabySmart™ .................................... 45
Children and air bags ....................... 37
Children in the vehicle .....................55Child seat anchors – LATCH-type
....60
Fastening the seat belts ...................
49
Front passenger front air bag off
indicator lamp (Canada
only) ........................................ 45, 307
Front passenger front air bag off
indicator lamp (USA only) ........42, 307
Infant and child restraint systems .... 55
Introduction ..................................... 36
OCS (Occupant Classification
System) ........................................... 42
PRE-SAFE ®
....................................... 52
Seat belts .................................. 39, 47
OCS (Occupant Classification
System) ................................................ 42
Self-test ........................................... 45
Odometer ........................................... 125
Oil, oil level see Engine oil
On-board computer
see Control system
One-touch gearshifting .....................120
Operating safety .................................. 22
Ornamental moldings, cleaning .......265
Outside temperature see Displays
Overhead control panel ......................32 P
Paintwork, cleaning ..........................264
Paintwork code ................................. 345
Panic alarm .......................................... 62
Panorama roof with power tilt/
sliding panel ...................................... 184
Cleaning .........................................
266
Operation ....................................... 184
Roller sunblinds ............................. 184
Synchronizing ................................ 186
Parcel nets ......................................... 188
Parking ............................................... 114
Parktronic system ..........................156
Parking brake ............................ 114, 255
Messages in the multifunction
display ........................................... 286
Parking position
Exterior rear view mirrors ................ 95
Transmission position .................... 118 Index
13 251_AKB; 4; 52, en-US
d2ureepe,
Version: 2.11.8.1 2009-03-23T09:22:52+01:00 - Seite 13
Page 35 of 364
Function Page
H
Hands-free microphone for
Tele Aid (emergency call
system), telephone, and
Voice Control System, see
separate operating
instructions
I
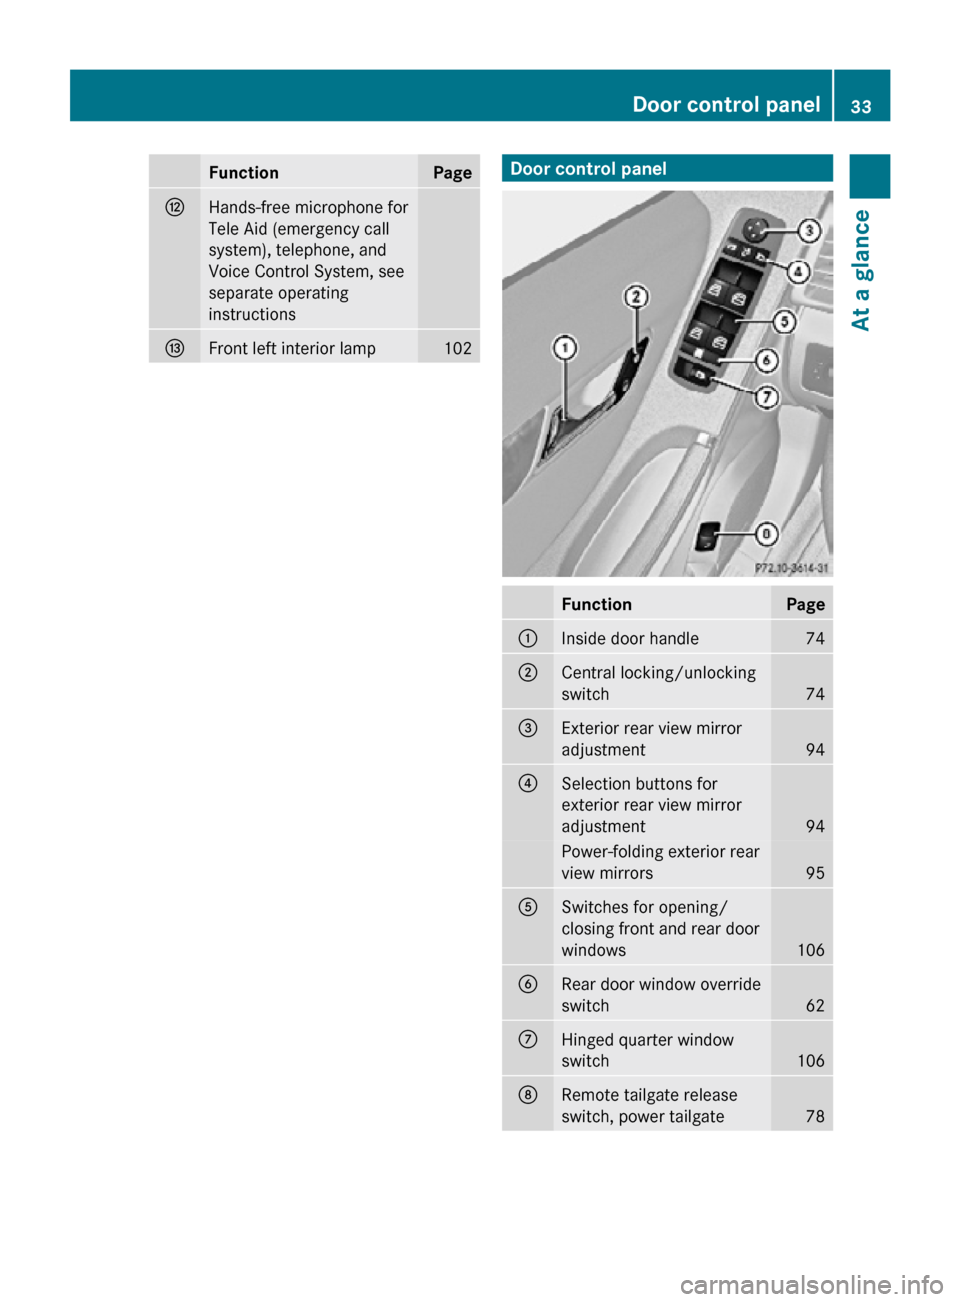
Front left interior lamp 102 Door control panel
Function Page
:
Inside door handle 74
;
Central locking/unlocking
switch
74
=
Exterior rear view mirror
adjustment
94
?
Selection buttons for
exterior rear view mirror
adjustment
94
Power-folding exterior rear
view mirrors
95
A
Switches for opening/
closing front and rear door
windows
106
B
Rear door window override
switch
62
C
Hinged quarter window
switch
106
D
Remote tailgate release
switch, power tailgate
78Door control panel
33At a glance
251_AKB; 4; 52, en-US
d2ureepe, Version: 2.11.8.1 2009-03-23T09:22:52+01:00 - Seite 33 Z
Page 73 of 364
i
Canada only:
This device complies with RSS-210 of
Industry Canada. Operation is subject to
the following two conditions:
1. This
device may not cause interference,
and
2. this device must accept any interference received, including
interference that may cause undesired
operation of the device.
Any unauthorized modification to this
device could void the user’s authority to
operate the equipment.
Factory setting X
Global unlocking: Press button %.
Unless you open a door or the tailgate within
approximately 40 seconds after unlocking
the vehicle:
R The vehicle will be locked again.
R The
antitheft alarm system will be rearmed.
X Global locking: Press button &.
Selective setting If you frequently travel alone, you may wish
to reprogramm the SmartKey. Pressing
button
%
will then only unlock the driver’s
door and the fuel filler flap.
X Switching on/off:
Press and hold buttons
% and & simultaneously for
approximately 6 seconds until the battery
check lamp (Y page 73) flashes twice.
The SmartKey will then function as follows:
X Unlocking driver’s door and fuel filler
flap: Press button % once.
X Global unlocking: Press button %
twice.
X Global locking: Press button &. KEYLESS-GO
Vehicles equipped with KEYLESS-GO come
with two SmartKeys with KEYLESS-GO, each
with remote control and a removable
mechanical key.
The KEYLESS-GO function is integrated into
the
SmartKey. The validity of the SmartKey is
checked every time you grasp an outside door
handle.
When the SmartKey is valid, your vehicle
unlocks
R the doors
R the fuel filler flap
R the tailgate
i USA only:
This device complies with Part 15 of the
FCC Rules. Operation is subject to the
following two conditions:
1. This device may not cause harmful interference, and
2. this device must accept any interference received, including
interference that may cause undesired
operation.
Any unauthorized modification to this
device could void the user’s authority to
operate the equipment.
i Canada only:
This device complies with RSS-210 of
Industry Canada. Operation is subject to
the following two conditions:
1. This device may not cause interference, and
2. this device must accept any interference received, including
interference that may cause undesired
operation of the device.
Any unauthorized modification to this
device could void the user’s authority to
operate the equipment. Locking and unlocking
71
Controls in detail
251_AKB; 4; 52, en-US
d2ureepe, Version: 2.11.8.1 2009-03-23T09:22:52+01:00 - Seite 71 Z
Page 75 of 364
Unless you open a door or the tailgate within
approximately 40 seconds after unlocking
the vehicle:
R
The vehicle will be locked again.
R The antitheft alarm system will be rearmed. X
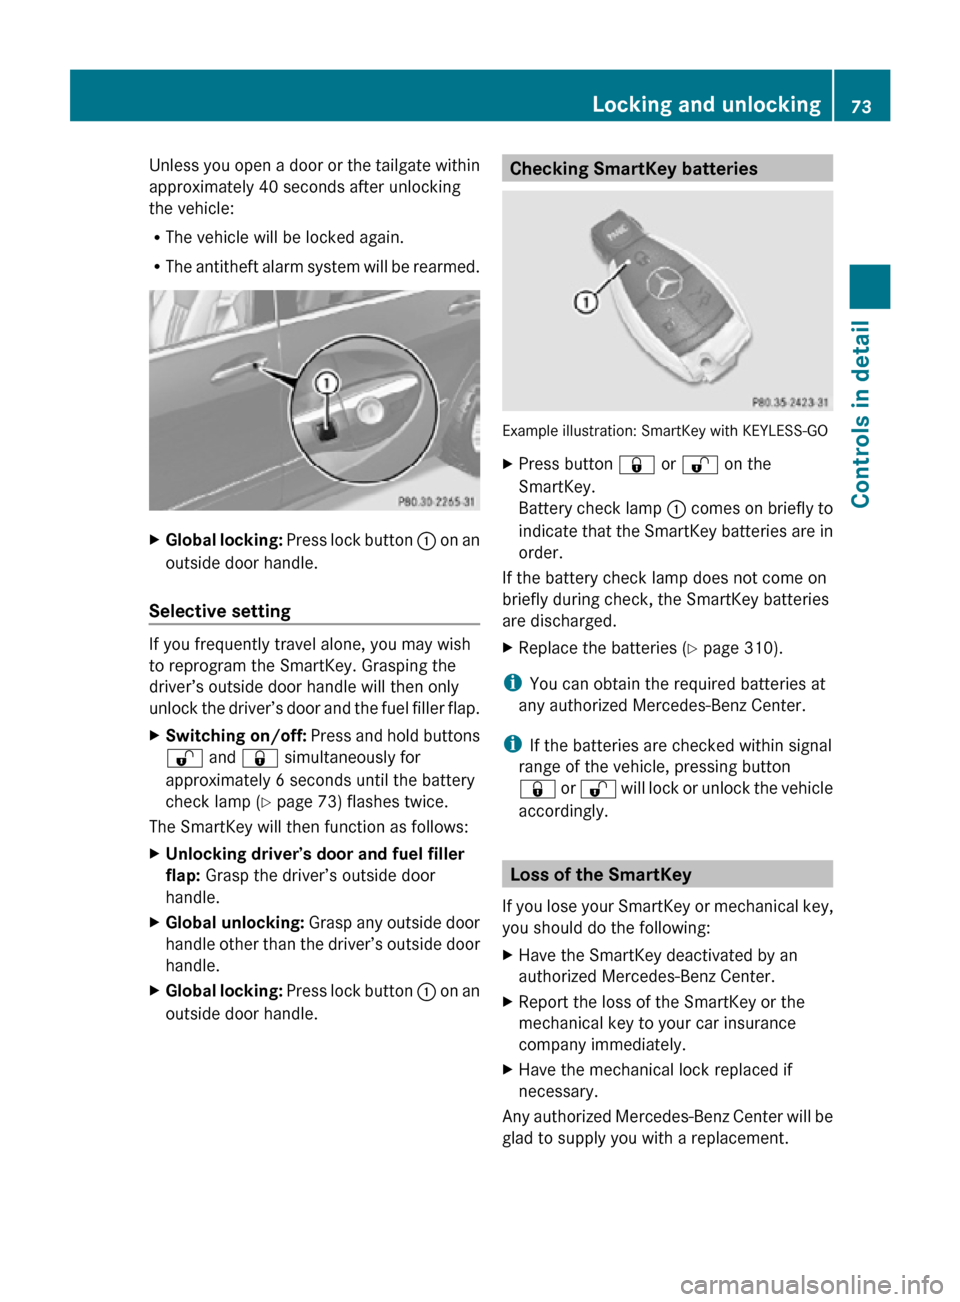
Global locking: Press lock button : on an
outside door handle.
Selective setting If you frequently travel alone, you may wish
to reprogram the SmartKey. Grasping the
driver’s outside door handle will then only
unlock the driver’s door and the fuel filler flap.
X
Switching on/off: Press and hold buttons
% and & simultaneously for
approximately 6 seconds until the battery
check lamp (Y page 73) flashes twice.
The SmartKey will then function as follows:
X Unlocking driver’s door and fuel filler
flap: Grasp the driver’s outside door
handle.
X Global unlocking: Grasp any outside door
handle other than the driver’s outside door
handle.
X Global locking: Press lock button : on an
outside door handle. Checking SmartKey batteries
Example illustration: SmartKey with KEYLESS-GO
X
Press button & or % on the
SmartKey.
Battery check lamp : comes on briefly to
indicate that the SmartKey batteries are in
order.
If the battery check lamp does not come on
briefly during check, the SmartKey batteries
are discharged.
X Replace the batteries ( Y page 310).
i You can obtain the required batteries at
any authorized Mercedes-Benz Center.
i If the batteries are checked within signal
range of the vehicle, pressing button
& or % will lock or unlock the vehicle
accordingly. Loss of the SmartKey
If you lose your SmartKey or mechanical key,
you should do the following:
X Have the SmartKey deactivated by an
authorized Mercedes-Benz Center.
X Report the loss of the SmartKey or the
mechanical key to your car insurance
company immediately.
X Have the mechanical lock replaced if
necessary.
Any authorized Mercedes-Benz Center will be
glad to supply you with a replacement. Locking and unlocking
73Controls in detail
251_AKB; 4; 52, en-US
d2ureepe, Version: 2.11.8.1 2009-03-23T09:22:52+01:00 - Seite 73 Z
Page 94 of 364
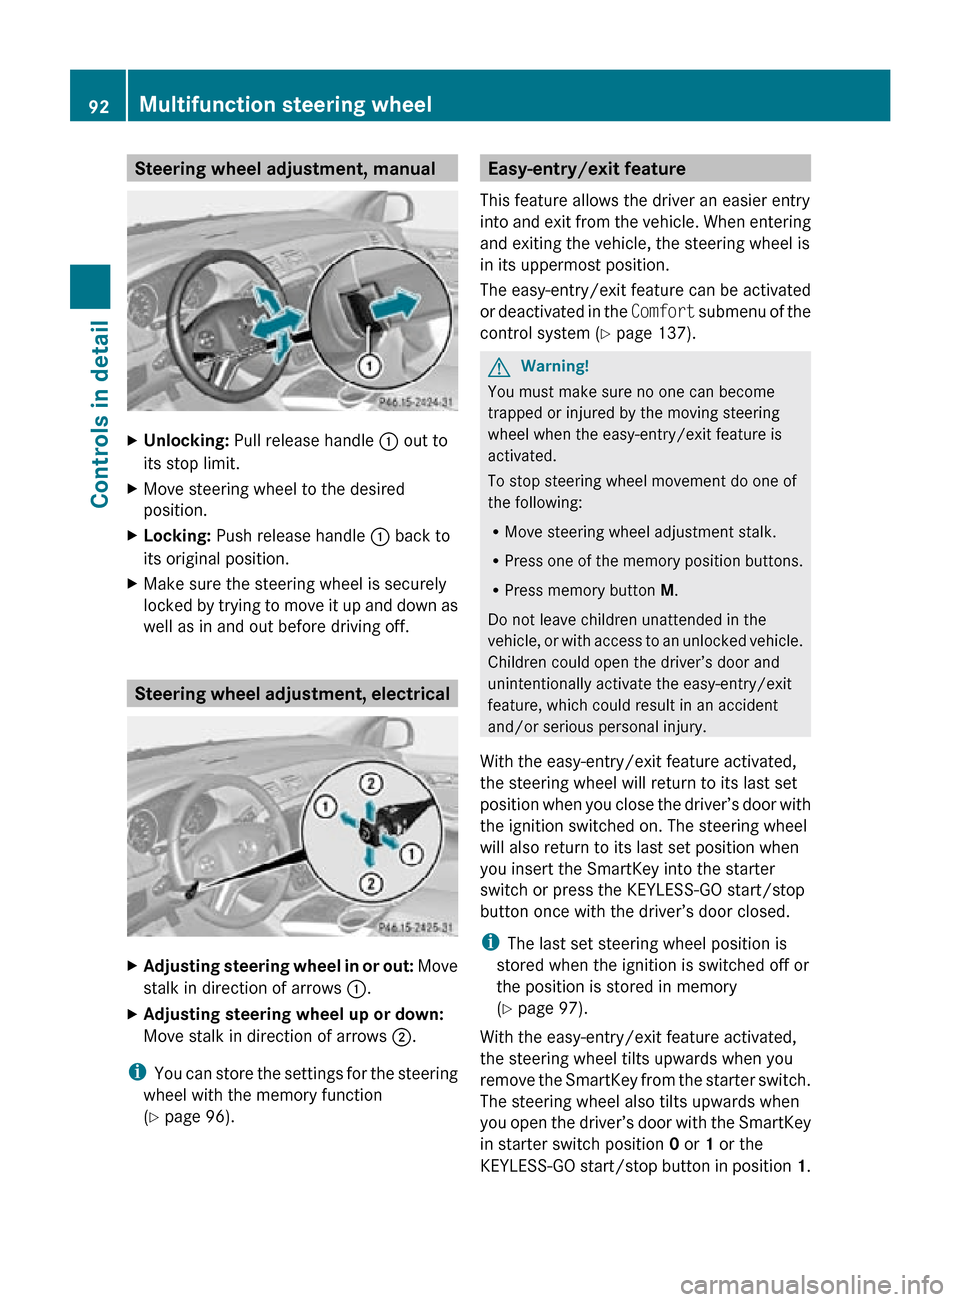
Steering wheel adjustment, manual
X
Unlocking: Pull release handle : out to
its stop limit.
X Move steering wheel to the desired
position.
X Locking: Push release handle : back to
its original position.
X Make sure the steering wheel is securely
locked by trying to move it up and down as
well as in and out before driving off. Steering wheel adjustment, electrical
X
Adjusting steering wheel in or out: Move
stalk in direction of arrows :.
X Adjusting steering wheel up or down:
Move stalk in direction of arrows ;.
i You can store the settings for the steering
wheel with the memory function
(Y page 96). Easy-entry/exit feature
This feature allows the driver an easier entry
into and exit from the vehicle. When entering
and exiting the vehicle, the steering wheel is
in its uppermost position.
The easy-entry/exit feature can be activated
or deactivated in the Comfort submenu of the
control system ( Y page 137). G
Warning!
You must make sure no one can become
trapped or injured by the moving steering
wheel when the easy-entry/exit feature is
activated.
To stop steering wheel movement do one of
the following:
R Move steering wheel adjustment stalk.
R Press one of the memory position buttons.
R Press memory button M.
Do not leave children unattended in the
vehicle, or with access to an unlocked vehicle.
Children could open the driver’s door and
unintentionally activate the easy-entry/exit
feature, which could result in an accident
and/or serious personal injury.
With the easy-entry/exit feature activated,
the steering wheel will return to its last set
position when you close the driver’s door with
the ignition switched on. The steering wheel
will also return to its last set position when
you insert the SmartKey into the starter
switch or press the KEYLESS-GO start/stop
button once with the driver’s door closed.
i The last set steering wheel position is
stored when the ignition is switched off or
the position is stored in memory
(Y page 97).
With the easy-entry/exit feature activated,
the steering wheel tilts upwards when you
remove the SmartKey from the starter switch.
The steering wheel also tilts upwards when
you open the driver’s door with the SmartKey
in starter switch position 0 or 1 or the
KEYLESS-GO start/stop button in position 1.92
Multifunction steering wheelControls in detail
251_AKB; 4; 52, en-US
d2ureepe,
Version: 2.11.8.1 2009-03-23T09:22:52+01:00 - Seite 92
Page 104 of 364
Driving in reverse: The front fog lamp
opposite to your steering direction comes
on.
The corner-illuminating front fog lamps will
come on automatically depending on the
steering angle, even if you did not switch on
either turn signal. If the corner-illuminating
front fog lamps came on automatically, they
will also go out automatically depending on
the steering angle and vehicle speed.
The corner-illuminating front fog lamps
temporarily come on on both sides of the
vehicle if you turn the steering wheel in one
direction and then again in the other direction
shortly thereafter.
The corner-illuminating front fog lamp
remains lit for a short time only. It then goes
out automatically.
Switching off X
Switch off the left or right turn signal.
or
X Steer straight ahead.
i There may be a brief delay before the
corner-illuminating front fog lamps go out. Interior lighting in the front
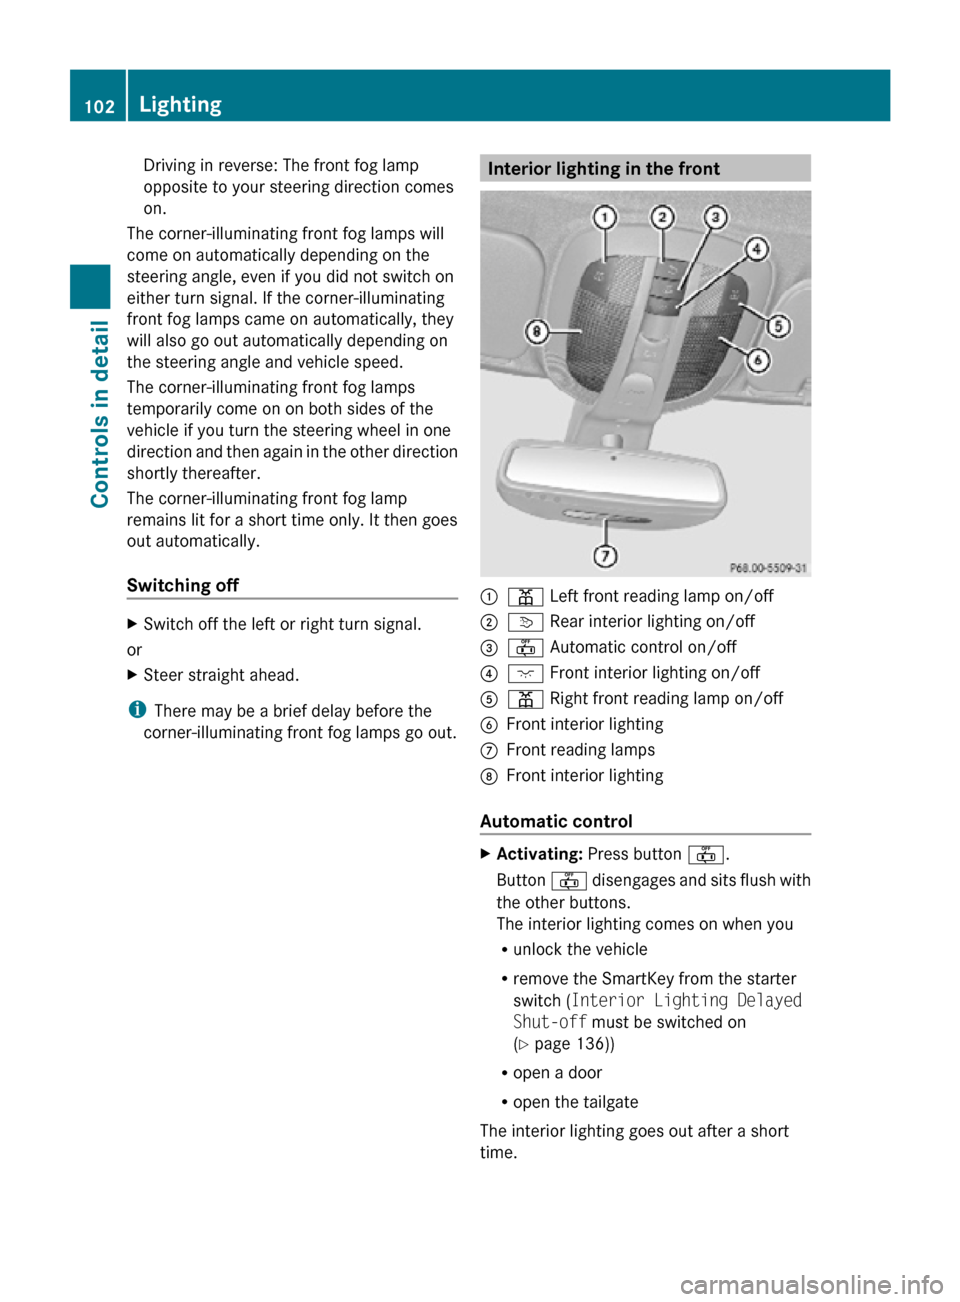
:
p Left front reading lamp on/off
; v Rear interior lighting on/off
= ~ Automatic control on/off
? c Front interior lighting on/off
A p Right front reading lamp on/off
B Front interior lighting
C Front reading lamps
D Front interior lighting
Automatic control X
Activating: Press button ~.
Button ~ disengages and sits flush with
the other buttons.
The interior lighting comes on when you
R unlock the vehicle
R remove the SmartKey from the starter
switch ( Interior Lighting Delayed
Shut-off must be switched on
(Y page 136))
R open a door
R open the tailgate
The interior lighting goes out after a short
time. 102
LightingControls in detail
251_AKB; 4; 52, en-US
d2ureepe,
Version: 2.11.8.1 2009-03-23T09:22:52+01:00 - Seite 102
Page 125 of 364
Adjusting the instrument cluster
illumination
X To brighten illumination: Press and hold
button = until the desired level of
illumination is reached.
X To dim illumination: Press and hold
button : until the desired level of
illumination is reached.
i The instrument cluster illumination is
dimmed
or brightened automatically to suit
ambient light conditions.
The instrument cluster illumination will also
be adjusted automatically when you switch
on the vehicle’s exterior lamps.
i With the exterior lighting switched on, the
brightness of the switches in the center
console will also be adjusted when using
button : or =. Resetting trip odometer
X Make sure you are viewing the standard
display
(Y page 126) in the multifunction
display.
X Press and hold the reset button in the
instrument cluster
(Y page 122) until the
trip odometer is reset. Tachometer
The red marking on the tachometer
(Y
page 29) denotes excessive engine speed.
! Avoid driving at excessive engine speeds,
as it may result in serious engine damage
that is not covered by the Mercedes-Benz
Limited Warranty.
To help protect the engine, the fuel supply is
interrupted if the engine is operated within
the red marking. Control system
Introduction
The
control system is activated as soon as the
starter switch is in position 1 (Y page 79).
The control system enables you to call up
information about your vehicle and to change
vehicle settings.
For example, you can use the control system
to find out when your vehicle is next due for
maintenance service, to set the language for
messages in the instrument cluster display,
and much more. G
Warning!
A driver’s attention to the road and traffic
conditions must always be his/her primary
focus when driving.
For your safety and the safety of others,
selecting features through the multifunction
steering wheel should only be done by the
driver
when traffic and road conditions permit
it to be done safely.
Bear in mind that at a speed of just 30 mph
(approximately 50 km/h), your vehicle is
covering a distance of 44 feet (approximately
14 m) every second.
The control system relays information to the
multifunction display. Multifunction steering wheel
The displays in the multifunction display and
the settings in the control system are
controlled by using the buttons on the
multifunction steering wheel. Control system
123Controls in detail
251_AKB; 4; 52, en-US
d2ureepe, Version: 2.11.8.1 2009-03-23T09:22:52+01:00 - Seite 123 Z
Page 126 of 364
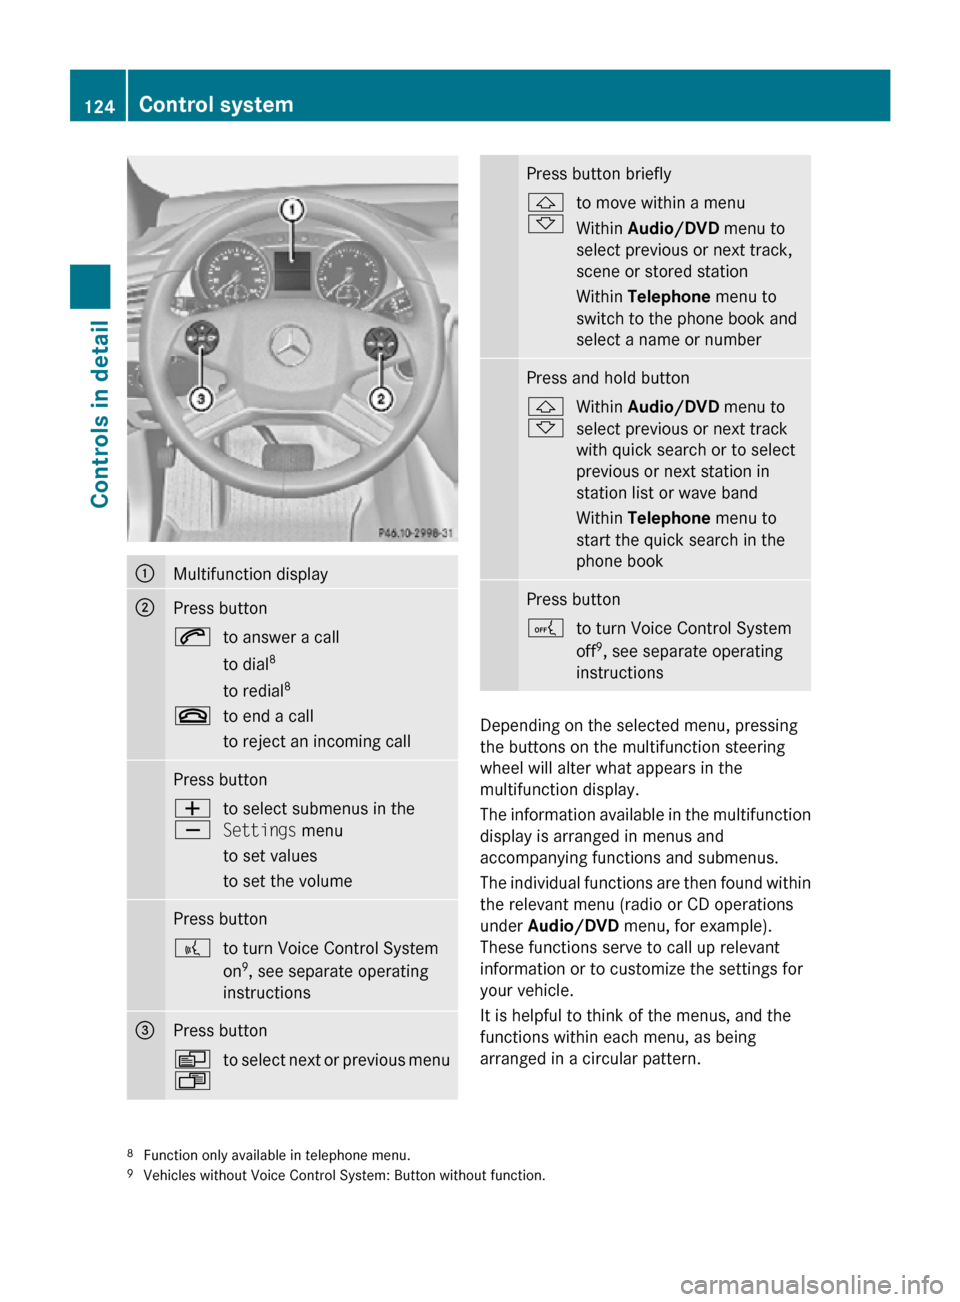
:
Multifunction display
;
Press button
6
to answer a call
to dial8
to redial 8
~ to end a call
to reject an incoming call Press button
W
X
to select submenus in the
Settings menu
to set values
to set the volume Press button
?
to turn Voice Control System
on9
, see separate operating
instructions =
Press button
V
U
to select next or previous menu Press button briefly
&
*
to move within a menu
Within Audio/DVD
menu to
select previous or next track,
scene or stored station
Within Telephone menu to
switch to the phone book and
select a name or number Press and hold button
&
*
Within Audio/DVD
menu to
select previous or next track
with quick search or to select
previous or next station in
station list or wave band
Within Telephone menu to
start the quick search in the
phone book Press button
A
to turn Voice Control System
off9
, see separate operating
instructions Depending on the selected menu, pressing
the buttons on the multifunction steering
wheel will alter what appears in the
multifunction display.
The information available in the multifunction
display is arranged in menus and
accompanying functions and submenus.
The individual functions are then found within
the relevant menu (radio or CD operations
under Audio/DVD
menu, for example).
These functions serve to call up relevant
information or to customize the settings for
your vehicle.
It is helpful to think of the menus, and the
functions within each menu, as being
arranged in a circular pattern.
8 Function only available in telephone menu.
9 Vehicles without Voice Control System: Button without function. 124
Control systemControls in detail
251_AKB; 4; 52, en-US
d2ureepe,
Version: 2.11.8.1 2009-03-23T09:22:52+01:00 - Seite 124