2010 MERCEDES-BENZ GLK350 4MATIC stop start
[x] Cancel search: stop startPage 287 of 344
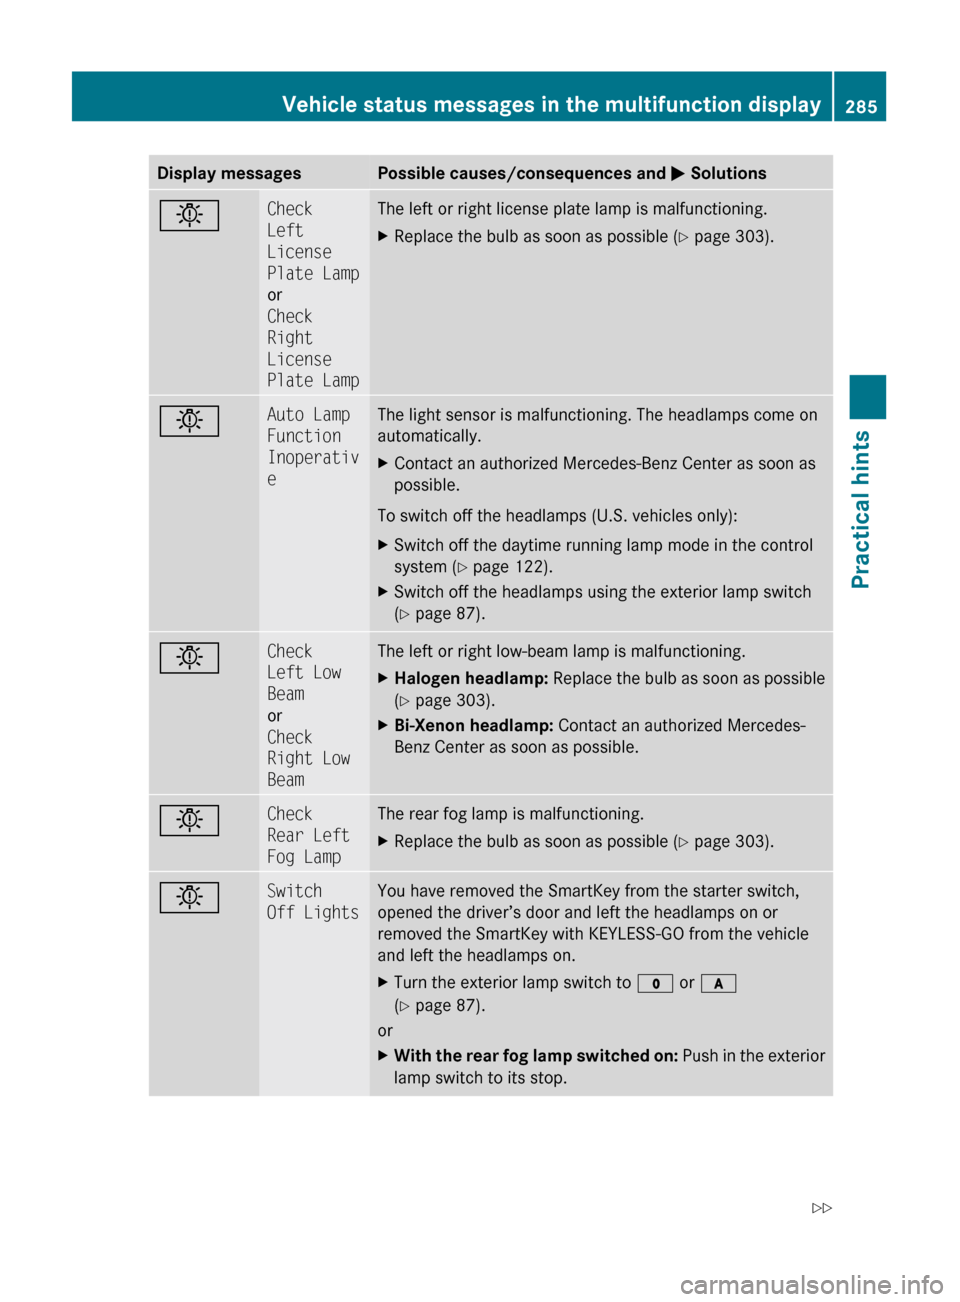
Display messagesPossible causes/consequences and M SolutionsbCheck
Left
License
Plate Lamp
or
Check
Right
License
Plate LampThe left or right license plate lamp is malfunctioning.XReplace the bulb as soon as possible ( Y page 303).bAuto Lamp
Function
Inoperativ
eThe light sensor is malfunctioning. The headlamps come on
automatically.XContact an authorized Mercedes-Benz Center as soon as
possible.
To switch off the headlamps (U.S. vehicles only):
XSwitch off the daytime running lamp mode in the control
system ( Y page 122).XSwitch off the headlamps using the exterior lamp switch
( Y page 87).bCheck
Left Low
Beam
or
Check
Right Low
BeamThe left or right low-beam lamp is malfunctioning.XHalogen headlamp: Replace the bulb as soon as possible
( Y page 303).XBi-Xenon headlamp: Contact an authorized Mercedes-
Benz Center as soon as possible.bCheck
Rear Left
Fog LampThe rear fog lamp is malfunctioning.XReplace the bulb as soon as possible ( Y page 303).bSwitch
Off LightsYou have removed the SmartKey from the starter switch,
opened the driver’s door and left the headlamps on or
removed the SmartKey with KEYLESS-GO from the vehicle
and left the headlamps on.XTurn the exterior lamp switch to $ or c
( Y page 87).
or
XWith the rear fog lamp switched on: Push in the exterior
lamp switch to its stop.Vehicle status messages in the multifunction display285Practical hintsX204_AKB; 3; 23, en-USd2ureepe,Version: 2.11.8.12009-07-16T19:16:58+02:00 - Seite 285Z
Page 294 of 344
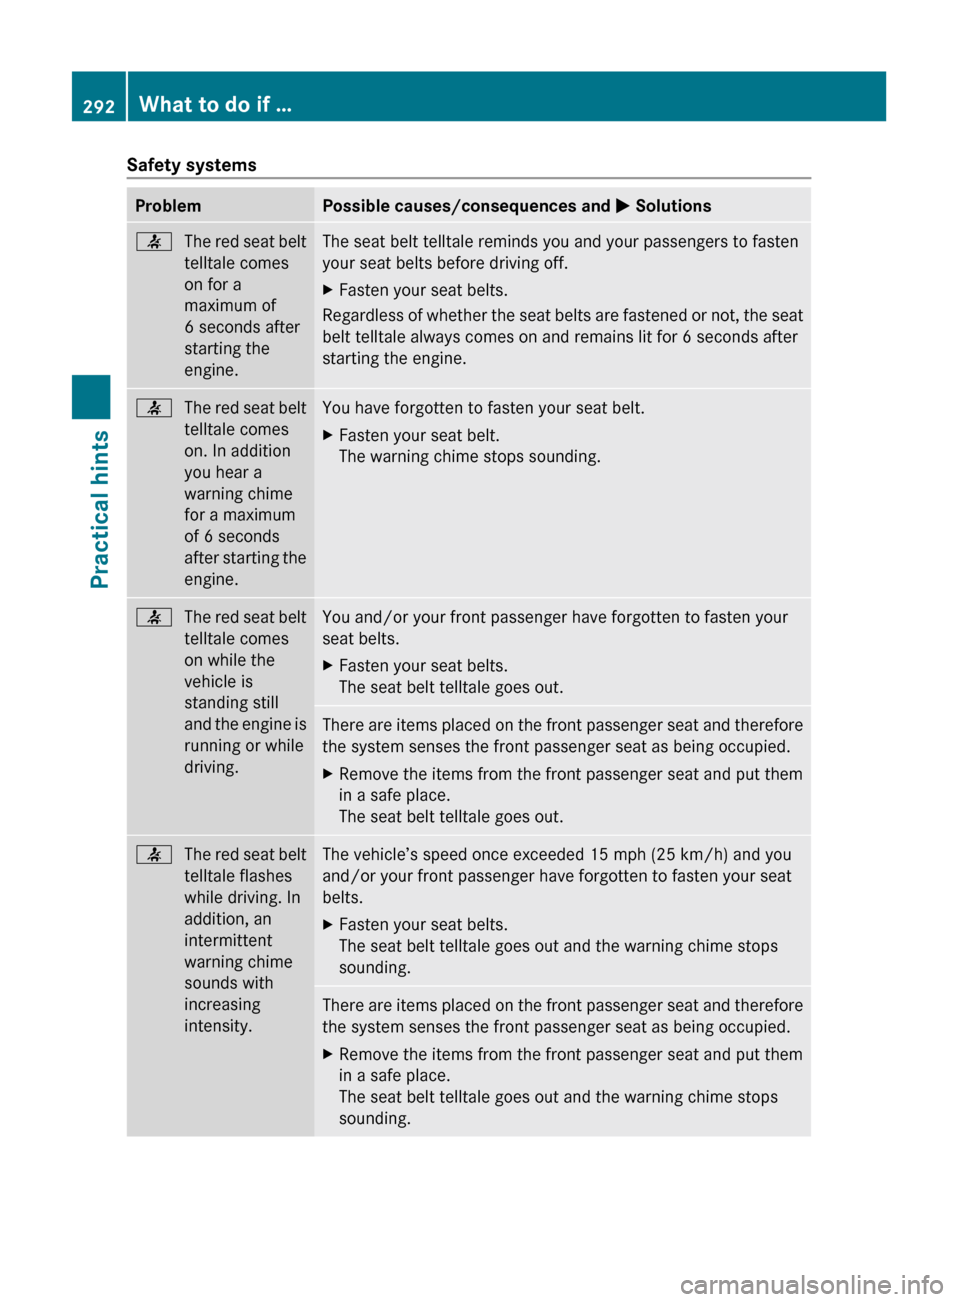
Safety systemsProblemPossible causes/consequences and M Solutions7The red seat belt
telltale comes
on for a
maximum of
6 seconds after
starting the
engine.The seat belt telltale reminds you and your passengers to fasten
your seat belts before driving off.XFasten your seat belts.
Regardless of whether the seat belts are fastened or not, the seat
belt telltale always comes on and remains lit for 6 seconds after
starting the engine.
7The red seat belt
telltale comes
on. In addition
you hear a
warning chime
for a maximum
of 6 seconds
after starting the
engine.You have forgotten to fasten your seat belt.XFasten your seat belt.
The warning chime stops sounding.7The red seat belt
telltale comes
on while the
vehicle is
standing still
and the engine is
running or while
driving.You and/or your front passenger have forgotten to fasten your
seat belts.XFasten your seat belts.
The seat belt telltale goes out.There are items placed on the front passenger seat and therefore
the system senses the front passenger seat as being occupied.XRemove the items from the front passenger seat and put them
in a safe place.
The seat belt telltale goes out.7The red seat belt
telltale flashes
while driving. In
addition, an
intermittent
warning chime
sounds with
increasing
intensity.The vehicle’s speed once exceeded 15 mph (25 km/h) and you
and/or your front passenger have forgotten to fasten your seat
belts.XFasten your seat belts.
The seat belt telltale goes out and the warning chime stops
sounding.There are items placed on the front passenger seat and therefore
the system senses the front passenger seat as being occupied.XRemove the items from the front passenger seat and put them
in a safe place.
The seat belt telltale goes out and the warning chime stops
sounding.292What to do if …Practical hints
X204_AKB; 3; 23, en-USd2ureepe,Version: 2.11.8.12009-07-16T19:16:58+02:00 - Seite 292
Page 295 of 344
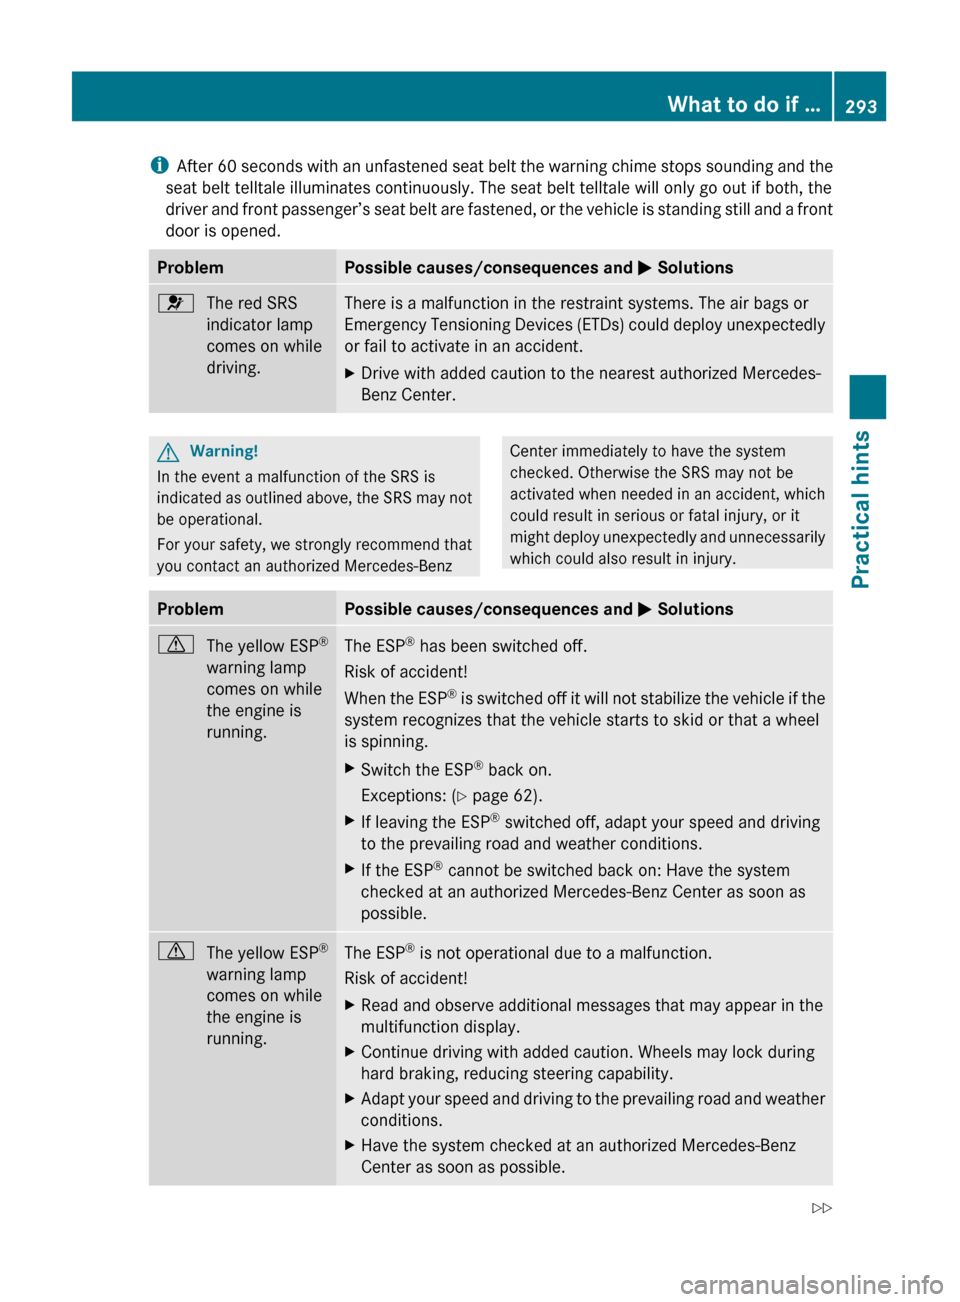
iAfter 60 seconds with an unfastened seat belt the warning chime stops sounding and the
seat belt telltale illuminates continuously. The seat belt telltale will only go out if both, the
driver and front passenger’s seat belt are fastened, or the vehicle is standing still and a front
door is opened.ProblemPossible causes/consequences and M Solutions6The red SRS
indicator lamp
comes on while
driving.There is a malfunction in the restraint systems. The air bags or
Emergency Tensioning Devices (ETDs) could deploy unexpectedly
or fail to activate in an accident.XDrive with added caution to the nearest authorized Mercedes-
Benz Center.GWarning!
In the event a malfunction of the SRS is
indicated as outlined above, the SRS may not
be operational.
For your safety, we strongly recommend that
you contact an authorized Mercedes-Benz
Center immediately to have the system
checked. Otherwise the SRS may not be
activated when needed in an accident, which
could result in serious or fatal injury, or it
might deploy unexpectedly and unnecessarily
which could also result in injury.ProblemPossible causes/consequences and M SolutionsdThe yellow ESP ®
warning lamp
comes on while
the engine is
running.The ESP ®
has been switched off.
Risk of accident!
When the ESP ®
is switched off it will not stabilize the vehicle if the
system recognizes that the vehicle starts to skid or that a wheel
is spinning.XSwitch the ESP ®
back on.
Exceptions: ( Y page 62).XIf leaving the ESP ®
switched off, adapt your speed and driving
to the prevailing road and weather conditions.XIf the ESP ®
cannot be switched back on: Have the system
checked at an authorized Mercedes-Benz Center as soon as
possible.dThe yellow ESP ®
warning lamp
comes on while
the engine is
running.The ESP ®
is not operational due to a malfunction.
Risk of accident!XRead and observe additional messages that may appear in the
multifunction display.XContinue driving with added caution. Wheels may lock during
hard braking, reducing steering capability.XAdapt your speed and driving to the prevailing road and weather
conditions.XHave the system checked at an authorized Mercedes-Benz
Center as soon as possible.What to do if …293Practical hintsX204_AKB; 3; 23, en-USd2ureepe,Version: 2.11.8.12009-07-16T19:16:58+02:00 - Seite 293Z
Page 299 of 344
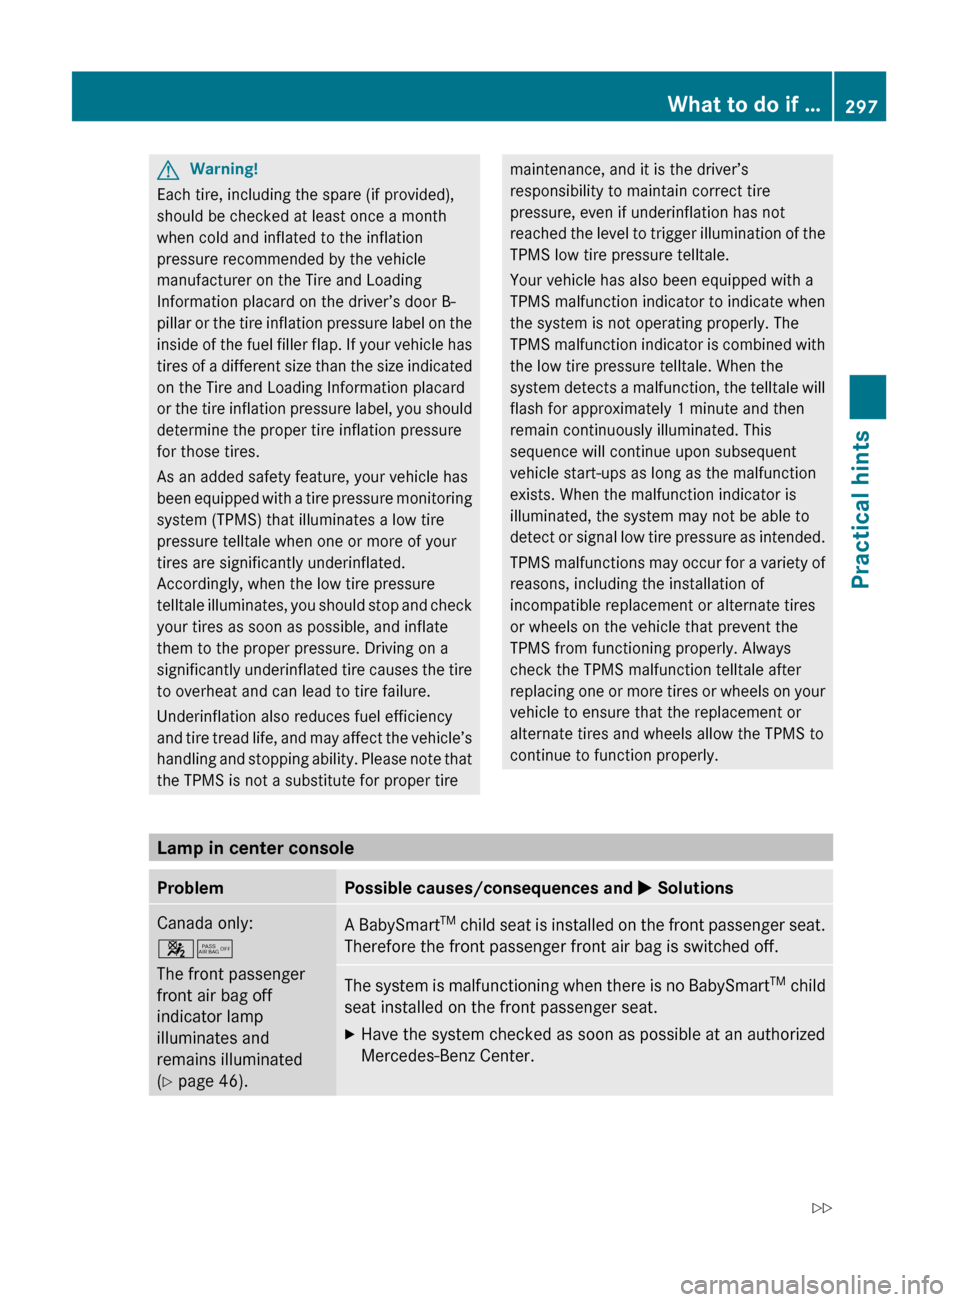
GWarning!
Each tire, including the spare (if provided),
should be checked at least once a month
when cold and inflated to the inflation
pressure recommended by the vehicle
manufacturer on the Tire and Loading
Information placard on the driver’s door B-
pillar or the tire inflation pressure label on the
inside of the fuel filler flap. If your vehicle has
tires of a different size than the size indicated
on the Tire and Loading Information placard
or the tire inflation pressure label, you should
determine the proper tire inflation pressure
for those tires.
As an added safety feature, your vehicle has
been equipped with a tire pressure monitoring
system (TPMS) that illuminates a low tire
pressure telltale when one or more of your
tires are significantly underinflated.
Accordingly, when the low tire pressure
telltale illuminates, you should stop and check
your tires as soon as possible, and inflate
them to the proper pressure. Driving on a
significantly underinflated tire causes the tire
to overheat and can lead to tire failure.
Underinflation also reduces fuel efficiency
and tire tread life, and may affect the vehicle’s
handling and stopping ability. Please note that
the TPMS is not a substitute for proper tire
maintenance, and it is the driver’s
responsibility to maintain correct tire
pressure, even if underinflation has not
reached the level to trigger illumination of the
TPMS low tire pressure telltale.
Your vehicle has also been equipped with a
TPMS malfunction indicator to indicate when
the system is not operating properly. The
TPMS malfunction indicator is combined with
the low tire pressure telltale. When the
system detects a malfunction, the telltale will
flash for approximately 1 minute and then
remain continuously illuminated. This
sequence will continue upon subsequent
vehicle start-ups as long as the malfunction
exists. When the malfunction indicator is
illuminated, the system may not be able to
detect or signal low tire pressure as intended.
TPMS malfunctions may occur for a variety of
reasons, including the installation of
incompatible replacement or alternate tires
or wheels on the vehicle that prevent the
TPMS from functioning properly. Always
check the TPMS malfunction telltale after
replacing one or more tires or wheels on your
vehicle to ensure that the replacement or
alternate tires and wheels allow the TPMS to
continue to function properly.
Lamp in center console
ProblemPossible causes/consequences and M SolutionsCanada only:
45
The front passenger
front air bag off
indicator lamp
illuminates and
remains illuminated
( Y page 46).A BabySmart TM
child seat is installed on the front passenger seat.
Therefore the front passenger front air bag is switched off.The system is malfunctioning when there is no BabySmart TM
child
seat installed on the front passenger seat.XHave the system checked as soon as possible at an authorized
Mercedes-Benz Center.What to do if …297Practical hintsX204_AKB; 3; 23, en-USd2ureepe,Version: 2.11.8.12009-07-16T19:16:58+02:00 - Seite 297Z
Page 302 of 344
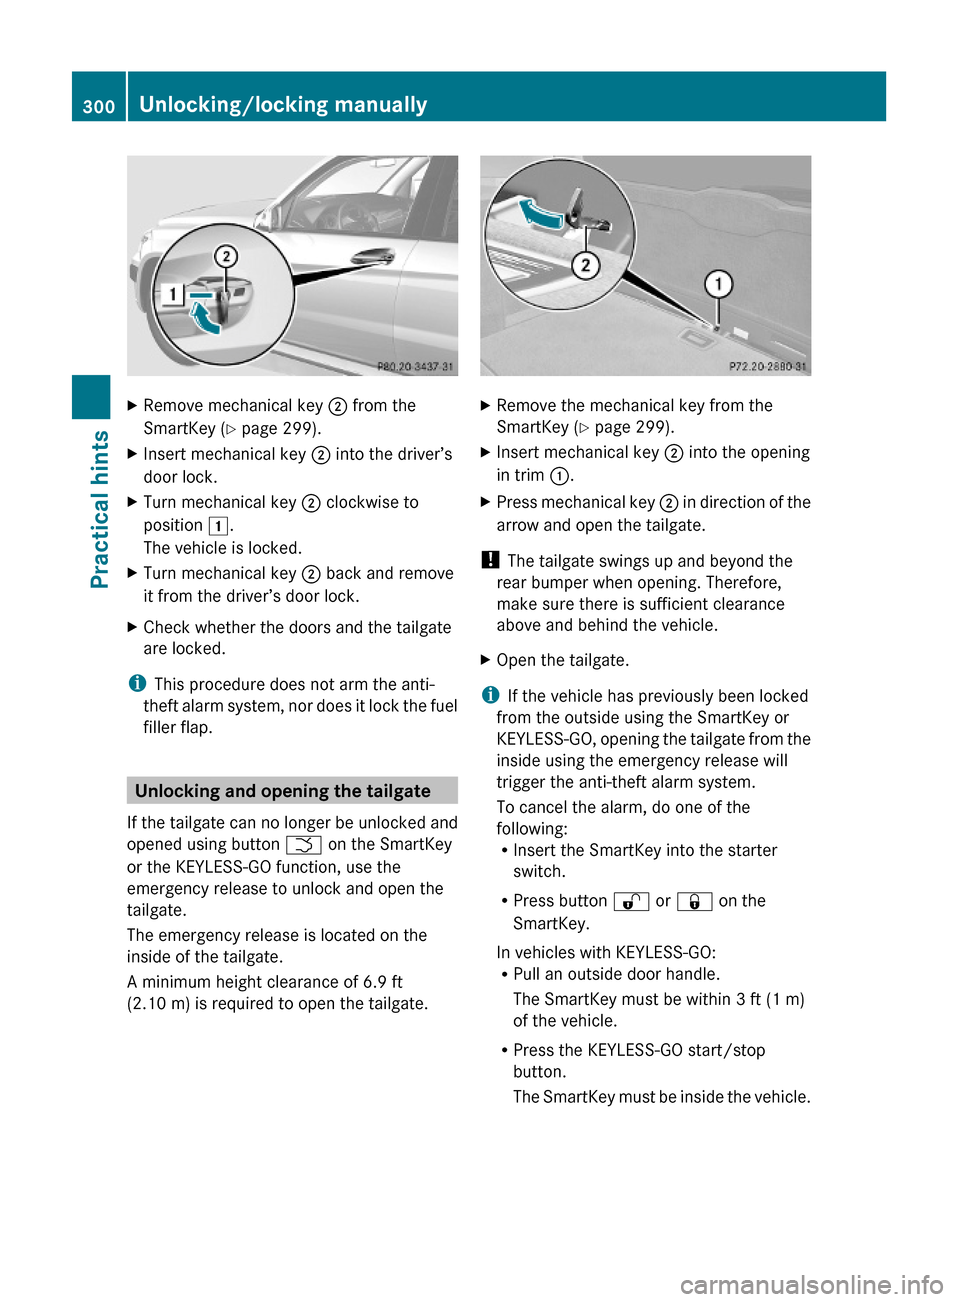
XRemove mechanical key ; from the
SmartKey (Y page 299).
XInsert mechanical key ; into the driver’s
door lock.
XTurn mechanical key ; clockwise to
position 1.
The vehicle is locked.
XTurn mechanical key ; back and remove
it from the driver’s door lock.
XCheck whether the doors and the tailgate
are locked.
iThis procedure does not arm the anti-
theft alarm system, nor does it lock the fuel
filler flap.
Unlocking and opening the tailgate
If the tailgate can no longer be unlocked and
opened using button F on the SmartKey
or the KEYLESS-GO function, use the
emergency release to unlock and open the
tailgate.
The emergency release is located on the
inside of the tailgate.
A minimum height clearance of 6.9 ft
(2.10 m) is required to open the tailgate.
XRemove the mechanical key from the
SmartKey (Y page 299).
XInsert mechanical key ; into the opening
in trim :.
XPress mechanical key ; in direction of the
arrow and open the tailgate.
! The tailgate swings up and beyond the
rear bumper when opening. Therefore,
make sure there is sufficient clearance
above and behind the vehicle.
XOpen the tailgate.
iIf the vehicle has previously been locked
from the outside using the SmartKey or
KEYLESS-GO, opening the tailgate from the
inside using the emergency release will
trigger the anti-theft alarm system.
To cancel the alarm, do one of the
following:RInsert the SmartKey into the starter
switch.
RPress button % or & on the
SmartKey.
In vehicles with KEYLESS-GO:RPull an outside door handle.
The SmartKey must be within 3 ft (1 m)
of the vehicle.
RPress the KEYLESS-GO start/stop
button.
The SmartKey must be inside the vehicle.
300Unlocking/locking manuallyPractical hints
X204_AKB; 3; 23, en-USd2ureepe,Version: 2.11.8.12009-07-16T19:16:58+02:00 - Seite 300
Page 318 of 344
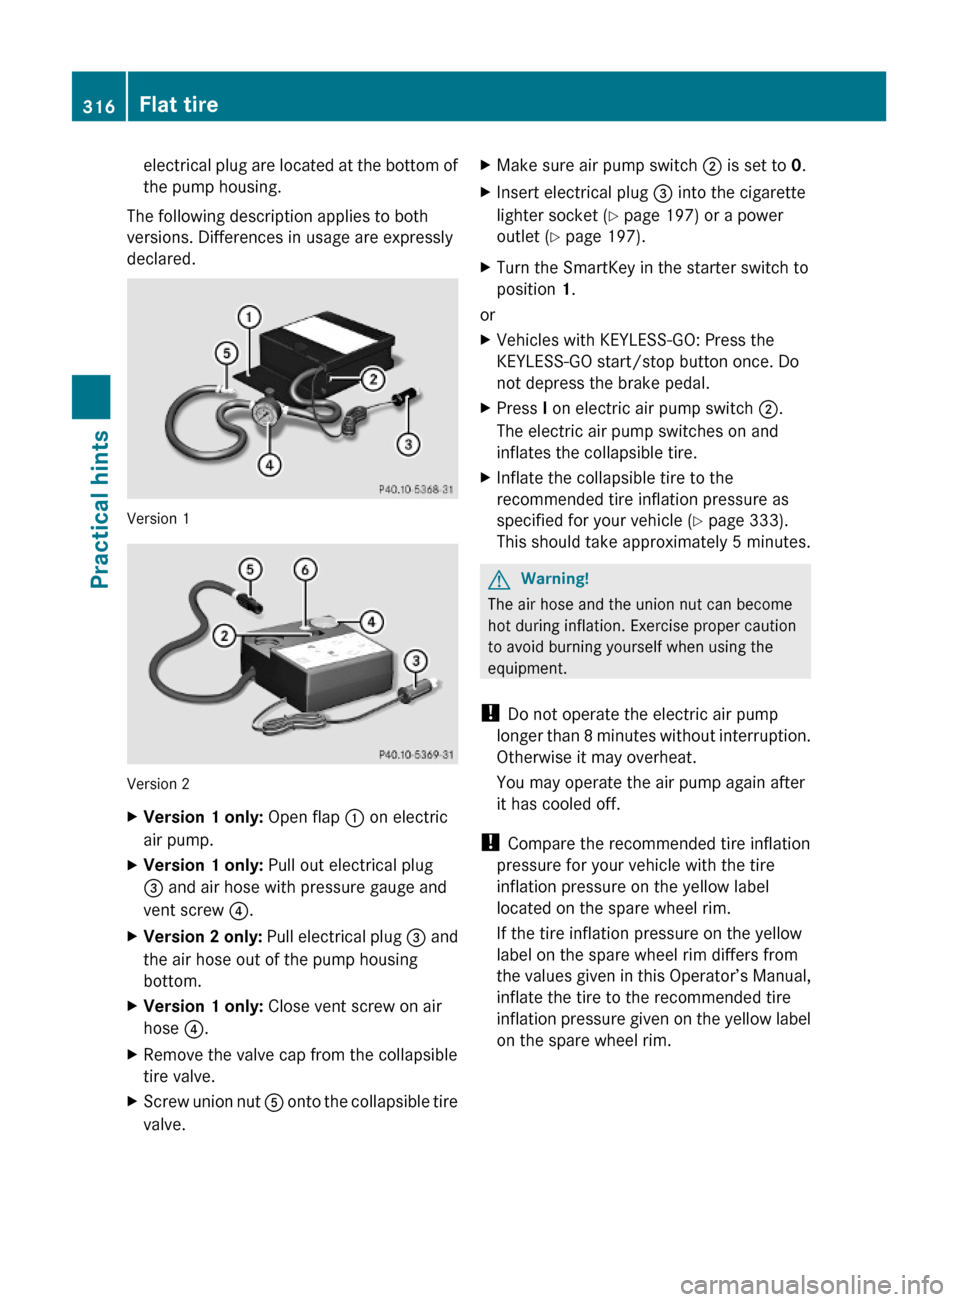
electrical plug are located at the bottom of
the pump housing.
The following description applies to both
versions. Differences in usage are expressly
declared.
Version 1
Version 2
XVersion 1 only: Open flap : on electric
air pump.
XVersion 1 only: Pull out electrical plug
= and air hose with pressure gauge and
vent screw ?.
XVersion 2 only: Pull electrical plug = and
the air hose out of the pump housing
bottom.
XVersion 1 only: Close vent screw on air
hose ?.
XRemove the valve cap from the collapsible
tire valve.
XScrew union nut A onto the collapsible tire
valve.
XMake sure air pump switch ; is set to 0.XInsert electrical plug = into the cigarette
lighter socket (Y page 197) or a power
outlet (Y page 197).
XTurn the SmartKey in the starter switch to
position 1.
or
XVehicles with KEYLESS-GO: Press the
KEYLESS-GO start/stop button once. Do
not depress the brake pedal.
XPress I on electric air pump switch ;.
The electric air pump switches on and
inflates the collapsible tire.
XInflate the collapsible tire to the
recommended tire inflation pressure as
specified for your vehicle (Y page 333).
This should take approximately 5 minutes.
GWarning!
The air hose and the union nut can become
hot during inflation. Exercise proper caution
to avoid burning yourself when using the
equipment.
! Do not operate the electric air pump
longer than 8 minutes without interruption.
Otherwise it may overheat.
You may operate the air pump again after
it has cooled off.
! Compare the recommended tire inflation
pressure for your vehicle with the tire
inflation pressure on the yellow label
located on the spare wheel rim.
If the tire inflation pressure on the yellow
label on the spare wheel rim differs from
the values given in this Operator’s Manual,
inflate the tire to the recommended tire
inflation pressure given on the yellow label
on the spare wheel rim.
316Flat tirePractical hints
X204_AKB; 3; 23, en-USd2ureepe,Version: 2.11.8.12009-07-16T19:16:58+02:00 - Seite 316
Page 319 of 344
XPress 0 on electric air pump switch ;.XTurn the SmartKey in the starter switch to
position 0.
or
XVehicles with KEYLESS-GO: Press the
KEYLESS-GO start/stop button twice. Do
not depress the brake pedal.
XVersion 1 only: If the tire inflation pressure
is above the recommended tire inflation
pressure as specified for your vehicle
(Y page 333), decrease tire pressure using
the vent screw on air hose ?.
XVersion 2 only: If the tire inflation pressure
is above the recommended tire inflation
pressure as specified for your vehicle
(Y page 333), decrease tire pressure using
deflate button B.
GObserve Safety notes, see page 221.XDetach the electric air pump.XReinstall collapsible tire valve cap.XVersion 1 only: Store electrical plug =
and air hose ? behind flap :.
XVersion 2 only: Store electrical plug =
and the air hose back into the pump
housing bottom.
XPlace the electric air pump back in its
designated storage space.
XLower the vehicle.
Lowering the vehicle
GWarning!
Inflate collapsible tire only after the wheel is
properly attached.
Inflate the collapsible tire using the electric
air pump before lowering the vehicle.
XAttach ratchet to vehicle jack so that the
word DOWN can be seen.
Lower the vehicle until the vehicle is resting
fully on its own weight:
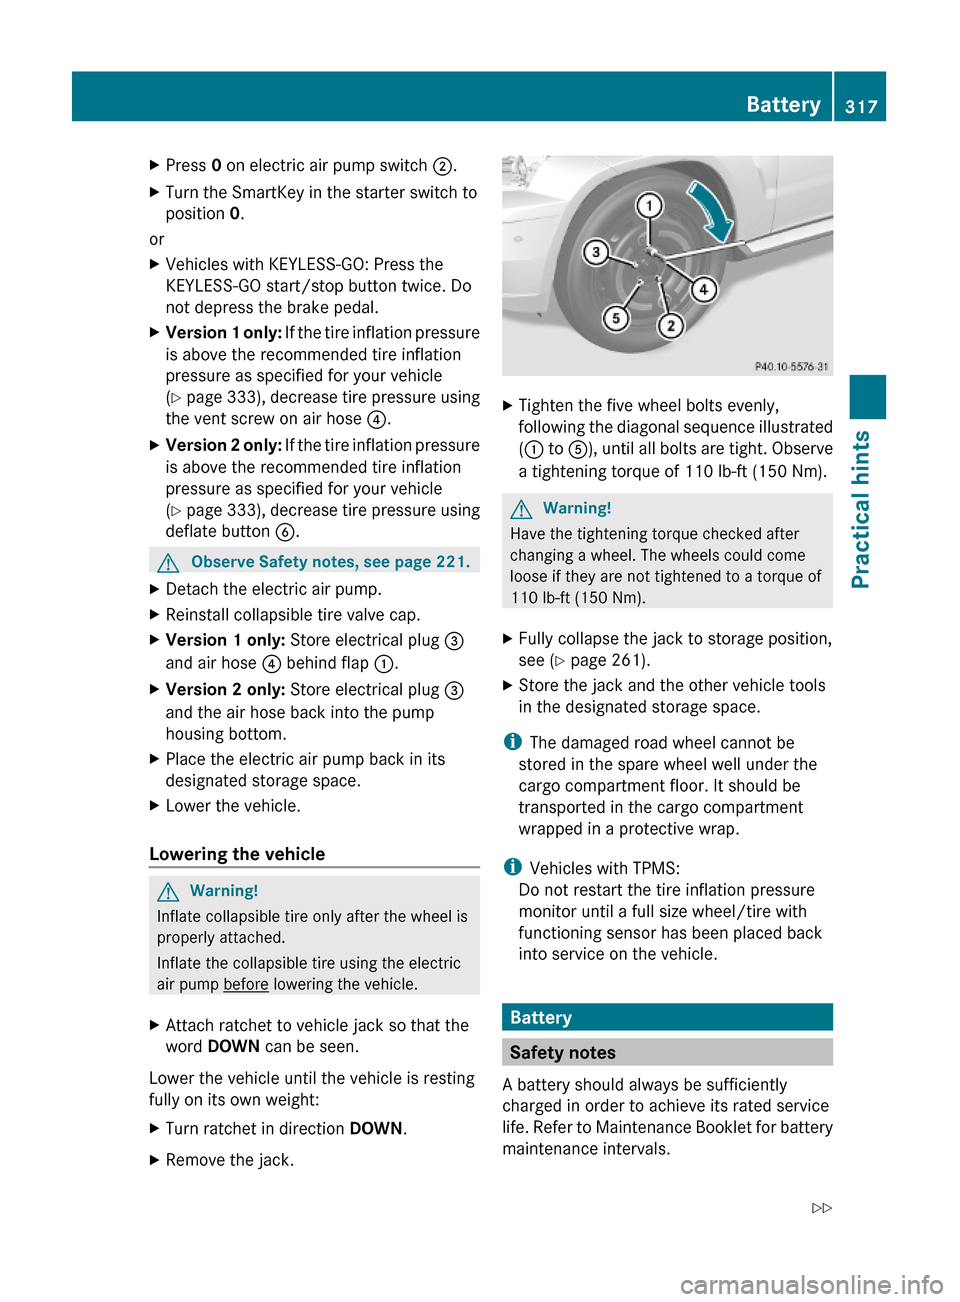
XTurn ratchet in direction DOWN.XRemove the jack.XTighten the five wheel bolts evenly,
following the diagonal sequence illustrated
(: to A), until all bolts are tight. Observe
a tightening torque of 110 lb-ft (150 Nm).
GWarning!
Have the tightening torque checked after
changing a wheel. The wheels could come
loose if they are not tightened to a torque of
110 lb-ft (150 Nm).
XFully collapse the jack to storage position,
see (Y page 261).
XStore the jack and the other vehicle tools
in the designated storage space.
iThe damaged road wheel cannot be
stored in the spare wheel well under the
cargo compartment floor. It should be
transported in the cargo compartment
wrapped in a protective wrap.
iVehicles with TPMS:
Do not restart the tire inflation pressure
monitor until a full size wheel/tire with
functioning sensor has been placed back
into service on the vehicle.
Battery
Safety notes
A battery should always be sufficiently
charged in order to achieve its rated service
life. Refer to Maintenance Booklet for battery
maintenance intervals.
Battery317Practical hintsX204_AKB; 3; 23, en-USd2ureepe,Version: 2.11.8.12009-07-16T19:16:58+02:00 - Seite 317Z
Page 325 of 344
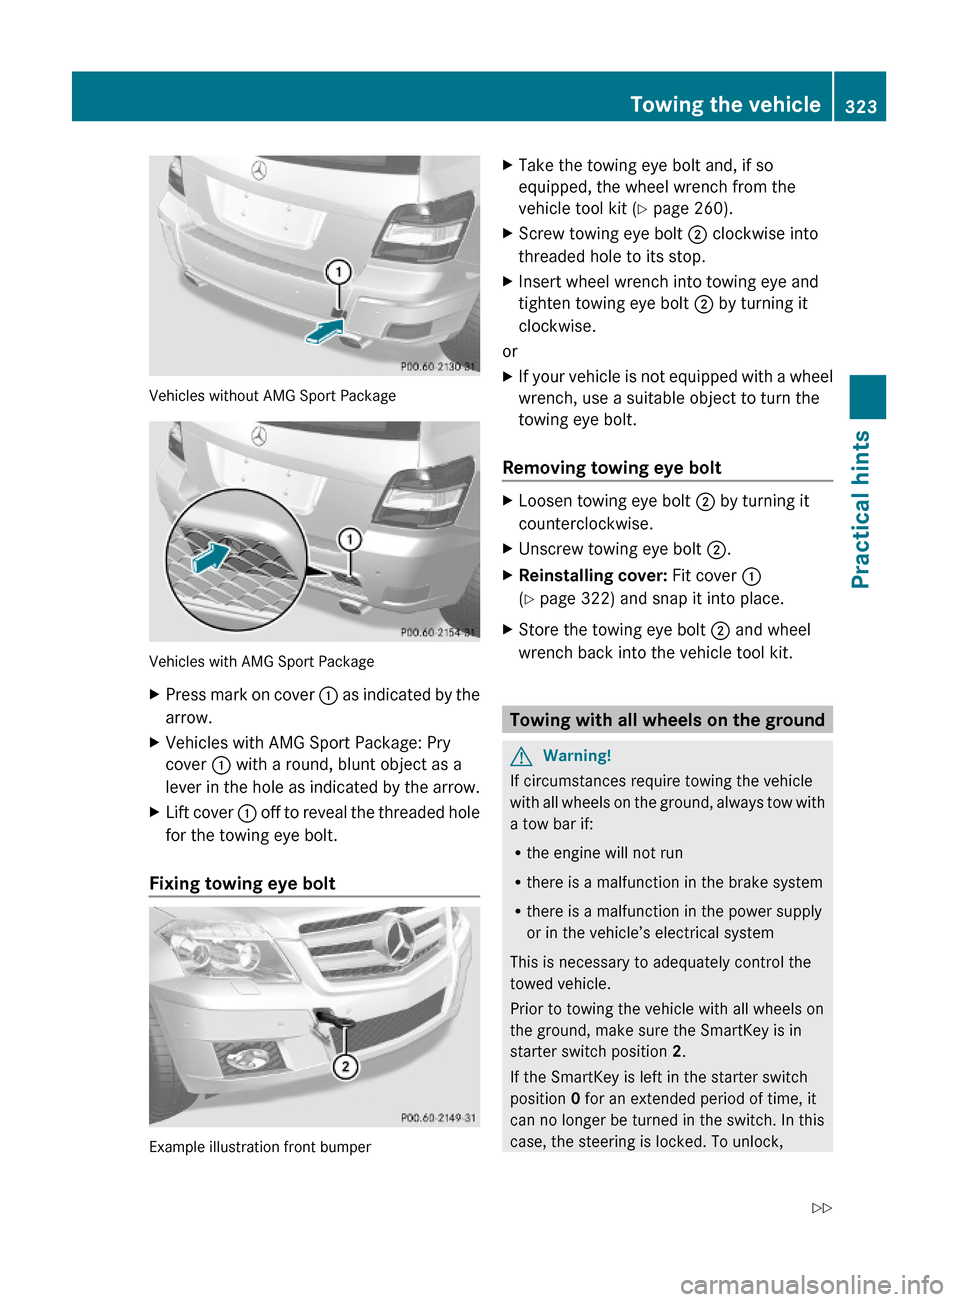
Vehicles without AMG Sport Package
Vehicles with AMG Sport Package
XPress mark on cover : as indicated by the
arrow.
XVehicles with AMG Sport Package: Pry
cover : with a round, blunt object as a
lever in the hole as indicated by the arrow.
XLift cover : off to reveal the threaded hole
for the towing eye bolt.
Fixing towing eye bolt
Example illustration front bumper
XTake the towing eye bolt and, if so
equipped, the wheel wrench from the
vehicle tool kit (Y page 260).
XScrew towing eye bolt ; clockwise into
threaded hole to its stop.
XInsert wheel wrench into towing eye and
tighten towing eye bolt ; by turning it
clockwise.
or
XIf your vehicle is not equipped with a wheel
wrench, use a suitable object to turn the
towing eye bolt.
Removing towing eye bolt
XLoosen towing eye bolt ; by turning it
counterclockwise.
XUnscrew towing eye bolt ;.XReinstalling cover: Fit cover :
(Y page 322) and snap it into place.
XStore the towing eye bolt ; and wheel
wrench back into the vehicle tool kit.
Towing with all wheels on the ground
GWarning!
If circumstances require towing the vehicle
with all wheels on the ground, always tow with
a tow bar if:
Rthe engine will not run
Rthere is a malfunction in the brake system
Rthere is a malfunction in the power supply
or in the vehicle’s electrical system
This is necessary to adequately control the
towed vehicle.
Prior to towing the vehicle with all wheels on
the ground, make sure the SmartKey is in
starter switch position 2.
If the SmartKey is left in the starter switch
position 0 for an extended period of time, it
can no longer be turned in the switch. In this
case, the steering is locked. To unlock,
Towing the vehicle323Practical hintsX204_AKB; 3; 23, en-USd2ureepe,Version: 2.11.8.12009-07-16T19:16:58+02:00 - Seite 323Z