2010 MERCEDES-BENZ CLS COUPE key
[x] Cancel search: keyPage 212 of 337
Deactivating the delayed switch-off tempora-
rily:
X Before leaving the vehicle, tur nthe key to
position 0in the ignition lock.
X Turn the key to position 2in the ignition
lock and back to position 0.
The delayed switch-off is deactivated.
Delayed switch-off is reactivated the next
time you start the engine.
Activating/deactivating the interior light-
ing delayed switch-off
If the Light. delay function is activated and
you remove the key from the ignition lock, the
interior lighting remains on for 20 seconds.
X Press the =or; button on the steer-
ing wheel to select the Settings menu.
X Press the :or9 button to select the
Light submenu.
X Press the abutton to confirm.
X Press the :or9 button to select the
Light. delay function.
When the Light. delay function is acti-
vated, the vehicle interior is displayed in
red in the multifunction display.
X Press the abutton to save the setting.
Vehicle Setting permanent SPEEDTRONIC
You can set permanent SPEEDTRONIC
(Y page 164) using the Limit speed (win‐ter tyres): function.
X Press the =or; button on the steer-
ing wheel to select the menu.
X Press the :or9 button to select the
Vehicle submenu.
X Press the abutton to confirm.
X Press :or9 to select the Limit speed (winter tyres): function.
You will see the current setting.
X Press the abutton to confirm.
X Press :or9 to adjust permanent
SPEEDTRONIC in increments of 10 (240 km/h to
160 km/h ). The
Off setting
switches permanent SPEEDTRONIC off.
X Press the abutton to store the entry.
Switching the automatic locking feature
on/off
If you select the Automatic door lock func-
tion, the vehicle is centrally locked above a
speed of around 15 km/h.
i For further information on the automatic
locking feature, see (Y page 74).
X Press the =or; button on the steer-
ing wheel to select the Sett. menu.
X Press the :or9 button to select the
Vehicle submenu.
X Press the abutton to confirm.
X Press the :or9 button to select the
Automatic door lock function.
When the Automatic door locks func-
tion is activated, the vehicle doors are dis-
played in red in the multifunction display.
X Press the abutton to save the setting.
Activating/deactivating the acoustic
locking confirmation
If you activate the Acoustic Lock function,
an acoustic signal sounds when you lock or
unlock the vehicle. When unlocking, the sig-
nal sounds once. When locking, it sounds
three times.
X Press the =or; button on the steer-
ing wheel to select the Settings menu.
X Press the :or9 button to select the
Vehicle submenu.
X Press the abutton to confirm.
X Press :or9 to select the Acous‐ tic Lock function.
If the Acoustic Lock function is activated,
the & symbol is displayed in red in the
multifunction display.
X Press the abutton to save the setting. Menus and submenus
209On-board computer and displays Z
Page 215 of 337
X
Press the =or; button on the steer-
ing wheel to select the Settings menu.
X Press the :or9 button to select the
Convenience submenu.
X Press the abutton to confirm.
X Press the :or9 button to select the
Auto. fold in function.
When the Auto. fold in function is acti-
vated, the vehicle's exterior mirror is dis-
played in red in the multifunction display.
X Press the abutton to save the setting.
Resetting to factor ysettings For safety reasons, no
tall functions are reset:
the Limit Speed (winter tyres) function
in permanent SPEEDTRONIC can only be set
in the Vehicle submenu. If you want to reset
the Daytime driving lights in the
Light submenu, you must tur
nthe key in the igni-
tion lock to position 1.
X Press the =or; button on the steer-
ing wheel to select the Settings menu.
X Press the :or9 button to select the
Factory setting submenu.
X Press the abutton to confirm.
The Reset all settings? message
appears.
X Press the :or9 button to select
No or
Yes .
X Press the abutton to confirm the selec-
tion.
If you select Yes , the multifunction display
shows a confirmation message. AMG menu in AMG vehicles
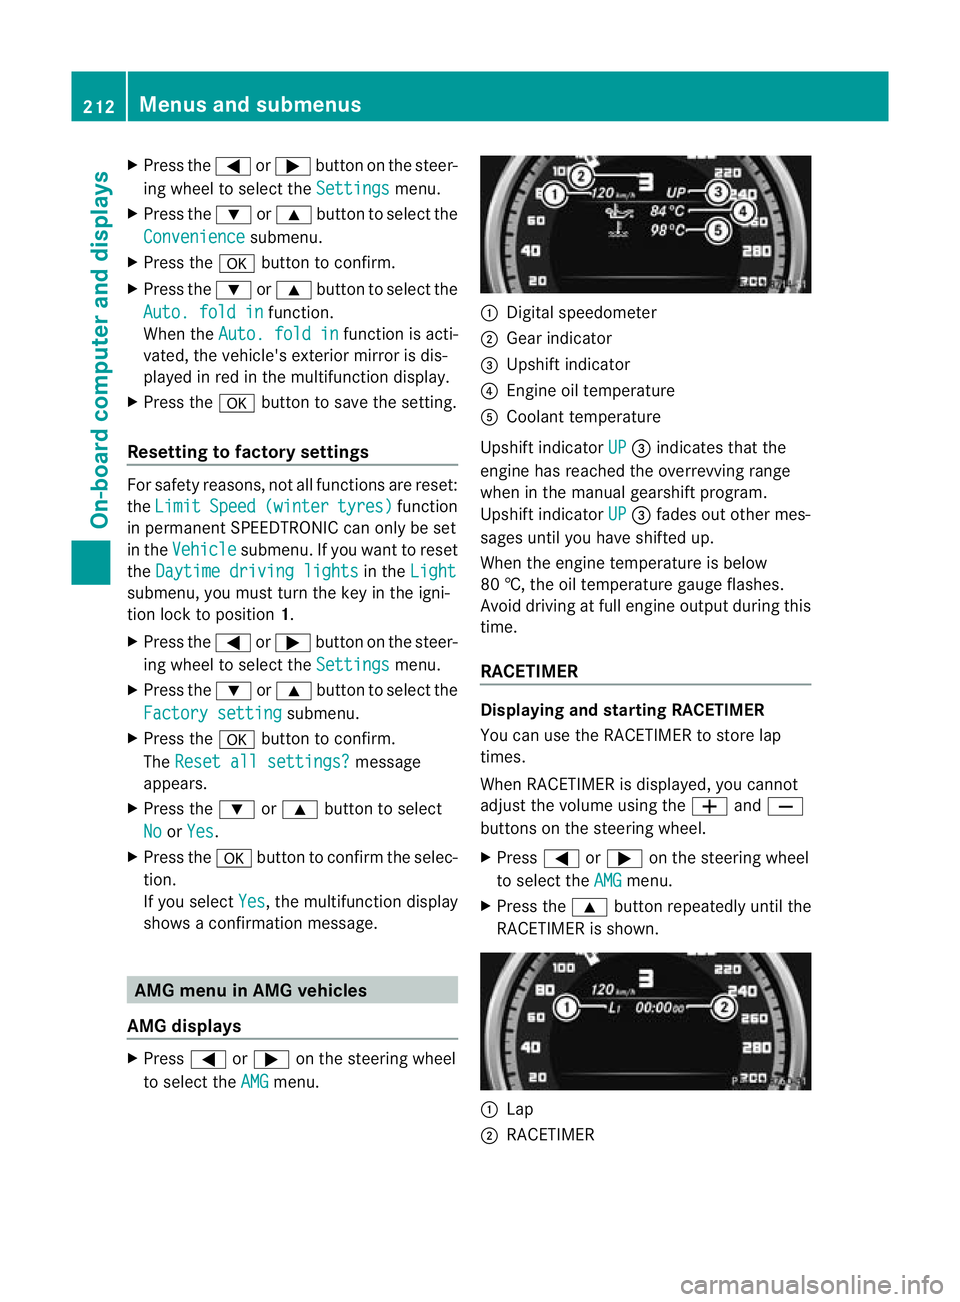
AMG displays X
Press =or; on the steering wheel
to select the AMG menu. :
Digital speedometer
; Gear indicator
= Upshift indicator
? Engine oil temperature
A Coolant temperature
Upshift indicator UP =
indicates that the
engine has reached the overrevving range
when in the manual gearshift program.
Upshift indicator UP =
fades out other mes-
sages until you have shifted up.
When the engine temperature is below
80 †, the oil temperature gauge flashes.
Avoid driving at full engine output during this
time.
RACETIMER Displaying and starting RACETIMER
You can use the RACETIMER to store lap
times.
When RACETIMER is displayed, you cannot
adjust the volume using the
WandX
buttons on the steering wheel.
X Press =or; on the steering wheel
to select the AMG menu.
X Press the 9button repeatedly until the
RACETIMER is shown. :
Lap
; RACETIMER 212
Menus and submenusOn-board computer and displays
Page 216 of 337
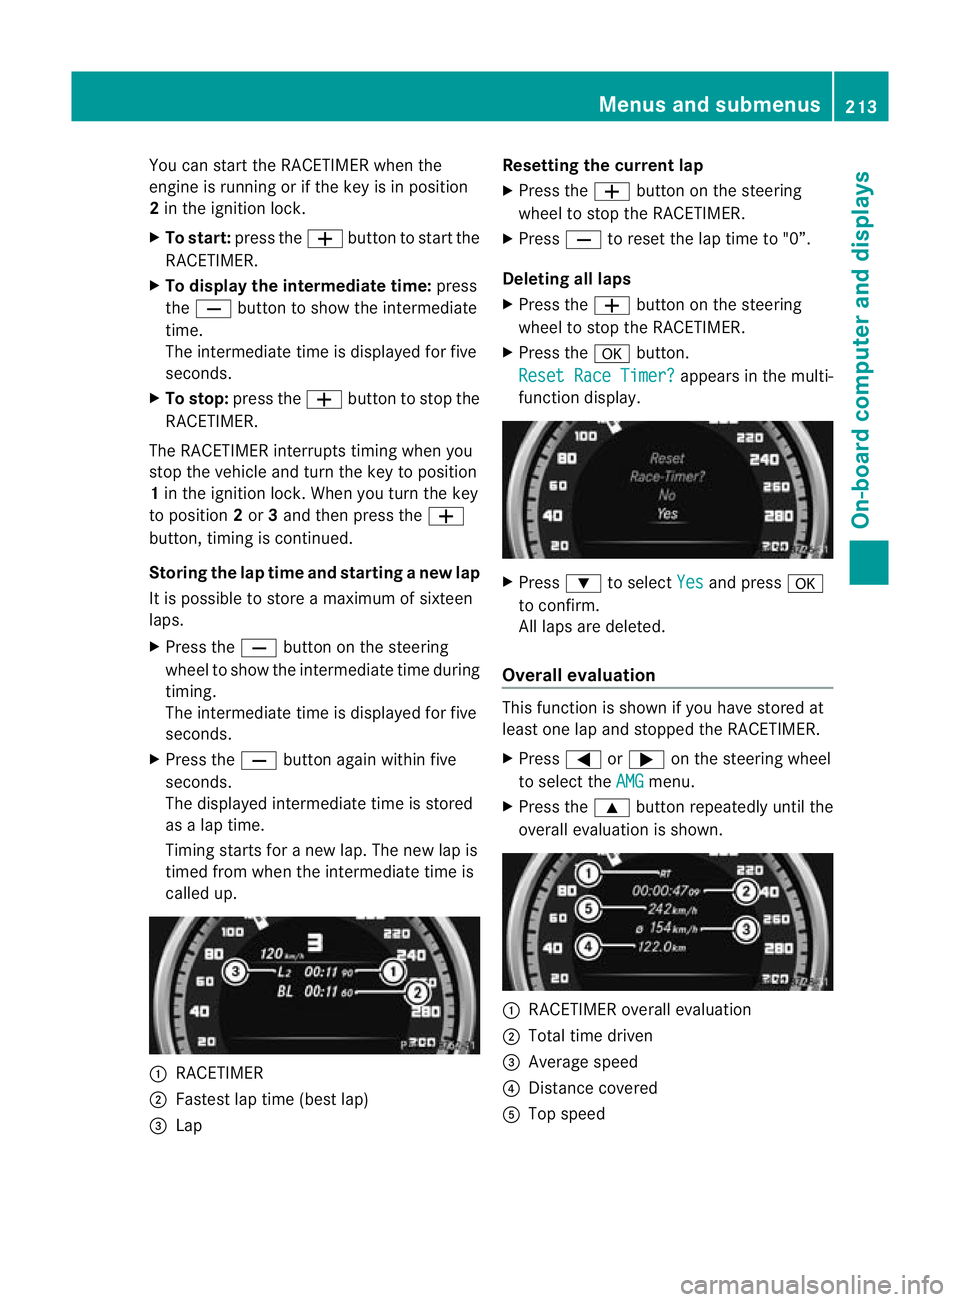
You can start the RACETIMER when the
engine is running or if the key is in position
2 in the ignition lock.
X To start: press the Wbutton to start the
RACETIMER.
X To display the intermediate time: press
the X button to show the intermediate
time.
The intermediate time is displayed for five
seconds.
X To stop: press the Wbutton to stop the
RACETIMER.
The RACETIMER interrupts timing when you
stop the vehicle and turn the key to position
1 in the ignition lock. When you turn the key
to position 2or 3and the npress the W
button, timing is continued.
Storing the lap time and starting anew lap
It is possible to store a maximum of sixteen
laps.
X Press the Xbutton on the steering
wheel to show the intermediate time during
timing.
The intermediate time is displayed for five
seconds.
X Press the Xbutton again within five
seconds.
The displayed intermediate tim eis stored
as a lap time.
Timing starts for a new lap. The new lap is
timed from when the intermediate time is
called up. :
RACETIMER
; Fastest lap time (best lap)
= Lap Resetting the current lap
X
Press the Wbutton on the steering
wheel to stop the RACETIMER.
X Press Xto reset the lap time to "0”.
Deleting all laps
X Press the Wbutton on the steering
wheel to stop the RACETIMER.
X Press the abutton.
Reset Race Timer? appears in the multi-
function display. X
Press :to select Yes and press
a
to confirm.
All laps are deleted.
Overall evaluation This function is shown if you have stored at
least one lap and stopped the RACETIMER.
X
Press =or; on the steering wheel
to select the AMG menu.
X Press the 9button repeatedly until the
overall evaluation is shown. :
RACETIMER overall evaluation
; Total time driven
= Average speed
? Distance covered
A Top speed Menus and submenus
213On-board computer and displays Z
Page 239 of 337
Display messages Possible causes/consequences and
M Solutions
&
inoperative Bat‐
tery low The on-board voltage is too low. The auxiliary heating has switched
itself of
forcannot be switched on (Y page 119).
X Drive for a longer distance.
The battery is being charged. The auxiliary heating can be reac-
tivated as soon as the on-board electrical system voltage is suf-
ficient. &
inoperative
Refuel
vehicle The fuel level in the fuel tan
kis too low. The auxiliary heating can-
not be switched on (Y page 119).
X Refuel at the nearest filling station. &
inoperative See
Owner's Man. The auxiliary heating has a temporary malfunction or is faulty.
X
When the vehicle is on alevel surface and the engine has cooled
down, make up to four attempts to switch on the auxiliary heat-
ing, waiting several minutes between each attempt
(Y page 119).
X If the auxiliary heating does not switch on, consult a qualified
specialist workshop. ¥
Top
up washer fluid The washer fluid level in the washer fluid reservoir has dropped
below the minimum.
X
Top up the washer fluid (Y page 269).Key
Display messages Possible causes/consequences and
M Solutions
Â
Key does not
belong to vehicle You have put the wrong key in the ignition lock.
X
Use the correct key. Â
Replace key The key needs to be replaced.
X
Visit a qualified specialist workshop. Â
Change key batter‐
ies The batteries of the KEYLESS-GO key are discharged.
X
Change the batteries (Y page 70).236
Display messagesOn-board computer and displays
Page 240 of 337
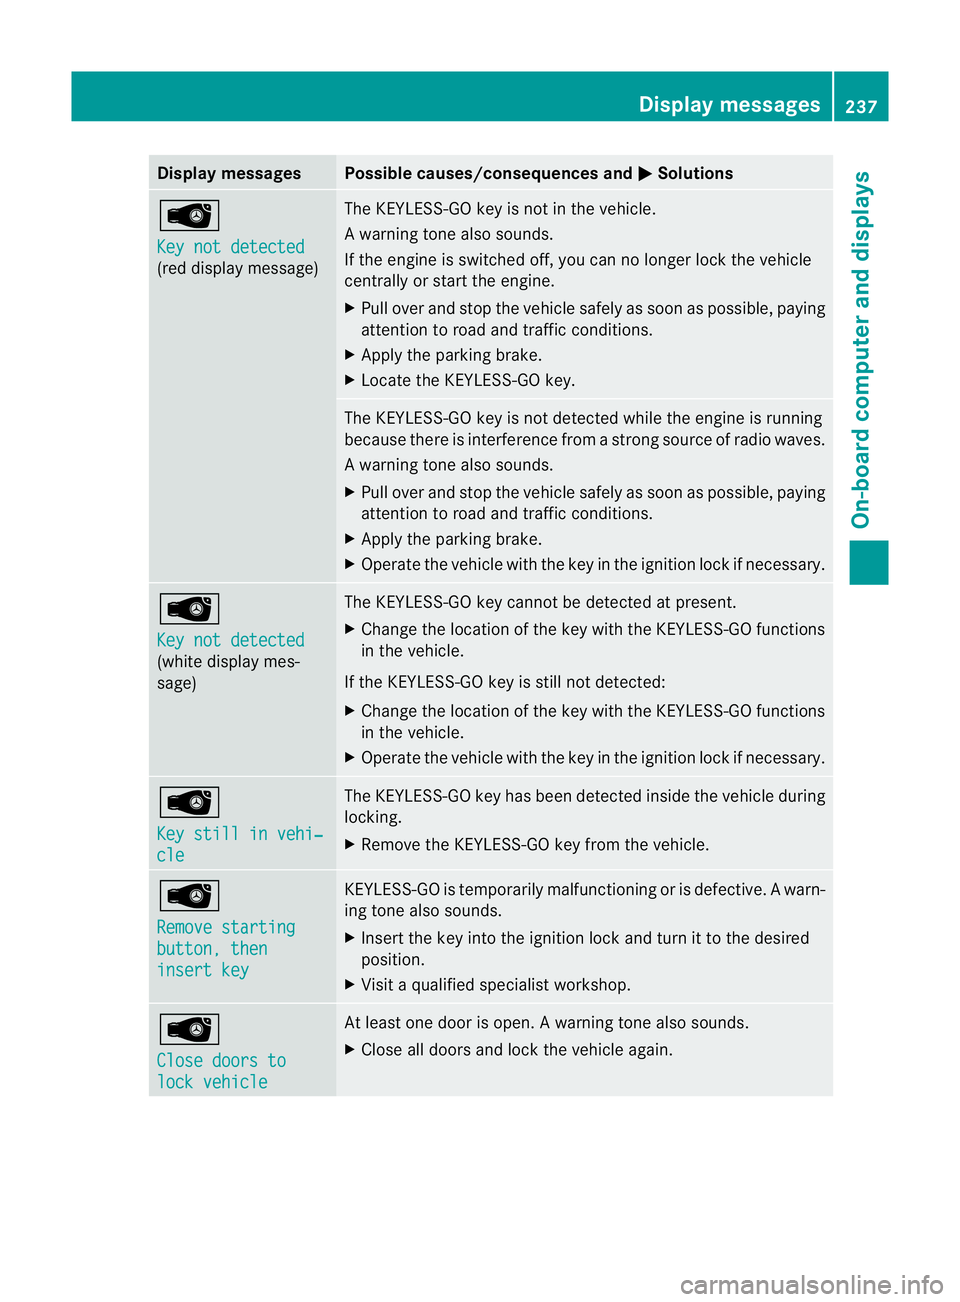
Display messages Possible causes/consequences and
M Solutions
Â
Key not detected
(red display message) The KEYLESS-GO key is not in the vehicle.
Aw
arning tone also sounds.
If the engine is switched off, you can no longer loc kthe vehicle
centrally or start the engine.
X Pull over and stop the vehicle safely as soon as possible, paying
attention to road and traffic conditions.
X Apply the parking brake.
X Locate the KEYLESS-GO key. The KEYLESS-GO key is not detected while the engine is running
because there is interference from a strong source of radio waves.
Aw
arning tone also sounds.
X Pull ove rand stop the vehicle safely as soo nas possible, paying
attention to road and traffic conditions.
X Apply the parking brake.
X Operate the vehicle with the key in the ignition lock if necessary. Â
Key not detected
(white display mes-
sage) The KEYLESS-GO key cannot be detected at present.
X
Change the location of the key with the KEYLESS-GO functions
in the vehicle.
If the KEYLESS-GO key is still not detected:
X Change the location of the key with the KEYLESS-GO functions
in the vehicle.
X Operate the vehicle with the key in the ignition lock if necessary. Â
Key still in vehi‐
cle The KEYLESS-GO key has been detected inside the vehicle during
locking.
X
Remove the KEYLESS-GO key from the vehicle. Â
Remove starting
button, then
insert key KEYLESS-GO is temporarily malfunctioning or is defective.
Awarn-
ing tone also sounds.
X Insert the key into the ignition lock and turn it to the desired
position.
X Visi taqualified specialist workshop. Â
Close doors to
lock vehicle At least one door is open.
Awarning tone also sounds.
X Close all doors and loc kthe vehicle again. Display messages
237On-board computer and displays Z
Page 252 of 337
X
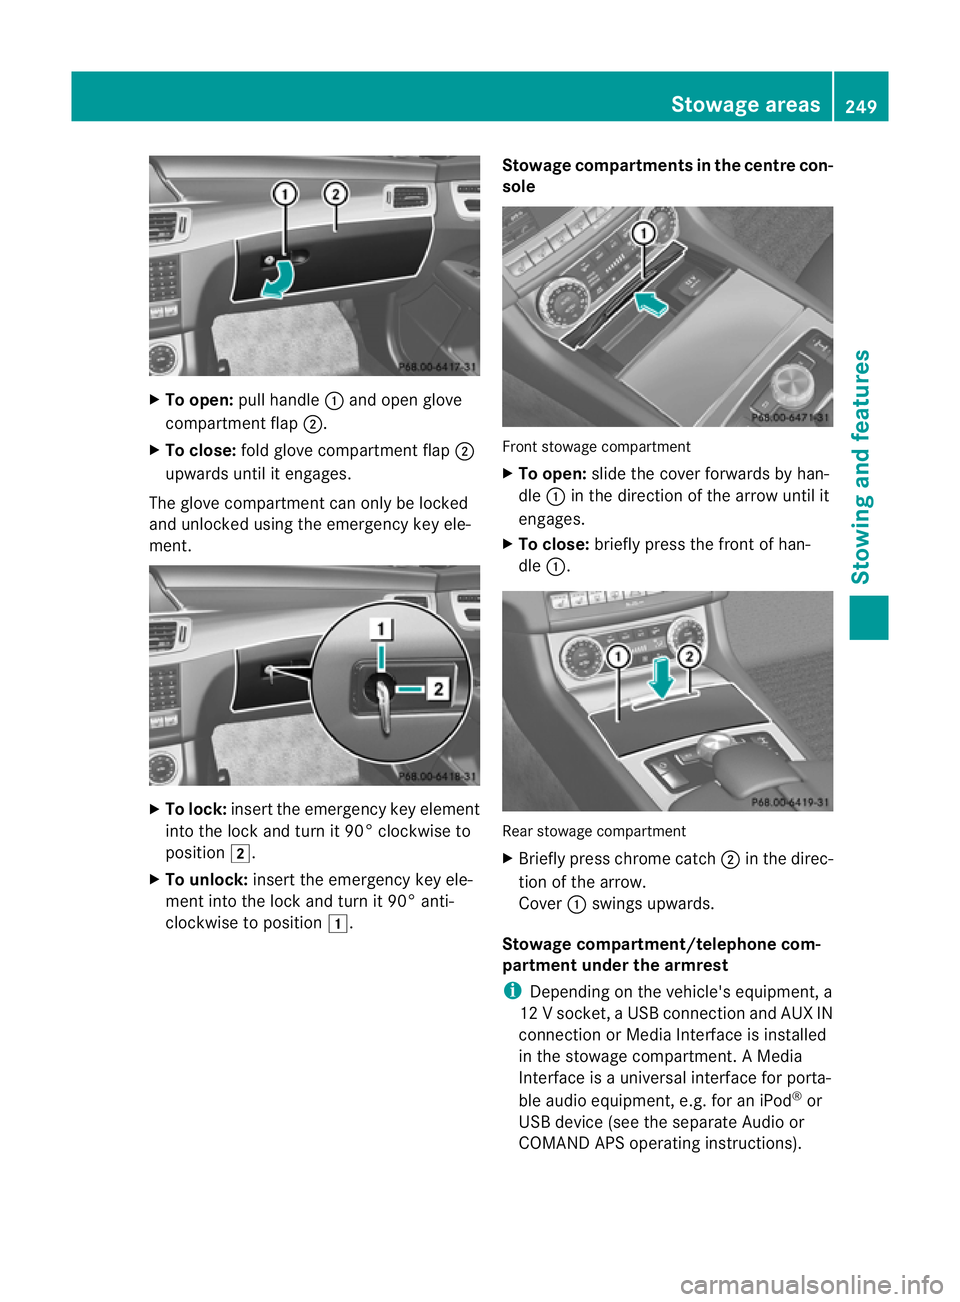
To open: pull handle :and open glove
compartment flap ;.
X To close: fold glove compartment flap ;
upwards until it engages.
The glove compartment can only be locked
and unlocked using the emergency key ele-
ment. X
To lock: insert the emergency key element
into the lock and turn it 90° clockwise to
position 2.
X To unlock: insert the emergency key ele-
ment into the lock and turn it 90° anti-
clockwise to position 1. Stowage compartments in the centre con-
sole Front stowage compartment
X
To open: slide the cove rforwards by han-
dle :in the direction of the arrow until it
engages.
X To close: briefly press the front of han-
dle :. Rear stowage compartment
X
Briefly press chrome catch ;in the direc-
tion of the arrow.
Cover :swings upwards.
Stowage compartment/telephone com-
partment under the armrest
i Depending on the vehicle's equipment, a
12 V socket ,aUSB connection and AUX IN
connection or Media Interface is installed
in the stowage compartment. AMedia
Interface is a universal interface for porta-
ble audio equipment, e.g. for an iPod ®
or
USB device (see the separate Audio or
COMAND APS operating instructions). Stowage areas
249Stowing and features Z
Page 260 of 337
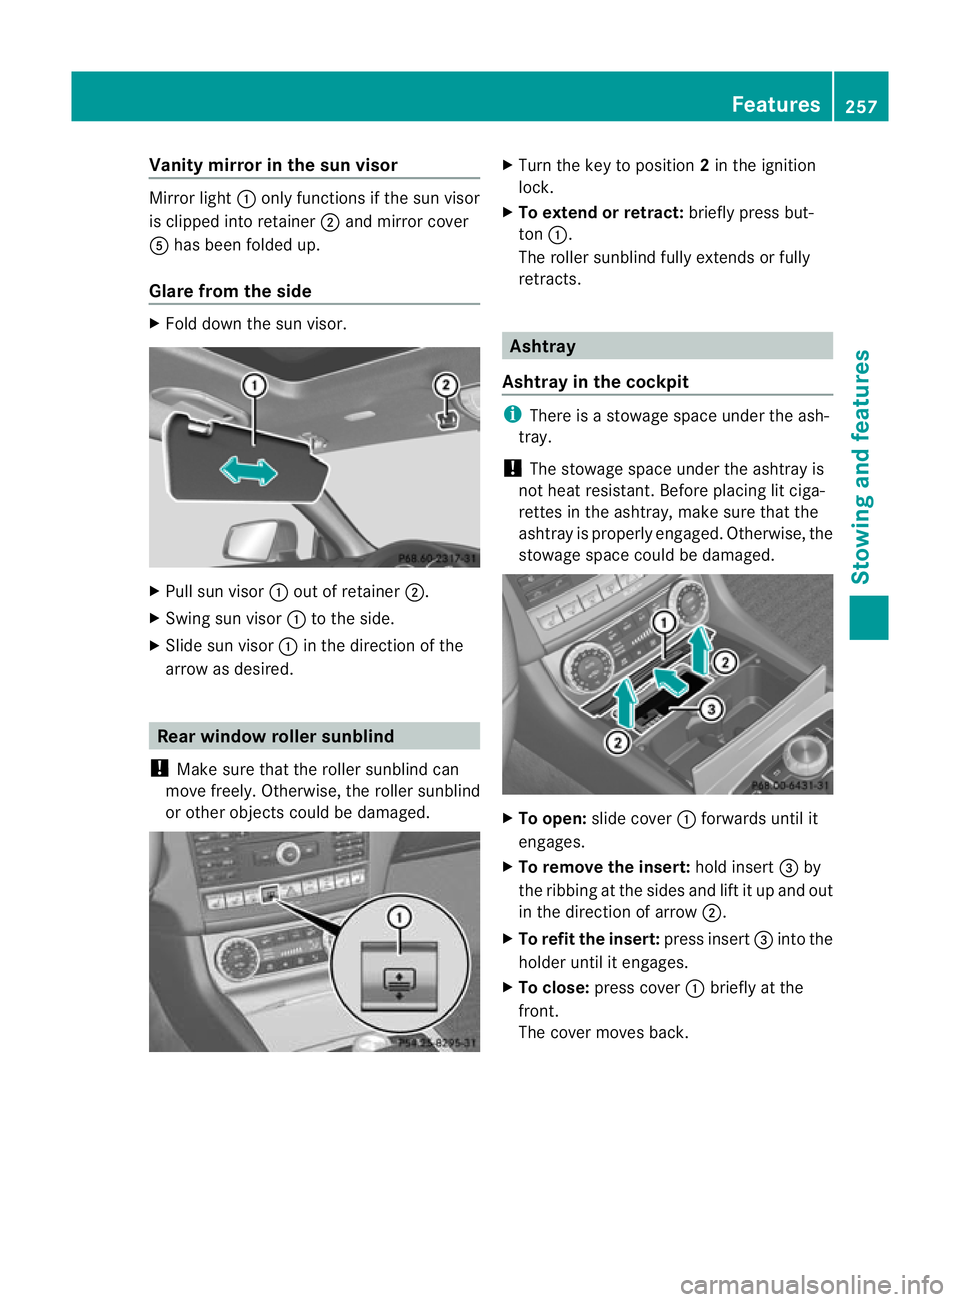
Vanity mirror in the sun visor
Mirror light
:only functions if the sun visor
is clipped into retainer ;and mirror cover
A has been folded up.
Glare from the side X
Fold down the su nvisor. X
Pull sun visor :out of retainer ;.
X Swing sun visor :to the side.
X Slide sun visor :in the direction of the
arrow as desired. Rea
rwindow roller sunblind
! Make sure that the roller sunblind can
move freely. Otherwise, the roller sunblind
or other objects could be damaged. X
Turn the key to position 2in the ignition
lock.
X To extend or retract: briefly press but-
ton :.
The roller sunblind fully extends or fully
retracts. Ashtray
Ashtray in the cockpit i
There is a stowage space under the ash-
tray.
! The stowage space under the ashtray is
not heat resistant .Before placing lit ciga-
rettes in the ashtray, make sure that the
ashtray is properly engaged. Otherwise, the
stowage space could be damaged. X
To open: slide cover :forwards until it
engages.
X To remove the insert: hold insert=by
the ribbing at the sides and lift it up and out
in the direction of arrow ;.
X To refit the insert: press insert=into the
holder until it engages.
X To close: press cover :briefly at the
front.
The cover moves back. Features
257Stowing and features Z
Page 261 of 337
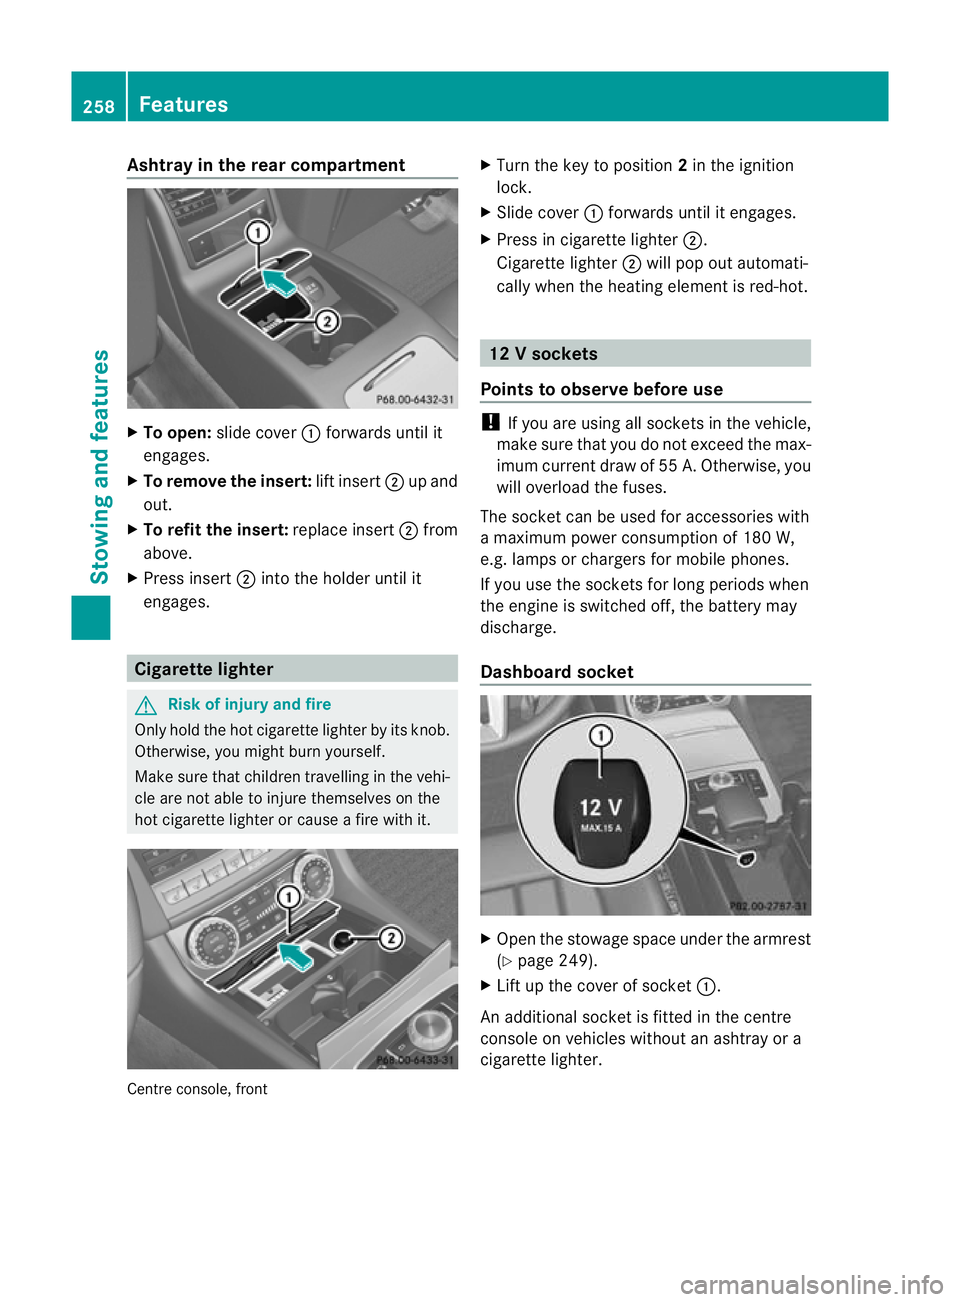
Ashtray in the rear compartment
X
To open: slide cover :forwards until it
engages.
X To remove the insert: lift insert;up and
out.
X To refit the insert: replace insert;from
above.
X Press insert ;into the holder until it
engages. Cigarette lighter
G
Risk of injury and fire
Only hold the hot cigarette lighte rby its knob.
Otherwise, you might burn yourself.
Make sure that children travelling in the vehi-
cle are no table to injure themselves on the
hot cigarette lighter or cause a fire with it. Centre console, front X
Turn the key to position 2in the ignition
lock.
X Slide cover :forwards until it engages.
X Press in cigarette lighter ;.
Cigarette lighter ;will pop out automati-
cally when the heating element is red-hot. 12
Vsockets
Points to observe before use !
If you are using all sockets in the vehicle,
make sure that you do no texceed the max-
imu mcurren tdraw of 55 A. Otherwise, you
will overload the fuses.
The socket can be used for accessories with
a maximum power consumption of 180 W,
e.g. lamps or chargers for mobile phones.
If you use the sockets for long periods when
the engine is switched off, the battery may
discharge.
Dashboard socket X
Open the stowage space under the armrest
(Y page 249).
X Lift up the cover of socket :.
An additional socket is fitted in the centre
console on vehicles without an ashtray or a
cigarette lighter. 258
FeaturesStowing and features