2010 MERCEDES-BENZ CLS COUPE child lock
[x] Cancel search: child lockPage 9 of 337
Bel
ttensioner
Activation ........................................ .35
Function ........................................... 45
Blin dSpot Assist
Activating/deactivating (on-
board computer) ............................ 204
Display message ............................ 229
Function/notes ............................. 183
Bonnet
Closing .......................................... .267
Display message ............................ 235
Opening ......................................... 266
Boot
Automatic opening ........................... 76
Emergency release ..........................77
Important safety guidelines .............75
Opening automatically from
insid e............................................... 77
Boot lid
Display message ............................ 235
Opening dimensions ......................326
Boot load (maximum) ........................ 323
Bottle holder ...................................... 256
Box (boot) .......................................... .252
Brake fluid Notes ............................................. 322
Brake lamps
Adaptive .......................................... .58
Display message ............................ 222
Brakes
ABS .................................................. 57
BAS .................................................. 57
BAS PLUS ........................................ 57
Brake fluid (notes) .........................322
Display message ............................ 220
High-performance brake system ....150
Important safety notes ..................149
Parking brake ................................ 148
Warning lamp ................................. 238
Breakdown
see Flat tyre
Bulbs
Overview ........................................ 105 C
Care Automatic car wash .......................271
Display ........................................... 274
Exterior lighting ............................. 273
High-pressure cleaner .................... 272
Matt paintwork .............................. 272
Nigh tView Assist Plus ...................274
Notes ............................................. 270
Paint .............................................. 272
Plastic trim .................................... 275
Reversing camera ..........................274
Seat bel t........................................ 276
Seat covers .................................... 275
Sensors ......................................... 274
Tai lpipes ....................................... 274
Trim strips ..................................... 275
Wheels ........................................... 272
Windows ........................................ 273
Wiper blades .................................. 273
Wooden trim .................................. 275
CD player/CD changer(on-board
computer) .......................................... 201
Central locking Automatic locking (on-board com-
puter) ............................................. 209
Key .................................................. 68
Central unlocking
Key .................................................. 68
Centre console ..................................... 30
Changing bulbs Headlamps ..................................... 104
Changing gears .................................. 138
Child-proof locks Rea rdoors ....................................... 55
Children
In the vehicle ................................... 46
Restraint systems ............................ 46
Child seat
Automatic recognition .....................48
Display message ............................ 217
ISOFIX .............................................. 49
On the front-passenger sea t............ 47
Recommendations ...........................54
Suitable positions ............................ 52
Troubleshooting ............................... 51
Cigarette lighter ................................ 2586
Index
Page 14 of 337

Sea
tbelt ........................................ 239
SPORT handling mode ...................243
SRS ................................................ 243
Tyr ep ressure monitor ...................246
Instrument cluster
Displays. .......................................... 26
Overview .......................................... 26
Submenu (on-board computer) ......205
Warning and indicator lamps ...........28
Intelligen tLight System
Display message ............................ 223
Setting dipped-bea mheadlamps
for driving on the right/left (on-
board computer) ............................ 207
Switching on/off (on-board com-
puter) ............................................. 207
Interior lighting
Automatic control system ..............104
Delayed switch-off (on-board
computer) ...................................... 209
Emergency lighting ........................104
Manual control ............................... 104
Reading lamp ................................. 103
Setting brightness for display/
switches (on-board computer) .......206
Setting the ambient lighting
brightness (on-board computer) ....208
Setting the ambient lighting col-
our (on-board computer) ................ 208
Interior motion sensor ........................64
ISOFIX child seat securing system ....49 J
Jack Storage location ............................ 279
Using ............................................. 285
Jump-starting ..................................... 294
see Jump-starting K
Key Changing the battery .......................71
Checking the battery .......................70
Convenience closing feature ............79
Convenience opening feature ..........79
Display message ............................ 236Malfunction ...................................... 72
Modifying the programming
.............69
Starting the engine ........................130
KEYLESS-GO
Button ............................................ 129
Convenience closing ........................79
Display message ............................ 236
Locking ............................................ 69
Starting the engine ........................130
Unlocking ......................................... 69
Keyp ositions
Key ................................................ 129
KEYLESS GO .................................. 129
Kickdown ................................... 138, 141
Kneebag ............................................... 38 L
Lane-change assistant see Active Blind Spot Assist
see Blind Spot Assist
Lane Keeping Assist
Activating/deactivating (on-
board computer) ............................ 205
Display message ............................ 228
Function/informatio n.................... 185
Lane package ..................................... 183
Lashing eyelets ................................. 252
Lights Activating/deactivating the inte-
rior lighting delayed switch-off
(on-board computer) ......................209
Active light function .......................102
Automatic headlamp mode ..............99
Cornering light function .................102
Daytime driving lights ......................99
Dipped-bea mheadlamps ................. 99
Driving abroad ................................. 98
Foglamps (extended range) ...........103
Hazard warning lamps ...................101
Ligh tswitc h..................................... 98
Main-beam headlamps ................... 100
Motorway mode ............................. 103
Rea rfoglamp ................................... 99
Setting brightness for display/
switches (on-board computer) .......206
Setting the ambient lighting
brightness (on-board computer) ....208 Index
11
Page 51 of 337

the dashboard and on both sides of the sun
visor on the front-passenge rside.
Information about recommended child
restraint systems is available at any
Mercedes-Benz Service Centre.
Automatic child seat recognition on the
front-passenger seat If your vehicle does not have automatic child
seat recognition 2
on the front-passenger
seat, this is indicated by a special sticker .The
sticker is affixed to the side of the dashboard
on the front-passenger side. The sticker is
visible when you open the front-passenger
door. The automatic child seat recognition sensor
system on the front-passenger seat detects
whether a special Mercedes-Ben zchild seat
with automatic child seat recognition has
been fitted there. In such cases, 4
PASSENGER AIRBAG OFF indicator lamp :lights up. The front-passenger airbag is disa-
bled. G
Risk of injury
If the 4 PASSENGER AIRBAG OFF indica-
tor lamp does not light up when the child
restraint system is fitted, the front-passenger
airbag has not been disabled. If the front-
passenger airbag deploys, the child could be
seriously or even fatally injured.
Proceed as follows:
R do not use a rearward-facing child restraint
system on the front-passenger seat.
R fit a rearward-facing child restraint system
on a suitable rear seat.
or
R only use a forward-facing child restraint
system on the front-passenger seat and
move the front-passenger seat to the rear-
most position.
R have the automatic child seat recognition
checked at a qualified specialist workshop.
To ensure that the automatic child seat rec-
ognition on the front-passenger seat func-
tions/communicates correctly, never place
objects, e.g. a cushion, under the child
restraint system. The entire base of the child
restraint system must always rest on the seat
cushion. An incorrectly fitted child restraint
system cannot perform its intended protec-
tive function in the event of an accident, and
could lead to injuries.
i If the front-passenger airbag is disabled
by the automatic child seat recognition, the
following remain enabled on the front-
passenger side:
R the sidebag
R the pelvisbag
R the windowbag
R the belt tensioner
2 Vehicles without automatic child seat recognition on the front-passenger seat: if you turn the key to position
2int he ignition lock, the 4PASSENGER AIRBAG OFF indicator lamp lights up briefly but has no function.
It does not indicate that there is automatic child seat recognition on the front-passenger seat. 48
Children in the vehicleSafety
Page 52 of 337
G
Risk of injury
Do not place electronic devices on the front-
passenger seat, e.g.:
R laptops, whe nswitched on
R mobile phones
R cards with transponders, e.g .ski passes or
access cards
Signals from electronic equipment can cause
interference in the automatic child seat rec-
ognitio nsensor system. This can lead to a
system malfunction. This may cause the
4 PASSENGER AIRBAG OFF indicator
lamp to light up without there being a child
seat with automatic child seat recognition fit-
ted, and the front-passenger fron tairbag will
not deploy during an accident .Itis also pos-
sible that the 6SRS warning lamp lights
up and/or the 4PASSENGER AIRBAG OFF
indicator lamp does not light up briefly when
you turn the key in the ignition lock to position
2.
ISOFIX child seat securing system for
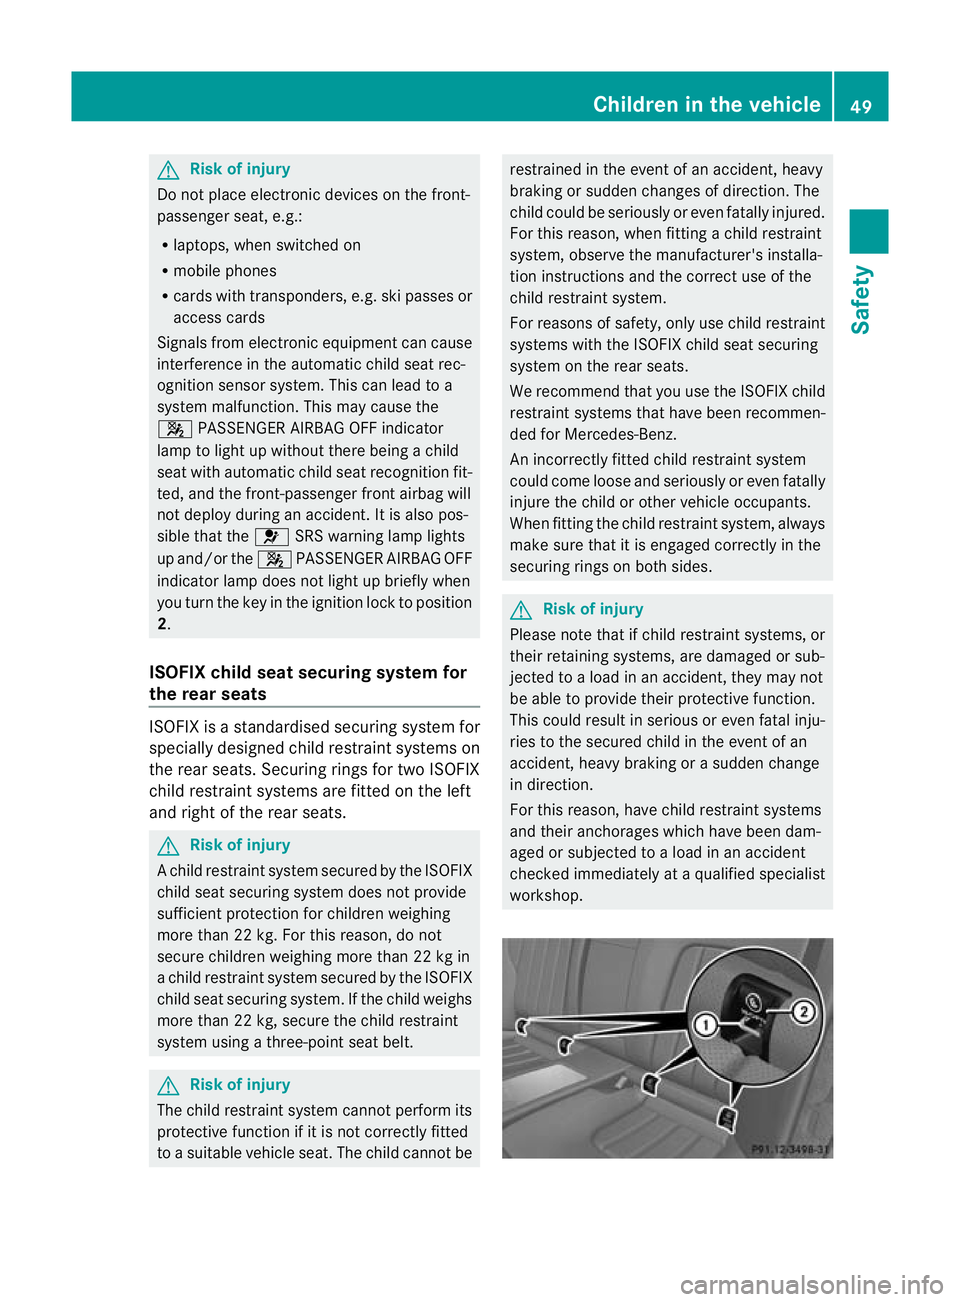
the rear seats ISOFIX is a standardised securing system for
specially designed child restraint systems on
the rear seats. Securing rings for two ISOFIX
child restraint systems are fitted on the left
and right of the rear seats. G
Risk of injury
Ac hild restraint system secured by the ISOFIX
child seat securing system does not provide
sufficient protection for children weighing
more than 22 kg. For this reason, do not
secure children weighing more than 22 kg in
a child restraint system secured by the ISOFIX
child seat securing system. If the child weighs
more than 22 kg, secure the child restraint
system using a three-point seat belt. G
Risk of injury
The child restraint system cannot perform its
protective function if it is not correctly fitted
to a suitable vehicle seat. The child cannot be restrained in the event of an accident, heavy
braking or sudden changes of direction. The
child could be seriously or even fatally injured.
For this reason, when fitting a child restraint
system, observe the manufacturer's installa-
tion instructions and the correct use of the
child restraint system.
For reasons of safety, only use child restraint
systems with the ISOFIX child seat securing
system on the rear seats.
We recommend that you use the ISOFIX child
restraint systems that have been recommen-
ded for Mercedes-Benz.
An incorrectly fitted child restraint system
could come loose and seriously or even fatally
injure the child or other vehicle occupants.
When fitting the child restraint system, always
make sure that it is engaged correctly in the
securing rings on both sides. G
Risk of injury
Please note that if child restraint systems, or
their retaining systems, are damaged or sub-
jected to a load in an accident, they may not
be able to provide their protective function.
This could result in serious or even fatal inju-
ries to the secured child in the event of an
accident, heavy braking or a sudden change
in direction.
For this reason, have child restraint systems
and their anchorages which have been dam-
aged or subjected to a load in an accident
checked immediately at a qualified specialist
workshop. Children in the vehicle
49Safety Z
Page 58 of 337
Weight categories
Group 0:
up to
10 kg Group 0:
up to
10 kg Group 0:
up to
10 kg Group 0+:
up to
13 kg Group 0+:
up to
13 kg Group 0+:
up to
13 kg
Order
number - - - - - B6 6 86
8224
Auto-
matic
chil
dseat
recogni-
tion - - - - - No
Weigh
tcategories Group I:
9to
18 kg Group I:
9to
18 kg Group I:
9to
18 kg Group I:
9to
18 kg Group I:
9to
18 kg Size cate-
gory
A B B1 C D
Manufac-
turer
- - Britax Römer - -
Type
- - DUO PLUS - -
Type
approval
number
- - E1 03
301133
E1 04
301133 - -
Category
- - Universal - -
Order num-
ber - - A 000 970 11
00 - -
Automatic
child seat
recognition
- - Yes - -
Child-proof locks
Child-proof locks for the rear doors G
Risk of accident and injury
Activate the child-proof locks for the rear
doors and the override switch for the rear
windows when children are travelling in the vehicle. Otherwise, the children could open
doors or side windows while the vehicle is in
motion and injure themselves or others.
You secure each door individually with the
child-proof locks on the rear doors. Adoor
secured with a child-proof lock cannot be
opened from inside the vehicle. When the Children in the vehicle
55Safety Z
Page 59 of 337
vehicle is unlocked, the door can be opened
from the outside.
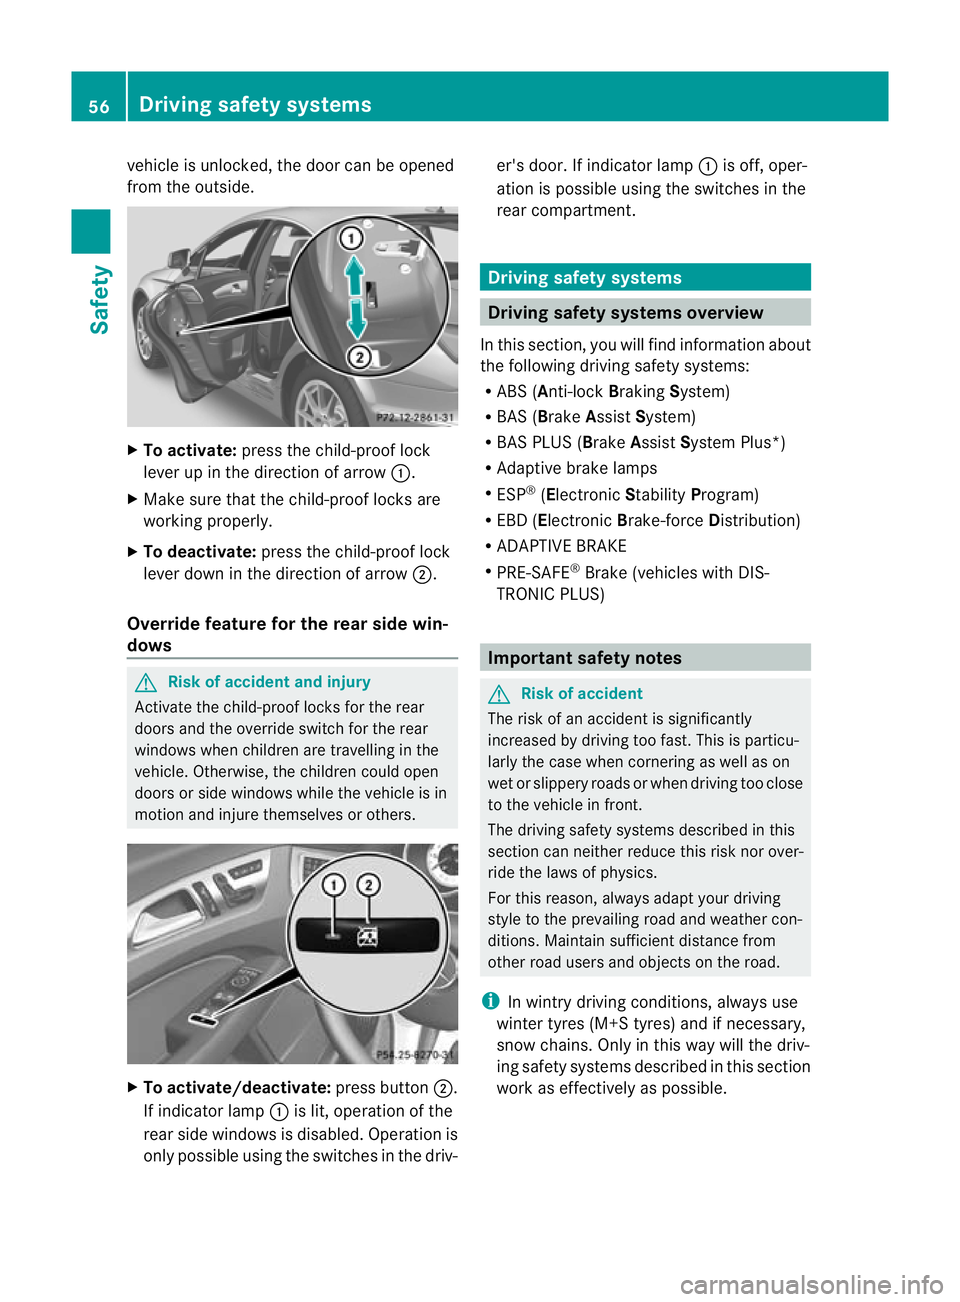
X
To activate: press the child-proof lock
leve rup in the direction of arrow :.
X Make sure that the child-proof locks are
working properly.
X To deactivate: press the child-proof lock
lever down in the direction of arrow ;.
Override feature for the rear side win-
dows G
Risk of accident and injury
Activate the child-proof locks for the rear
doors and the override switch for the rear
windows when children are travelling in the
vehicle. Otherwise, the children could open
doors or side windows while the vehicle is in
motion and injure themselves or others. X
To activate/deactivate: press button;.
If indicator lamp :is lit, operation of the
rear side windows is disabled. Operation is
only possible using the switches in the driv- er's door. If indicator lamp
:is off, oper-
ation is possible using the switches in the
rear compartment. Driving safet
ysystems Driving safety systems overview
In this section, you will find information about
the following driving safety systems:
R ABS ( Anti-lock BrakingSystem)
R BAS ( Brake Assist System)
R BAS PLUS ( BrakeAssist System Plus*)
R Adaptive brake lamps
R ESP ®
(Electronic StabilityProgram)
R EBD ( Electronic Brake-force Distribution)
R ADAPTIVE BRAKE
R PRE-SAFE ®
Brake (vehicles with DIS-
TRONIC PLUS) Important safety notes
G
Risk of accident
The risk of an accident is significantly
increased by driving too fast. This is particu-
larly the case when cornering as well as on
wet or slippery roads or when driving too close
to the vehicle in front.
The driving safety systems described in this
section can neither reduce this risk nor over-
ride the laws of physics.
For this reason, always adapty our driving
style to the prevailing road and weather con-
ditions. Maintain sufficient distance from
other road users and objects on the road.
i In wintry driving conditions, always use
winter tyres (M+S tyres) and if necessary,
snow chains. Only in this way will the driv-
ing safety systems described in this section
work as effectively as possible. 56
Driving safety systemsSafety
Page 71 of 337
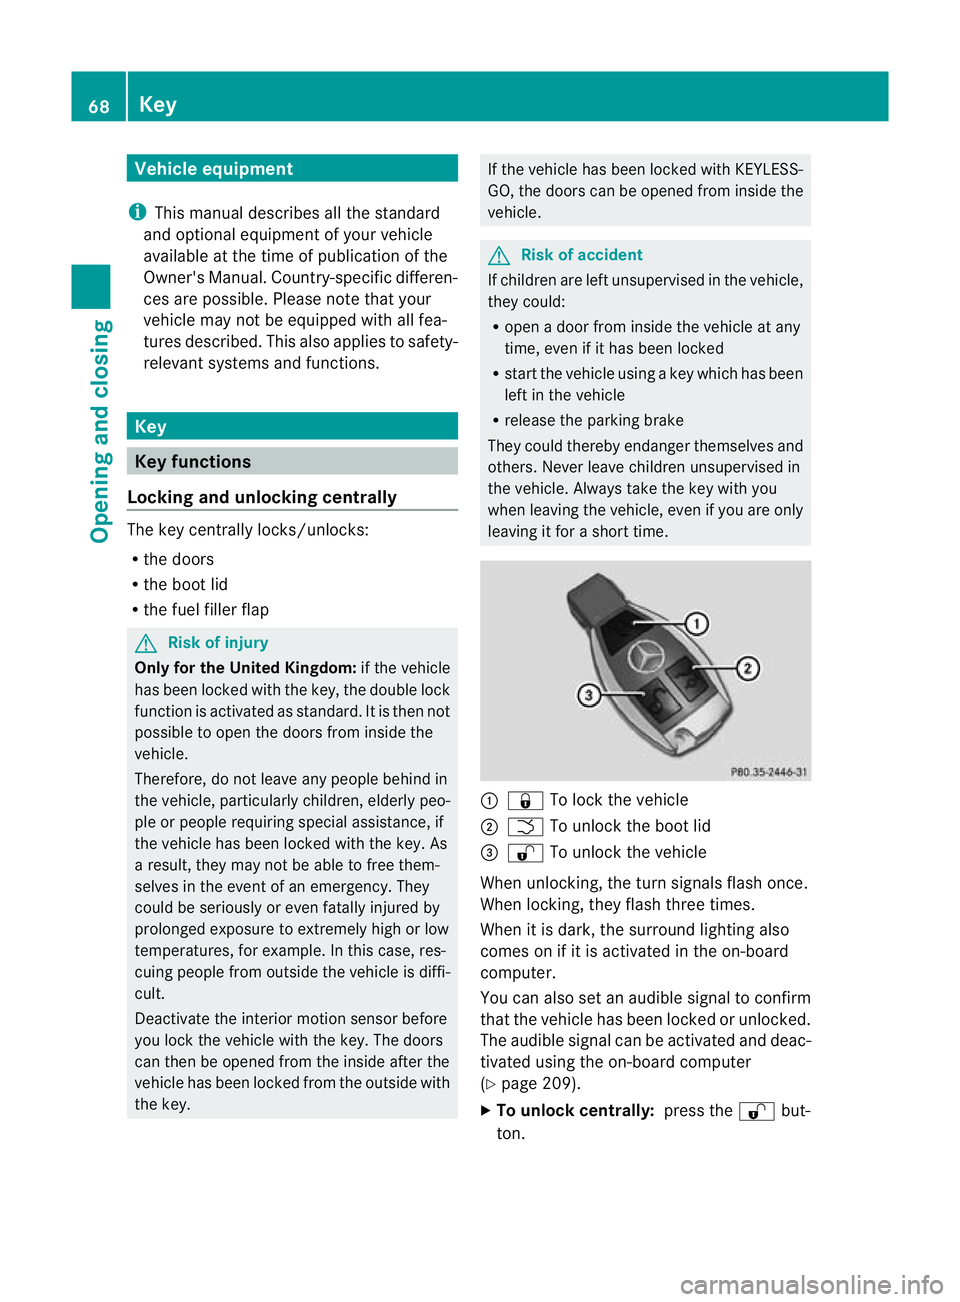
Vehicle equipment
i This manual describes all the standard
and optional equipment of your vehicle
available at the time of publicatio nofthe
Owner's Manual. Country-specific differen-
ces are possible. Please note that your
vehicle may not be equipped with all fea-
tures described. This also applies to safety-
relevant systems and functions. Key
Key functions
Locking and unlocking centrally The key centrally locks/unlocks:
R
the doors
R the boot lid
R the fuel filler flap G
Risk of injury
Only for the United Kingdom: if the vehicle
has been locked with the key, the double lock
function is activated as standard. It is then not
possible to open the doors from inside the
vehicle.
Therefore, do not leave any people behind in
the vehicle, particularly children, elderly peo-
ple or people requiring special assistance, if
the vehicle has been locked with the key. As
a result, they may not be able to free them-
selves in the event of an emergency. They
could be seriously or even fatally injured by
prolonged exposure to extremely high or low
temperatures, for example. In this case, res-
cuing people from outside the vehicle is diffi-
cult.
Deactivate the interior motion sensor before
you lock the vehicle with the key. The doors
can then be opened from the inside after the
vehicle has been locked from the outside with
the key. If the vehicle has been locked with KEYLESS-
GO, the doors can be opened from inside the
vehicle. G
Risk of accident
If children are left unsupervised in the vehicle,
they could:
R open a door from inside the vehicle at any
time, even if it has been locked
R start the vehicle using akey which has been
left in the vehicle
R release the parking brake
They could thereby endanger themselves and
others. Never leave children unsupervised in
the vehicle. Always take the key with you
when leaving the vehicle, even if you are only
leaving it for a short time. :
& To lock the vehicle
; F To unlock the boot lid
= % To unlock the vehicle
When unlocking, the turn signals flash once.
When locking, they flash three times.
When it is dark, the surround lighting also
comes on if it is activated in the on-board
computer.
You can also set an audible signal to confirm
that the vehicle has been locked or unlocked.
The audible signal can be activated and deac-
tivated using the on-board computer
(Y page 209).
X To unlock centrally: press the%but-
ton. 68
KeyOpening and closing
Page 73 of 337

lid, the anti-theft alarm system will be trig-
gered (Y
page 63).
There are several ways to tur noff the alarm:
X To deactivate the alarm with the key:
press the %or& button on the key.
or
X Insert the key into the ignition lock.
or
X To deactivate the alarm with KEYLESS-
GO: press the Start/Stop button in the igni-
tion lock. The key must be in the vehicle.
or
X Lock or unlock the vehicle using KEYLESS-
GO. The key must be outside the vehicle.
If you unlock the vehicle using the emergency
key element, the fuel filler flap will not be
unlocked automatically.
X To unlock the fuel filler flap: insert the
key in the ignition lock.
Removing the emergency key element X
Push release catch :in the direction of
the arrow and at the same time, remove
emergency key element ;from the key. Battery of the key
Important safety notes It is advisable to have batteries replaced at a
qualified specialist workshop, e.g. at a
Mercedes-Benz Service Centre. G
Risk of poisoning
Batteries are toxic and contain caustic sub-
stances. For this reason, keep batteries out of
the reach of children.
If a battery has been swallowed, visi tadoctor
immediately. H
Environmental note Batteries contain pollutants.
It is against the law to dis-
pose of them with the house-
hold rubbish. They must be
collected separately and
recycled in an environmen-
tally responsible manner. Dispose of batteries in an
environmentally responsible
manner. Take discharged
batteries to a qualified spe-
cialist workshop, e.g. a
Mercedes-Benz Service
Centre, or to a special col-
lection point for old batter-
ies.
Checking the battery X
Press the &or% button.
The key battery is working properly if the
battery charge indicator lamp :lights up
briefly.
If battery charge indicator lamp :does not
light up briefly during the test, the key battery
is discharged.
X Replace the key battery (Y page 71).70
KeyOpening and closing