2010 MERCEDES-BENZ CLS COUPE child lock
[x] Cancel search: child lockPage 98 of 337
exterior mirror such that the rear
wheel and kerb are visible.
X Press memory button M? and one of
the arrows on adjustment button =
within three seconds.
The parking position is stored if the
exterior mirror does not move.
If the mirror moves out of position, repeat
the steps.
Calling up astore dparking position set-
ting X
With the key in position 2in the ignition
lock and the exterior mirror on the front-
passenge rside activated, engage reverse
gear.
The exterior mirror on the front-passenger
side moves to the stored parking position.
The exterior mirror on the front-passenger
side moves back to its original position:
R as soon as you exceed a speed of
10 km/h
R about ten seconds after you have disen-
gaged reverse gear
R if you press button :for the exterior mir-
ror on the driver's side Memory functions
Storing settings
With the memory function, you can store up
to three different settings, e.g. for three dif-
ferent people.
The following settings are stored as a single
memory preset:
R position of the seat, backrest and head
restraint
R active multicontour seat :seat cushion
length, seat backrest side bolsters, contour
of the backrest, dynamic function level set-
ting R
driver's side: steering wheel position
R driver's side: position of the exterior mir-
rors on the driver's and front-passenger
sides G
Risk of injury
The memory function can still be used when
the key has been removed. For this reason,
children should never be left unsupervised in
the vehicle. They could otherwise become
trapped when adjusting the seat or the steer-
ing wheel. G
Risk of accident
Only use the memory function on the driver's
side when the vehicle is stationary. Other-
wise, you could be distracted from the traffic
conditions by the steering wheel and seat
moving of their own accord, and as a result
cause an accident. X
Adjust the seat (Y page 86).
X On the driver's side, adjust the steering
wheel (Y page 91) and the exterior mirrors
(Y page 93).
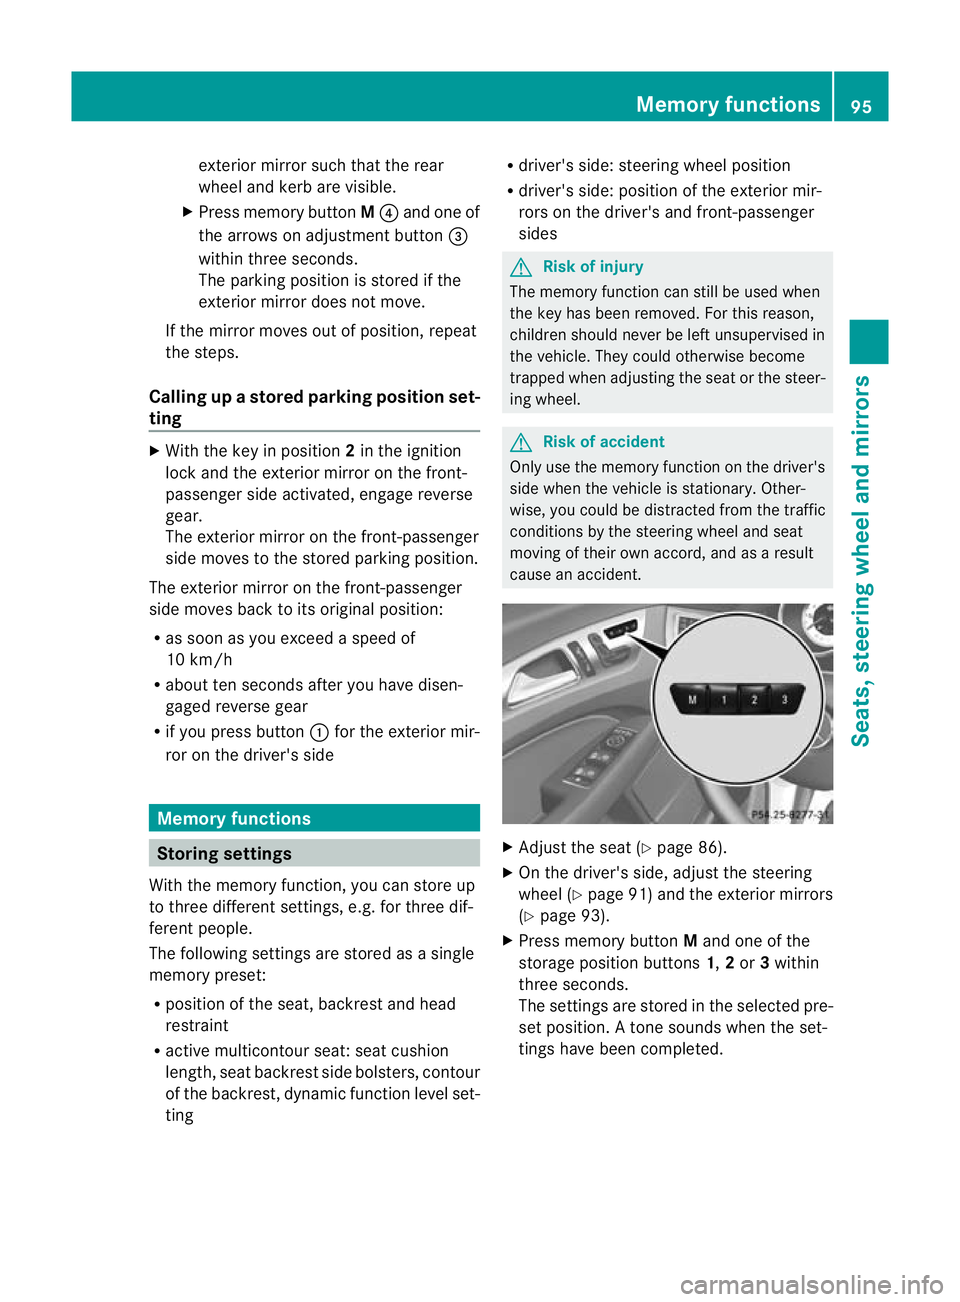
X Press memory button Mand one of the
storage position buttons 1,2or 3within
three seconds.
The settings are stored in the selected pre-
set position .Atone sounds when the set-
tings have been completed. Memory functions
95Seats, steering wheel and mirrors Z
Page 133 of 337
is open, the power supply is deactivated
again.
Removing the Start/Stop button
You can remove the Start/Stop button from
the ignition lock and start the vehicle as nor-
mal using the key.
i You do not have to remove the Start/Stop
button from the ignition lock when you
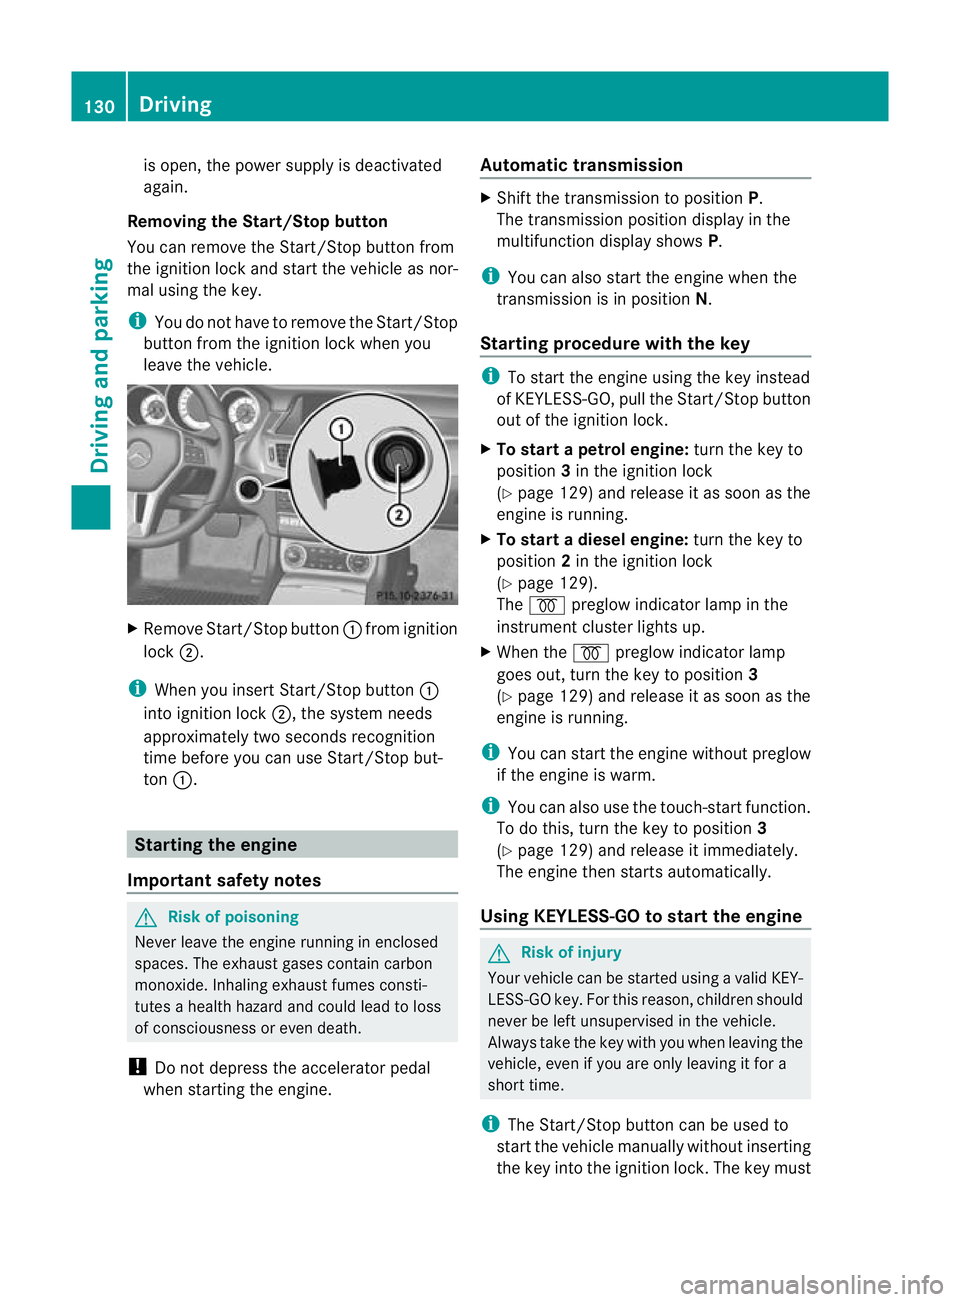
leave the vehicle. X
Remove Start/Stop button :fromi gnition
lock ;.
i When you insert Start/Stop button :
into ignition lock ;, the system needs
approximately two seconds recognition
time before you can use Start/Stop but-
ton :. Starting the engine
Important safety notes G
Risk of poisoning
Never leave the engine running in enclosed
spaces. The exhaust gases contain carbon
monoxide. Inhaling exhaust fumes consti-
tutes a health hazard and could lead to loss
of consciousness or even death.
! Do not depress the accelerator pedal
when starting the engine. Automatic transmission X
Shift the transmission to position P.
The transmission position display in the
multifunction display shows P.
i You can also start the engine when the
transmission is in position N.
Starting procedure with the key i
To start the engine using the key instead
of KEYLESS-GO, pull the Start/Stop button
out of the ignition lock.
X To start a petrol engine: turn the key to
position 3in the ignition lock
(Y page 129) and release it as soon as the
engine is running.
X To startad iesel engine: turn the key to
position 2in the ignition lock
(Y page 129).
The % preglow indicator lamp in the
instrumen tcluster lights up.
X When the %preglow indicator lamp
goes out, tur nthe key to position 3
(Y page 129) and release it as soon as the
engine is running.
i You can start the engine without preglow
if the engine is warm.
i You can also use the touch-start function.
To do this, turn the key to position 3
(Y page 129) and release it immediately.
The engine then starts automatically.
Using KEYLESS-GO to startt he engine G
Risk of injury
You rvehicle can be started using a valid KEY-
LESS-GO key. For this reason, children should
never be left unsupervised in the vehicle.
Always take the key with you when leaving the
vehicle, even if you are only leaving it for a
short time.
i The Start/Stop button can be used to
start the vehicle manually without inserting
the key into the ignition lock. The key must 130
DrivingDriving and parking
Page 150 of 337
Problem Possible causes/consequences and
M Solutions
The fuel filler flap is unlocked, but the opening mechanism is jam-
med.
X
Consult a qualified specialist workshop. The engine will not
start. The fuel tank of a vehicle with a diesel engine has been run com-
pletely dry.
X Refuel the vehicle with at least 5litres of diesel.
X Turn the ignition on for at least 10 seconds (Y page 129).
X Start the engine continuously for up to 10 seconds until it runs
smoothly.
or
X Start the engine via the touch-star tfunction .To do this, turn the
key to position 3(Ypage 129) in the ignition lock and then
release it immediately.
If the engine does not start:
X Turn the ignition on again for approximately 10 seconds
(Y page 129).
X Start the engine again continuously for up to 10 seconds until
it runs smoothly.
or
X Start the engine again via the touch-start function.
If the engine does not start after three attempts:
X Consult a qualified specialist workshop. Parking
Important safety notes
G
Risk of accident
Only remove the key from the ignition lock
when the vehicle is stationary, as you cannot
steer the vehicle when the key is removed.
Never leave children unsupervised in the vehi-
cle. They could release the parking brake. This
could lead to a serious or fatal accident. G
Risk of fire
Under no circumstances should the exhaust
system come into contact with flammable
materials such as dry grass or petrol, for
example. Do not park the vehicle on dry grass- land or harvested grain fields. The hot exhaust
system could otherwise ignite the flammable
material and set the vehicle on fire.
To ensure that the vehicle is secured against
rolling away unintentionally:
R the parking brake must be applied.
R the transmission must be in position Pand
the key must be removed from the ignition
lock.
R on steep uphill or downhill gradients, turn
the front wheels towards the kerb. Parking
147Driving and parking Z
Page 214 of 337
X
Press the :or9 button to select
one of the three departure times or Timeroff (no timer active).
X Press the abutton to confirm.
When a departure time is selected, the yel-
low indicator lamp lights up on the auxiliary
heating button.
Changing the departure time
X Press the =or; button on the steer-
ing wheel to select the Settings menu.
X Press the :or9 button to select the
Heating submenu.
X Press the abutton to confirm.
You will see the selected setting.
X Press the abutton to confirm.
X Press the :or9 button to select
Change A ,
B or
C .
X Press the abutton to confirm.
You can now change the departure time.
X Press the =or; button to select the
display to be changed: hours, minutes.
X Press the :or9 button to set the
selected display.
X Press the abutton to store the entry.
The yellow indicator lamp on the auxiliary
heating button lights up.
Convenience Activating/deactivating the EASY-
ENTRY/EXIT feature
You can use the
Easy Entry/Exit: function
to activate or deactivate the EASY ENTRY/
EXIT feature (Y page 92). G
Risk of injury
The steering wheel moves when the EASY-
ENTRY/EXIT feature is active. There is a risk
of occupants becoming trapped. Before acti-
vating the EASY-ENTRY/EXIT feature, make
sure that nobody can become trapped.
Do not leave children unsupervised in the
vehicle, even if they are secured in a child
restraint system. The children could open the driver's door and thereby unintentionally acti-
vate the EASY-ENTRY/EXIT feature and
become trapped.
X Press the =or; button on the steer-
ing wheel to select the Settings menu.
X Press the :or9 button to select the
Convenience submenu.
X Press the abutton to confirm.
X Press the :or9 button to select the
Easy Entry/Exit: function.
When the Easy Entry/Exit: function is
activated, the vehicle steering wheel is dis-
played in red in the multifunction display.
X Press the abutton to save the setting.
Switching the belt adjustment on/off
For further information on belt adjustment
(Y page 43).
X Press =or; on the steering wheel
to select the Settings menu.
X Press the :or9 button to select the
Convenience submenu.
X Press the abutton to confirm.
X Press the :or9 button to select the
Belt adjustment function.
When the Belt adjustment function is
activated, the vehicle seat belt is displayed
in red in the multifunction display.
X Press the abutton to save the setting.
Switching the fold-in mirrors when lock-
ing function on/off
If you switch on the Auto. fold in function,
the exterior mirrors fold in when you lock the
vehicle. When you unlock the vehicle and then
open the driver's or front-passenger door, the
exterior mirrors fold out again.
If you have switched the function on and you
fold the exterior mirrors in using the button
on the door (Y page 93), they will not fold out
automatically. The exterior mirrors can then
only be folded out using the button on the
door. Menus and submenus
211On-board computer and displays Z
Page 261 of 337
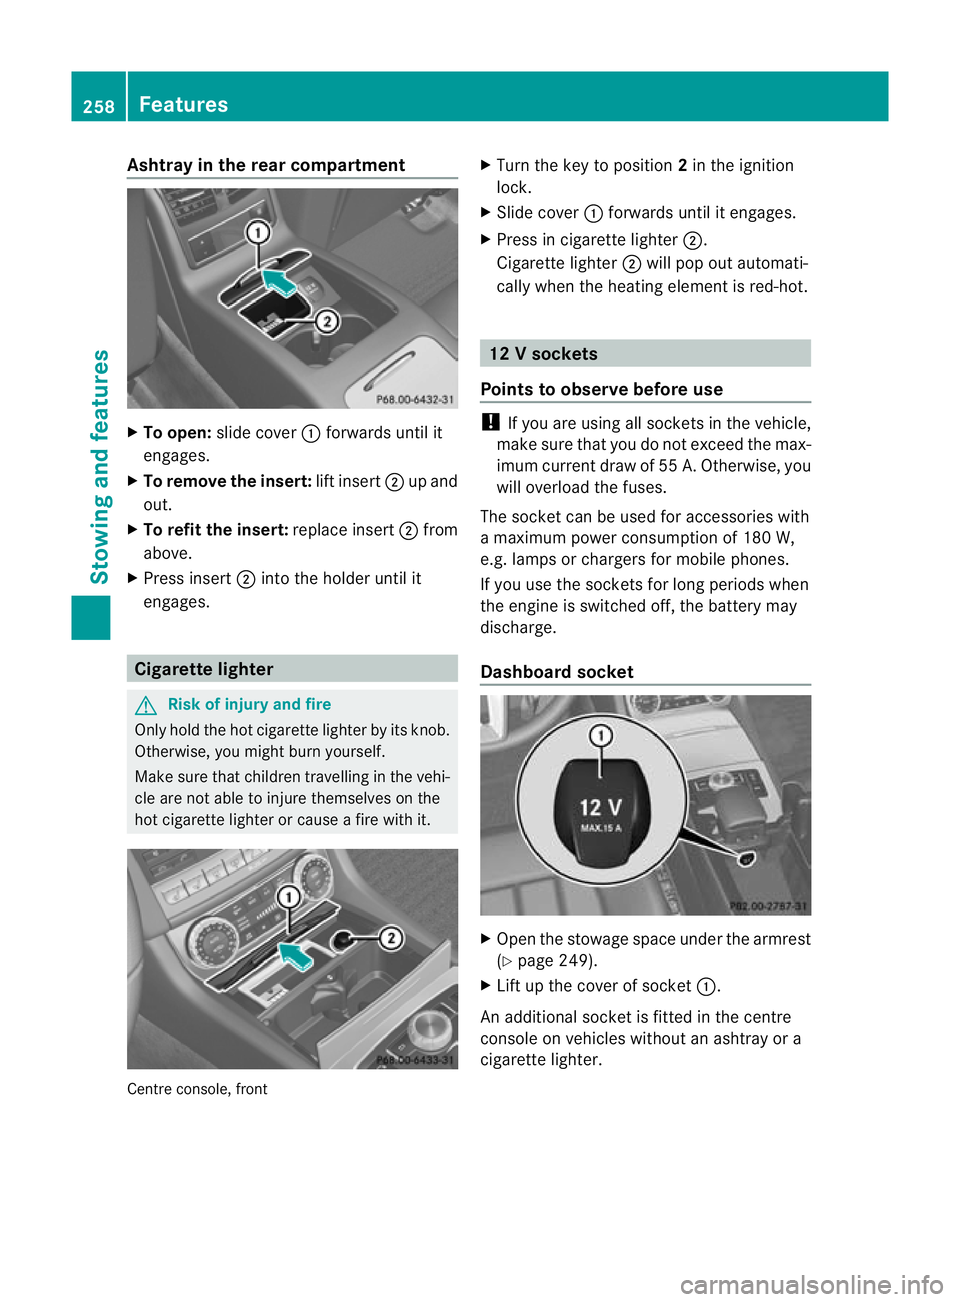
Ashtray in the rear compartment
X
To open: slide cover :forwards until it
engages.
X To remove the insert: lift insert;up and
out.
X To refit the insert: replace insert;from
above.
X Press insert ;into the holder until it
engages. Cigarette lighter
G
Risk of injury and fire
Only hold the hot cigarette lighte rby its knob.
Otherwise, you might burn yourself.
Make sure that children travelling in the vehi-
cle are no table to injure themselves on the
hot cigarette lighter or cause a fire with it. Centre console, front X
Turn the key to position 2in the ignition
lock.
X Slide cover :forwards until it engages.
X Press in cigarette lighter ;.
Cigarette lighter ;will pop out automati-
cally when the heating element is red-hot. 12
Vsockets
Points to observe before use !
If you are using all sockets in the vehicle,
make sure that you do no texceed the max-
imu mcurren tdraw of 55 A. Otherwise, you
will overload the fuses.
The socket can be used for accessories with
a maximum power consumption of 180 W,
e.g. lamps or chargers for mobile phones.
If you use the sockets for long periods when
the engine is switched off, the battery may
discharge.
Dashboard socket X
Open the stowage space under the armrest
(Y page 249).
X Lift up the cover of socket :.
An additional socket is fitted in the centre
console on vehicles without an ashtray or a
cigarette lighter. 258
FeaturesStowing and features
Page 285 of 337
X
Do not remove any foreign objects which
have penetrated the tyre, e.g .screws or
nails.
X Remove the tyre sealant bottle, the accom-
panying "max. 80 km/h" sticker and the
tyre inflation compressor from the stowage
well underneath the boo tfloor
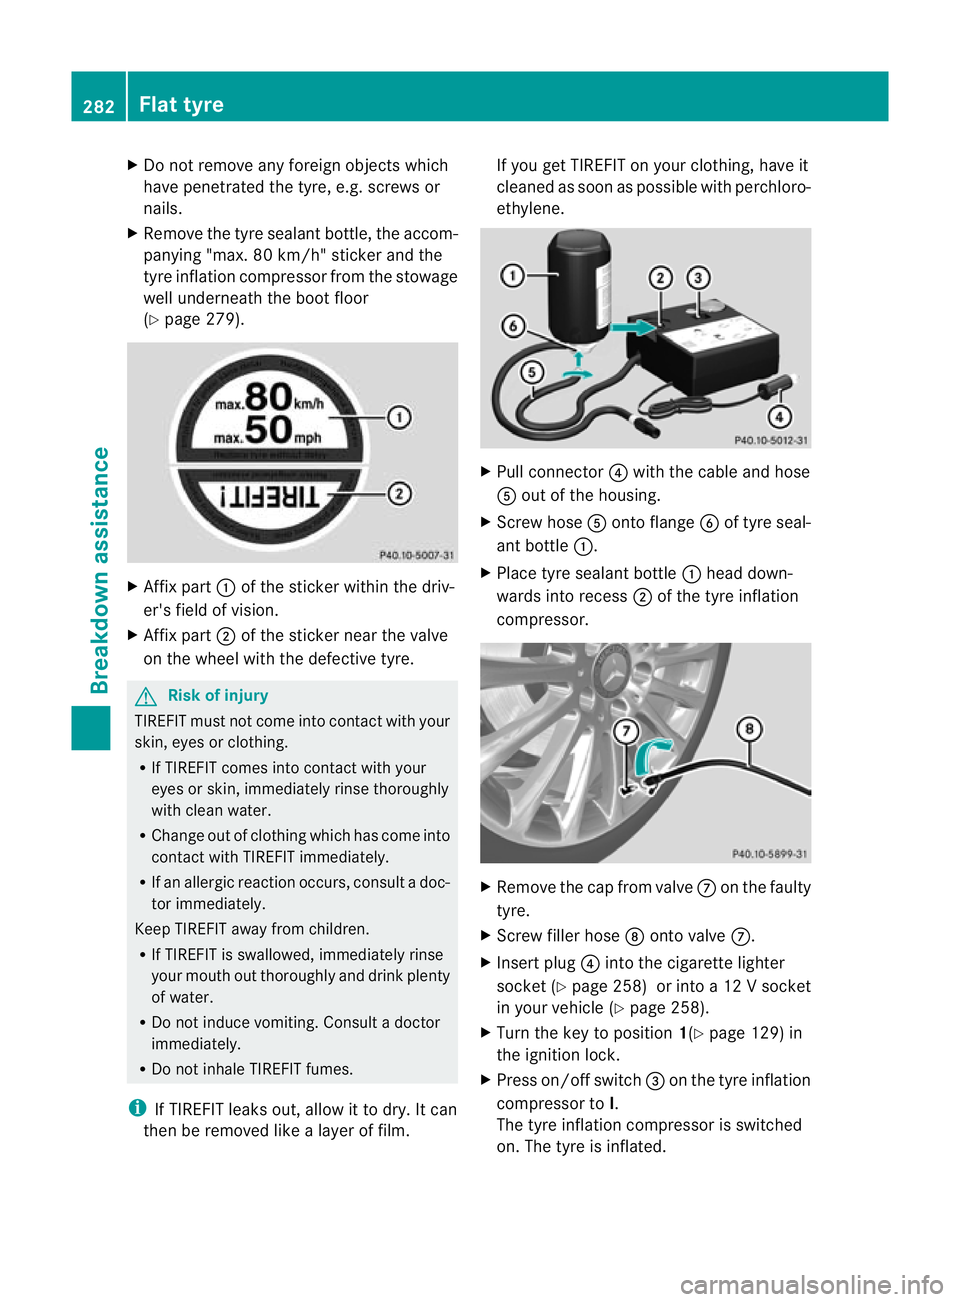
(Y page 279). X
Affix part :of the sticker within the driv-
er's field of vision.
X Affix part ;of the sticker near the valve
on the wheel with the defective tyre. G
Risk of injury
TIREFIT must not com einto contact with your
skin, eyes or clothing.
R If TIREFIT comes into contact with your
eyes or skin, immediately rinse thoroughly
with clean water.
R Change ou tofclothing which has come into
contact with TIREFIT immediately.
R If an allergic reaction occurs, consult a doc-
tor immediately.
Keep TIREFIT away fro mchildren.
R If TIREFIT is swallowed, immediately rinse
your mouth out thoroughly and drink plenty
of water.
R Do not induce vomiting. Consult a doctor
immediately.
R Do not inhale TIREFIT fumes.
i If TIREFIT leaks out, allow it to dry. It can
then be removed like a layer of film. If you get TIREFIT on your clothing, have it
cleaned as soon as possible with perchloro-
ethylene.
X
Pull connector ?with the cable and hose
A out of the housing.
X Screw hose Aonto flange Bof tyre seal-
ant bottle :.
X Place tyre sealant bottle :head down-
wards into recess ;of the tyre inflation
compressor. X
Remove the cap from valve Con the faulty
tyre.
X Screw filler hose Donto valve C.
X Insert plug ?into the cigarette lighter
socket (Y page 258) or into a12 V socket
in you rvehicle (Y page 258).
X Turn the key to position 1(Ypage 129) in
the ignition lock.
X Press on/off switch =on the tyre inflation
compressor to I.
The tyre inflation compressor is switched
on. The tyre is inflated. 282
Flat tyreBreakdown assistance