2010 MERCEDES-BENZ CLS COUPE keyless
[x] Cancel search: keylessPage 10 of 337

Climate control
Activating/deactivating rear win-
dow heating ................................... 117
Activating/deactivating the auxil-
iary heating/ventilatio n................. 120
Convenience opening/closing (air
recirculation) ................................. 118
Demisting the windows .................. 117
Important safety information .........110
Indicator lamp ................................ 114
Problems with "cooling with air
dehumidification" ........................... 114
Problems with the rear window
heating .......................................... 117
Setting the climate mode (AIR
FLOW) ............................................ 114
Switching the ZONE function on/
off .................................................. 116
Clock( on-board computer) ...............206
Cockpit ................................................. 24
Collapsible spare wheel see Emergency spare wheel
Combination switch ............................99
Constant headlamp mode see Daytime driving lights
Consumption statistics (on-board
computer) .......................................... 198
Convenience box ............................... 252
Convenience closing feature ..............79
Convenience opening/closing Air-recirculation mode ...................118
Convenience opening feature ............79
Coolan t(engine)
Checkin gthe level ......................... 268
Display message ............................ 224
Notes ............................................. 322
Temperature (on-board computer) .212
Temperature gauge ........................ 194
Warning lamp ................................. 244
Cooling
see Climate control
Cornering light function (display
message) ............................................ 221
Crash-responsive emergency light-
ing ....................................................... 104Cruise control
Cruise control leve r....................... 152
Display message ............................ 231
Cup holder ......................................... 255
Centre console .............................. 255
Rea rcompartmen t......................... 255
Current fuel consumption (on-
board computer) ............................... 198 D
Dashboard see Cockpit
Data, technical .................................. 316
Date (on-board computer) ................206
Daytime driving lights Display message ............................ 223
Switching on/off (on-board com-
puter) ............................................. 207
Delaye dswitch-off
Exterio rlighting (on-board com-
puter )............................................. 208
Interior lighting (on-board com-
puter) ............................................. 209
Diesel particle filter ..........................149
Digital speedometer .........................198
Dipped-beam headlamps Display message ............................ 221
Setting for driving on the right/
left (on-board computer) ................207
DIREC TSELECT lever
see Automatic transmission
Display (cleaning instructions) ........274
Display messages ASSYST PLUS service interval dis-
play................................................ 269
Brakes ........................................... 219
Calling up (on-board computer) .....215
Clearing (on-board computer) ........215
Driving systems ............................. 226
Engine ............................................ 224
Key ................................................ 236
KEYLESS-GO .................................. 236
Lamp s............................................ 221
Safety systems .............................. 215
Tyres .............................................. 232
Vehicle .......................................... .234 Index
7
Page 12 of 337
EBD (Electronic Brake-force Distri-
bution) Display message ............................ 220
Function/notes ................................ 61
ECO start/stop function
General information .......................131
Switching on/off (AMG vehicles) ...133
Switching on/off (except AMG
vehicles) ........................................ 133
Electrical fuses
see Fuses
Electronic Brake-force Distribution
see EBD
Electronic Stability Program
see ESP ®
Electronic Traction System see ETS/4ETS
Emergency key element
Function/notes ................................ 69
Emergency locking
Vehicle ............................................. 75
Emergency release
Fuel filler fla p................................. 145
Emergency running mode
Automatic transmission .................142
Emergency spare wheel
Inflating the collapsible spare
wheel ............................................. 288
Notes/data .................................... 313
Storage location ............................ 280
Stowing .......................................... 280
Emergency unlocking
Boot ................................................. 77
Vehicle ............................................. 75
Engine
Running irregularl y......................... 134
Starting problems ..........................134
Starting the engine with the key ....130
Starting with KEYLESS GO .............130
Stopping ........................................ 148
Warning lamp (engine diagnos-
tics) ............................................... 244
Engine electronics .............................316
Malfunction ................................... .134
Engine number .................................. 319Engine oil
Additives ........................................ 321
Checking the oil level ..................... 267
Display message ............................ 225
Filling capacity ............................... 321
Notes about oil grades ................... 320
Temperature (on-board computer) .212
Topping up ..................................... 268
Viscosity ........................................ 321
Environmental protection
Note ................................................ .19
Returning an end-of-life vehicle .......19
Error messages
see Display messages
ESP ®
(Electronic Stability Pro-
gram) Activating/deactivating (AMG
vehicles) .......................................... 60
Activating/deactivating (except
AMG vehicles) .................................. 59
Activating/deactivating (on-
board computer) ............................ 204
ETS/4ETS ........................................ 59
Important safety guidelines .............58
Warning lamp ................................. 242
ETS/4ETS (Electronic Traction Sys-
tem) ...................................................... 59
Exhaus ttail pipe (cleaning instruc-
tions) .................................................. 274
Exterior mirrors Adjusting ......................................... 93
Anti-dazzle mode (automatic) ..........94
Folding in/ou t(automatically) .........93
Folding in/ou t(electrically) .............93
Folding in whe nlocking (on-board
computer) ...................................... 211
Out of position ................................. 94
Parking position ............................... 94
Resetting ......................................... 93
Storing settings (memory func-
tion) ................................................. 95 F
Fatigue Assist see ATTENTION ASSIST
Fire extinguisher ............................... 278
First-aid kit ......................................... 278 Index
9
Page 14 of 337

Sea
tbelt ........................................ 239
SPORT handling mode ...................243
SRS ................................................ 243
Tyr ep ressure monitor ...................246
Instrument cluster
Displays. .......................................... 26
Overview .......................................... 26
Submenu (on-board computer) ......205
Warning and indicator lamps ...........28
Intelligen tLight System
Display message ............................ 223
Setting dipped-bea mheadlamps
for driving on the right/left (on-
board computer) ............................ 207
Switching on/off (on-board com-
puter) ............................................. 207
Interior lighting
Automatic control system ..............104
Delayed switch-off (on-board
computer) ...................................... 209
Emergency lighting ........................104
Manual control ............................... 104
Reading lamp ................................. 103
Setting brightness for display/
switches (on-board computer) .......206
Setting the ambient lighting
brightness (on-board computer) ....208
Setting the ambient lighting col-
our (on-board computer) ................ 208
Interior motion sensor ........................64
ISOFIX child seat securing system ....49 J
Jack Storage location ............................ 279
Using ............................................. 285
Jump-starting ..................................... 294
see Jump-starting K
Key Changing the battery .......................71
Checking the battery .......................70
Convenience closing feature ............79
Convenience opening feature ..........79
Display message ............................ 236Malfunction ...................................... 72
Modifying the programming
.............69
Starting the engine ........................130
KEYLESS-GO
Button ............................................ 129
Convenience closing ........................79
Display message ............................ 236
Locking ............................................ 69
Starting the engine ........................130
Unlocking ......................................... 69
Keyp ositions
Key ................................................ 129
KEYLESS GO .................................. 129
Kickdown ................................... 138, 141
Kneebag ............................................... 38 L
Lane-change assistant see Active Blind Spot Assist
see Blind Spot Assist
Lane Keeping Assist
Activating/deactivating (on-
board computer) ............................ 205
Display message ............................ 228
Function/informatio n.................... 185
Lane package ..................................... 183
Lashing eyelets ................................. 252
Lights Activating/deactivating the inte-
rior lighting delayed switch-off
(on-board computer) ......................209
Active light function .......................102
Automatic headlamp mode ..............99
Cornering light function .................102
Daytime driving lights ......................99
Dipped-bea mheadlamps ................. 99
Driving abroad ................................. 98
Foglamps (extended range) ...........103
Hazard warning lamps ...................101
Ligh tswitc h..................................... 98
Main-beam headlamps ................... 100
Motorway mode ............................. 103
Rea rfoglamp ................................... 99
Setting brightness for display/
switches (on-board computer) .......206
Setting the ambient lighting
brightness (on-board computer) ....208 Index
11
Page 66 of 337
At speeds up to approximately 70 km/h,
PRE-SAFE ®
Brake may also detect stationary
obstacles, for example stoppe dorparked
vehicles. G
Ris
kofa ccident
If, in a critical driving situation, you do not
receive a visual and acoustic warning:
R PRE-SAFE ®
Brake did no tdetec tthe risk of
a collision
R PRE-SAFE ®
Brake is switched off
R PRE-SAFE ®
Brake has failed
You must then brake to avoid a collision.
X To activate/deactivate: activate or deac-
tivate PRE-SAFE ®
Brake in the on-board
computer (Y page 204).
After activation, the Äsymbol is dis-
played on the left in the instrumentc luster.
The radar sensor system is switched off auto-
matically in the vicinity of radio telescope
facilities ( Ypage 327).
Vehicles without COMAND and navigation,
and vehicles for Australia: near radio tele-
scope installations, the radar sensor system
must be switched off with the on-board com-
puter (Y page 210).
For PRE-SAFE ®
Brake to assist you when driv-
ing, the radar sensor system must be
switched on (Y page 210) and operational.
PRE-SAFE ®
Brake does not always detect
complex traffic situations properly. You can
terminate the braking action of PRE-SAFE ®
Brake in a non-critical driving situation at any
time if:
R an acoustic and visual warning occurs.
R the vehicle brakes.
To end this, you can either depress the accel-
erator pedal further, activate kickdown or
release the brake pedal. The braking action of PRE-SAFE
®
Brake is
ended automatically if:
R you manoeuvre to avoid the obstacle.
R you drive slower than approximately
15 km/h.
R there is no longer an obstacle detected in
front of your vehicle.
R there is no longer any dange rofacollision.
Following a collisio norcollision-related dam-
age to the front end of the vehicle, have the
configuration and operation of the radar sen-
sors checked. Choose a qualified specialist
workshop which has the necessary specialist
knowledge and tools for the work required.
Mercedes-Benz recommends that you use a
Mercedes-Benz Service Centre for this pur-
pose. Anti-theft systems
Immobiliser
The immobiliser prevents your vehicle from
being started without the correc tkey.
X To activate with the key: remove the key
from the ignition lock.
X To activate with KEYLESS-GO: switch the
ignition off and open the driver's door.
X To deactivate: switch on the ignition.
i The immobiliser is always deactivated
when you start the engine. ATA (Anti-Theft Alarm system)
Av isual and audible alarm is triggered if the
alarm system is primed and you open:
R a door
R the vehicle with the emergency key ele-
ment
R the boot lid
R the bonnet
The alarm is not switched off, even if you
close the open door that has triggered it, for
example. Anti-theft systems
63Safety Z
Page 67 of 337
X
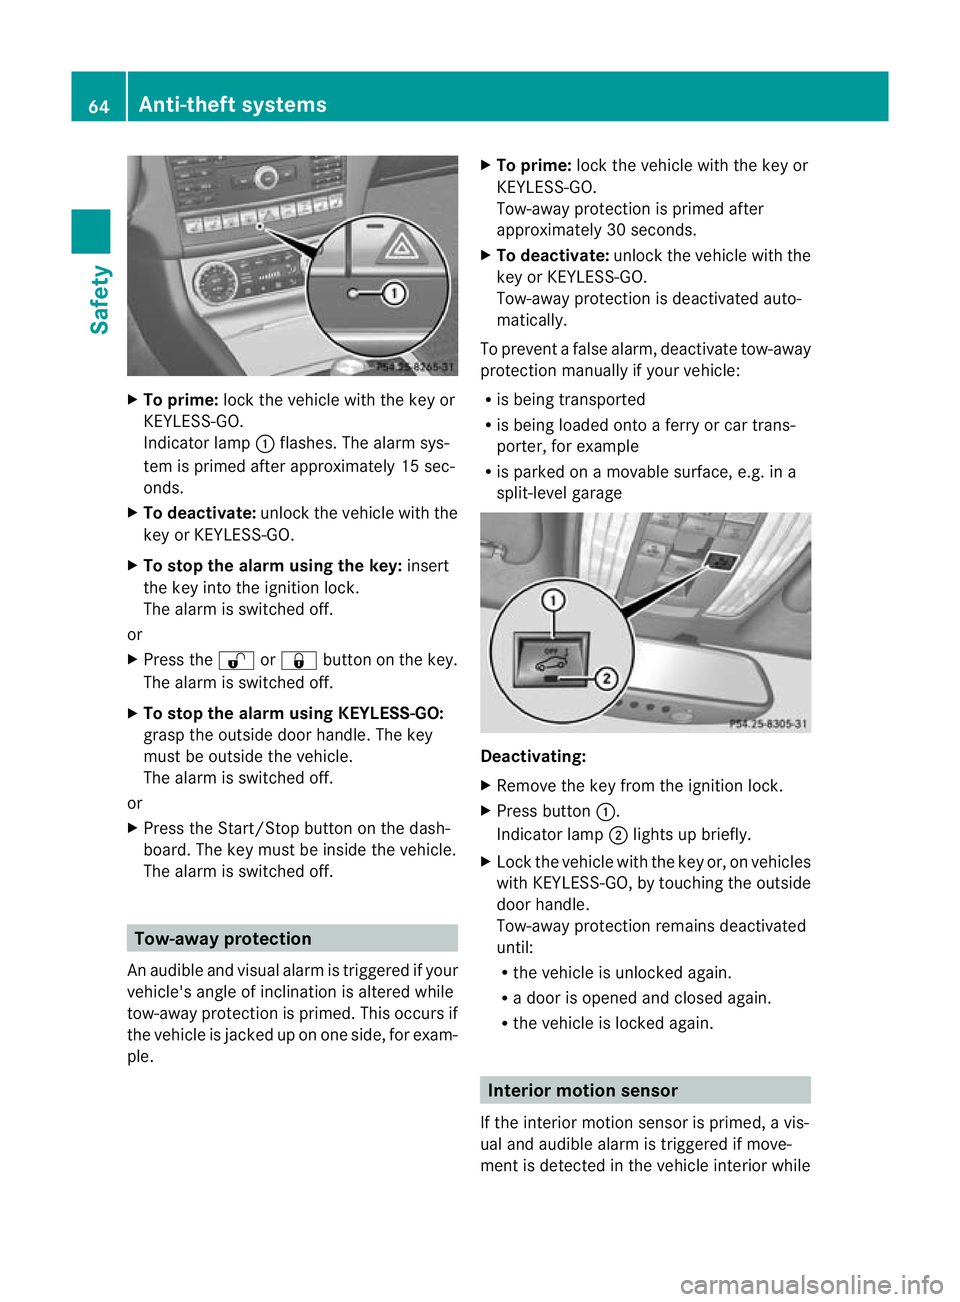
To prime: lock the vehicle with the key or
KEYLESS-GO.
Indicato rlamp :flashes. The alarm sys-
te mi s primed after approximately 15 sec-
onds.
X To deactivate: unlock the vehicle with the
key or KEYLESS-GO.
X To stop the alarm using the key: insert
the key into the ignition lock.
The alarm is switched off.
or
X Press the %or& button on the key.
The alarm is switched off.
X To stop the alarm using KEYLESS-GO:
grasp the outside door handle. The key
must be outside the vehicle.
The alarm is switched off.
or
X Press the Start/Stop button on the dash-
board. The key must be inside the vehicle.
The alarm is switched off. Tow-away protection
An audible and visual alarm is triggered if your
vehicle's angle of inclination is altered while
tow-away protection is primed. This occurs if
the vehicle is jacked up on one side, for exam-
ple. X
To prime: lock the vehicle with the key or
KEYLESS-GO.
Tow-away protection is primed after
approximately 30 seconds.
X To deactivate: unlock the vehicle with the
key or KEYLESS-GO.
Tow-away protection is deactivated auto-
matically.
To prevent a false alarm, deactivate tow-away
protection manually if your vehicle:
R is being transported
R is being loaded onto a ferry or car trans-
porter, for example
R is parked on a movable surface, e.g. in a
split-level garage Deactivating:
X
Remove the key from the ignition lock.
X Press button :.
Indicator lamp ;lights up briefly.
X Lock the vehicle with the key or, on vehicles
with KEYLESS-GO, by touching the outside
door handle.
Tow-away protection remains deactivated
until:
R the vehicle is unlocked again.
R a door is opened and closed again.
R the vehicle is locked again. Interior motion sensor
If the interior motion sensor is primed, a vis-
ual and audible alarm is triggered if move-
ment is detected in the vehicle interior while 64
Anti-theft systemsSafety
Page 68 of 337

the vehicle is locked
.This occurs if someone
reaches into the vehicle interior, for example.
To activate:
X Make sure that:
R
the side windows are closed.
R the sliding sunroof is closed.
R there are no objects, e.g. mascots, hang-
ing on the rear-view mirror or on the grab
handles on the roof trim.
This will prevent false alarms.
X Make sure that all the doors and the tail-
gate are closed.
X Lock the vehicle with the key or KEYLESS-
GO.
To deactivate:
X Unlock the vehicle with the key or KEY-
LESS-GO.
The interior motion sensor is deactivated
automatically.
To prevent a false alarm, deactivate the inte-
rior motion sensor if you lock your vehicle
and:
R people or animals remain in the vehicle.
R the side windows remain open.
R the sliding sunroof remains open.
Deactivating:
X Remove the key from the ignition lock. X
Press button :.
Indicator lamp ;flashes briefly. X
Lock the vehicle with the key. On vehicles
with KEYLESS-GO, the locking buttons on
the door handle/boot lid can also be used.
The interior motion sensor remains deacti-
vated until:
R the vehicle is unlocked again.
R a door is opened and closed again.
R the vehicle is locked again.
i United Kingdom only: if the vehicle has
been locked with the key, the doors cannot
be opened from the inside (Y page 74).
Deactivate the interior motion sensor
before locking the vehicle with the key. The
doors can then be opened from the inside
after the vehicle has been locked from the
outside with the key. Observe the "Impor-
tant safety notes" (Y page 73). Anti-theft systems
65Safety Z
Page 71 of 337
Vehicle equipment
i This manual describes all the standard
and optional equipment of your vehicle
available at the time of publicatio nofthe
Owner's Manual. Country-specific differen-
ces are possible. Please note that your
vehicle may not be equipped with all fea-
tures described. This also applies to safety-
relevant systems and functions. Key
Key functions
Locking and unlocking centrally The key centrally locks/unlocks:
R
the doors
R the boot lid
R the fuel filler flap G
Risk of injury
Only for the United Kingdom: if the vehicle
has been locked with the key, the double lock
function is activated as standard. It is then not
possible to open the doors from inside the
vehicle.
Therefore, do not leave any people behind in
the vehicle, particularly children, elderly peo-
ple or people requiring special assistance, if
the vehicle has been locked with the key. As
a result, they may not be able to free them-
selves in the event of an emergency. They
could be seriously or even fatally injured by
prolonged exposure to extremely high or low
temperatures, for example. In this case, res-
cuing people from outside the vehicle is diffi-
cult.
Deactivate the interior motion sensor before
you lock the vehicle with the key. The doors
can then be opened from the inside after the
vehicle has been locked from the outside with
the key. If the vehicle has been locked with KEYLESS-
GO, the doors can be opened from inside the
vehicle. G
Risk of accident
If children are left unsupervised in the vehicle,
they could:
R open a door from inside the vehicle at any
time, even if it has been locked
R start the vehicle using akey which has been
left in the vehicle
R release the parking brake
They could thereby endanger themselves and
others. Never leave children unsupervised in
the vehicle. Always take the key with you
when leaving the vehicle, even if you are only
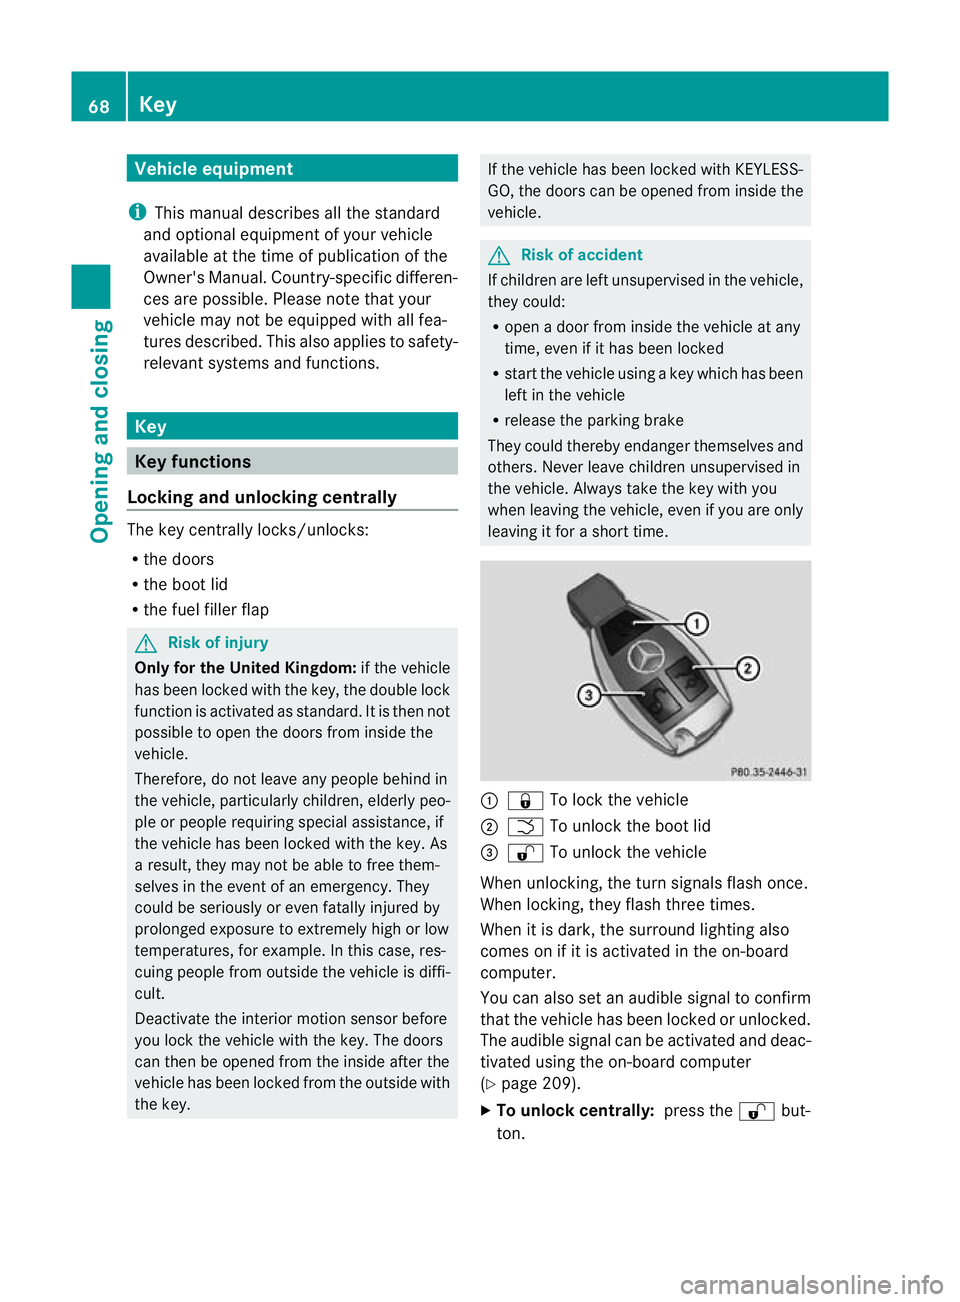
leaving it for a short time. :
& To lock the vehicle
; F To unlock the boot lid
= % To unlock the vehicle
When unlocking, the turn signals flash once.
When locking, they flash three times.
When it is dark, the surround lighting also
comes on if it is activated in the on-board
computer.
You can also set an audible signal to confirm
that the vehicle has been locked or unlocked.
The audible signal can be activated and deac-
tivated using the on-board computer
(Y page 209).
X To unlock centrally: press the%but-
ton. 68
KeyOpening and closing
Page 72 of 337
If you do not open
adoor or the boot lid within
approximately 40 seconds of unlocking the
vehicle:
R the vehicle is locked again.
R the anti-theft system is primed again.
X To lock centrally: press the&button. KEYLESS-GO
You can start, lock or unlock the vehicle using
KEYLESS-GO. To do this, you only need carry
the key with you. When you touch the surface
of the sensors on the vehicle's outside door
handles, KEYLESS-GO establishes a radio
connection between the vehicle and the key.
The distance from the door handle with which
you wish to lock or unlock the vehicle must
not be greater than 1 m.
When the engine is started and whilst you are
driving, KEYLESS-GO also checks whether a
valid key is in the vehicle by periodically
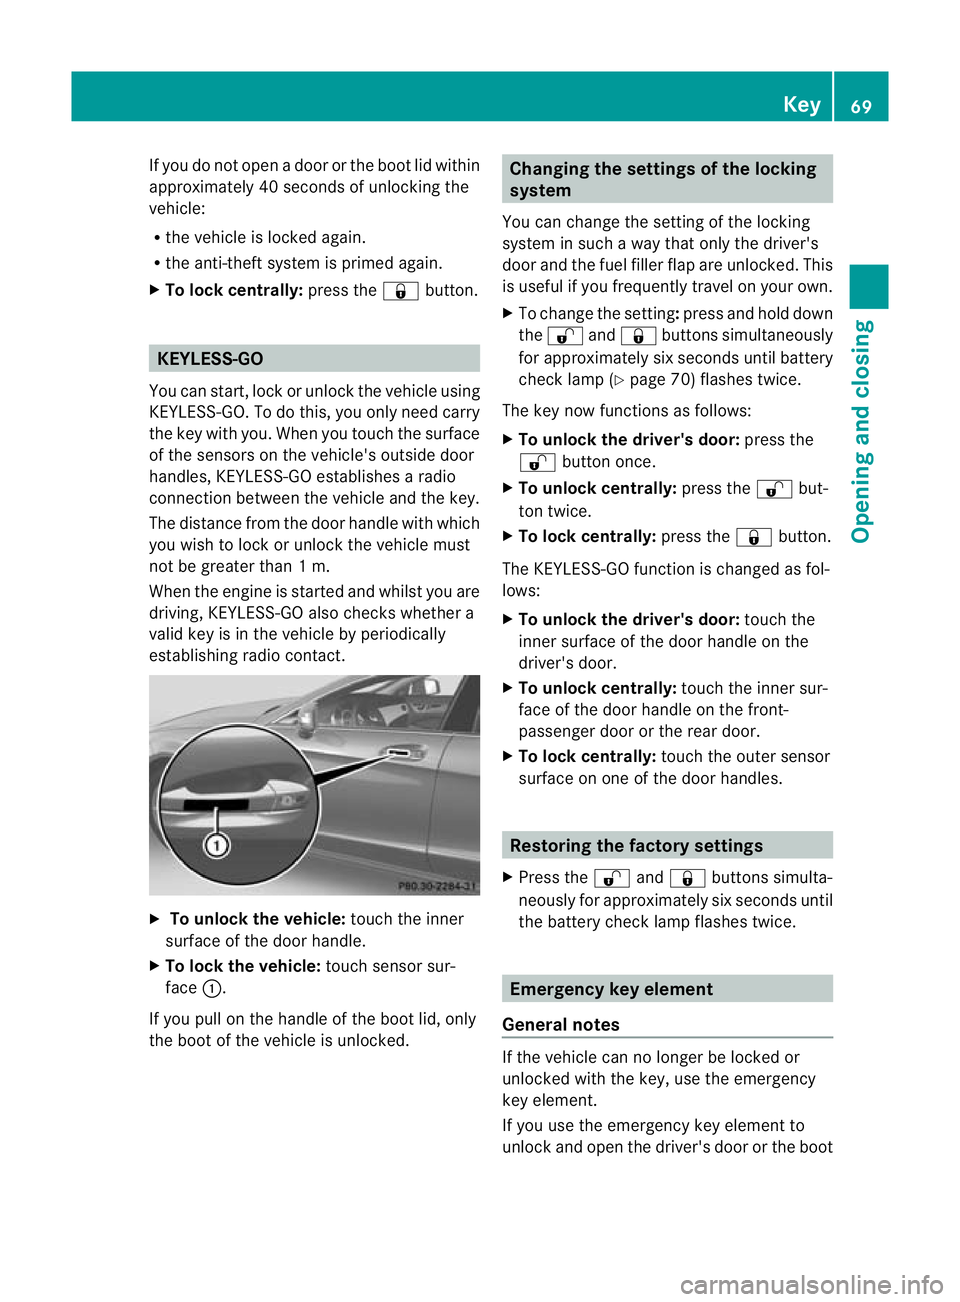
establishing radio contact. X
To unlock the vehicle: touch the inner
surface of the door handle.
X To lock the vehicle: touch sensor sur-
face :.
If you pull on the handle of the boot lid, only
the boot of the vehicle is unlocked. Changing the settings of the locking
system
You can change the setting of the locking
system in such a way that only the driver's
door and the fuel filler flap are unlocked. This
is useful if you frequently travel on your own.
X To change the setting: press and hold down
the % and& buttons simultaneously
for approximately six seconds until battery
check lamp (Y page 70) flashes twice.
The key now functions as follows:
X To unlock the driver's door: press the
% button once.
X To unlock centrally: press the%but-
ton twice.
X To lock centrally: press the&button.
The KEYLESS-GO function is changed as fol-
lows:
X To unlock the driver's door: touch the
inner surface of the door handle on the
driver's door.
X To unlock centrally: touch the inner sur-
face of the door handle on the front-
passenger door or the rear door.
X To lock centrally: touch the outer sensor
surface on one of the door handles. Restoring the factory settings
X Press the %and& buttons simulta-
neously for approximately six seconds until
the battery check lamp flashes twice. Emergency key element
General notes If the vehicle can no longer be locked or
unlocked with the key, use the emergency
key element.
If you use the emergenc
ykey element to
unlock and open the driver's door or the boot Key
69Opening and closing Z