2010 MERCEDES-BENZ CLS COUPE key
[x] Cancel search: keyPage 151 of 337
Switching off the engine
Important safety notes G
Risk of accident
If the engine is not running, there is no power
assistance for the steering and brakes. Steer-
ing and braking then requires significantly
greater effort.
As a result, you might lose control of the vehi-
cle, cause an accident and injure yourself and
others.
Therefore, do not switch off the engine while
you are driving.
Vehicles with automatic transmission X
Apply the parking brake firmly.
X Standard vehicles: shift the transmission
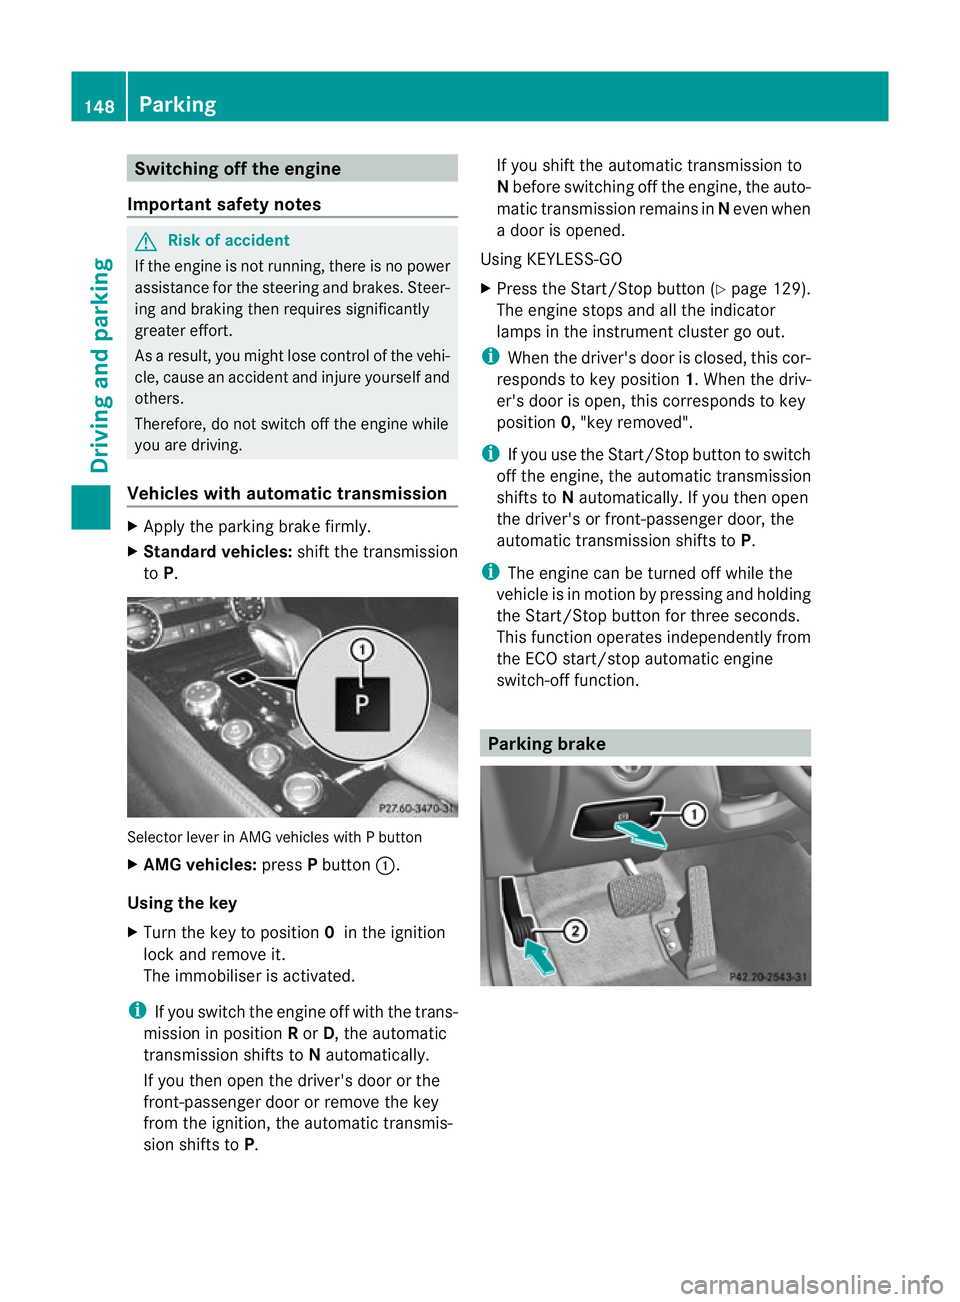
to P. Selector lever in AMG vehicles with P button
X AMG vehicles: pressPbutton :.
Using the key
X Turn the key to position 0in the ignition
lock and remove it.
The immobiliser is activated.
i If you switch the engine off with the trans-
mission in position Ror D, the automatic
transmission shifts to Nautomatically.
If you then open the driver's door or the
front-passenger door or remove the key
from the ignition, the automatic transmis-
sion shifts to P. If you shift the automatic transmission to
N
before switching off the engine, the auto-
matic transmission remains in Neven when
a door is opened.
Using KEYLESS-GO
X Press the Start/Stop button (Y page 129).
The engine stops and all the indicator
lamps in the instrumen tcluste rgo out.
i When the driver's door is closed, this cor-
responds to key position 1. When the driv-
er's door is open, this corresponds to key
position 0, "key removed".
i If you use the Start/Stop button to switch
off the engine, the automatic transmission
shifts to Nautomatically. If you then open
the driver's or front-passenger door, the
automatic transmission shifts to P.
i The engine can be turned off while the
vehicle is in motion by pressing and holding
the Start/Stop button for three seconds.
This function operates independently from
the ECO start/stop automatic engine
switch-off function. Parking brake148
ParkingDriving and parking
Page 171 of 337
Make sure when parking that you position
your vehicle so that it does not make con-
tact with the kerb as the vehicle is lowered.
Your vehicle could otherwise be damaged.
Setting the vehicle level
Select the "Normal" setting for normal road
surfaces and "Raised" for driving with snow
chains or on particularly poor road surfaces.
Your selection remains stored even if you
remove the key from the ignition lock. G
Risk of injury
Make sure that nobody is in the vicinity of the
wheel housing or under the vehicle while low-
ering the vehicle when it is stationary. Other-
wise, limbs could become trapped. Setting raised level
X
Start the engine.
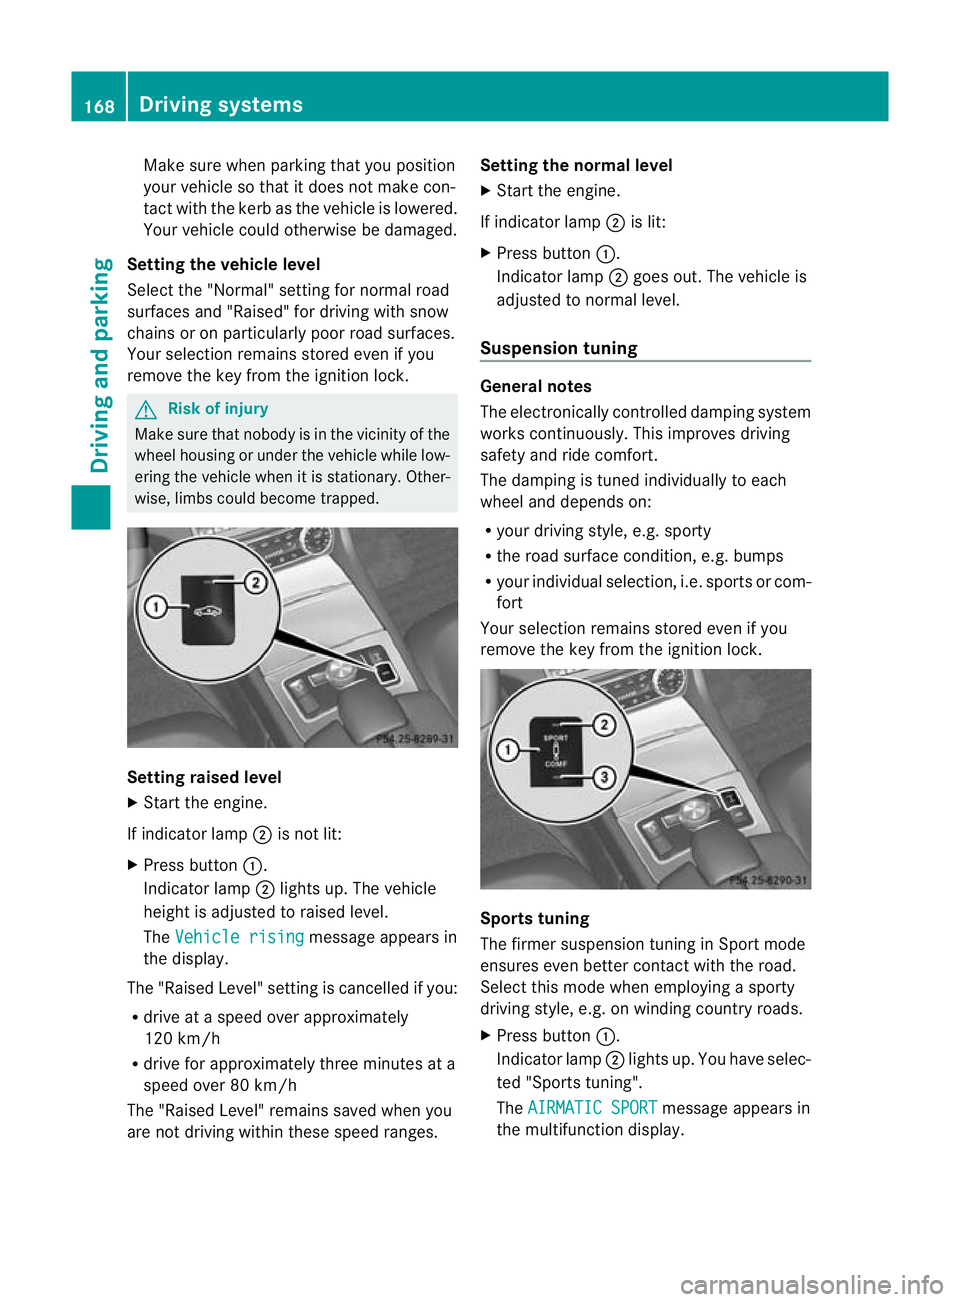
If indicator lamp ;is not lit:
X Press button :.
Indicator lamp ;lights up. The vehicle
height is adjusted to raised level.
The Vehicle rising message appears in
the display.
The "Raised Level" setting is cancelled if you:
R drive at a speed over approximately
120 km/h
R drive for approximately three minutes at a
speed over 80 km/h
The "Raised Level" remains saved when you
are not driving within these speed ranges. Setting the normal level
X
Start the engine.
If indicator lamp ;is lit:
X Press button :.
Indicator lamp ;goes out. The vehicle is
adjusted to normal level.
Suspension tuning General notes
The electronically controlled damping system
works continuously.T
his improves driving
safety and ride comfort.
The damping is tuned individually to each
wheel and depends on:
R your driving style, e.g. sporty
R the road surface condition,e .g. bumps
R your individual selection, i.e .sports or com-
fort
Your selection remains stored even if you
remove the key from the ignition lock. Sports tuning
The firmer suspension tunin
ginSport mode
ensures even better contact with the road.
Select this mode when employing a sporty
driving style, e.g. on winding country roads.
X Press button :.
Indicator lamp ;lights up. You have selec-
ted "Sports tuning".
The AIRMATIC SPORT message appears in
the multifunction display. 168
Driving systemsDriving and parking
Page 180 of 337
View through the camera
The area behind the vehicle is displayed as a
mirror image, as in the rear-view mirror. G
Ris
kofa ccident
The reversing camera is only an aid and may
display obstacles in a distorted or incorrect
manner, or may no teven display them at all.
The reversing camera does not relieve you of
the responsibility to pay attention. The cam-
era cannot show objects:
R very near to the rear bumper
R below the rear bumper
R in the area immediately above the boot lid
handle
You are always responsible for safety and
must continue to pay attention to youri mme-
diate surroundings when parking and
manoeuvring. This applies to the areas
behind, in front of and next to the vehicle. You
could otherwise endange ryourself and oth-
ers. G
Risk of accident
Under the following circumstances, the
reversing camera will not function, or function
in a limited manner:
R if the boot lid is open
R in heavy rain, snow or fog
R at night or in very dark places
R if the camera is exposed to very bright light
R if the area is lit by fluorescent light (the dis-
play may flicker)
R if there is a sudden change in temperature,
e.g. when driving into a heated garage in
winter
R if the camera lens is dirty or obstructed
R if the rear of your vehicle is damaged. In this
event, have the camera position and setting
checked at a qualified specialist workshop.
Mercedes-Benz recommends that you use
a Mercedes-Benz Service Centre for this
purpose.
Do not use the reversing camera in these
types of situation. You could otherwise injure others or damage objects and your vehicle
while you are parking.
Activating the reversing camera X
Make sure that the key is in position 2in
the ignition lock.
X Make sure that the "Reversing camera"
function is selected in COMAND APS (see
the separate operating instructions for
COMAND APS).
X Engage reverse gear.
The area behind the vehicle is shown in the
COMAND APS display. ATTENTION ASSIST
Important safety notes ATTENTION ASSIST helps you during long,
monotonous journeys such as on motorways
and trunk roads. It is active in the 80 km/h
to 180 km/h range.
If ATTENTION ASSIST detects typical indica-
tors of fatigue or increasing lapses in con-
centration on the part of the driver, it sug-
gests taking a break.
G
Risk of accident
ATTENTION ASSIST is only an aid and may
detect your tiredness or lapses in concentra-
tion too late or not at all. It is not asubstitute
for a well rested and attentive driver.
Fatigue may cause you to recognise hazard-
ous situations too late, misjudge a situation
or react slower. For this reason, make sure
you feel rested before you begin driving and
during your journey. Always take breaks in
good time and regularly, especially during
long journeys. Otherwise, you may fail to rec-
ognise dangers in time, cause an acciden tand
injure yoursel fand others. Driving systems
177Driving and parking Z
Page 184 of 337
Activating Night View Assis
tPlus You can only activate Night View Assist Plus
if:
R the key is in position 2in the ignition lock.
R it is dark.
R the light switch is in the corL posi-
tion.
R reverse gear has not been engaged.
X Make sure COMAN DAPS is switched on.
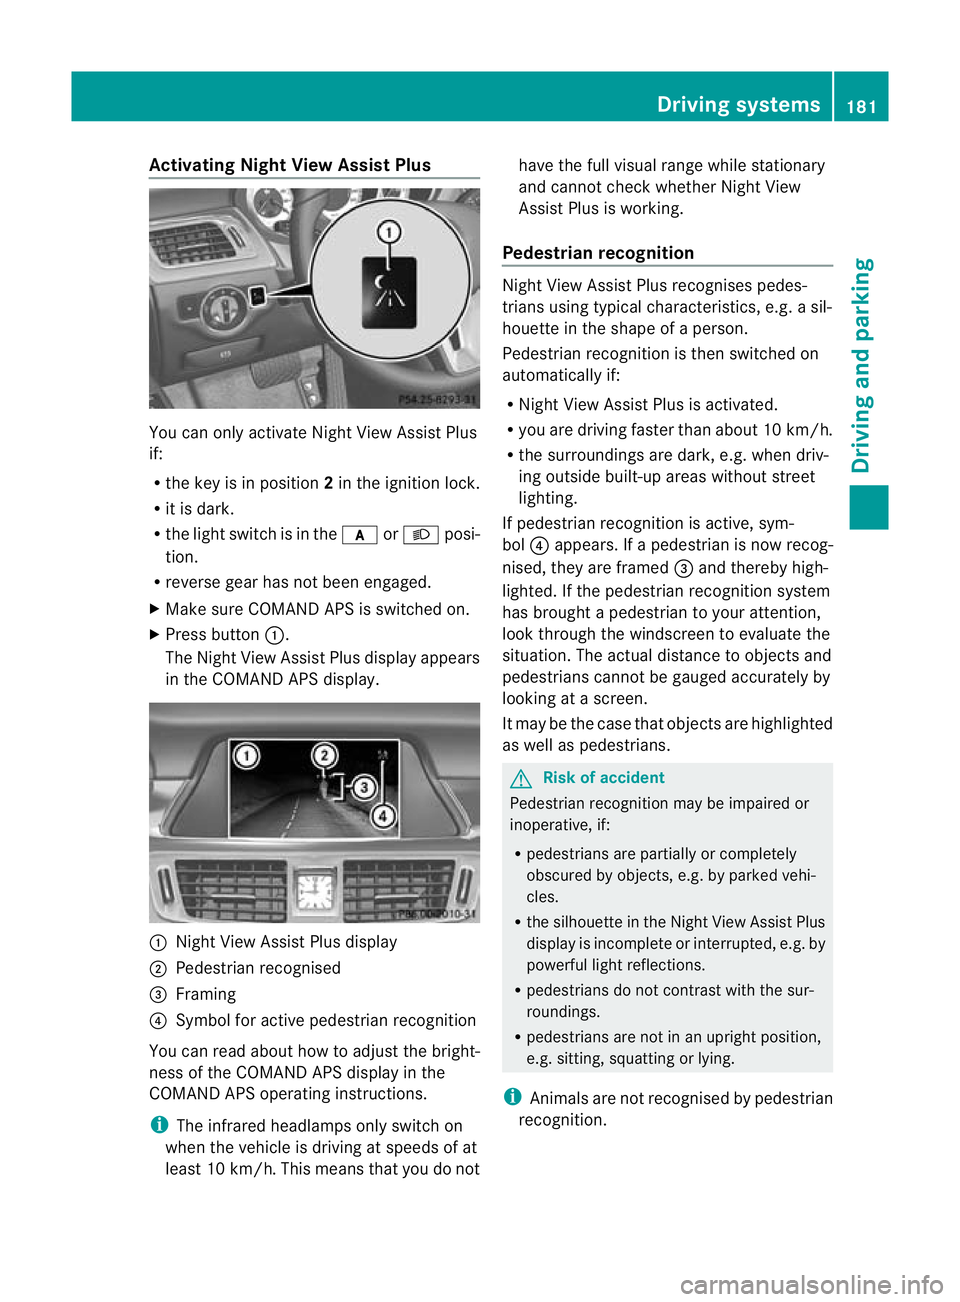
X Press button :.
The Night View Assist Plus display appears
in the COMAND APS display. :
Night View Assist Plus display
; Pedestrian recognised
= Framing
? Symbol for active pedestrian recognition
You can read about how to adjust the bright-
ness of the COMAND APS display in the
COMAND APS operating instructions.
i The infrared headlamps only switch on
when the vehicle is driving at speeds of at
least 10 km/h. This means that you do not have the full visual range while stationary
and cannot check whether Night View
Assist Plus is working.
Pedestrian recognition Night View Assist Plus recognises pedes-
trians using typical characteristics, e.g. a sil-
houette in the shape of a person.
Pedestrian recognition is then switched on
automatically if:
R
Night View Assist Plus is activated.
R you are driving faster than about 10 km/h.
R the surroundings are dark, e.g .when driv-
ing outside built-up areas without street
lighting.
If pedestrian recognition is active, sym-
bol ?appears. If a pedestrian is now recog-
nised, they are framed =and thereby high-
lighted. If the pedestrian recognition system
has brought a pedestrian to your attention,
look through the windscreen to evaluate the
situation. The actual distance to objects and
pedestrians cannot be gauged accurately by
looking at a screen.
It may be the case that objects are highlighted
as well as pedestrians. G
Risk of accident
Pedestrian recognition may be impaired or
inoperative, if:
R pedestrians are partially or completely
obscured by objects, e.g. by parked vehi-
cles.
R the silhouette in the Night View Assist Plus
display is incomplete or interrupted, e.g. by
powerful light reflections.
R pedestrians do not contrast with the sur-
roundings.
R pedestrians are not in an upright position,
e.g. sitting, squatting or lying.
i Animals are not recognised by pedestrian
recognition. Driving systems
181Driving and parking Z
Page 188 of 337
from the side
.When you overtake a vehicle,
the warning only occurs if the difference in
speed is less than 12 km/h.
The yellow indicator lamp goes out if reverse
gear is engaged. In this event, Blind Spot
Assist is no longer active.
The brightness of the indicator/warning
lamps is adjusted automatically according to
the ambient light. G
Risk of accident
Blind Spot Assist is not active at speeds below
30 km/h, and the indicator lamps in the exte-
rior mirrors are yellow.V ehicles in the moni-
toring range are then not indicated.
Always pay attention to traffic conditions and
your surroundings. Otherwise, you may fail to
recognise dangers in time, cause an accident
and injure yourself and others.
Collision warning
If a vehicle is detected in the monitoring range
of Blind Spot Assist and you switch on the turn
signal, a double warning tones ounds. Red
warning lamp :flashes. If the turn signal
remains on, detected vehicles are indicated
by the flashing of red warning lamp :.There
are no further warning tones.
Switching on Blind Spot Assist
X Make sure that the radar sensor system
(Y page 210) and Blind Spot Assist
(Y page 204) are activated in the on-board
computer.
X Turn the key to position 2in the ignition
lock.
Warning lamps :light up red in the exte-
rior mirrors for approximately 1.5 seconds
and then turn yellow.
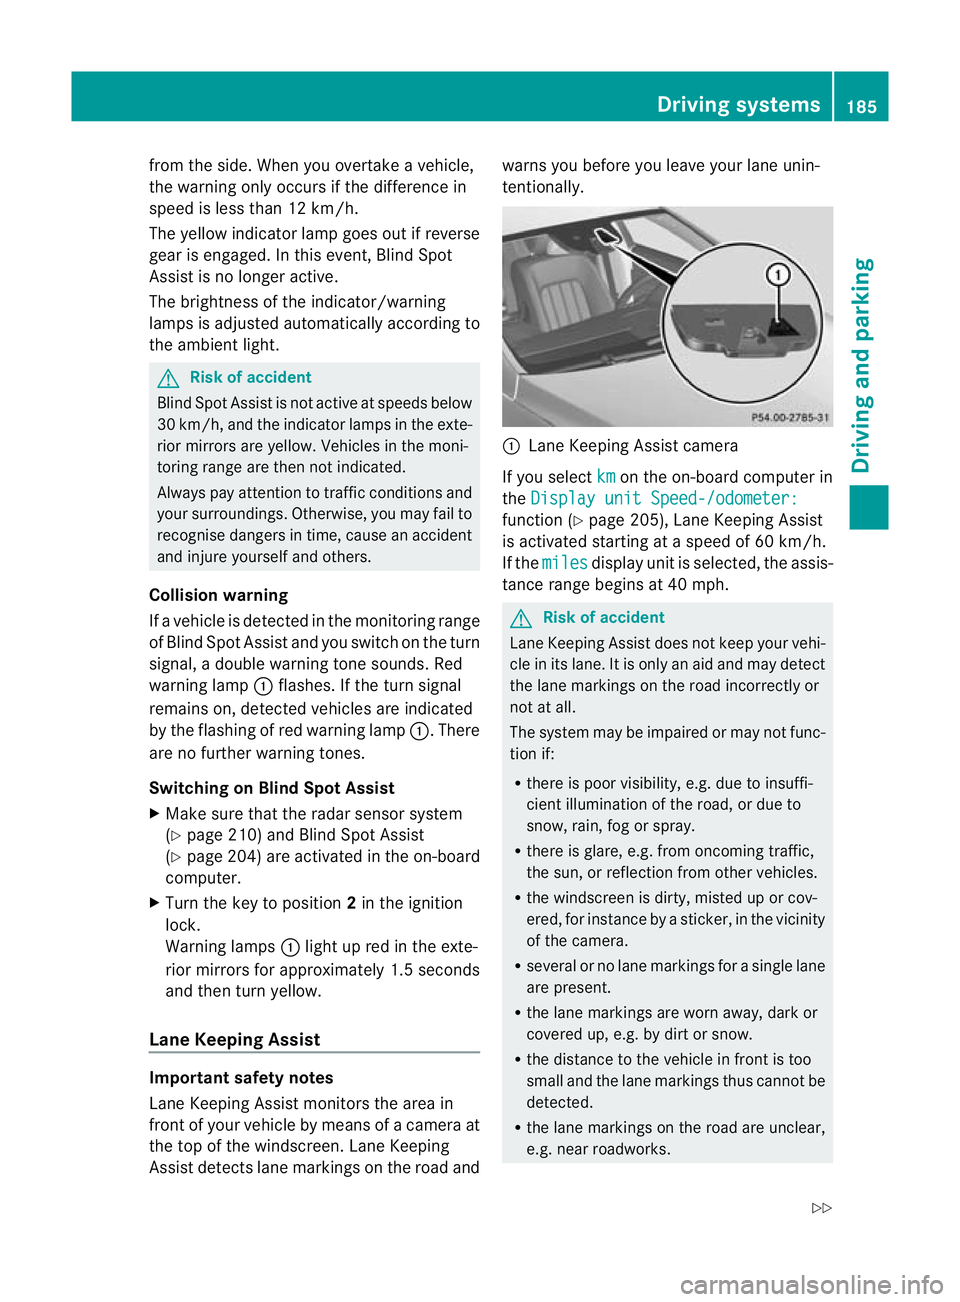
Lane Keeping Assist Important safety notes
Lane Keeping Assist monitors the area in
front of your vehicle by means of a camera at
the top of the windscreen. Lane Keeping
Assist detects lane markings on the road and warns you before you leave your lane unin-
tentionally.
:
Lane Keeping Assist camera
If you select km on the on-board computer in
the Display unit Speed-/odometer: function (Y
page 205), Lane Keeping Assist
is activated startinga t a speed of 60 km/h.
If the miles display uni
tis selected, the assis-
tance range begins at 40 mph. G
Risk of accident
Lane Keeping Assist does not keep your vehi-
cle in its lane. It is only an aid and may detect
the lane markings on the road incorrectly or
not at all.
The system may be impaired or may not func-
tion if:
R there is poor visibility, e.g. due to insuffi-
cient illumination of the road, or due to
snow, rain, fog or spray.
R there is glare, e.g. from oncoming traffic,
the sun, or reflection from other vehicles.
R the windscreen is dirty, misted up or cov-
ered, for instance by a sticker, in the vicinity
of the camera.
R several or no lane markings for a single lane
are present.
R the lane markings are worn away, dark or
covered up, e.g. by dirt or snow.
R the distance to the vehicle in front is too
small and the lane markings thus cannot be
detected.
R the lane markings on the road are unclear,
e.g. near roadworks. Driving systems
185Driving and parking
Z
Page 192 of 337
G
Risk of accident
Active Blind Spot Assist is only an aid
designed to assist driving .Itis not a substitute
for attentive driving. Automatic braking by the
system may not always be sufficient to avoid
a collision. In such cases, you need to steer,
brake or accelerate yourself.
In very rare cases, the system may detect a
risk of collision where there is none and brake
in error near crash barriers or similar road
boundaries. Active Blind Spot Assist cannot
detect all traffic situations and road users.
Ensure at all times that there is sufficient lat-
eral distance between you and other road
users or obstacles. You can, for example,
countersteer gently or depress the accelera-
tor pedal at any time to cancel inappropriate
braking action.
You are responsible for the vehicle's speed,
correct steering and for braking in good time.
Always adapty our driving style to suit the
prevailing road and weather conditions.
Always pay attention to traffic conditions and
your surroundings. Otherwise, you may fail to
recognise dangers in time, cause an accident
and injure yourself and others.
Either a very slight course-correcting brake
application, or none at all, may occur if:
R there are vehicles and/or obstacles, e.g.
crash barriers, in the immediate vicinity of
your vehicle.
R a vehicle approaches you too closely at the
side.
R you have adopted a sporty driving style with
high cornering speeds.
R you brake or accelerate decisively.
R a driving safety system intervenes, such as
ESP ®
or PRE-SAFE ®
Brake. R
ESP ®
is deactivated.
R a loss of tyre pressure or a defective tyre
has been detected and displayed.
Activating Active Blind Spot Assist
X Make sure that the radar sensor system
(Y page 210) and Active Blind Spot Assist
(Y page 204) are activated in the on-board
computer.
X Turn the key to position 2in the ignition
lock.
Warning lamps :light up red in the exte-
rior mirrors for approximately 1.5 seconds
and then turn yellow.
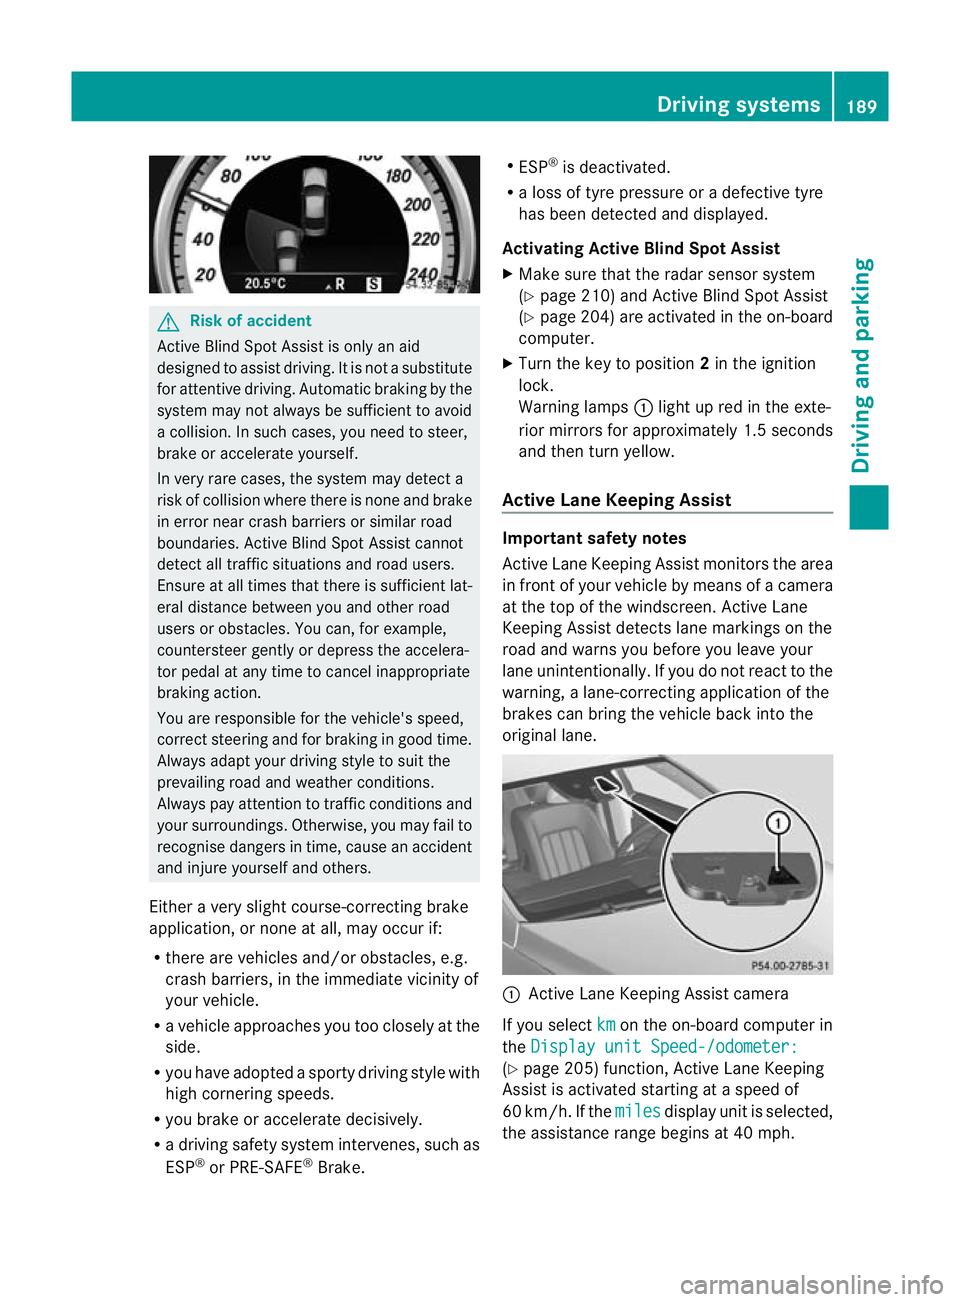
Active Lane Keeping Assist Important safety notes
Active Lane Keeping Assist monitors the area
in front of your vehicle by means of a camera
at the top of the windscreen. Active Lane
Keeping Assist detects lane markings on the
road and warns you before you leave your
lane unintentionally. If you do not react to the
warning, a lane-correcting application of the
brakes can bring the vehicle back into the
original lane.
:
Active Lane Keeping Assist camera
If you select km on the on-board computer in
the Display unit Speed-/odometer: (Y
page 205) function, Active Lane Keeping
Assist is activated starting at a speed of
60 km/h. If the miles display unit is selected,
the assistance range begins at 40 mph. Driving systems
189Driving and parking Z
Page 198 of 337
Outside temperature display
The outside temperature display is in the mul-
tifunction display (Y page 196). G
Risk of accident
At temperatures just above freezing point, the
street may be icy, especially in wooded areas
or on bridges. If you do not adapt your driving
style to the conditions ,the vehicle could skid.
For this reason, adapt your driving style and
speed to the weather conditions.
Changes in the outside temperature are dis-
played after a short delay. Speedometer with segments
The segments in the speedometer indicate
which speed range is available.
Cruise control (Y page 152) activated:
The segments light up from the stored speed
to the maximum speed.
Variable SPEEDTRONIC (Y page 162) activa-
ted:
The segments light up from the start of the
scale to the selected limit speed.
DISTRONIC PLUS (Y page 154) activated:
One or two segments in the set speed range
light up. Operating the on-board computer
The on-board computer is activated as soon
as you turn the key to position 1in the ignition
lock.
You can control the multifunction display and
the settings in the on-board computer using
the buttons on the multifunction steering
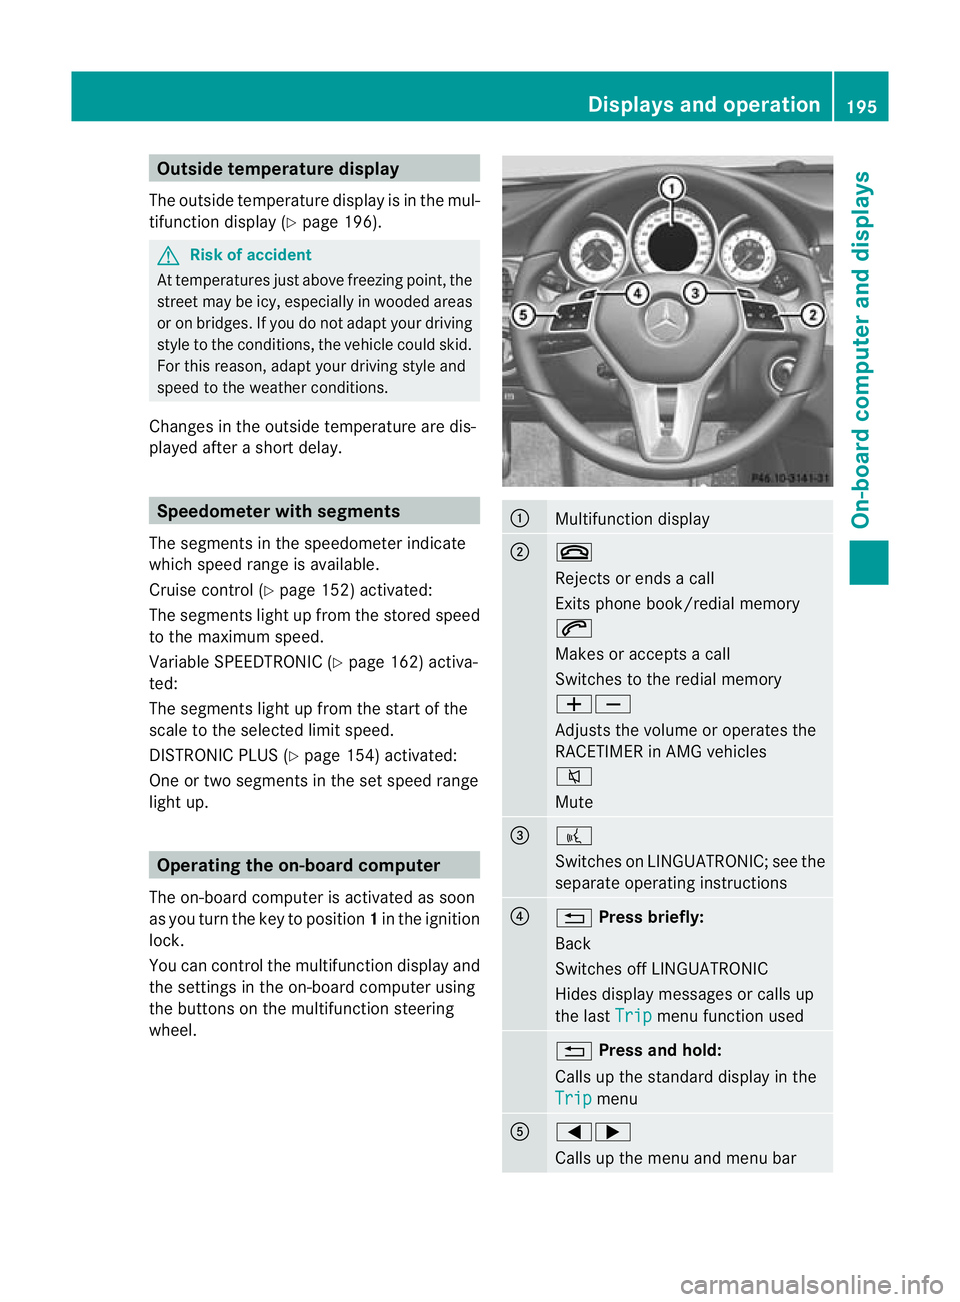
wheel. :
Multifunction display
;
~
Rejects or ends a call
Exits phone book/redial memory
6
Makes or accepts a call
Switches to the redial memory
WX
Adjusts the volume or operates the
RACETIMER in AMG vehicles
8
Mute
=
?
Switches on LINGUATRONIC; see the
separate operating instructions
?
%
Press briefly:
Back
Switches off LINGUATRONIC
Hides display messages or calls up
the last Trip menu function used
%
Press and hold:
Calls up the standard display in the
Trip menu
A
=;
Calls up the menu and menu bar Displays and operation
195On-board computer and displays Z
Page 211 of 337
Switching Adaptive Highbeam Assist on/
off
X
Press the =or; button on the steer-
ing wheel to select the Settings menu.
X Press the :or9 button to select the
Light submenu.
X Press the abutton to confirm.
X Press :or9 to select the Adapt. main beam function.
If the Adapt. main beam function has
been switched on, the cone of light and the
_ symbol in the multifunction display
are shown in red.
X Press the abutton to save the setting.
Setting the brightness of the ambient
lighting
X Press the =or; button on the steer-
ing wheel to select the Settings menu.
X Press the :or9 button to select the
Light submenu.
X Press the abutton to confirm.
X Press the :or9 button to select the
Amb. light +/- function.
X Press the abutton to confirm.
X Press the :or9 button to adjust the
brightness to any level from Off to
Level 5 (bright).
X Press the aor% button to save the
setting.
Setting the ambient lighting colour
X Press the =or; button on the steer-
ing wheel to select the Settings menu.
X Press the :or9 button to select the
Light submenu.
X Press the abutton to confirm.
X Press the :or9 button to select the
Amb. light col. function.
X Press the abutton to confirm. X
Press the :or9 button to set the
colour to SOLAR ,
NEUTRAL or
POLAR .
X Press the aor% button to save the
setting.
Activating/deactivating the surround
lighting and exterior lighting delayed
switch-off
The Surround lighting: function allows
you to set whether the exterior lighting should
come on when it is dark
R for 40 seconds after unlocking the vehicle
with the key
The exterior lighting switches off when you
open the driver’s door.
R for 15 seconds after switching off the
engine and closing the doors
If the engine is switched off and then none
of the doors are opened, or if an open door
is not closed, the exterior lighting goes out
after 60 seconds.
If you activate the Surround light‐ ing: function, the following light up:
R the side lamps
R the dipped-beam headlamps 31
R the daytime driving lamps 32
R the licence plate lighting
X Press the =or; button on the steer-
ing wheel to select the Settings menu.
X Press the :or9 button to select the
Light submenu.
X Press the abutton to confirm.
X Press the :or9 button to select the
Surround lighting function.
When the Surround lighting function is
activated, the light cone and the area
around the vehicle are displayed in red in
the multifunction display.
X Press the abutton to save the setting.
31 Only for vehicles without Intelligent Light System.
32 Only vehicles with Intelligent Light System. 208
Menus and submenusOn-board computer and displays