2010 MERCEDES-BENZ CLS COUPE sensor
[x] Cancel search: sensorPage 83 of 337
X
Touch sensor surface :on the door han-
dle until the side windows and the sliding
sunroof are fully closed.
i Make sure you only touch sensor sur-
face :.
X Make sure that all the side windows and the
sliding sunroof are closed. Resetting the side windows
You must reset each side window if a side
window can no longer be closed fully.
X Turn the key to position 2in the ignition
lock.
X Pull the corresponding switch on the door
control panel until the side window is com-
pletely closed. (Y page 78)
X Hold the switch for an additional second.
If the side window opens again slightly:
X Immediately pull the corresponding switch
on the door control panel until the side win-
dow is completely closed (Y page 78).
X Hold the switch for an additional second.
X If the corresponding side window remains
closed after the button has been released,
the side window has been reset correctly.
If this is not the case, repeat the steps
above again. Problems with the side windows
Problem: aside window cannot be closed
because an object is obstructing the side
window.
X Remove the object(s).
X Close the side window.
Problem :aside window cannot be closed,
and you cannot see the cause. G
Risk of injury
Closing the side windows with increased force
or without the anti-entrapment feature could
lead to serious or even fatal injury. Make sure that nobody can become trapped when clos-
ing the side windows.
If a side window is obstructed during closing
and reopens again slightly:
X Immediately afte rthe window blocks, pull
the corresponding switch again until the
side window has closed.
The side window is closed with increased
force.
If a side window is obstructed again during
closing and reopens again slightly:
X Immediately after the window blocks, pull
the corresponding switch again until the
side window has closed.
The side window is closed without the anti-
entrapment feature. Sliding sunroof
Important safety notes
G
Risk of injury
Make sure that nobody can become trapped
when closing the sliding sunroof. If there is a
risk of entrapment, release the switch and
push it briefly in any direction to stop the slid-
ing sunroof. G
Risk of injury
Children could injure themselves if they oper-
ate the sliding sunroof.
Never leave children unsupervised in the vehi-
cle. Always take the key with you when leaving
the vehicle, even if you are only leaving it for
a short time. G
Risk of injury
The glass in the panorama sunroof could
break in an accident. If you are not wearing a
seat belt, there is a risk that you could be
thrown through the opening in the event of the
vehicle overturning. Therefore, always wear a
seat belt to reduce the risk of injuries. 80
Sliding sunroofOpening and closing
Page 84 of 337
!
Only open the panorama sliding sunroof
if it is free of snow and ice. Otherwise, mal-
functions may occur.
Do not allow anything to protrude from the
sliding sunroof. Otherwise, the seals could
be damaged.
i Resonance noises can occur in addition
to the usual airflow noises when the sliding
sunroof is open. They are caused by minor
pressure fluctuations in the vehicle interior.
Change the position of the sliding sunroof
or open a side window slightly to reduce or
eliminate these noises. Operating the sliding sunroof
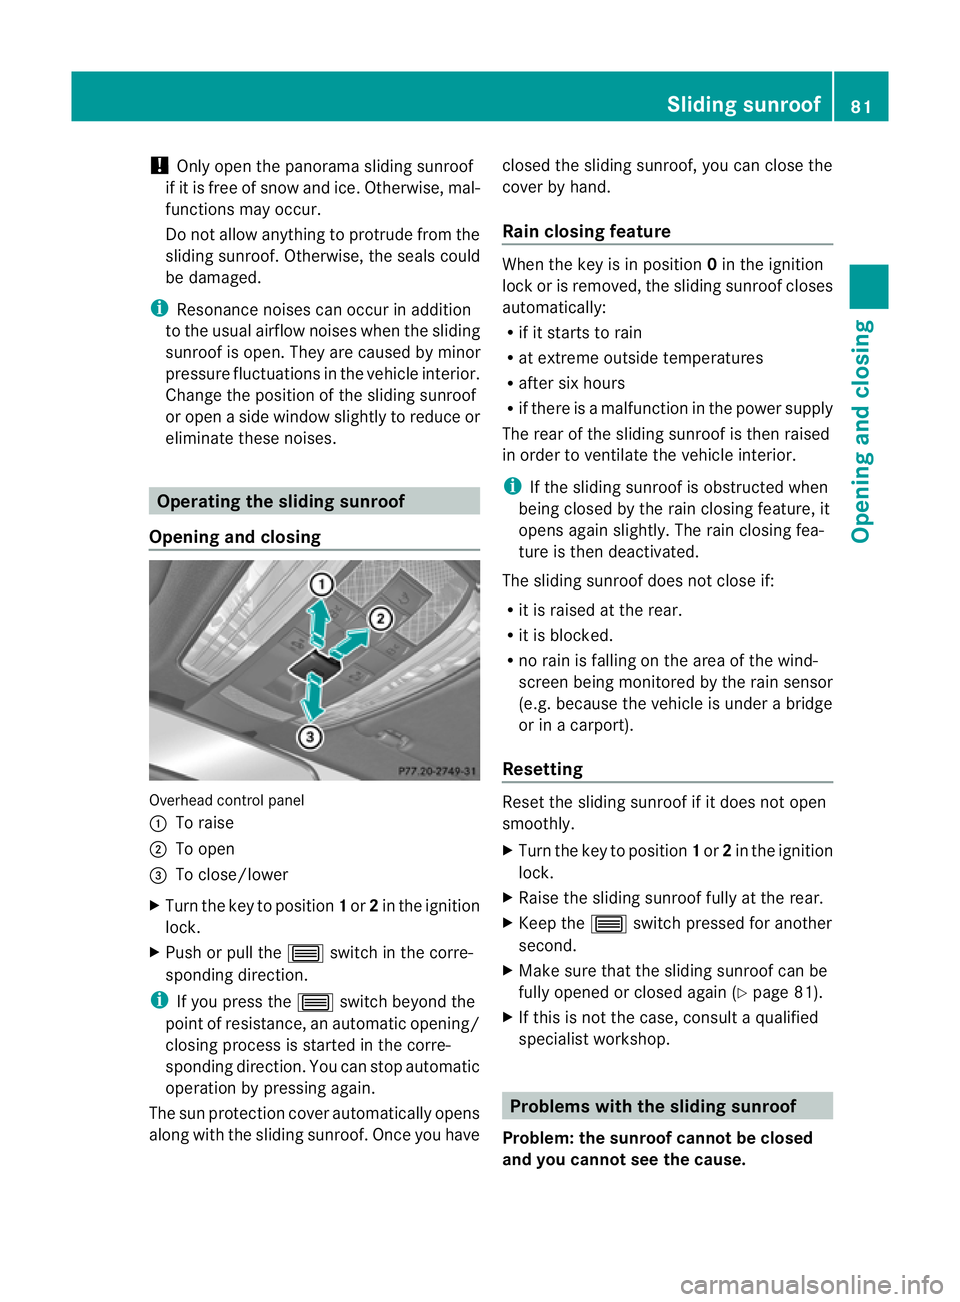
Opening and closing Overhead control panel
:
To raise
; To open
= To close/lower
X Turn the key to position 1or 2in the ignition
lock.
X Push or pull the 3switch in the corre-
sponding direction.
i If you press the 3switch beyond the
point of resistance, an automatic opening/
closing process is started in the corre-
sponding direction. You can stop automatic
operation by pressing again.
The sun protection cover automatically opens
along with the sliding sunroof. Once you have closed the sliding sunroof, you can close the
cover by hand.
Rain closing feature When the key is in position
0in the ignition
lock or is removed, the sliding sunroof closes
automatically:
R if it starts to rain
R at extreme outside temperatures
R after six hours
R if there is a malfunction in the power supply
The rear of the sliding sunroof is then raised
in order to ventilate the vehicle interior.
i If the sliding sunroof is obstructed when
being closed by the rain closing feature, it
opens agains lightly. The rain closing fea-
ture is the ndeactivated.
The sliding sunroof does not close if:
R it is raised at the rear.
R it is blocked.
R no rain is falling on the area of the wind-
screen being monitored by the rain sensor
(e.g. because the vehicle is under a bridge
or in a carport).
Resetting Reset the sliding sunroof if it does not open
smoothly.
X
Turn the key to position 1or 2in the ignition
lock.
X Raise the sliding sunroof fully at the rear.
X Keep the 3switch pressed for another
second.
X Make sure that the sliding sunroof can be
fully opened or closed again (Y page 81).
X If this is not the case, consult a qualified
specialist workshop. Problems with the sliding sunroof
Problem: the sunroof cannot be closed
and you cannot see the cause. Sliding sunroof
81Opening and closing Z
Page 97 of 337
i
The mirrors do not fold out if they have
been folded in manually.
Exterior mirror out of position If an exterior mirror has been pushed out of
position, proceed as follows:
X Vehicles without electrically folding
exterior mirrors: move the exterior mirror
into the correc tposition manually.
X Vehicles with electrically folding exte-
rior mirrors: press the mirror-folding but-
ton (Y page 93) repeatedly until you hear
the mirror engage in position.
The mirror housing is engaged again and
you can adjust the exterior mirrors as usual
(Y page 93). Automatic anti-dazzle mirrors
G
Risk of accident
If the incident light from headlamps cannot
strike the sensor in the rear-view mirror, for
instance, when the rear window roller sun-
blind is extended, the mirror's automatic anti-
dazzle function will not operate.
Incident light could then blind you. This may
distract you from the traffic conditions and,
as a result, you may cause an accident .Inthis
case, adjust the rear-view mirror manually.
The rear-view mirror and the exterior mirror
on the driver's side automatically go into anti-
dazzle mode if the ignition is switched on and
incident light from headlamps strikes the sen-
sor in the rear-view mirror.
The mirrors do not go into anti-dazzle mode if
reverse gear is engaged or the interior lighting
is switched on. Parking position for the exterior mir-
ror on the front-passenger side
Setting and storing the parking position You can position the front-passenger side
exterior mirror in such a way that you can see
the rear wheel on that side as soon as you
engage reverse gear. You can store this posi-
tion.
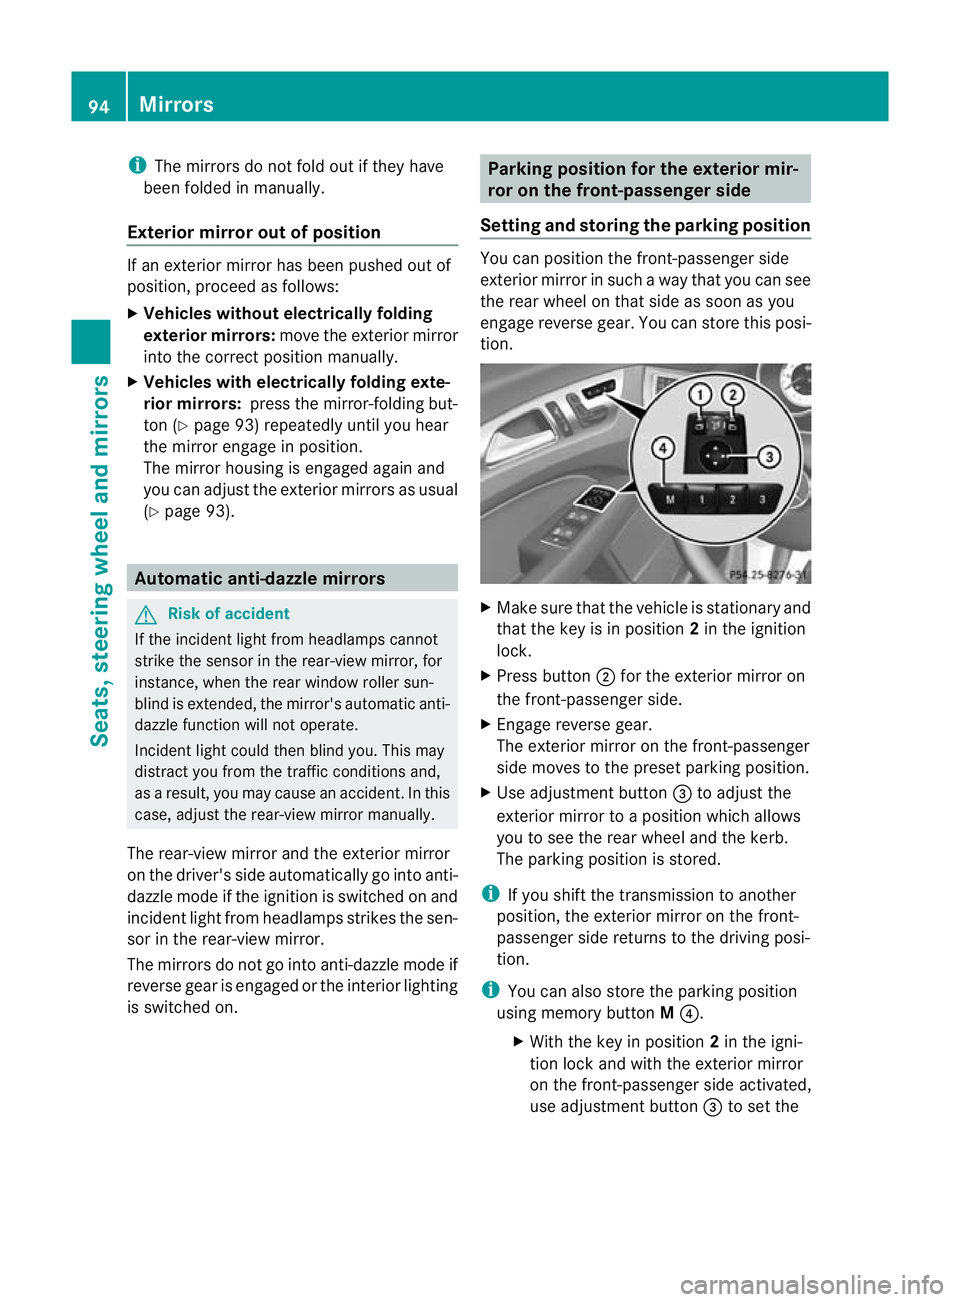
X
Make sure that the vehicle is stationary and
that the key is in position 2in the ignition
lock.
X Press button ;for the exterior mirror on
the front-passenger side.
X Engage reverse gear.
The exterior mirror on the front-passenger
side moves to the preset parking position.
X Use adjustment button =to adjust the
exterior mirror to a position which allows
you to see the rear wheel and the kerb.
The parking position is stored.
i If you shift the transmission to another
position, the exterior mirror on the front-
passenger side returns to the driving posi-
tion.
i You can also store the parking position
using memory button M?.
X With the key in position 2in the igni-
tion lock and with the exterior mirror
on the front-passenger side activated,
use adjustment button =to set the 94
MirrorsSeats, steering wheel and mirrors
Page 103 of 337
=
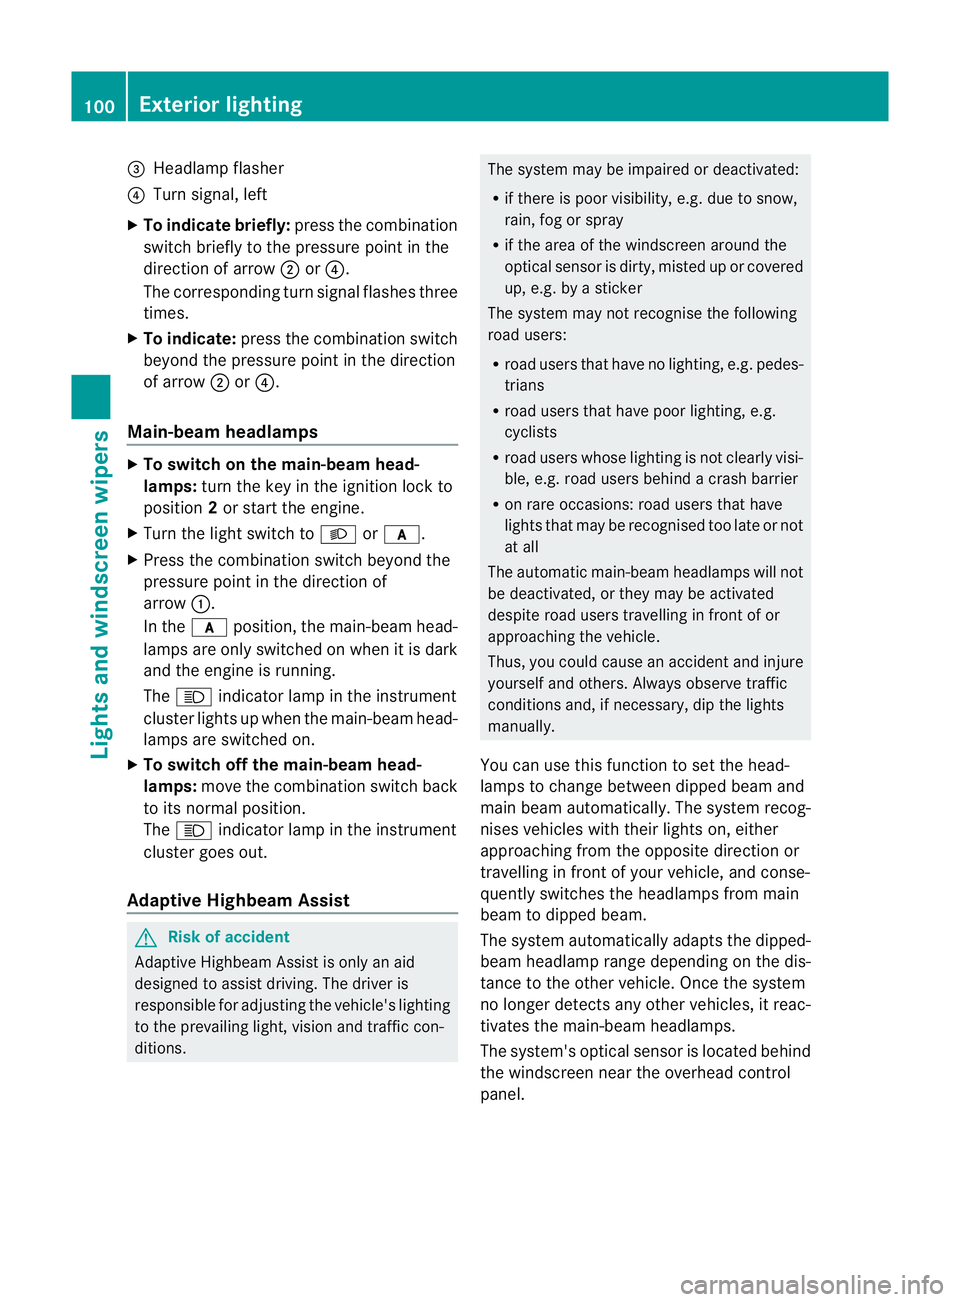
Headlamp flasher
? Turn signal, left
X To indicate briefly: press the combination
switch briefly to the pressure point in the
directio nofarrow;or?.
The corresponding turn signal flashes three
times.
X To indicate: press the combination switch
beyond the pressure point in the direction
of arrow ;or?.
Main-beam headlamps X
To switch on the main-beam head-
lamps: turn the key in the ignition lock to
position 2or start the engine.
X Turn the light switch to Lorc.
X Press the combination switch beyond the
pressure point in the direction of
arrow :.
In the cposition, the main-beam head-
lamps are only switched on when it is dark
and the engine is running.
The K indicator lamp in the instrument
cluster lights up when the main-beam head-
lamps are switched on.
X To switch off the main-beam head-
lamps: move the combination switch back
to its normal position.
The K indicator lamp in the instrument
cluster goes out.
Adaptive Highbeam Assist G
Risk of accident
Adaptive Highbeam Assist is only an aid
designed to assist driving. The drive ris
responsible for adjusting the vehicle's lighting
to the prevailing light, visio nand traffic con-
ditions. The system may be impaired or deactivated:
R if there is poor visibility, e.g .due to snow,
rain, fog or spray
R if the area of the windscree naround the
optical sensor is dirty, misted up or covered
up, e.g. by a sticker
The system may not recognise the following
road users:
R road users that have no lighting, e.g. pedes-
trians
R road users that have poor lighting, e.g.
cyclists
R road users whose lighting is not clearly visi-
ble, e.g. road users behind a crash barrier
R on rare occasions: road users that have
lights that may be recognised too late or not
at all
The automatic main-bea mheadlamps will not
be deactivated, or they may be activated
despite road users travelling in fron tofor
approaching the vehicle.
Thus, you could cause an acciden tand injure
yoursel fand others. Alway sobserve traffic
conditions and, if necessary, dip the lights
manually.
You can use this function to set the head-
lamps to change between dipped beam and
main beam automatically. The system recog-
nises vehicles with their lights on, either
approaching from the opposite direction or
travelling in fron tofyour vehicle, and conse-
quently switches the headlamps from main
beam to dipped beam.
The system automatically adapts the dipped-
beam headlamp range depending on the dis-
tance to the other vehicle. Once the system
no longer detects any other vehicles, it reac-
tivates the main-beam headlamps.
The system's optical sensor is located behind
the windscreen near the overhead control
panel. 100
Exterior lightingLights and windscreen wipers
Page 104 of 337
X
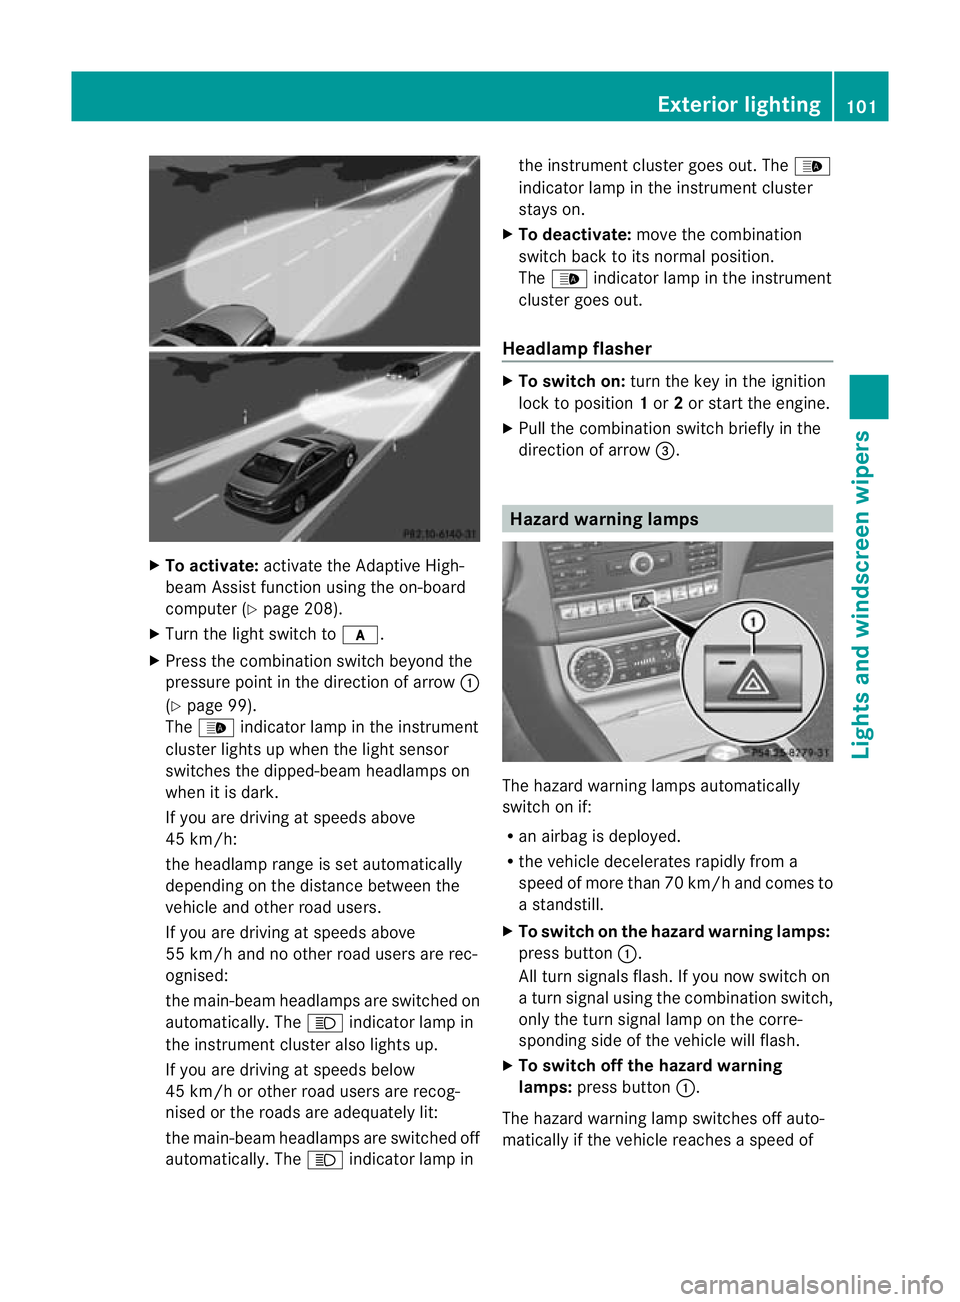
To activate: activate the Adaptive High-
beam Assist functio nusing the on-board
computer (Y page 208).
X Turn the light switch to c.
X Press the combination switch beyond the
pressure point in the direction of arrow :
(Y page 99).
The _ indicator lamp in the instrument
cluster lights up when the light sensor
switches the dipped-beam headlamps on
when it is dark.
If you are driving at speeds above
45 km/h:
the headlamp range is set automatically
depending on the distance between the
vehicle and other road users.
If you are driving at speeds above
55 km/h and no other road users are rec-
ognised:
the main-beam headlamps are switched on
automatically. The Kindicator lamp in
the instrument cluster also lights up.
If you are driving at speeds below
45 km/h or other road users are recog-
nised or the roads are adequately lit:
the main-beam headlamps are switched off
automatically. The Kindicator lamp in the instrument cluster goes out. The
_
indicator lamp in the instrument cluster
stays on.
X To deactivate: move the combination
switch back to its normal position.
The _ indicator lamp in the instrument
cluster goes out.
Headlamp flasher X
To switch on: turn the key in the ignition
lock to position 1or 2or start the engine.
X Pull the combination switch briefly in the
direction of arrow =. Hazard warning lamps
The hazard warning lamps automatically
switch on if:
R
an airbag is deployed.
R the vehicle decelerates rapidlyf rom a
speed of more than 70 km/h and comes to
a standstill.
X To switch on the hazard warnin glamps:
press button :.
All turn signals flash. If you now switch on
a turn signal using the combination switch,
only the turn signal lamp on the corre-
sponding side of the vehicle will flash.
X To switch off the hazard warning
lamps: press button :.
The hazard warning lamp switches off auto-
matically if the vehicle reaches a speed of Exterior lighting
101Lights and windscreen wipers Z
Page 109 of 337

Changing the rea
rbulbs
Reversing lamp Lamp cluster
X
Switch off the lights.
X Open the boot.
X Reach into the top of the side trim panel
and pull dow nuntil the lamp cluster is eas-
ily accessible.
X Press connector grid ;and pull ou tcon-
nector ;.
X Use a suitable tool to loosen and remove
four nuts :.
X Remove the complete lamp cluster.
X Turn bulb holder =anti-clockwise and pull
it out.
X Pull out the bulb.
X Insert the new bulb into bulb holder =.
X Insert bulb holder =into the lamp and turn
it clockwise.
X Insert the lamp cluster again.
X Tighten four nuts :.
X Push in connector ;until it engages.
X Insert the side trim panel. Windscreen wipers
Switching the windscreen wipers on/
off
G
Risk of accident
The windscreen will not longer be wiped prop-
erly if the wiper blades are worn. This could
prevent you from observing the traffic condi-
tions, thereby causing an accident .Replace
the wiper blades twice a year, ideally in spring
and autumn.
! Do not operate the windscreen wipers
when the windscreen is dry, as this could
damage the wiper blades. Moreover, dirt
that has collected on the windscreen can
scratch the glass if wiping takes place when
the windscreen is dry.
! If the windscreen wipers leave smears on
the windscreen after the vehicle has been
washed in an automatic car wash, this may
be due to wax or other residue. Clean the
windscreen with washer fluid after an auto-
matic car wash. Combination switch
1
$ Windscreen wipers off
2 Ä Intermittent wipe, low 22
3 Å Intermittent wipe, high 23
4 ° Continuous wipe, slow
5 ¯ Continuous wipe, fast
B í Single wipe/ îTo wipe the
windscreen using washer fluid
22 Rain sensor set to low sensitivity.
23 Rain sensor set to high sensitivity. 106
Windscreen wipersLights and windscreen wipers
Page 110 of 337
X
Turn the key to position 1or 2in the ignition
lock.
X Turn the combination switch to the corre-
sponding position.
! Intermittent wiping with rain sensor: due
to optical influences and the windscreen
becoming dirty in dry weather conditions,
the windscreen wipers may be activated
inadvertently. This could damage the wind-
screen wiper blades or scratch the wind-
screen.
For this reason, you should always switch
off the windscreen wipers in dry weather.
In the ÄorÅ position, the appropriate
wiping frequency is set automatically accord-
ing to the intensity of the rain. In the Å
position, the rain sensor is more sensitive
than in the Äposition, causing the wind-
screen wiper to wipe more frequently. Replacing the wiper blades
Important safety notes G
Risk of accident
The wiper arms could start moving and cause
an injury if you leave the windscreen wipers
switched on.
Remove the key from the ignition lock before
replacing the wiper blades.
! To avoid damaging the windscreen wiper
blades, make sure that you touch only the
wiper arm of the windscreen wiper.
Replacing the wiper blades Removing the wiper blades
X
Remove the key from the ignition lock or
turn the key to position 0(KEYLESS-GO).
X Fold the wiper arm away from the wind-
screen until it engages.
X Set the wiper blade at right angles to the
wiper arm. X
Remove the wiper blade from the retainer
on the wiper arm in the direction of the
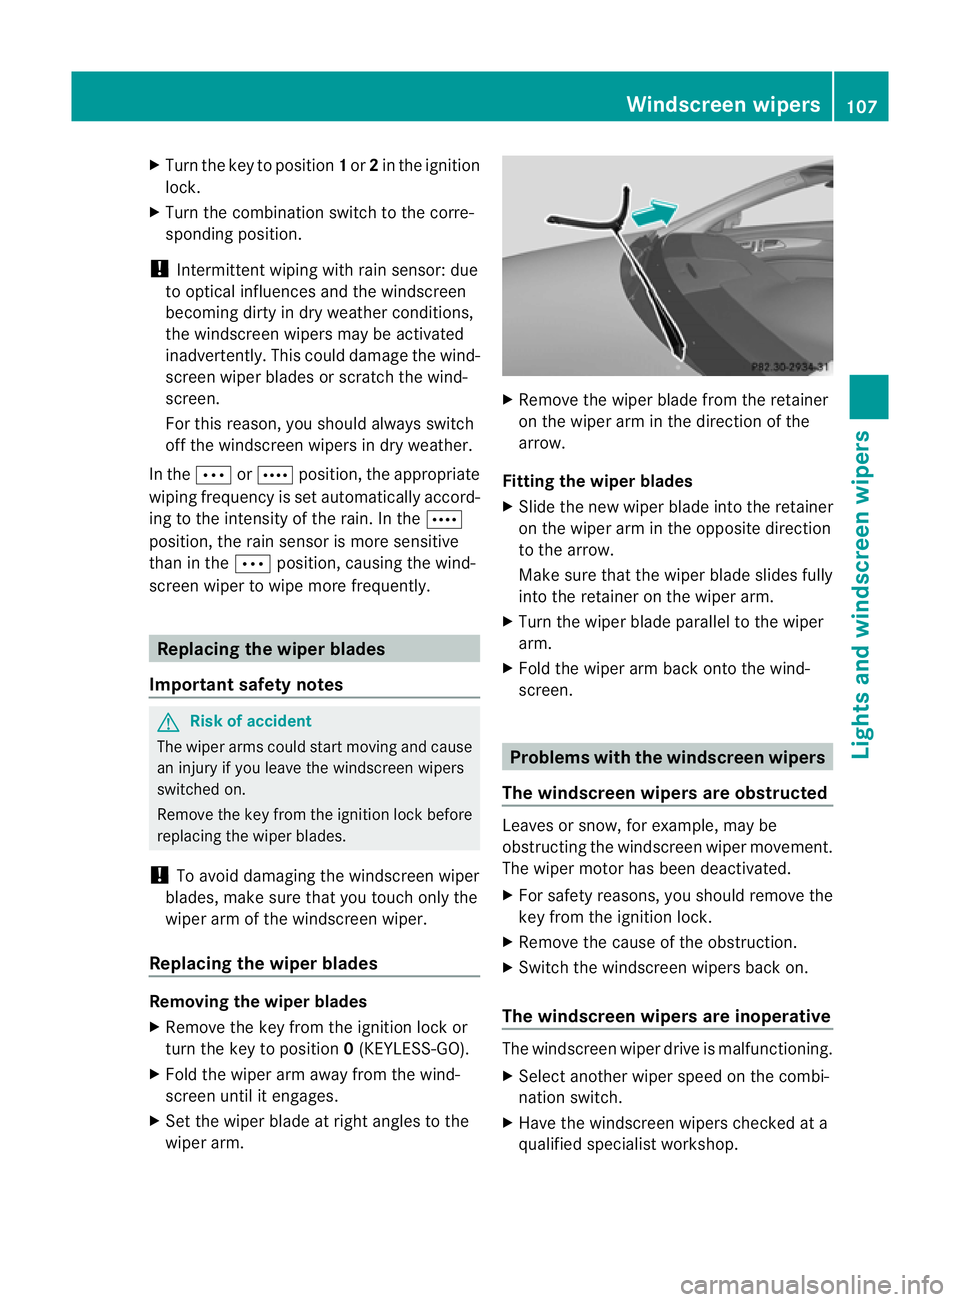
arrow.
Fitting the wiper blades
X Slide the new wiper blade into the retainer
on the wiper arm in the opposite direction
to the arrow.
Make sure that the wiper blade slides fully
into the retainer on the wiper arm.
X Turn the wiper blade parallel to the wiper
arm.
X Fold the wiper arm back onto the wind-
screen. Problems with the windscreen wipers
The windscreen wipers are obstructed Leaves or snow, for example, may be
obstructing the windscreen wiper movement.
The wiper motor has been deactivated.
X
For safety reasons, you should remove the
key from the ignition lock.
X Remove the cause of the obstruction.
X Switch the windscreen wipers back on.
The windscreen wipers are inoperative The windscreen wiper drive is malfunctioning.
X
Select another wiper speed on the combi-
nation switch.
X Have the windscreen wipers checked at a
qualified specialist workshop. Windscreen wipers
107Lights and windscreen wipers Z
Page 158 of 337
R
when changing to a lane with faster moving
traffic
R in complex driving situations or where lanes
are diverted, e.g .atroadworks on a motor-
way
DISTRONIC PLUS otherwise maintains the
current speed set by you or accelerates up to
the set speed.
DISTRONIC PLUS cannot take account of
weather conditions. Deactivate, or do not
activate, DISTRONIC PLUS:
R if the roads are slippery, snow-covered or
icy. The wheels could lose their grip when
braking or accelerating. The vehicle could
start to skid.
R if the sensors are dirty or there is poor vis-
ibility, e.g. due to snow, rain or fog. Dis-
tance control may be impaired.
Always pay attention to traffic conditions
even when DISTRONIC PLUS is activated.
Otherwise, you may fail to recognise dangers
in time, cause an accident and injure yourself
and others.
! You must deactivate the radar sensor sys-
tem in certain countries and near radio
telescope facilities. You will find further
information under "Radar sensor system"
in the index.
The radar sensor system is automatically
deactivated near radio telescope facilities
(Y page 327).
If you want DISTRONIC PLUS to assist you,
the radar sensor system must be activated
(Y page 210) and operational.
If there is no vehicle in front, DISTRONIC
PLUS operates in the same way as cruise
control in the speed range between
30 km/ha nd 200 km/h. If avehicle is driving
in front of you, DISTRONIC operates in the
speed range between 0km/h and
200 km/h.
Do not use DISTRONIC PLUS while driving on
roads with steep gradients. G
Risk of accident
DISTRONIC PLUS brakes yourv ehicle up to a
maximum of 4 m/s 2
depending on its speed.
This corresponds to approximately 40% of
your vehicle's maximum braking power. You
must also apply the brakes yourself if this
braking power is not sufficient.
If DISTRONIC PLUS detects a risk of collision
with avehicle in front, an intermittent warning
tone sounds. In addition, the ·distance
warning lamp in the instrument cluster lights
up. Brake to avoid a collision.
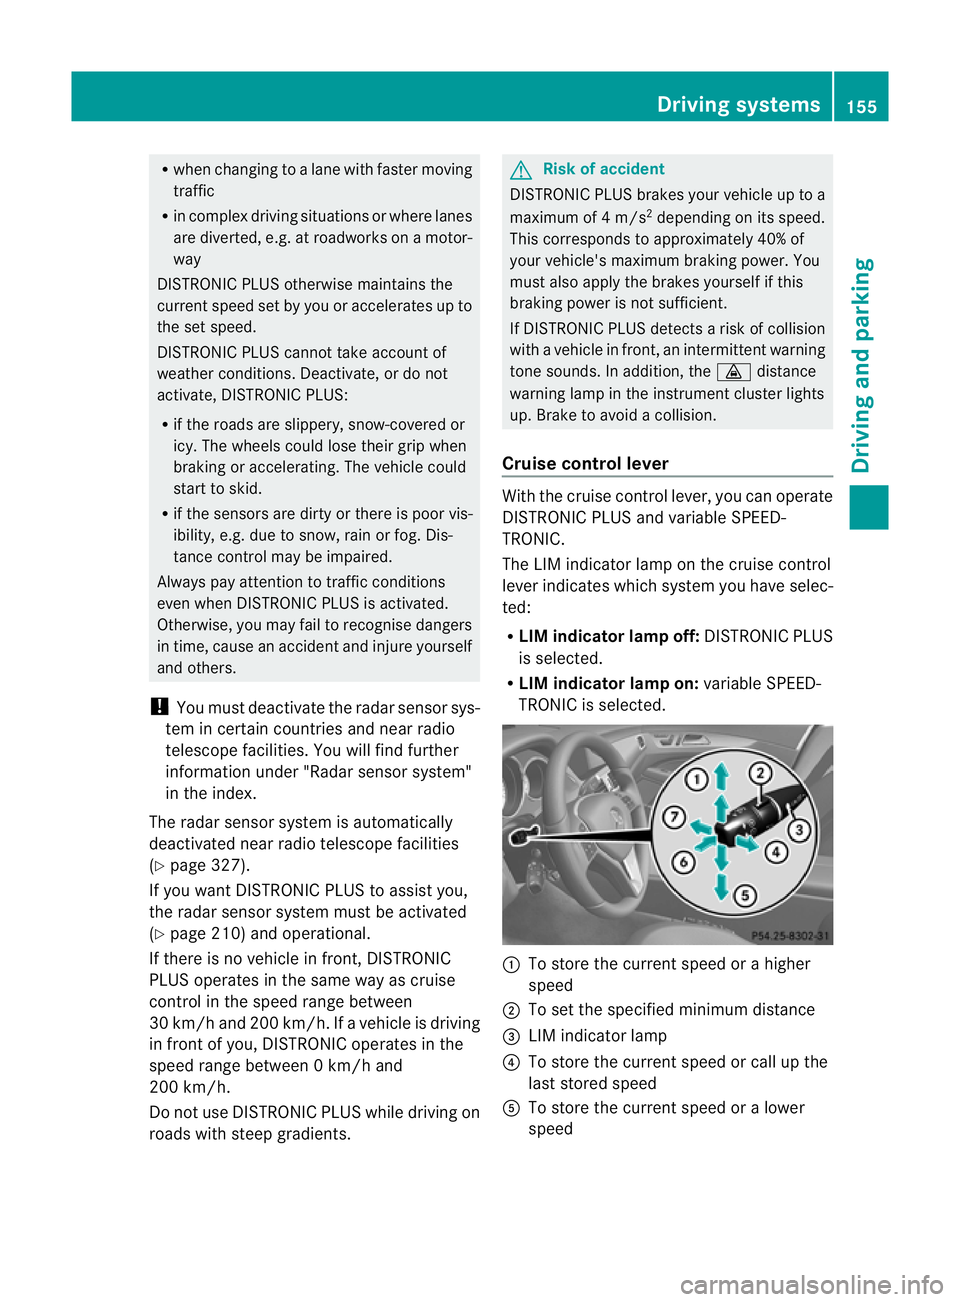
Cruise control lever With the cruise control lever, you can operate
DISTRONIC PLUS and variable SPEED-
TRONIC.
The LIM indicator lamp on the cruise control
lever indicates which system you have selec-
ted:
R
LIM indicator lamp off: DISTRONIC PLUS
is selected.
R LIM indicator lamp on: variable SPEED-
TRONIC is selected. :
To store the curren tspeed or a higher
speed
; To set the specified minimum distance
= LIM indicator lamp
? To store the curren tspeed or call up the
last stored speed
A To store the curren tspeed or a lower
speed Driving systems
155Driving and parking Z