2010 MERCEDES-BENZ CLS COUPE radio
[x] Cancel search: radioPage 267 of 337
Frequencies for the garage door opener
The radio type approval number and the frequency range for the garage door opener can be
found on the Internet at: http://www.mercedes-benz.de/betriebsanleitung. Floormat on the driver's side
G
Ris
kofa ccident
Make sure that there is sufficient clearance
around the pedals when floormats are used,
and that the floormats are properly secured.
The floormats must be correctly secured at all
times using retainers and press-studs.
Before you drive off, check the floormats and
secure if necessary. Afloormat which is not
properly secured can slip and, thereby, inter-
fere with the movemen tofthe pedals.
Do not place floormats on top of one another. X
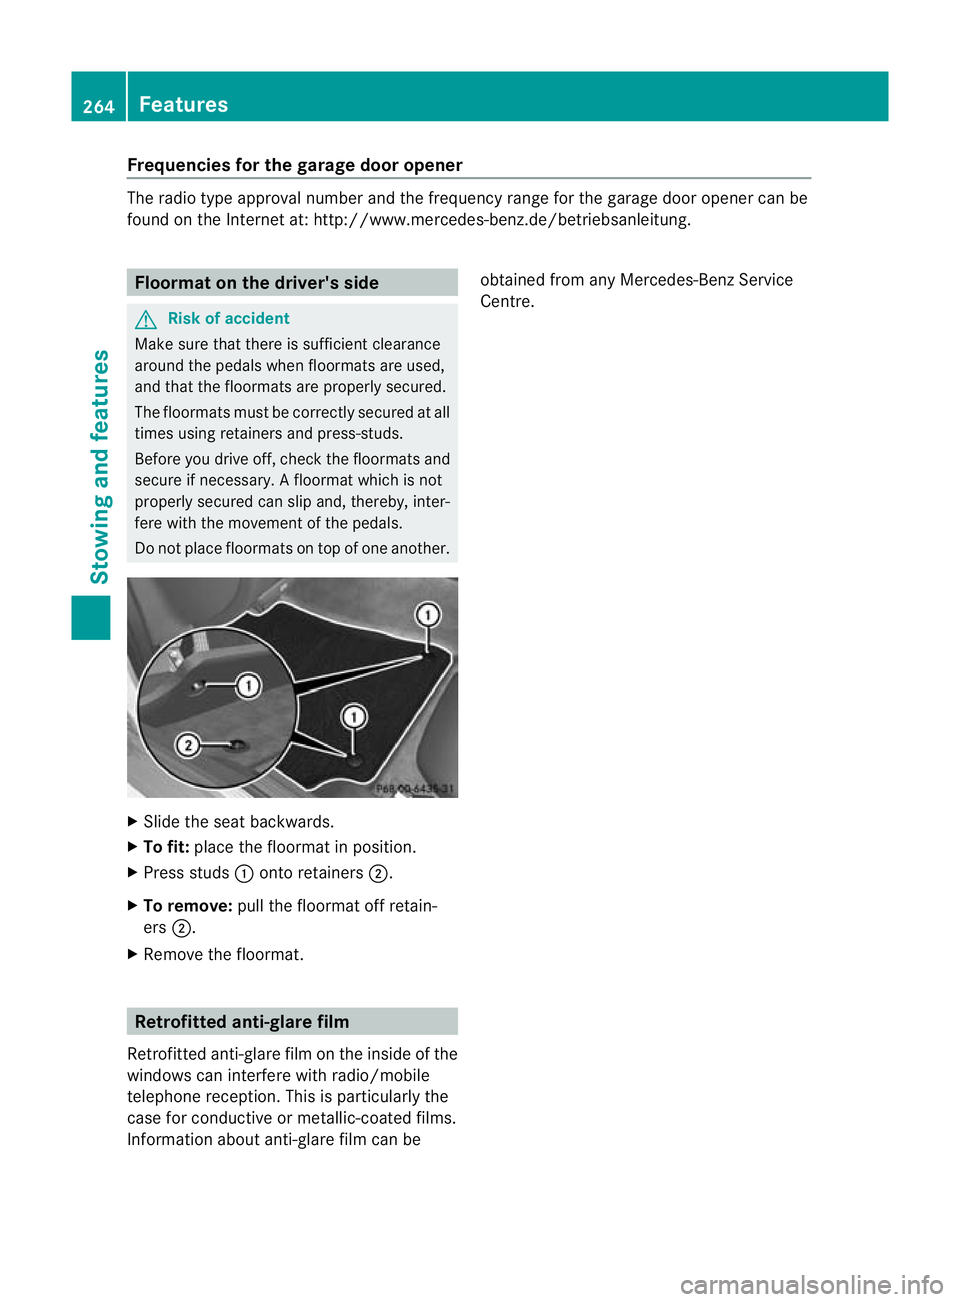
Slide the seat backwards.
X To fit: place the floormat in position.
X Press studs :onto retainers ;.
X To remove: pull the floormat off retain-
ers ;.
X Remove the floormat. Retrofitted anti-glare film
Retrofitted anti-glare film on the inside of the
windows can interfere with radio/mobile
telephone reception. This is particularly the
case for conductive or metallic-coated films.
Information about anti-glare film can be obtained from any Mercedes-Benz Service
Centre.264
FeaturesStowing and features
Page 294 of 337
recycled in an environmen-
tally responsible manner.
Dispose of batteries in an
environmentally responsible
manner. Take discharged
batteries to a qualified spe-
cialist workshop, e.g. a
Mercedes-Benz Service
Centre, or to a special col-
lection point for old batter-
ies.
G
Risk of injury
For safety reasons, Mercedes-Benz recom-
mends that you only use batteries which have
been tested and approved for yourv ehicle by
Mercedes-Benz .These batteries provide
increased impact protection to prevent vehi-
cle occupants from suffering acid burns
should the battery be damaged in the event
of an accident.
To prevent acid burns, observe the following
safety notes when handling batteries:
R do not lean over the battery.
R do not place any metal objects on a battery.
Otherwise, you could cause a short circuit
and the battery's gas mixture could ignite.
R make sure that you do not create an elec-
trostatic charge, e.g. by wearing synthetic
clothing or as a result of friction on fabrics.
Therefore, you should not pull or slide the
battery over carpets or other synthetic
materials.
R never touch the battery first. To discharge
a possible electrostatic charge, step out of
the vehicle first and touch the bodywork.
R do not wipe the battery using a cloth. The
battery may explode as a result of electro-
static charge or due to flying sparks.
! Switch off the engine and remove the key
before disconnecting the terminal clamps
from the battery. On vehicles with KEY-
LESS-GO, make sure that the ignition is
switched off. Check that all the indicator
lamps in the instrumentc luster are off.You may otherwise destroy electronic compo-
nents, such as the alternator.
i Remove the key if you park the vehicle
and do not require any electrical consum-
ers. The vehicle will then use very little
energy, thus conserving battery power.
Mercedes-Benz recommends that you do not
carry out work on batteries yourself, e.g.
removing, charging or replacing. Always have
this work performed at aqualified specialist
workshop, e.g. a Mercedes-Ben zService
Centre. Installation location of the battery
Your vehicle is equipped with a battery in the
engine compartment .Itis located on the front
bulkhead under the filter box on the right-
hand side of the vehicle when viewed in the
direction of travel.
X Firmly depress the parking brake and move
the transmission to position P.
X Switch off all electrical consumers (e.g.
radio, blower, etc.).
X Turn the key to position 0(Y page 129) in
the ignition lock and remove it, or, on vehi-
cles with KEYLESS-GO, make sure that the
ignition has been switched off
(Y page 129). All indicator lamps in the
instrument cluster must be off.
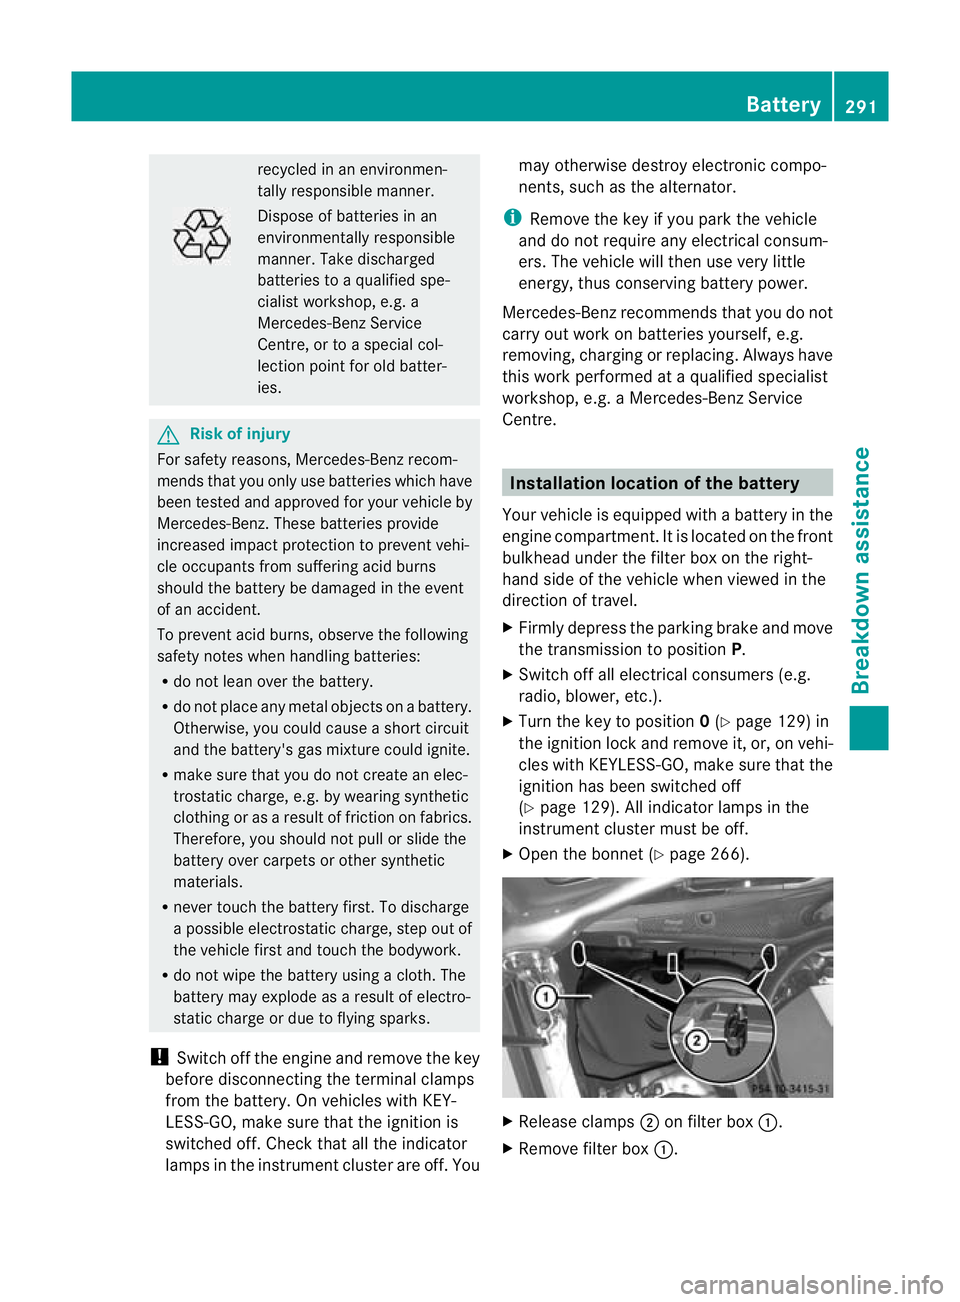
X Open the bonnet (Y page 266). X
Release clamps ;on filter box :.
X Remove filter box :. Battery
291Breakdown assistance Z
Page 296 of 337

The jump-starting connection point is in the
engine compartment (Y page 294).
X Open the bonnet (Y page 266).
X Connec tthe battery charger to the positive
terminal and earth point in the same order
as when connecting the donor battery in
the jump-starting procedure
(Y page 294). Reconnecting the battery
! Always connect the battery in the order
described below. Never swap the terminal
clamps. You may otherwise damage the
vehicle electronics.
X Switch off all electrical consumers (e.g.
radio, blower, etc.).
X Connect the positive terminal clamp and
secure the cover.
X Connect the negative terminal clamp.
X Put the filter box back in place, then clip in
and close the retaining clamps.
X Close the bonnet.
i If the power supply has been interrupted,
e.g. if the battery has been reconnected,
you must carry out the following tasks:
R set the clock (Y page 206).
R reset the function for automatically fold-
ing the exterior mirrors in/out by folding
the mirrors out once (Y page 93). Battery
293Breakdown assistance Z
Page 297 of 337
Jump-starting
G
Risk of injury
There is a risk of acid burns when jump-starting a vehicle due to the gases which escape from
the battery. Do not lean over the battery while the engine is being jump-started. G
Risk of explosion
Gases escaping from the battery during jump-starting may cause minor explosions. Avoid cre-
ating sparks. Keep naked flames away from the battery, and do not smoke.
Comply with safety precautions when handling batteries. You will find these under "Battery" in
the index.
! Avoid repeated and lengthy starting attempts. Otherwise, non-combusted fuel may dam-
age the catalytic converter 39
and create a risk of fire.
Do not use a rapid-charging device to start the engine.
Make sure the jump leads are not damaged.
Make sure the jump leads are not touching any other metal objects when they are connected
to the battery.
If your vehicle's battery is discharged, the engine can be jump-started from another vehicle
or from a second battery using jump leads.
Observe the following points:
X The battery is not accessible in all vehicles. If the other vehicle's battery is not accessible,
jump-start the vehicle using a second battery or ajump-starting device.
X Only jump-start the vehicle when the engine is cold and the catalyti cconverter system has
cooled down 40
.
X Do not start the engine if the battery is frozen. Let the battery thaw first.
X Jump-starting may only be performed from batteries with a nominal voltage of 12 V.
X Only use jump leads that have a sufficient cross-section and insulated terminal clamps.
X Make sure that the jump leads cannot come into contact with parts, such as the pulley or
the fan. These parts move when the engine is started and while it is running.
X If the battery is fully discharged, leave the battery that is being used to jump-start connected
for a few minutes before attempting to start.T his charges the empty battery a little.
i Jump leads and further information about jump-starting can be obtained from any
Mercedes-Benz Service Centre.
X Make sure that the two vehicles do not touch.
X Apply the parking brake firmly.
X Shift the transmission to position P.
X Switch off all electrical consumers (e.g. radio, blower, etc.).
X Open the bonnet (Y page 266).
39 Only vehicles with a petrol engine.
40 Only vehicles with a petrol engine. 294
Jump-startingBreakdown assistance
Page 311 of 337
vehicle to a haltb
y braking carefully. Do not
make any sudden steering movements when
doing so.
Information on tyre pressures is displayed in
the multifunction display. Afte rafew minutes
of driving, the current tyre pressure of each
tyre is show ninthe multifunction display.
i The tyre pressure values indicated by the
on-board computer may differ from those
measured at a filling station with a pressure
gauge. The tyre pressures shown by the on-
board computer refer to those measured at
sea level. At high altitudes, the tyre pres-
sure values indicated by a pressure gauge
are higher than those shown by the on-
board computer. In this case, do not reduce
the tyre pressures.
i The operation of the tyre pressure moni-
tor can be affected by interference from
radio transmitting equipment (e.g. radio
headphones, two-way radios) that may be
being operated in or near the vehicle.
Checking tyre pressure electronically X
Make sure that the key is in posi-
tion 2(Ypage 129) in the ignition lock.
X Use the =or; button on the steer-
ing wheel to select the Service menu.
X Use the 9or: button to select
Tyre pressure .
X Press the abutton.
The current tyre pressure for each wheel
will be displayed in the multifunction dis-
play.
If the vehicle has been parked for longer than
20 minutes, you will see the Tyre pressure
displayed after a few minutes of
driving message.
After a teach-in period, the tyre pressure
monitor automatically recognises new
wheels or new sensors. As long as a clear
allocation of the tyre pressure values to the
individual wheels is not possible, the Tyrepressure monitor active message isshown instead of the tyre pressure display.
The tyre pressures are already being moni-
tored.
i
If a spare wheel/emergency spare wheel
is fitted, for a few minutes the system may
continue to show the tyre pressure of the
wheel that has been removed. If this
occurs, note that the value displayed for
the position where the spare tyre is fitted
is not the same as the spare wheel/emer-
gency spare wheel's current tyre pressure.
Tyre pressure monitor warning mes-
sages If the tyre pressure monitor detects a signifi-
cant pressure loss on one or more tyres, a
warning message is shown in the multifunc-
tion display.
Awarning tone also sounds and
the tyre pressure warning lamp lights up in
the instrument cluster.
Each tyre that is affected by a significant loss
of pressure is highlighted with a colour.
If the Please correct tyre pressure(s) message appears in the multifunction dis-
play:
X
Chec kthe tyre pressure on all four wheels
and correct it if necessary.
i If the wheel positions on the vehicle are
interchanged, the tyre pressures may be
displayed for the wrong positions for a
short time. This is rectified after a few
minutes of driving, and the tyre pressures
are displayed for the correct positions.
Restarting the tyre pressure monitor When you restart the tyre pressure monitor,
all existing warning messages are deleted and
the warning lamps go out. The monitor uses
the currently set tyre pressures as the refer-
ence values for monitoring. In most cases, the
tyre pressure monitor will automatically
detect the new referencev alues after you
have changed the tyre pressure. 308
Tyre pressureWheels and tyres
Page 320 of 337
ist workshop, e.g. a Mercedes-Ben
zService
Centre. Vehicle componentsm ay other-
wise wear more quickly and the vehicle's
operating permit may be invalidated. Retrofitting of two-way radios and
mobile phones (RF transmitters)
Use the Technical Specification
ISO/TS 21609 45
implementation regulation
when retrofitting RF (radio frequency) trans-
mitters.
If your vehicle has fittings for two-way radio
equipmen t(e.g. taxis, hire cars or official vehi-
cles), use the power supply or aerial connec-
tions intended for use with the basic wiring.
Be sure to observe the manufacturer's addi-
tional instructions when installing the fittings.
! Have aftermarket radio frequency trans-
mitting equipment installed at a qualified
specialist workshop. Mercedes-Benzr ec-
ommends that you use a Mercedes-Benz
Service Centre for this purpose.
The transmission output at the aerial base
must not exceed the maximum values below. Waveband Maximum trans-
mission output
(PEAK)
Short wave (f <
54 MHz) 100 W
4 m waveband 30 W
2 m waveband 50 W
Trunked radio/Tetra 35 W
70 cm waveband 35 W
GSM 900/AMPS 10 W
GSM 1800 10 W
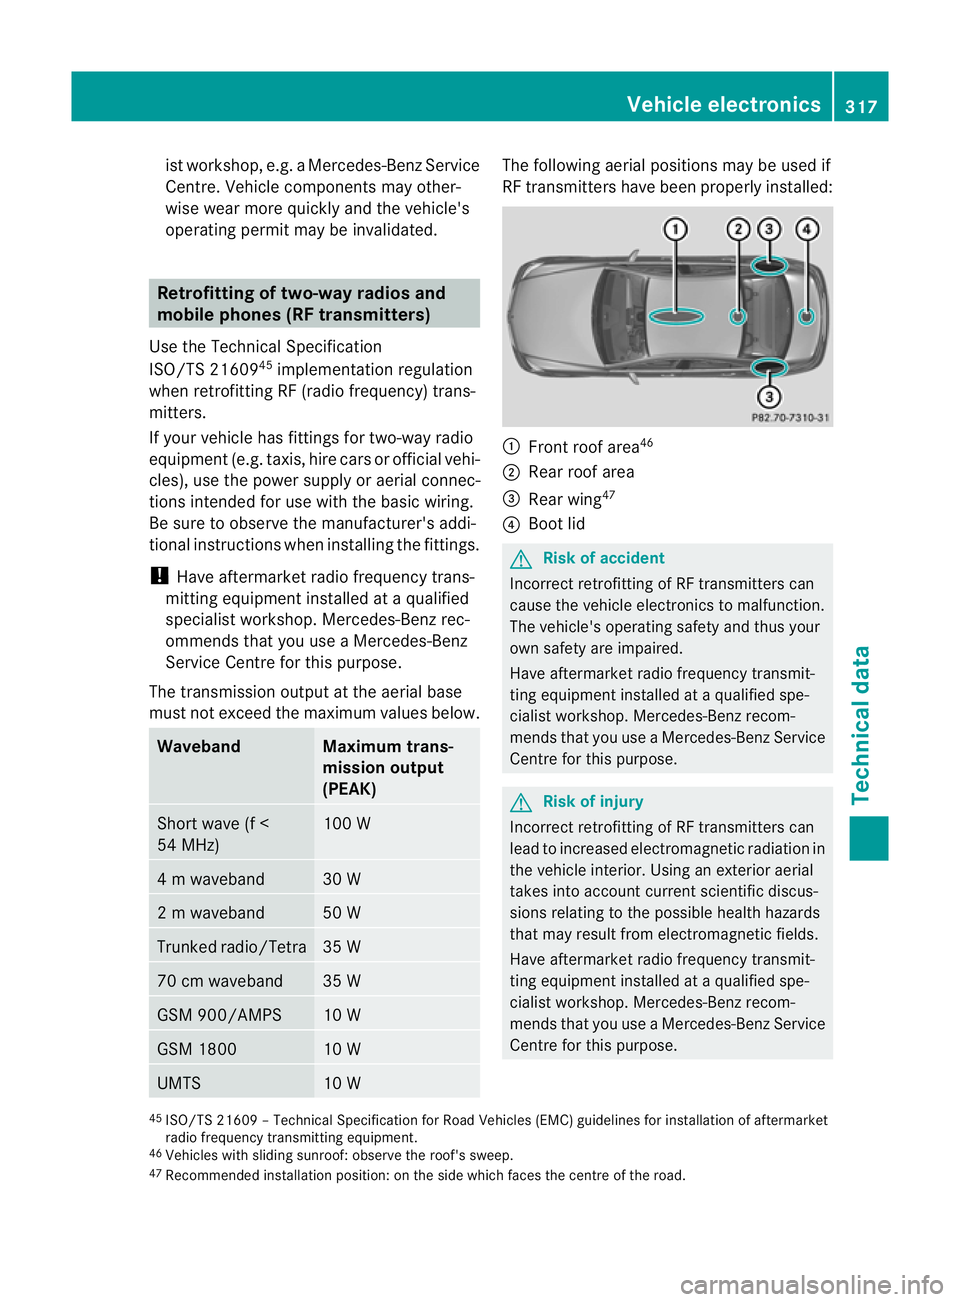
UMTS 10 W The following aerial positions may be used if
RF transmitters have been properly installed:
:
Front roof area 46
; Rear roof area
= Rear wing 47
? Boot lid G
Risk of accident
Incorrect retrofitting of RF transmitters can
cause the vehicle electronics to malfunction.
The vehicle's operating safety and thus your
own safety are impaired.
Have aftermarket radio frequency transmit-
ting equipment installed at a qualified spe-
cialist workshop. Mercedes-Benz recom-
mends that you use a Mercedes-Benz Service
Centre for this purpose. G
Risk of injury
Incorrect retrofitting of RF transmitters can
lead to increased electromagnetic radiation in
the vehicle interior. Using an exterior aerial
takes into account current scientific discus-
sions relating to the possible health hazards
that may result from electromagnetic fields.
Have aftermarket radio frequency transmit-
ting equipment installed at a qualified spe-
cialist workshop. Mercedes-Benz recom-
mends that you use a Mercedes-Benz Service
Centre for this purpose.
45 ISO/TS 2160 9–Technical Specification for Road Vehicles (EMC) guidelines for installation of aftermarket
radio frequency transmitting equipment.
46 Vehicles with sliding sunroof: observe the roof's sweep.
47 Recommended installation position: on the side which faces the centre of the road. Vehicle electronics
317Technical data Z
Page 321 of 337
Deviations with respect to aerial locations,
outpu
tand frequencies must be approved by
Mercedes-Benz.
There is no restriction for aerial positions in
the outer area of the vehicle for these wave-
bands: trunked radio/Tetra, 70 cm wave-
band, GSM 900/AMPS, GSM 1800 and
UMTS.
Legal provisions for fittings must be
observed.
RF transmitters with a maximum transmis-
sion output of 100 mW (PEAK) may be used
in the vehicle withou trestrictions.
! The operating permit may be invalidated
if the instructions for installation and use of
RF transmitters are not observed, e.g.
approved wavebands, maximum output
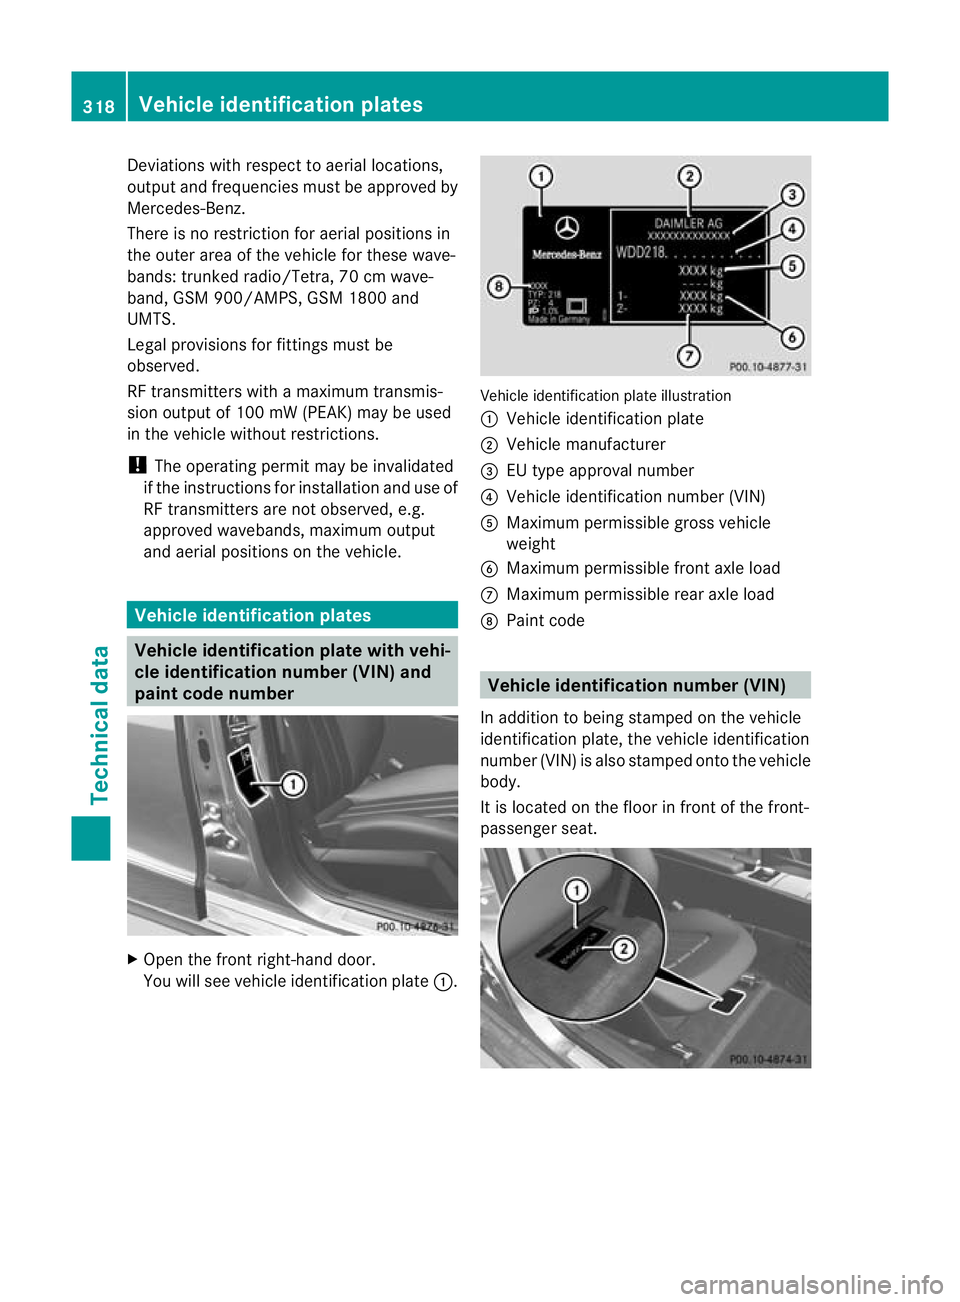
and aerial positions on the vehicle. Vehicle identification plates
Vehicle identification plate with vehi-
cle identification number (VIN) and
paint code number
X
Open the fron tright-hand door.
You will see vehicle identification plate :. Vehicle identification plate illustration
:
Vehicle identification plate
; Vehicle manufacturer
= EU type approval number
? Vehicle identification number (VIN)
A Maximum permissible gross vehicle
weight
B Maximum permissible front axle load
C Maximum permissible rear axle load
D Paint code Vehicle identification number (VIN)
In additio nto being stamped on the vehicle
identification plate, the vehicle identification
number (VIN) is also stamped onto the vehicle
body.
It is located on the floor in front of the front-
passenger seat. 318
Vehicle identification platesTechnical data
Page 330 of 337
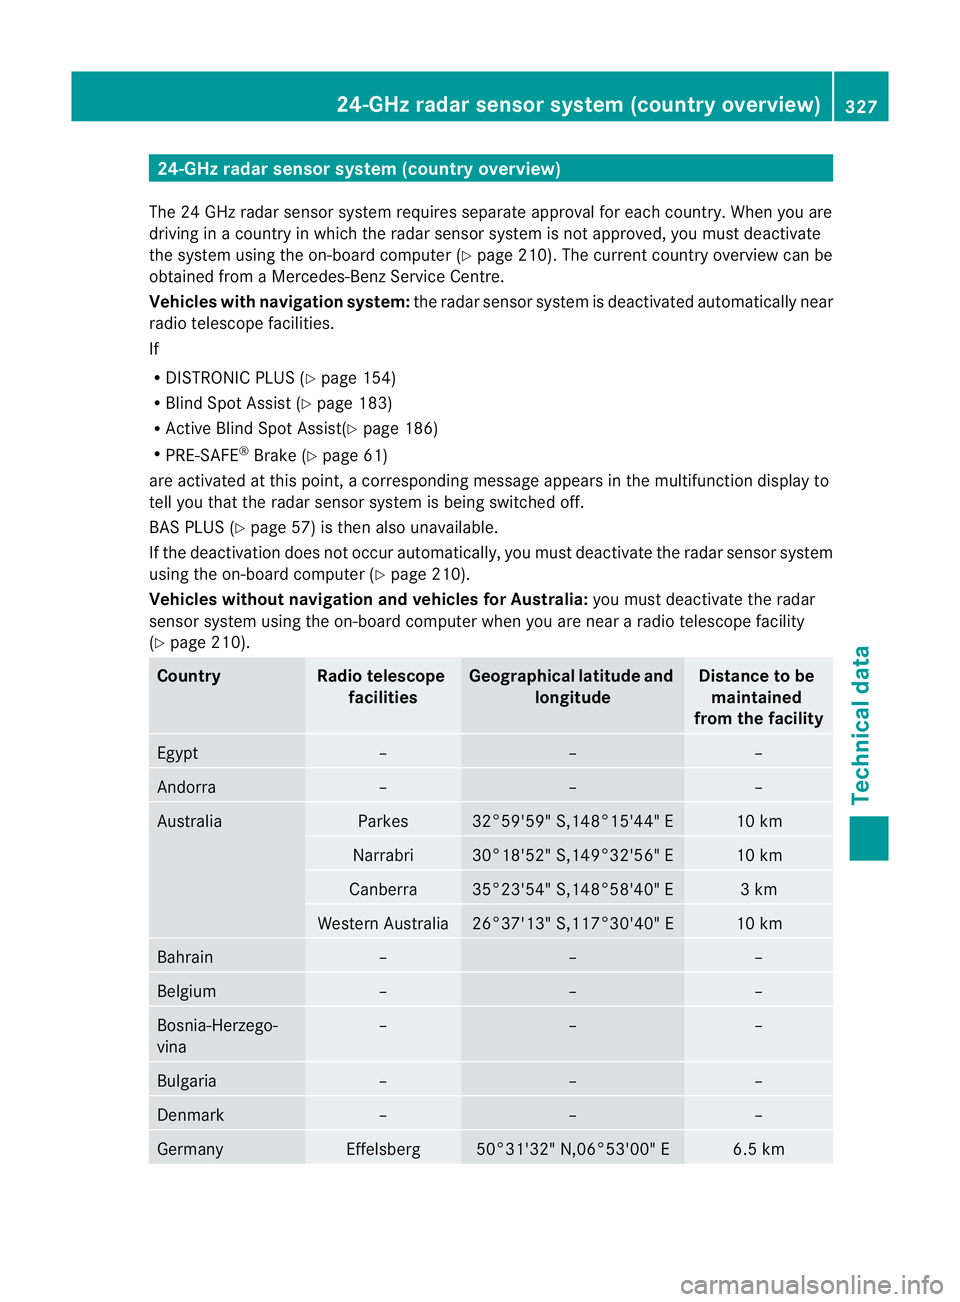
24-GHz radar sensor system (country overview)
The 24 GHz radar senso rsystem requires separate approval fo reach country. When you are
driving in a country in which the radar sensor system is no tapproved, you must deactivate
the system using the on-board computer (Y page 210). The current country overview can be
obtained from a Mercedes-Benz Service Centre.
Vehicles with navigation system: the radar sensorsystem is deactivated automatically near
radio telescope facilities.
If
R DISTRONIC PLUS (Y page 154)
R Blind Spot Assist (Y page 183)
R Active Blind Spot Assist(Y page 186)
R PRE-SAFE ®
Brake (Y page 61)
are activated at this point, a corresponding message appears in the multifunction display to
tell you that the rada rsensor system is being switched off.
BAS PLUS (Y page 57) is then also unavailable.
If the deactivation does not occur automatically, you must deactivate the radar sensor system
using the on-board computer (Y page 210).
Vehicles without navigation and vehicles for Australia: you must deactivate the radar
sensor system using the on-board computer when you are near a radio telescope facility
(Y page 210). Country Radio telescope
facilities Geographical latitude and
longitude Distance to be
maintained
from the facility Egypt – – –
Andorra – – –
Australia Parkes 32°59'59" S,148°15'44" E 10 km
Narrabri 30°18'52" S,149°32'56" E 10 km
Canberra 35°23'54" S,148°58'40" E 3 km
Wester
nAustralia 26°37'13" S,117°30'40" E 10 km
Bahrain – – –
Belgium – – –
Bosnia-Herzego-
vina – – –
Bulgaria – – –
Denmark – – –
Germany Effelsberg 50°31'32" N,06°53'00" E 6.5 km24-GHz radar sensor system (country overview)
327Technical data Z