2010 MERCEDES-BENZ CLS COUPE seat memory
[x] Cancel search: seat memoryPage 15 of 337

Setting the ambient lighting col-
our (on-board computer) ................ 208
Switching the Adaptive Highbeam
Assist on/off (on-board com-
puter) ............................................. 208
Switching the daytime driving
lights on/off (on-board computer) .207
Switching the exterio rlighting
delayed switch-off on/off (on-
board computer )............................ 208
Switching the Intelligent Light
System on/off (on-board com-
puter) ............................................. 207
Switching the surround lighting
on/off (on-board computer) ..........208
Light sensor (display message) .......223
LIM indicator lamp Cruise control ................................ 152
DISTRONI CPLUS ........................... 155
Variabl eSPEEDTRONIC .................163
Loading guidelines ............................248
Locking Automatic ........................................ 74
Emergency locking ........................... 75
From the inside (central locking
button) ............................................. 74
Locking verification signal (on-
board computer) ............................... 209
Lubricant additives see Additives
Luggage net ....................................... 250
Lumbar support ................................... 89
4-way lumba rsuppor t...................... 89
Luxury head restraint .........................87 M
M+S tyres ........................................... 303
Main-beam headlamps Display message ............................ 222
Malfunctions
see Display messages
Manual drive program ......................141
Massage function (PULSE) .................88
Matt finish (cleaning instructions) ..272
Memory card (on-board computer) .201
Memory function ................................. 95Menu (on-board computer)
AMG ............................................... 212
Assistance ..................................... 203
Audi o............................................. 200
DISTRONI CPLUS ........................... 160
DVD ............................................... 201
Menu overview .............................. 197
Navigation ..................................... 199
Service .......................................... .205
Settings ......................................... 205
Telephone ...................................... 201
Trip ................................................ 198
TV .................................................. 201
Message memory (on-board com-
puter) ................................................. .215
Messages see Display messages
Mirrors
Sun visor ........................................ 257
see Exterior mirrors or Rear-view mirror
Mobile phone ..................................... 259
Frequencies ................................... 317
Installatio n..................................... 317
Menu (on-board computer) ............201
Transmission output (maximum) .... 317
Mobile telephone
see Mobile phone .......................... 259
Modifying the programming
Key .................................................. 69
MP3
Operating (on-board computer) .....201
see separate operating instructions
Multicontour seat ................................ 87
Multifunction display ........................196
Multifunction steering wheel Operating the on-board computer .195
Overview .......................................... 29 N
Navigation On-board computer .......................199
see separate operating instructions
NECK-PRO head restraints
Operation ........................................ .41
Resetting after being triggered ........41 12
Index
Page 18 of 337

Seat belts
Adjusting the height .........................44
Warning lamp ................................. 239
Seats
Adjusting (electrically) .....................86
Adjusting lumba rsuppor t................ 89
Adjusting the 4-way lumba rsup-
por t.................................................. 89
Adjusting the head restraint ............86
Cleaning the cover .........................275
Correct driver's seat position ........... 84
Important safety instructions ...........85
Multicontour sea t............................ 87
Storing settings (memory func-
tion) ................................................. 95
Switching sea theating on/off .........89
Switching the sea tventilation on/
off .................................................... 90
Seat ventilation
Malfunction indicator lamp ..............90
Sensors (cleaning instructions) .......274
Service indicator see ASSYST PLUS service interval
display
Service menu (on-board computer) .205
Service products Brake fluid ..................................... 322
Coolant (engine) ............................ 322
Engine oil ....................................... 320
Fuel ................................................ 319
Important safety notes ..................319
Notes ............................................. 319
Settings
Factory (on-board computer) .........212
On-board computer .......................205
Shift ranges ....................................... 140
Showing the distance display (on-
board computer) ............................... 203
Sidebag ................................................ 38
Side window Important safety notes ....................78
Side windows
Convenience closing ........................79
Convenience opening ......................79
Opening/closing .............................. 78
resetting .......................................... 80
Troubleshooting ............................... 80Sliding sunroof
Important safety information ...........80
Opening/closing .............................. 81
Rain closing feature .........................81
Resetting ......................................... 81
Troubleshooting ............................... 81
Snow chains ...................................... 304
Socket ................................................ 258
Cockpi t.......................................... 258
Rea rcompartmen t......................... 259
Spare wheel
Notes/data .................................... 313
Storage location ............................ 280
Storing ........................................... 280
see Emergency spare wheel
Spee dLimit Assist
Activating/deactivating message
function (on-board computer )........ 203
Displaying (on-board computer) ..... 203
Display message ............................ 227
Function/notes ............................. 178
Spee dlimiter
SPEEDTRONIC ............................... 162
Speedometer
Digital speedometer (on-board
computer) ...................................... 198
Segments ...................................... 195
Setting the unit (on-board com-
puter) ............................................. 205
Speedtronic
Display message ............................ 231
Permanent ..................................... 164
Variabl e......................................... 163
SPEEDTRONIC
Function/notes ............................. 162
SPORT handling mode
Activating/deactivating (AMG
vehicles) .......................................... 60
Warning lamp ................................. 243
SRS (Supplemental Restraint Sys-
tem)
Display message ............................ 218
Introduction ..................................... 35
Warning lamp ................................. 243
Warning lamp (function) ................... 35
Standard display (on-board com-
puter) ................................................. .198 Index
15
Page 19 of 337
Starting the engine
Important safety notes ..................130
Station
see Radio
Steering (display message) ..............235
Steering wheel Adjusting (electrically). ....................91
Adjusting (manually). .......................91
Buttons (on-board computer) ......... 195
Important safety instructions ...........90
Memory function (storing set-
tings) ................................................ 91
Steering wheel heating ....................91
Storing settings (memory func-
tion) ................................................. 95
Steering wheel gearshift paddles ....139
Steering wheel heating Malfunction indicator lamp ..............92
Stowage compartments
Armrest (under) ............................. 249
Centre console .............................. 249
Centre console (rea rcompart-
ment). ............................................ 250
Cuph older..................................... 255
Glove compartment .......................248
Rea r............................................... 250
Under driver's seat/front-
passenger sea t.............................. 250
Stowage space
Important safety information .........248
Stowage well
Boot floo r(underneath) ................. 254
Submenu (on-board computer)
Convenience .................................. 211
Factory setting ............................... 212
Heating .......................................... 210
Instrument cluster .........................205
Lights ............................................ .207
Standard displa y............................ 198
Time/Date ..................................... 206
Vehicle .......................................... .209
Summer opening
see Convenience opening feature
Summer tyres .................................... 303
Sun visor ............................................ 256
Supplemental Restraint System see SRS Surround lighting (on-board com-
puter)
................................................. .208
Suspension tuning ....................168, 169
Switching off the alarm (ATA) ............63 T
Tail lamp (display message) .............222
Technical data CLS 250 CDI BlueEFFICIENCY .......324
CLS 350 BlueEFFICIENCY ..............323
CLS 350 CDI 4MATIC BlueEFFI-
CIENC Y.......................................... 325
CLS 350 CDI BlueEFFICIENCY .......325
CLS 500 4MATIC BlueEFFI-
CIENC Y.......................................... 323
CLS 500 BlueEFFICIENCY ..............323
CLS 63 AMG .................................. 324
Notes ............................................. 316
Tyres/wheels ................................. 310
Telephone
Accepting acall............................. 202
Menu (on-board computer) ............201
Number from the phone book ....... .202
Redialling ....................................... 203
Rejecting/ending acall................. 202
Telephone compartment ..................249
Temperature Coolant .......................................... 194
Coolant (on-board computer) ......... 212
Engine oil (on-board computer) ...... 212
Outside temperature ..................... .195
Setting ........................................... 115
TEMPOMAT
Function/notes ............................. 152
Through-loading feature ...................251
Tilt/sliding sunroof see Sliding sunroof
Time (on-board computer) ................206
Timer (on-board computer) ..............212
TIREFIT kit .......................................... 281
Top Tether ............................................ 50
Total distance recorder ....................198
Tow-away protection ..........................64
Towing Important safety notes ..................29516
Index
Page 43 of 337
the vehicle occupants on the side of the vehi-
cle on which the impact occurs.
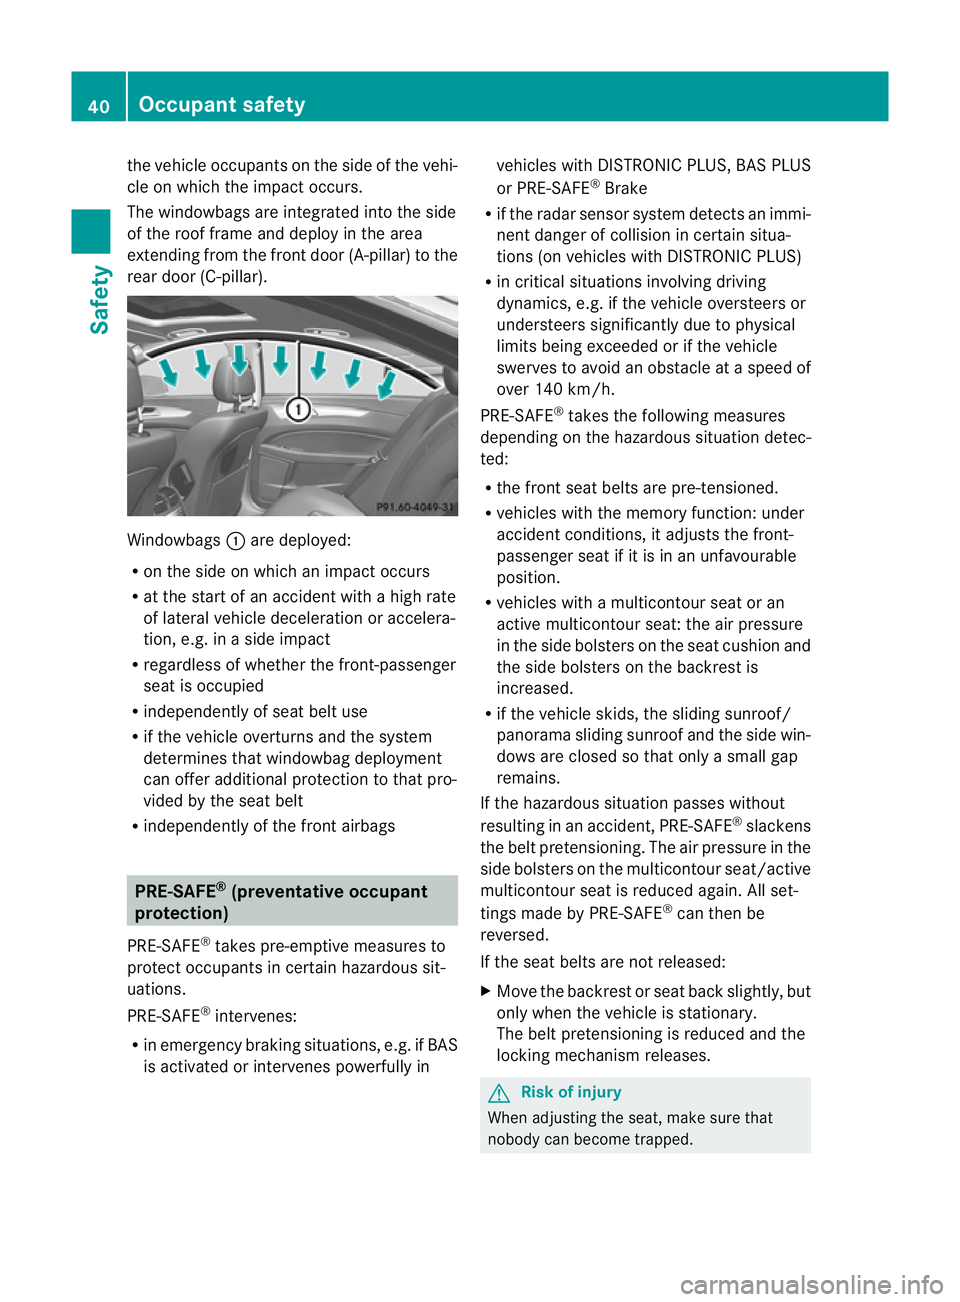
The windowbags are integrated into the side
of the roo
fframe and deploy in the area
extending from the front door (A-pillar) to the
rear door (C-pillar). Windowbags
:are deployed:
R on the side on which an impact occurs
R at the start of an accident with a high rate
of lateral vehicle deceleratio noraccelera-
tion, e.g. in a side impact
R regardless of whethe rthe front-passenger
seat is occupied
R independently of seat belt use
R if the vehicle overturns and the system
determines that windowbag deployment
can offer additional protection to that pro-
vided by the seat belt
R independently of the front airbags PRE-SAFE
®
(preventative occupant
protection)
PRE-SAFE ®
takes pre-emptive measures to
protect occupants in certain hazardous sit-
uations.
PRE-SAFE ®
intervenes:
R in emergency braking situations, e.g. if BAS
is activated or intervenes powerfully in vehicles with DISTRONIC PLUS, BAS PLUS
or PRE-SAFE ®
Brake
R if the radar sensor system detects an immi-
nent danger of collision in certain situa-
tions (on vehicles with DISTRONIC PLUS)
R in critical situations involving driving
dynamics, e.g. if the vehicle oversteers or
understeers significantly due to physical
limits being exceeded or if the vehicle
swerves to avoid an obstacle at a speed of
over 140 km/h.
PRE-SAFE ®
takes the following measures
depending on the hazardous situation detec-
ted:
R the front seat belts are pre-tensioned.
R vehicles with the memory function: under
accident conditions, it adjusts the front-
passenger seat if it is in an unfavourable
position.
R vehicles with a multicontour seat or an
active multicontour seat: the air pressure
in the side bolsters on the seat cushion and
the side bolsters on the backrest is
increased.
R if the vehicle skids, the sliding sunroof/
panorama sliding sunroof and the side win-
dows are closed so that only a small gap
remains.
If the hazardous situation passes without
resulting in an accident, PRE-SAFE ®
slackens
the belt pretensioning. The air pressure in the
side bolsters on the multicontour seat/active
multicontour seat is reduced again. All set-
tings made by PRE-SAFE ®
can then be
reversed.
If the seat belts are not released:
X Move the backrest or seat back slightly, but
only when the vehicle is stationary.
The belt pretensioning is reduced and the
locking mechanism releases. G
Risk of injury
When adjusting the seat, make sure that
nobody can become trapped. 40
Occupant safetySafety
Page 87 of 337
Vehicle equipment
i This manual describes all the standard
and optional equipment of your vehicle
available at the time of publicatio nofthe
Owner's Manual. Country-specific differen-
ces are possible. Please note that your
vehicle may not be equipped with all fea-
tures described. This also applies to safety-
relevant systems and functions. Correct driver's seat position
Observe the safety guidelines on
(Y
page 85).
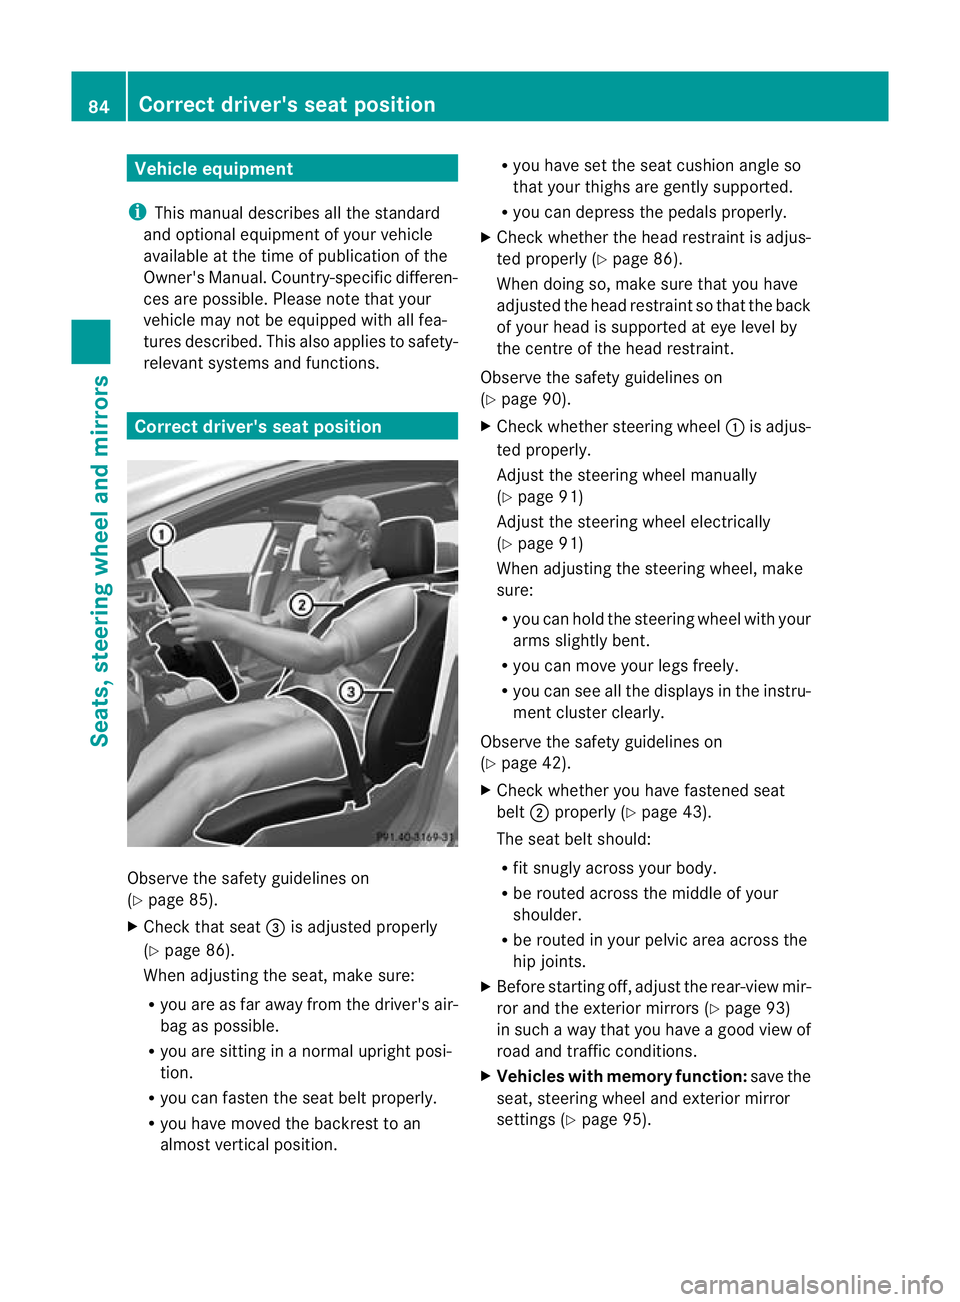
X Check that seat =is adjusted properly
(Y page 86).
When adjusting the seat, make sure:
R you are as far away from the driver's air-
bag as possible.
R you are sitting in a normal upright posi-
tion.
R you can fasten the seat belt properly.
R you have moved the backrest to an
almost vertical position. R
you have set the seat cushion angle so
that your thighs are gently supported.
R you can depress the pedals properly.
X Check whether the head restraint is adjus-
ted properly (Y page 86).
When doing so, make sure that you have
adjusted the head restraint so that the back
of your head is supported at eye level by
the centre of the head restraint.
Observe the safety guidelines on
(Y page 90).
X Check whether steering wheel :is adjus-
ted properly.
Adjust the steering wheel manually
(Y page 91)
Adjust the steering wheel electrically
(Y page 91)
When adjusting the steering wheel, make
sure:
R you can hold the steering wheel with your
arms slightly bent.
R you can move your legs freely.
R you can see all the displays in the instru-
ment cluster clearly.
Observe the safety guidelines on
(Y page 42).
X Check whether you have fastened seat
belt ;properly (Y page 43).
The seat belt should:
R fit snugly across your body.
R be routed across the middle of your
shoulder.
R be routed in your pelvic area across the
hip joints.
X Before starting off, adjust the rear-view mir-
ror and the exterior mirrors (Y page 93)
in such a way that you have a good view of
road and traffic conditions.
X Vehicles with memory function: save the
seat, steering wheel and exterior mirror
settings (Y page 95). 84
Correct driver's seat positionSeats, steering wheel and mirrors
Page 89 of 337
Adjusting the sea
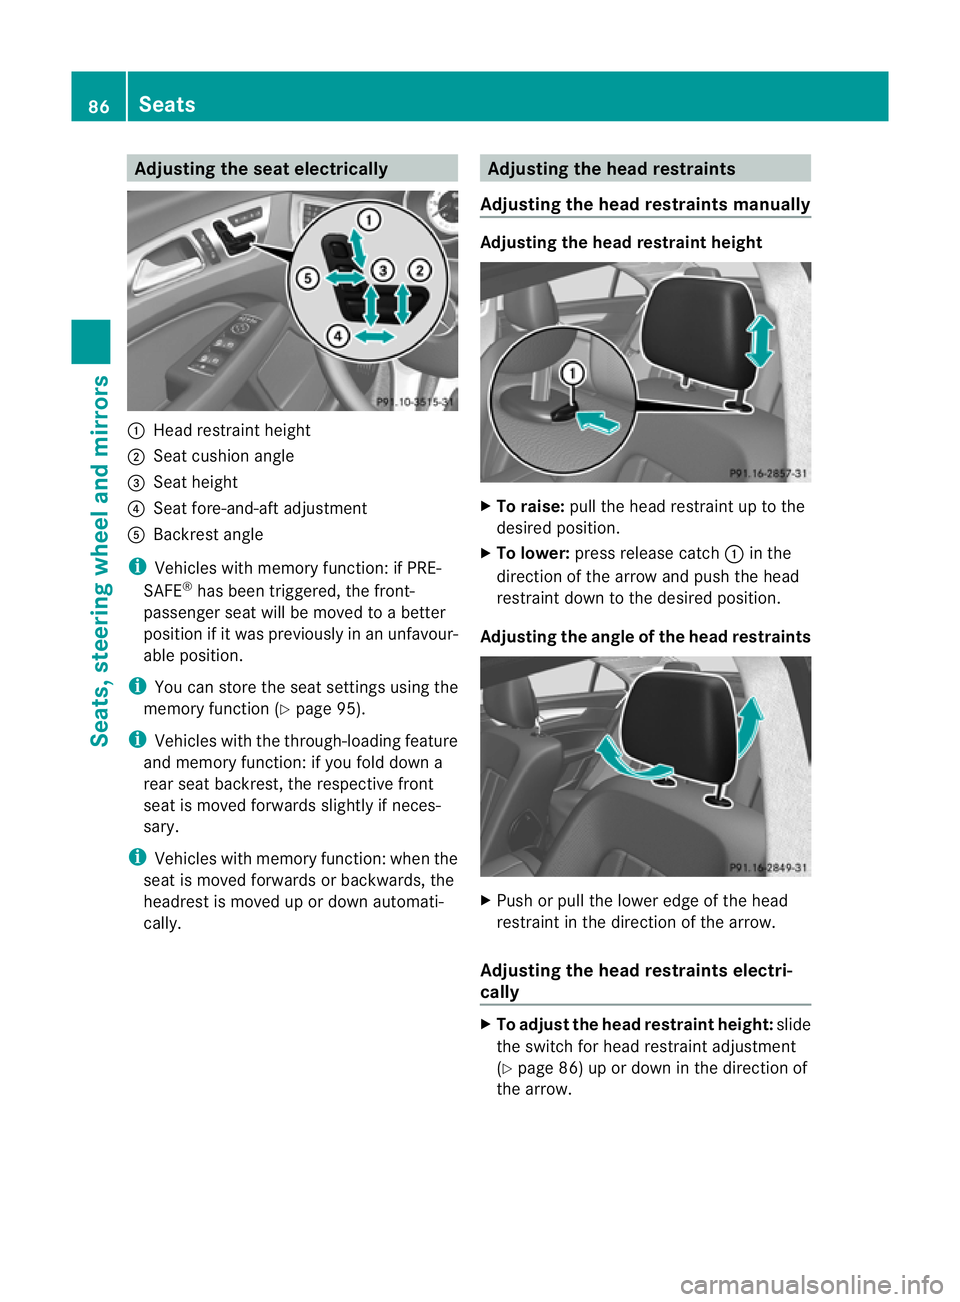
telectrically :
Head restraint height
; Seat cushio nangle
= Sea theight
? Seat fore-and-aft adjustment
A Backrest angle
i Vehicles with memory function: if PRE-
SAFE ®
has been triggered, the front-
passenger seat will be moved to a better
position if it was previously in an unfavour-
able position.
i You can store the seat settings using the
memory function (Y page 95).
i Vehicles with the through-loading feature
and memory function: if you fold down a
rear seat backrest, the respective front
seat is moved forwards slightly if neces-
sary.
i Vehicles with memory function :when the
seat is moved forwards or backwards, the
headrest is moved up or down automati-
cally. Adjusting the head restraints
Adjusting the head restraints manually Adjusting the head restraint height
X
To raise: pull the head restraint up to the
desired position.
X To lower: press release catch :in the
direction of the arrow and push the head
restraint down to the desired position.
Adjusting the angle of the head restraints X
Push or pull the lower edge of the head
restraint in the direction of the arrow.
Adjusting the head restraints electri-
cally X
To adjust the head restraint height: slide
the switch for head restraint adjustment
(Y page 86) up or down in the direction of
the arrow. 86
SeatsSeats, steering wheel and mirrors
Page 95 of 337
Problems with the steering wheel heat-
ing
If the steering wheel heating indicator lamp
on the lower left lever of the steering column
is flashing, the steering wheel heating has
switched off automatically. The vehicle's
electrical system voltage is too low because
too many electrical consumers are switched
on.
X
Switch off electrical consumers which you
do not need, such as the rear window heat-
ing or interior lighting.
Once the battery is sufficiently charged, the
steering wheel heating will switch back on
automatically. EASY-ENTRY/EXIT system
G
Risk of injury
Make sure that nobody can become trapped
when you activate the EASY-ENTRY/EXIT fea-
ture.
If there is a risk of someone becoming trap-
ped, stop the adjustment procedure. To halt
the procedure:
R move the switch for steering wheel adjust-
ment in the opposite direction to that in
which the steering wheel is moving.
R press one of the memory function position
buttons.
Never leave children unsupervised in the vehi-
cle. They could open the driver's door and
thereby unintentionally activate the EASY-
ENTRY/EXIT feature and become trapped.
The EASY-ENTRY/EXIT feature makes getting
in and out of your vehicle easier.
The steering wheel swings upwards when
you:
R remove the key from the ignition lock
R open the driver's door and KEYLESS-GO is
in position 1
R open the driver's door and the key is in
position 0or 1in the ignition lock i
The steering wheel only moves upwards if
it has not already reached the upper end
stop.
If you insert the key into the ignition lock with
the driver's door closed, the steering wheel is
automatically moved to the previously set
position.
The last position of the steering wheel is
stored after each manual setting or when you
store the setting with the memory function
(Y page 95).
You can activate and deactivate the EASY-
ENTRY/EXIT feature in the on-board com-
puter (Y page 211).
i If the crash-responsive EASY-EXIT feature
is triggered in an accident, the steering col-
umn will move upwards when the driver's
door is opened. This occurs irrespective of
the position of the key in the ignition lock.
This makes it easier to exit the vehicle and
rescue the occupants.
The crash-responsive EASY-EXIT feature is
only operational after an accident if the
EASY-EXIT/ENTRY feature is activated in
the on-board computer. Mirrors
Rear-view mirror
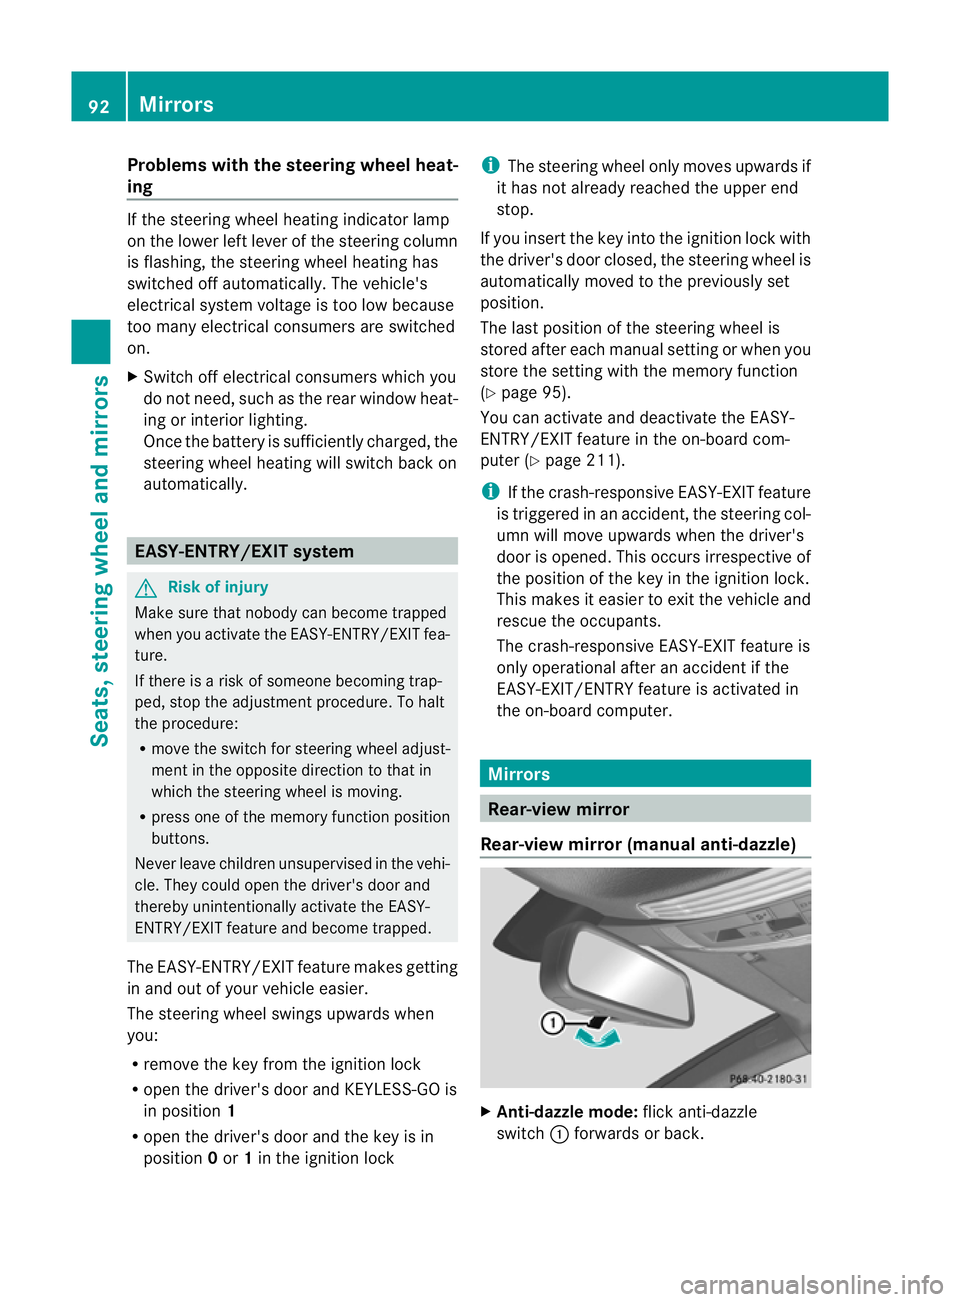
Rear-view mirror (manual anti-dazzle) X
Anti-dazzle mode: flick anti-dazzle
switch :forwards or back. 92
MirrorsSeats, steering wheel and mirrors
Page 97 of 337
i
The mirrors do not fold out if they have
been folded in manually.
Exterior mirror out of position If an exterior mirror has been pushed out of
position, proceed as follows:
X Vehicles without electrically folding
exterior mirrors: move the exterior mirror
into the correc tposition manually.
X Vehicles with electrically folding exte-
rior mirrors: press the mirror-folding but-
ton (Y page 93) repeatedly until you hear
the mirror engage in position.
The mirror housing is engaged again and
you can adjust the exterior mirrors as usual
(Y page 93). Automatic anti-dazzle mirrors
G
Risk of accident
If the incident light from headlamps cannot
strike the sensor in the rear-view mirror, for
instance, when the rear window roller sun-
blind is extended, the mirror's automatic anti-
dazzle function will not operate.
Incident light could then blind you. This may
distract you from the traffic conditions and,
as a result, you may cause an accident .Inthis
case, adjust the rear-view mirror manually.
The rear-view mirror and the exterior mirror
on the driver's side automatically go into anti-
dazzle mode if the ignition is switched on and
incident light from headlamps strikes the sen-
sor in the rear-view mirror.
The mirrors do not go into anti-dazzle mode if
reverse gear is engaged or the interior lighting
is switched on. Parking position for the exterior mir-
ror on the front-passenger side
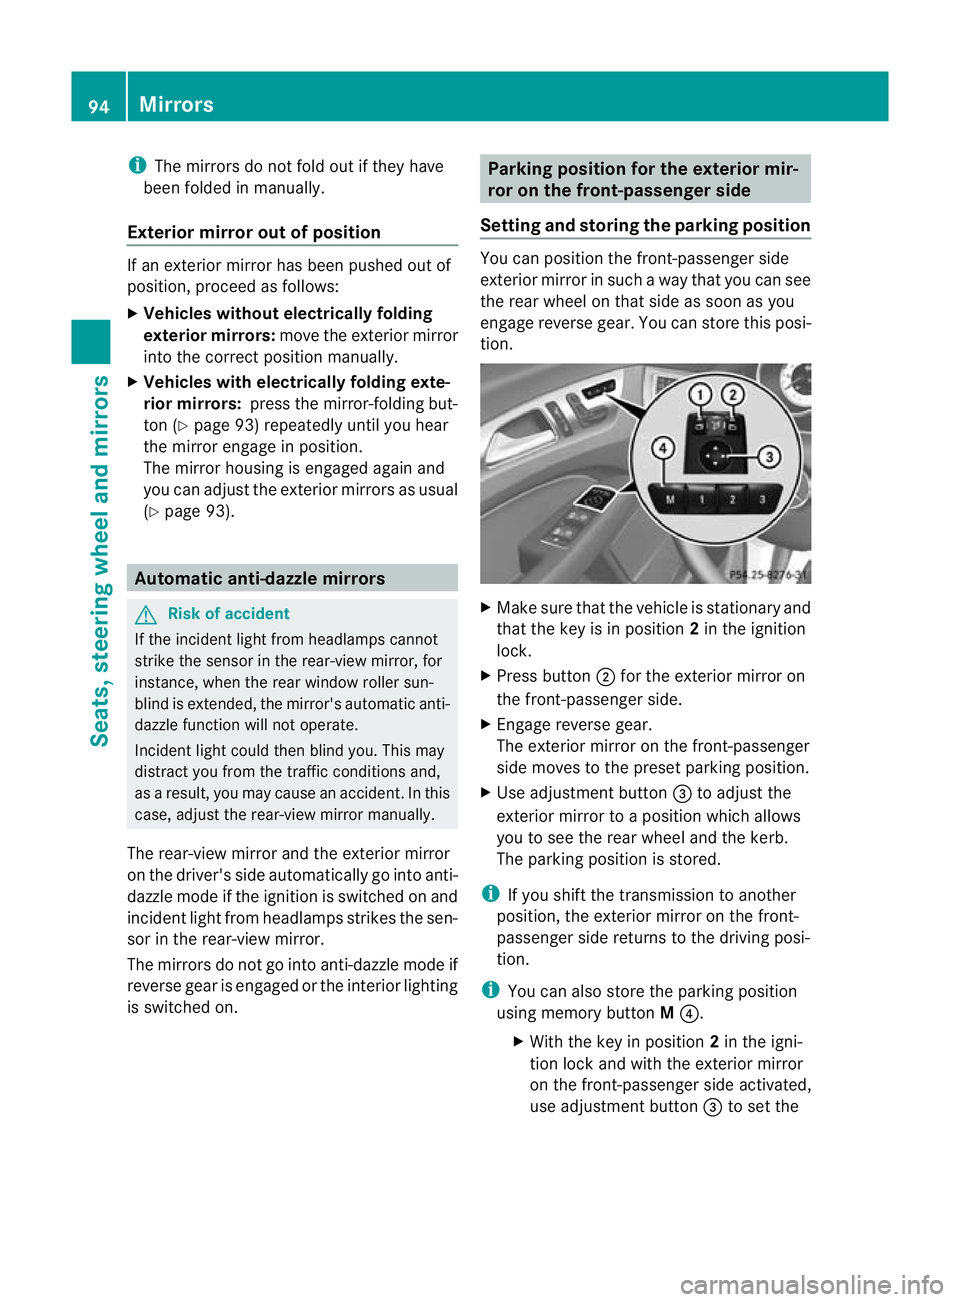
Setting and storing the parking position You can position the front-passenger side
exterior mirror in such a way that you can see
the rear wheel on that side as soon as you
engage reverse gear. You can store this posi-
tion.
X
Make sure that the vehicle is stationary and
that the key is in position 2in the ignition
lock.
X Press button ;for the exterior mirror on
the front-passenger side.
X Engage reverse gear.
The exterior mirror on the front-passenger
side moves to the preset parking position.
X Use adjustment button =to adjust the
exterior mirror to a position which allows
you to see the rear wheel and the kerb.
The parking position is stored.
i If you shift the transmission to another
position, the exterior mirror on the front-
passenger side returns to the driving posi-
tion.
i You can also store the parking position
using memory button M?.
X With the key in position 2in the igni-
tion lock and with the exterior mirror
on the front-passenger side activated,
use adjustment button =to set the 94
MirrorsSeats, steering wheel and mirrors