2010 MERCEDES-BENZ C350S ESP
[x] Cancel search: ESPPage 120 of 364

Outside temperature indicator
The outside temperature indicator is
displayed in the multifunction display
(Y page 120).
GWarning!
The outside temperature indicator is not
designed to serve as an ice-warning device
and is therefore unsuitable for that purpose.
Indicated temperatures just above the
freezing point do not guarantee that the road
surface is free of ice. The road may still be icy,
especially in wooded areas or on bridges.
Fuel gauge
The fuel gauge is on the left-hand side of the
instrument cluster (Y page 28). Once the fuel
level has fallen below the reserve mark, the
yellow fuel tank reserve warning lamp 8
for the fuel reserve comes on.
Control system
Introduction
The control system is activated as soon as the
starter switch is in position 2.
The control system enables you to call up
information about your vehicle and to change
vehicle settings.
For example, you can use the control system
to find out when your vehicle is next due for
maintenance service, to call up statistical
data on your vehicle, and much more.
GWarning!
A driver’s attention to the road and traffic
conditions must always be his/her primary
focus when driving.
For your safety and the safety of others,
selecting features through the multifunction
steering wheel should only be done by the
driver when traffic and road conditions permit
it to be done safely.
Bear in mind that at a speed of just 30 mph
(approximately 50 km/h), your vehicle is
covering a distance of 44 feet (approximately
14 m) every second.
The control system relays information to the
multifunction display.
Multifunction steering wheel
The displays in the multifunction display and
the settings in the control system are
controlled by using the buttons on the
multifunction steering wheel.
:Multifunction display;Press button~to end a call
to reject an incoming call
6to answer a call
to dial7
to redial7
8to mute7Function only available in telephone menu.118Control systemControls in detail
204_AKB; 5; 23, en-USd2ureepe,Version: 2.11.8.12009-07-16T17:54:06+02:00 - Seite 118
Page 121 of 364
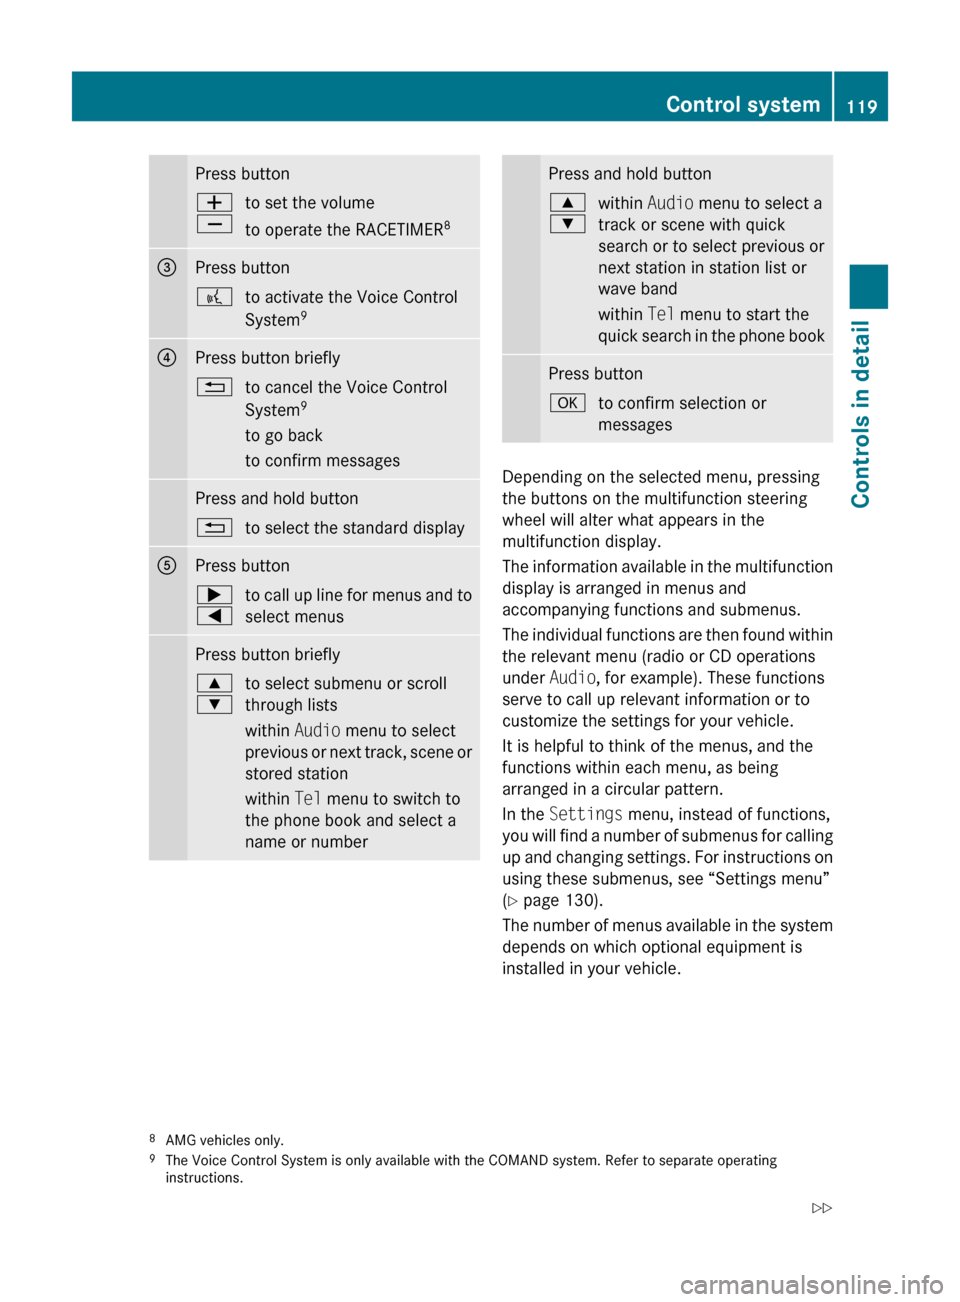
Press buttonW
Xto set the volume
to operate the RACETIMER 8=Press button?to activate the Voice Control
System 9?Press button briefly%to cancel the Voice Control
System 9
to go back
to confirm messagesPress and hold button%to select the standard displayAPress button;
=to call up line for menus and to
select menusPress button briefly9
:to select submenu or scroll
through lists
within Audio menu to select
previous or next track, scene or
stored station
within Tel menu to switch to
the phone book and select a
name or numberPress and hold button9
:within Audio menu to select a
track or scene with quick
search or to select previous or
next station in station list or
wave band
within Tel menu to start the
quick search in the phone bookPress buttonato confirm selection or
messages
Depending on the selected menu, pressing
the buttons on the multifunction steering
wheel will alter what appears in the
multifunction display.
The information available in the multifunction
display is arranged in menus and
accompanying functions and submenus.
The individual functions are then found within
the relevant menu (radio or CD operations
under Audio, for example). These functions
serve to call up relevant information or to
customize the settings for your vehicle.
It is helpful to think of the menus, and the
functions within each menu, as being
arranged in a circular pattern.
In the Settings menu, instead of functions,
you will find a number of submenus for calling
up and changing settings. For instructions on
using these submenus, see “Settings menu”
( Y page 130).
The number of menus available in the system
depends on which optional equipment is
installed in your vehicle.
8 AMG vehicles only.
9 The Voice Control System is only available with the COMAND system. Refer to separate operating
instructions.Control system119Controls in detail204_AKB; 5; 23, en-USd2ureepe,Version: 2.11.8.12009-07-16T17:54:06+02:00 - Seite 119Z
Page 126 of 364
RSETUP (Y page 124)
RRACETIMER (Y page 124)
ROverall analysis (Y page 125)
RLap analysis (Y page 126)
SETUP
XPress button = or ; to select the
AMG menu.
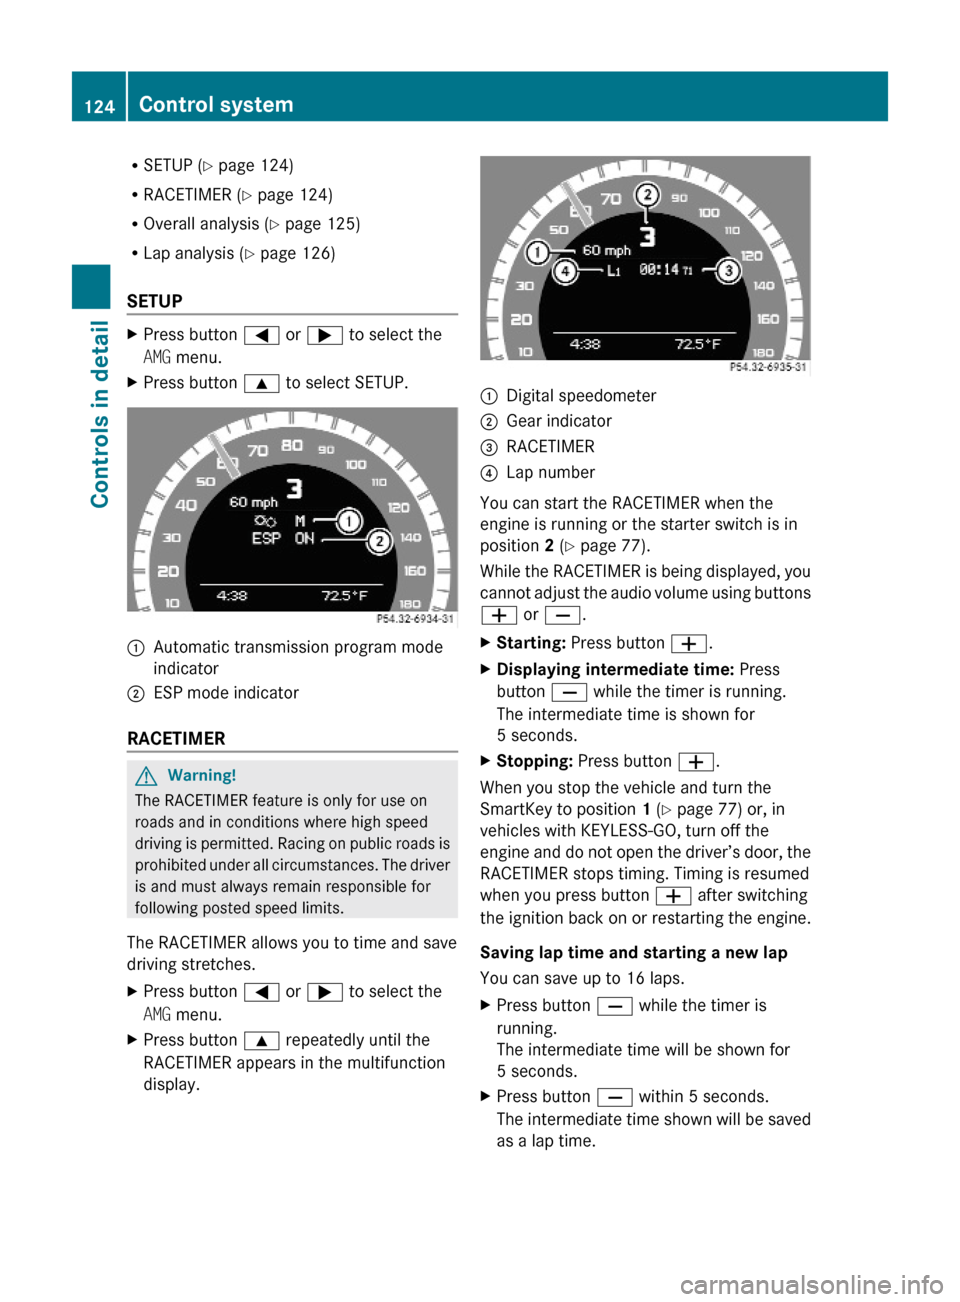
XPress button 9 to select SETUP.:Automatic transmission program mode
indicator
;ESP mode indicator
RACETIMER
GWarning!
The RACETIMER feature is only for use on
roads and in conditions where high speed
driving is permitted. Racing on public roads is
prohibited under all circumstances. The driver
is and must always remain responsible for
following posted speed limits.
The RACETIMER allows you to time and save
driving stretches.
XPress button = or ; to select the
AMG menu.
XPress button 9 repeatedly until the
RACETIMER appears in the multifunction
display.
:Digital speedometer;Gear indicator=RACETIMER?Lap number
You can start the RACETIMER when the
engine is running or the starter switch is in
position 2 (Y page 77).
While the RACETIMER is being displayed, you
cannot adjust the audio volume using buttons
W or X.
XStarting: Press button W.XDisplaying intermediate time: Press
button X while the timer is running.
The intermediate time is shown for
5 seconds.
XStopping: Press button W.
When you stop the vehicle and turn the
SmartKey to position 1 (Y page 77) or, in
vehicles with KEYLESS-GO, turn off the
engine and do not open the driver’s door, the
RACETIMER stops timing. Timing is resumed
when you press button W after switching
the ignition back on or restarting the engine.
Saving lap time and starting a new lap
You can save up to 16 laps.
XPress button X while the timer is
running.
The intermediate time will be shown for
5 seconds.
XPress button X within 5 seconds.
The intermediate time shown will be saved
as a lap time.
124Control systemControls in detail
204_AKB; 5; 23, en-USd2ureepe,Version: 2.11.8.12009-07-16T17:54:06+02:00 - Seite 124
Page 129 of 364
XSwitch on the audio system (Y page 144)
and select radio mode.
Vehicles with COMAND system:
Refer to separate COMAND system
operating instructions.
XPress button = or ; to select the
Audio menu.
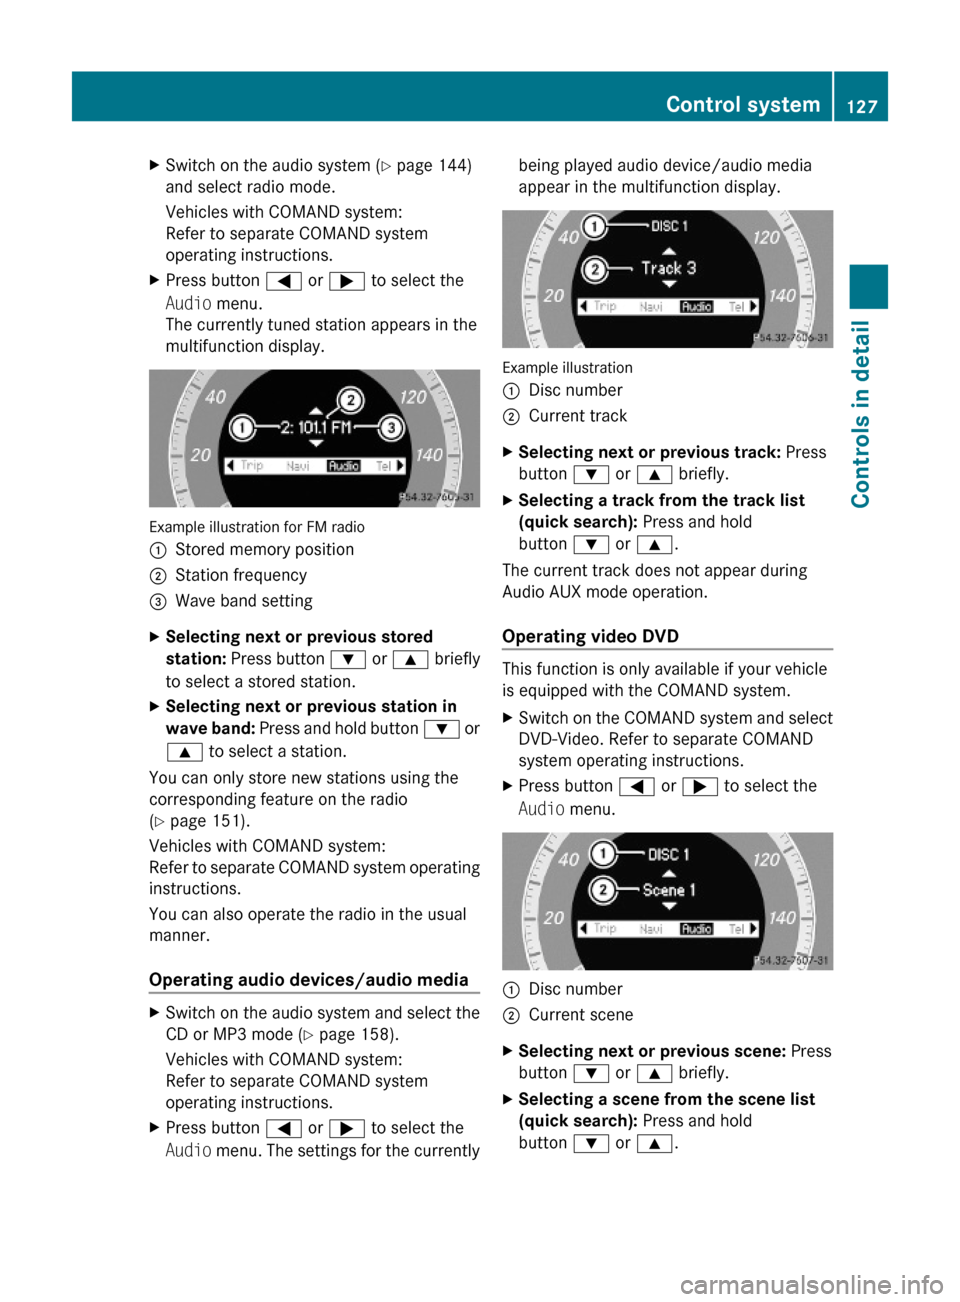
The currently tuned station appears in the
multifunction display.
Example illustration for FM radio
:Stored memory position;Station frequency=Wave band settingXSelecting next or previous stored
station: Press button : or 9 briefly
to select a stored station.
XSelecting next or previous station in
wave band: Press and hold button : or
9 to select a station.
You can only store new stations using the
corresponding feature on the radio
(Y page 151).
Vehicles with COMAND system:
Refer to separate COMAND system operating
instructions.
You can also operate the radio in the usual
manner.
Operating audio devices/audio media
XSwitch on the audio system and select the
CD or MP3 mode (Y page 158).
Vehicles with COMAND system:
Refer to separate COMAND system
operating instructions.
XPress button = or ; to select the
Audio menu. The settings for the currently
being played audio device/audio media
appear in the multifunction display.
Example illustration
:Disc number;Current trackXSelecting next or previous track: Press
button : or 9 briefly.
XSelecting a track from the track list
(quick search): Press and hold
button : or 9.
The current track does not appear during
Audio AUX mode operation.
Operating video DVD
This function is only available if your vehicle
is equipped with the COMAND system.
XSwitch on the COMAND system and select
DVD-Video. Refer to separate COMAND
system operating instructions.
XPress button = or ; to select the
Audio menu.
:Disc number;Current sceneXSelecting next or previous scene: Press
button : or 9 briefly.
XSelecting a scene from the scene list
(quick search): Press and hold
button : or 9.
Control system127Controls in detail204_AKB; 5; 23, en-USd2ureepe,Version: 2.11.8.12009-07-16T17:54:06+02:00 - Seite 127Z
Page 131 of 364

If you press and hold button : or
9 the system scrolls rapidly through the
list of names (quick search). After holding
button : or 9 for a short while the
scrolling speed increases. Release the
button to stop the quick search. The search
stops automatically at the end of the list.
Example illustration
:Selected name from the phone bookXIf the Symbol G appears on the right-hand
side of the name several entries are
present for the same name: Press button
6 or a and select the desired entry.
XPress button 6 or a.
The control system dials the selected
phone number.
If the connection is successful and this
feature is supported by your network
provider, the name of the party (if stored in
your phone book) you are calling will
appear in the multifunction display.
The control system stores the dialed
number in the redial memory.
or
XPress button ~ or % if you do not
want to make the call.
Redialing
The control system stores the most recently
dialed phone numbers. This eliminates the
need to search through your entire phone
book.
XPress button = or ; to select the
Tel menu.
XPress button 6.XPress button : or 9 to select the
desired number or name.
XPress button 6 or a.
The control system dials the selected
phone number.
Service menu
In the Service menu the following functions
are available:
RVehicle status message memory
(Y page 129)
RRestarting the tire pressure loss warning
system (Canada only) (Y page 234)
RChecking tire inflation pressure
electronically with the Advanced TPMS
(USA only) (Y page 234)
RCalling up the maintenance service
indicator display (Y page 259)
Vehicle status message memory
Use the vehicle status message memory
function to scan malfunction and warning
messages that may be stored in the system.
Such messages appear in the multifunction
display and are based on conditions or
system status the vehicle’s system has
recorded.
GWarning!
Malfunction and warning messages are only
indicated for certain systems and are
intentionally not very detailed. The
malfunction and warning messages are
simply a reminder with respect to the
Control system129Controls in detail204_AKB; 5; 23, en-USd2ureepe,Version: 2.11.8.12009-07-16T17:54:06+02:00 - Seite 129Z
Page 132 of 364
operation of certain systems. They do not
replace the owner’s and/or driver’s
responsibility to maintain the vehicle’s
operating safety. Have all required
maintenance and safety checks performed on
the vehicle. Bring the vehicle to an authorized
Mercedes-Benz Center to address the
malfunction and warning messages.
XPress button = or ; to select the
Service menu.
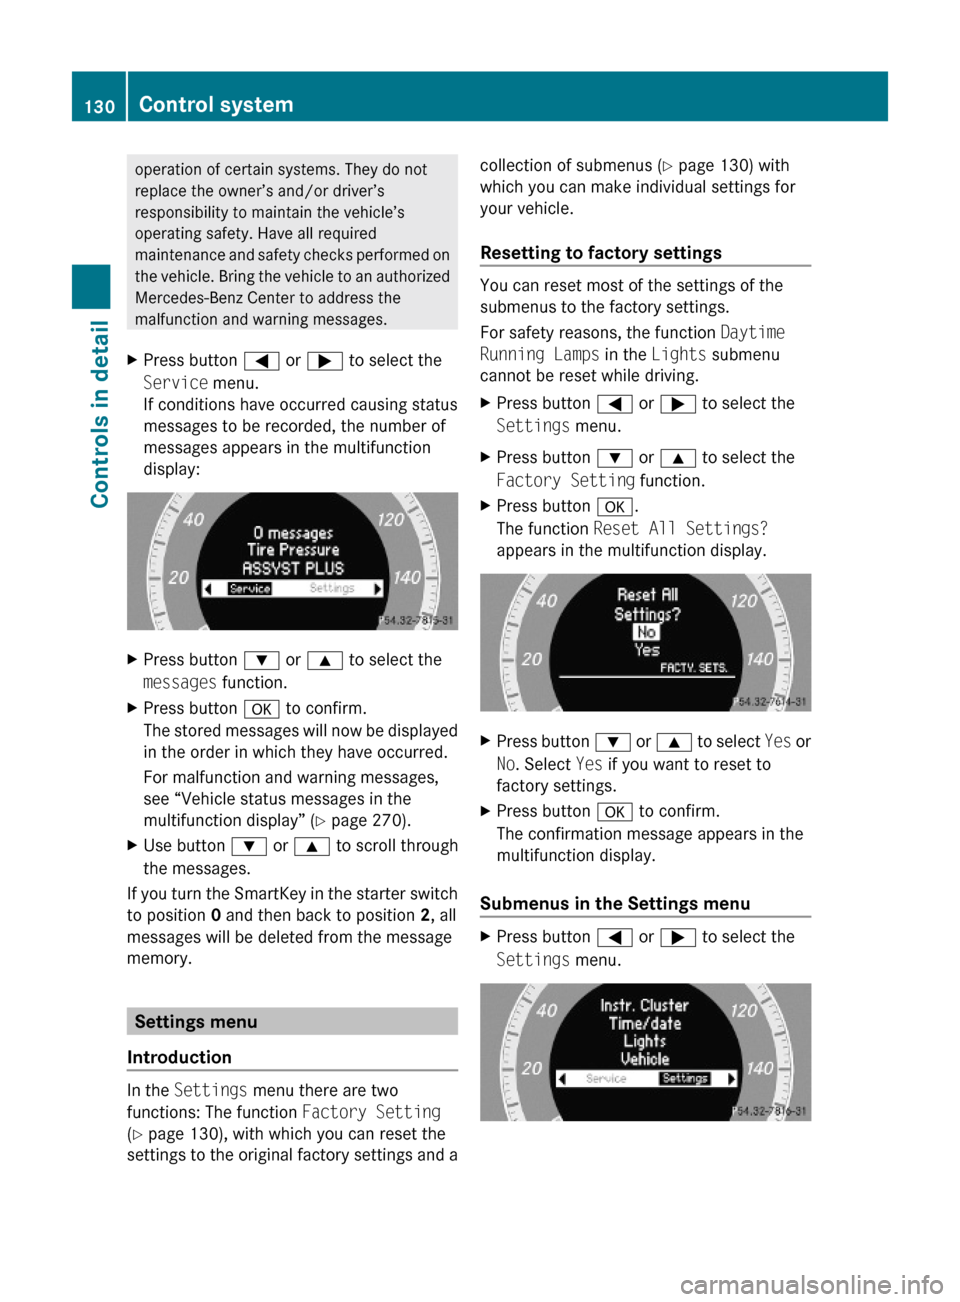
If conditions have occurred causing status
messages to be recorded, the number of
messages appears in the multifunction
display:
XPress button : or 9 to select the
messages function.
XPress button a to confirm.
The stored messages will now be displayed
in the order in which they have occurred.
For malfunction and warning messages,
see “Vehicle status messages in the
multifunction display” (Y page 270).
XUse button : or 9 to scroll through
the messages.
If you turn the SmartKey in the starter switch
to position 0 and then back to position 2, all
messages will be deleted from the message
memory.
Settings menu
Introduction
In the Settings menu there are two
functions: The function Factory Setting
(Y page 130), with which you can reset the
settings to the original factory settings and a
collection of submenus (Y page 130) with
which you can make individual settings for
your vehicle.
Resetting to factory settings
You can reset most of the settings of the
submenus to the factory settings.
For safety reasons, the function Daytime
Running Lamps in the Lights submenu
cannot be reset while driving.
XPress button = or ; to select the
Settings menu.
XPress button : or 9 to select the
Factory Setting function.
XPress button a.
The function Reset All Settings?
appears in the multifunction display.
XPress button : or 9 to select Yes or
No. Select Yes if you want to reset to
factory settings.
XPress button a to confirm.
The confirmation message appears in the
multifunction display.
Submenus in the Settings menu
XPress button = or ; to select the
Settings menu.
130Control systemControls in detail
204_AKB; 5; 23, en-USd2ureepe,Version: 2.11.8.12009-07-16T17:54:06+02:00 - Seite 130
Page 144 of 364

Clear button XDeleting an individual digit: Briefly press
button 2.
XDeleting an entire entry: Press and hold
button 2 until the entry is deleted.
Menu
The table below shows the structure of the
modes and their menus. Each mode has a
basic menu. Each menu item in turn has
several submenu items.
ButtonMode/Menu$Radio modeRadio (FM/AM) (Y page 148)Weather Band (Y page 149)Satellite radio (Y page 152)Presets (Y page 151)Sound (Y page 145)hDisc modeCD/MP3 (Y page 158)Track list/folder list
(Y page 165)
CD Changer (Y page 162)Sound (Y page 145)%Telephone modeButtonMode/MenuTelephone (Y page 167)Name (Y page 174)Call lists (Y page 176)iSystem settings menuSystem (Y page 147)Language (Y page 148)
Calling up an operating mode
XPress the respective button ($, h,
%, or i) on the audio control unit.
The basic menu of the selected mode
appears in the audio display. The main area
is active. The active area is highlighted.
iThe following screens show the audio
display’s day design. The appearance of the
highlighted items in the menu will vary
depending on the display design.
Illustration: Radio function basic menu
XMoving to the menu bar: Slide VÆ.
Horizontal menus
142Audio systemControls in detail
204_AKB; 5; 23, en-USd2ureepe,Version: 2.11.8.12009-07-16T17:54:06+02:00 - Seite 142
Page 145 of 364
XMoving through the menu bar: Slide
XVY or rotate cVd.
The currently selected item is highlighted.
XConfirming the selected menu item:
Press W.
XExiting the menu bar without
confirming a selection: Slide ZV in the
opposite direction of the list orientation.
or
XPress button k.
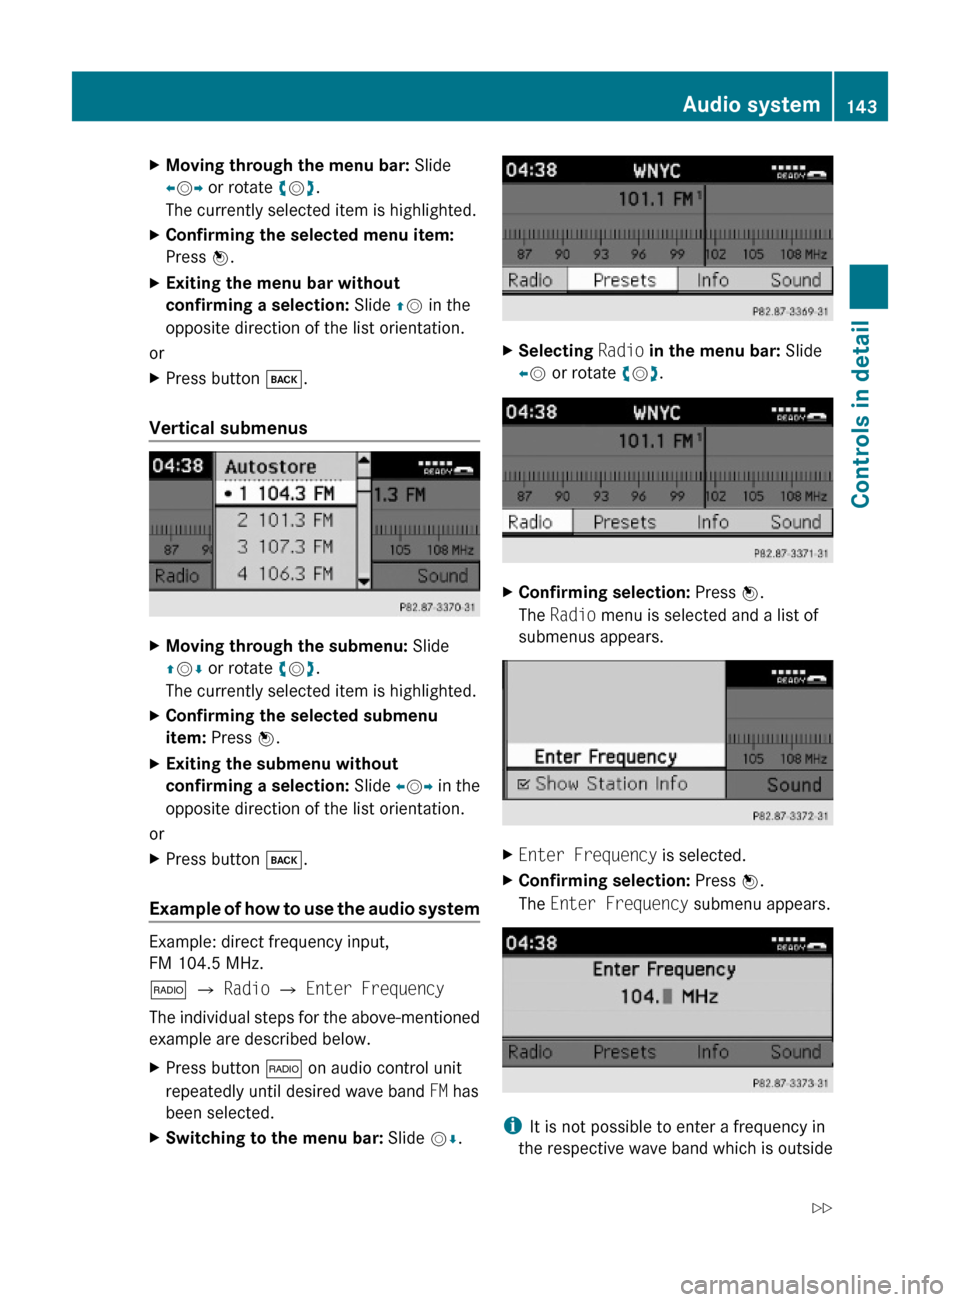
Vertical submenus
XMoving through the submenu: Slide
ZVÆ or rotate cVd.
The currently selected item is highlighted.
XConfirming the selected submenu
item: Press W.
XExiting the submenu without
confirming a selection: Slide XVY in the
opposite direction of the list orientation.
or
XPress button k.
Example of how to use the audio system
Example: direct frequency input,
FM 104.5 MHz.
$ Q Radio Q Enter Frequency
The individual steps for the above-mentioned
example are described below.
XPress button $ on audio control unit
repeatedly until desired wave band FM has
been selected.
XSwitching to the menu bar: Slide VÆ.XSelecting Radio in the menu bar: Slide
XV or rotate cVd.
XConfirming selection: Press W.
The Radio menu is selected and a list of
submenus appears.
XEnter Frequency is selected.XConfirming selection: Press W.
The Enter Frequency submenu appears.
iIt is not possible to enter a frequency in
the respective wave band which is outside
Audio system143Controls in detail204_AKB; 5; 23, en-USd2ureepe,Version: 2.11.8.12009-07-16T17:54:06+02:00 - Seite 143Z