2010 MERCEDES-BENZ C300 4MATIC lock
[x] Cancel search: lockPage 227 of 364
GWarning!
The engine is equipped with a transistorized
ignition system. Because of the high voltage
it is dangerous to touch any components
(ignition coils, spark plug sockets, diagnostic
socket) of the ignition system
Rwith the engine running
Rwhile starting the engine
Rwhen the ignition is switched on and the
engine is turned manually
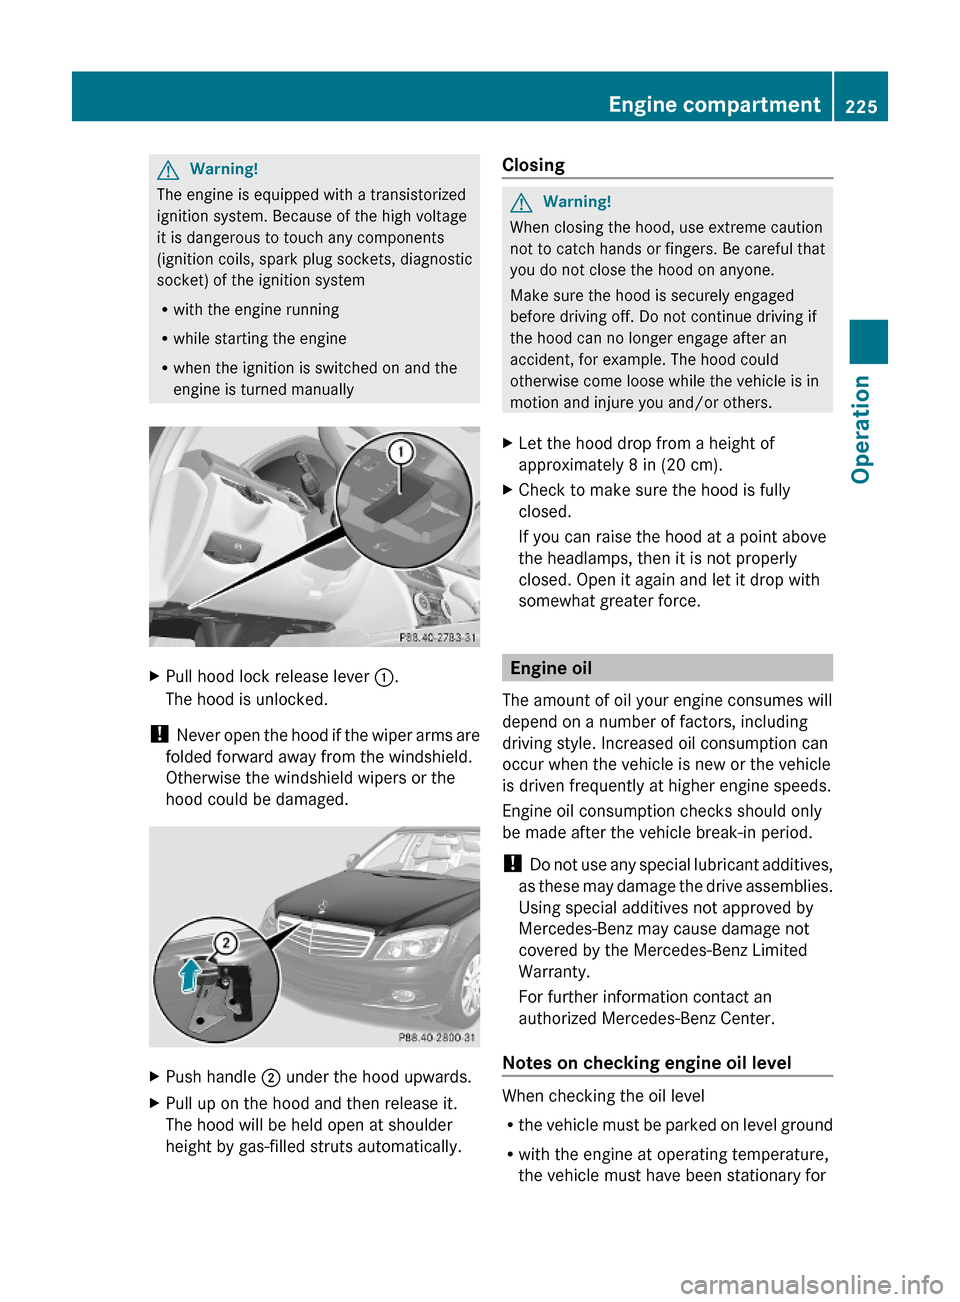
XPull hood lock release lever :.
The hood is unlocked.
! Never open the hood if the wiper arms are
folded forward away from the windshield.
Otherwise the windshield wipers or the
hood could be damaged.
XPush handle ; under the hood upwards.XPull up on the hood and then release it.
The hood will be held open at shoulder
height by gas-filled struts automatically.
ClosingGWarning!
When closing the hood, use extreme caution
not to catch hands or fingers. Be careful that
you do not close the hood on anyone.
Make sure the hood is securely engaged
before driving off. Do not continue driving if
the hood can no longer engage after an
accident, for example. The hood could
otherwise come loose while the vehicle is in
motion and injure you and/or others.
XLet the hood drop from a height of
approximately 8 in (20 cm).
XCheck to make sure the hood is fully
closed.
If you can raise the hood at a point above
the headlamps, then it is not properly
closed. Open it again and let it drop with
somewhat greater force.
Engine oil
The amount of oil your engine consumes will
depend on a number of factors, including
driving style. Increased oil consumption can
occur when the vehicle is new or the vehicle
is driven frequently at higher engine speeds.
Engine oil consumption checks should only
be made after the vehicle break-in period.
! Do not use any special lubricant additives,
as these may damage the drive assemblies.
Using special additives not approved by
Mercedes-Benz may cause damage not
covered by the Mercedes-Benz Limited
Warranty.
For further information contact an
authorized Mercedes-Benz Center.
Notes on checking engine oil level
When checking the oil level
Rthe vehicle must be parked on level ground
Rwith the engine at operating temperature,
the vehicle must have been stationary for
Engine compartment225Operation204_AKB; 5; 23, en-USd2ureepe,Version: 2.11.8.12009-07-16T17:54:06+02:00 - Seite 225Z
Page 229 of 364

C 63 AMG
XUnscrew filler cap : from filler neck.XAdd engine oil as required. Be careful not
to overfill with oil.
Be careful not to spill any oil when adding.
Avoid environmental damage caused by oil
entering the ground or water.
! Excess oil must be siphoned or drained
off. It could cause damage to the engine
and emission control system not covered
by the Mercedes-Benz Limited Warranty.
XScrew filler cap : back on filler neck.
For more information on engine oil, see the
“Technical data” section (Y page 349) and
(Y page 353).
Transmission fluid level
Vehicles with automatic transmission:
The transmission fluid level does not need to
be checked. If you notice transmission fluid
loss or gearshifting malfunctions, have an
authorized Mercedes-Benz Center check the
transmission.
Coolant level
The engine coolant is a mixture of water and
anticorrosion/antifreeze.
When checking the coolant level, the vehicle
must be parked on level ground, and the
coolant temperature must be below 158‡
(70†).
GWarning!
In order to avoid any potentially serious burns:
RUse extreme caution when opening the
hood if there are any signs of steam or
coolant leaking from the cooling system, or
if the coolant temperature gauge indicates
that the coolant is overheated.
RDo not remove the cap on the coolant
expansion tank if the coolant temperature
is above 158‡ (70†). Allow the engine to
cool down before removing the cap. The
coolant expansion tank contains hot fluid
and is under pressure.
RUsing a rag, slowly open the cap
approximately 1/2 turn counterclockwise
to relieve excess pressure. If opened
immediately, scalding hot fluid and steam
will be blown out under pressure.
RDo not spill antifreeze on hot engine parts.
Antifreeze contains ethylene glycol which
may burn if it comes into contact with hot
engine parts.
XUsing a rag, slowly open cap :
approximately 1/2 turn counterclockwise
to relieve excess pressure.
XContinue turning cap : counterclockwise
and remove it.
Engine compartment227Operation204_AKB; 5; 23, en-USd2ureepe,Version: 2.11.8.12009-07-16T17:54:06+02:00 - Seite 227Z
Page 262 of 364
XSwitch on the ignition.
The standard display of the control system
appears ( Y page 121).XPress button = or ; on the
multifunction steering wheel to select the
Service menu.XPress button : or 9 to select
ASSYST PLUS .XPress button a on the multifunction
steering wheel to confirm.
The maintenance service indicator display
with the maintenance service deadline
appears in the multifunction display.
i If the battery was disconnected, the days
of disconnection will not be included in the
count shown by the maintenance service
indicator. To arrive at the true maintenance
service deadline, you will need to subtract
these days from the days shown in the
maintenance service indicator message or
maintenance service indicator display.
Resetting the maintenance service
indicator
In the event that the maintenance service on
your vehicle is not carried out at an authorized
Mercedes-Benz Center, you can have the
maintenance service indicator reset.
The automotive maintenance facility carrying
out the maintenance service will find the
information for resetting the maintenance
service indicator in the maintenance-relevant
literature for your vehicle.
Such literature is available at any authorized
Mercedes-Benz Center or directly from
Mercedes-Benz.
! If the maintenance service indicator was
reset inadvertently, have an authorized
Mercedes-Benz Center correct it.
Only reset the maintenance service
indicator if the proper maintenance service
has been performed. Not following the
proper maintenance service as described
in the Maintenance Booklet will result in
engine damage and/or other vehicle
damage not covered by the Mercedes-Benz
Limited Warranty.
Vehicle care
Cleaning and care of the vehicle
Notes
Regular and proper care will help to maintain
the value of your vehicle.
GWarning!
Many cleaning products can be hazardous.
Some are poisonous, others are flammable.
Always follow the instructions on the
particular container. Always open your
vehicle’s doors or windows when cleaning the
inside.
Never use fluids or solvents that are not
designed for cleaning your vehicle.
Always lock away cleaning products and keep
them out of reach of children.
! When cleaning the vehicle, do not use
scouring agents. Never apply strong force
and only use a soft, wet cloth or sponge.
Otherwise you may scratch or damage the
surface to be cleaned.
While in operation, even while parked, your
vehicle is subjected to varying external
influences which, if gone unchecked, can
attack the paintwork as well as the vehicle
underbody and cause lasting damage.
Such damage is caused not only by extreme
and varying climatic conditions, but also by:
R Air pollution
R Road salt
R Tar
R Gravel and stone chipping
260Vehicle careOperation
204_AKB; 5; 23, en-USd2ureepe,Version: 2.11.8.12009-07-16T17:54:06+02:00 - Seite 260
Page 263 of 364
To avoid paint damage, you should
immediately remove:
R Grease and oil
R Fuel
R Coolant
R Brake fluid
R Bird droppings
R Insects
R Tree resins etc.
Frequent washing reduces and/or eliminates
the aggressiveness and potency of the above
adverse influences.
More frequent washings are necessary to
deal with unfavorable conditions:
R near the ocean
R in industrial areas (smoke, exhaust
emissions)
R during winter operation
You should check your vehicle from time to
time for stone chipping or other damage. Any
damage should be repaired as soon as
possible to prevent corrosion.
In doing so, do not neglect the underbody of
the vehicle. A prerequisite for a thorough
check is a washing of the underbody followed
by a thorough inspection. Damaged areas
need to be re-undercoated.
Your vehicle has been treated at the factory
with a wax-base rustproofing in the body
cavities which will last for the lifetime of the
vehicle. Post-production treatment is neither
necessary nor recommended by Mercedes-
Benz because of the possibility of
incompatibility between materials used in the
production process and others applied later.
We have selected vehicle-care products and
compiled recommendations which are
specially matched to our vehicles and which
always reflect the latest technology. You can
obtain Mercedes-Benz approved vehicle-care
products at an authorized Mercedes-Benz
Center.Scratches, corrosive deposits, corrosion or
damage due to negligent or incorrect care
cannot always be removed or repaired with
the vehicle-care products recommended
here. In such cases it is best to seek aid at an
authorized Mercedes-Benz Center.
The following topics deal with the cleaning
and care of your vehicle and give important
“how-to” information as well as references to
Mercedes-Benz approved vehicle-care
products.
Power washer
! Follow the instructions provided by the
power washer manufacturer on
maintaining a distance between the vehicle
and the nozzle of the power washer.
Never use a round nozzle to power-wash
tires. The intense jet of water can result in
damage to the tire.
Always replace a damaged tire.
Always keep the jet of water moving across
the surface. Do not aim directly at electrical
parts, electrical connectors, seals, or other
rubber parts.
i Vehicles with KEYLESS-GO:
If a door handle is hit by a strong jet of
water, and a SmartKey is within
approximately 3 ft (1 m) of the vehicle, it
could be inadvertently locked or unlocked.
Tar stains
Quickly remove tar stains before they dry and
become more difficult to remove. A tar
remover is recommended.
Paintwork, painted body components
! Affixing stickers, magnets, adhesive tape
or similar materials to painted body
components may damage the paintwork.
Mercedes-Benz approved Paint Care should
be applied when water drops on the paint
surface do not “bead up”. This should
Vehicle care261Operation204_AKB; 5; 23, en-USd2ureepe,Version: 2.11.8.12009-07-16T17:54:06+02:00 - Seite 261Z
Page 264 of 364
normally be done every 3 to 5 months,
depending on the climate and washing
detergent used.
Mercedes-Benz approved Paint Cleaner
should be applied if the paint surface shows
signs of embedded dirt (i.e. loss of gloss).
Do not apply any of these products or wax if
your vehicle is parked in the sun or if the hood
is still hot.XUse the appropriate MB-Touch-Up Stick for
quick and provisional repairs of minor paint
damage (i.e. chips from stones, vehicle
doors, etc.).
Engine cleaning
Prior to cleaning the engine compartment,
make sure to protect electrical components
and connectors from contact with water and
cleaning agents.
Corrosion protection, such as MB
Anticorrosion Wax should be applied to the
engine compartment after every engine
cleaning. Before applying, all control linkage
bushings and joints should be lubricated. The
poly-V-belt and all pulleys should be
protected from any wax.
Vehicle washing
In the winter, thoroughly remove all traces of
road salt as soon as possible.
When washing the vehicle underbody, do not
forget to clean the inner sides of the wheels.
i Vehicles with KEYLESS-GO:
If a door handle is hit by a strong jet of
water, and a SmartKey is within
approximately 3 ft (1 m) of the vehicle, it
could be inadvertently locked or unlocked.
Hand-wash
XDo not use hot water or wash your vehicle
in direct sunlight.XOnly use a soft, wet cloth or sponge to
clean the vehicle.XOnly use a mild vehicle wash detergent,
such as Mercedes-Benz approved Car
Shampoo.XThoroughly spray the vehicle with a
diffused jet of water.XDo not spray directly towards the
ventilation intake.XUse plenty of water and rinse the sponge
and chamois frequently.XRinse with clean water and dry with a
chamois thoroughly.
Do not allow cleaning agents to dry on the
finish.
Automatic car wash
You can have your vehicle washed in an
automatic car wash from the start. Brushless
car washes are preferable.
XTo protect the filter system, activate the air
recirculation mode using button g on
the climate control panel.
! Do not clean your vehicle in an automatic
touchless car wash which uses caustic
spray. Caustic spray will damage the paint
or ornamental moldings.
If the vehicle is very dirty, prewash it before
running it through the automatic car wash.
! Make sure the combination switch is set
to wiper setting $. Otherwise, the rain
sensor could activate and cause the wipers
to move unintentionally. This may lead to
vehicle damage.
Due to the width of the vehicle, fold in
exterior rear view mirrors prior to running
the vehicle through an automatic car wash
to prevent damage to the mirrors.
Vehicles with automatic transmission:
XWhen taking the vehicle through an
automatic conveyor-type car wash:
Make sure the automatic transmission
remains in neutral position N.
When leaving the automatic car wash, make
sure the mirrors are folded out.
262Vehicle careOperation
204_AKB; 5; 23, en-USd2ureepe,Version: 2.11.8.12009-07-16T17:54:06+02:00 - Seite 262
Page 269 of 364
Vehicle equipment ............................268
Where will I find ...? ..........................268
Vehicle status messages in the
multifunction display .......................270
What to do if … ..................................297
Unlocking/locking manually ...........309
Resetting activated NECK-PRO
active front head restraints .............311
Replacing SmartKey batteries .........312
Replacing bulbs .................................313
Replacing wiper blades ....................316
Flat tire ..............................................317
Battery ...............................................321
Jump starting ....................................323
Towing the vehicle ............................325
Fuses ..................................................328
267Practical hints204_AKB; 5; 23, en-USd2ureepe,Version: 2.11.8.12009-07-16T17:54:06+02:00 - Seite 267
Page 270 of 364
Vehicle equipment
iThis Operator’s Manual describes all
features, standard or optional, potentially
available for your vehicle at the time of
purchase. Please be aware that your
vehicle might not be equipped with all
features described in this manual.
Where will I find ...?
First aid kit
iCheck expiration dates and contents for
completeness at least once a year and
replace missing/expired items.
Depending on the equipment configuration,
the first-aid kit will be located either in the
open storage department in the trunk or
behind the cover panel on the left-hand side
of the trunk.
XTurn lock : counterclockwise.XFold down cover ;.
The first aid kit can be removed.
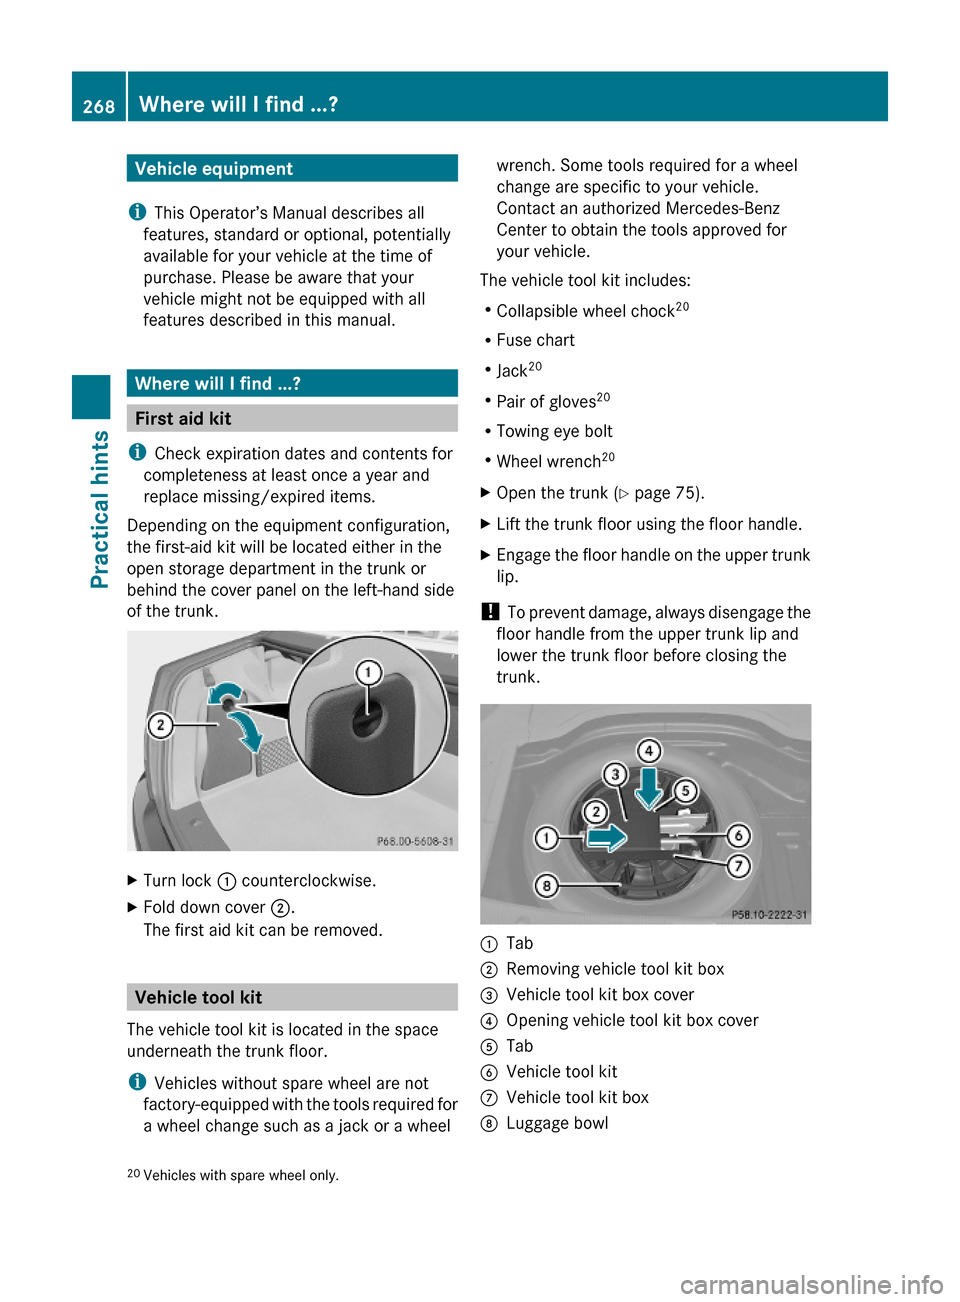
Vehicle tool kit
The vehicle tool kit is located in the space
underneath the trunk floor.
iVehicles without spare wheel are not
factory-equipped with the tools required for
a wheel change such as a jack or a wheel
wrench. Some tools required for a wheel
change are specific to your vehicle.
Contact an authorized Mercedes-Benz
Center to obtain the tools approved for
your vehicle.
The vehicle tool kit includes:
RCollapsible wheel chock20
RFuse chart
RJack20
RPair of gloves20
RTowing eye bolt
RWheel wrench20
XOpen the trunk (Y page 75).XLift the trunk floor using the floor handle.XEngage the floor handle on the upper trunk
lip.
! To prevent damage, always disengage the
floor handle from the upper trunk lip and
lower the trunk floor before closing the
trunk.
:Tab;Removing vehicle tool kit box=Vehicle tool kit box cover?Opening vehicle tool kit box coverATabBVehicle tool kitCVehicle tool kit boxDLuggage bowl20Vehicles with spare wheel only.268Where will I find ...?Practical hints
204_AKB; 5; 23, en-USd2ureepe,Version: 2.11.8.12009-07-16T17:54:06+02:00 - Seite 268
Page 271 of 364
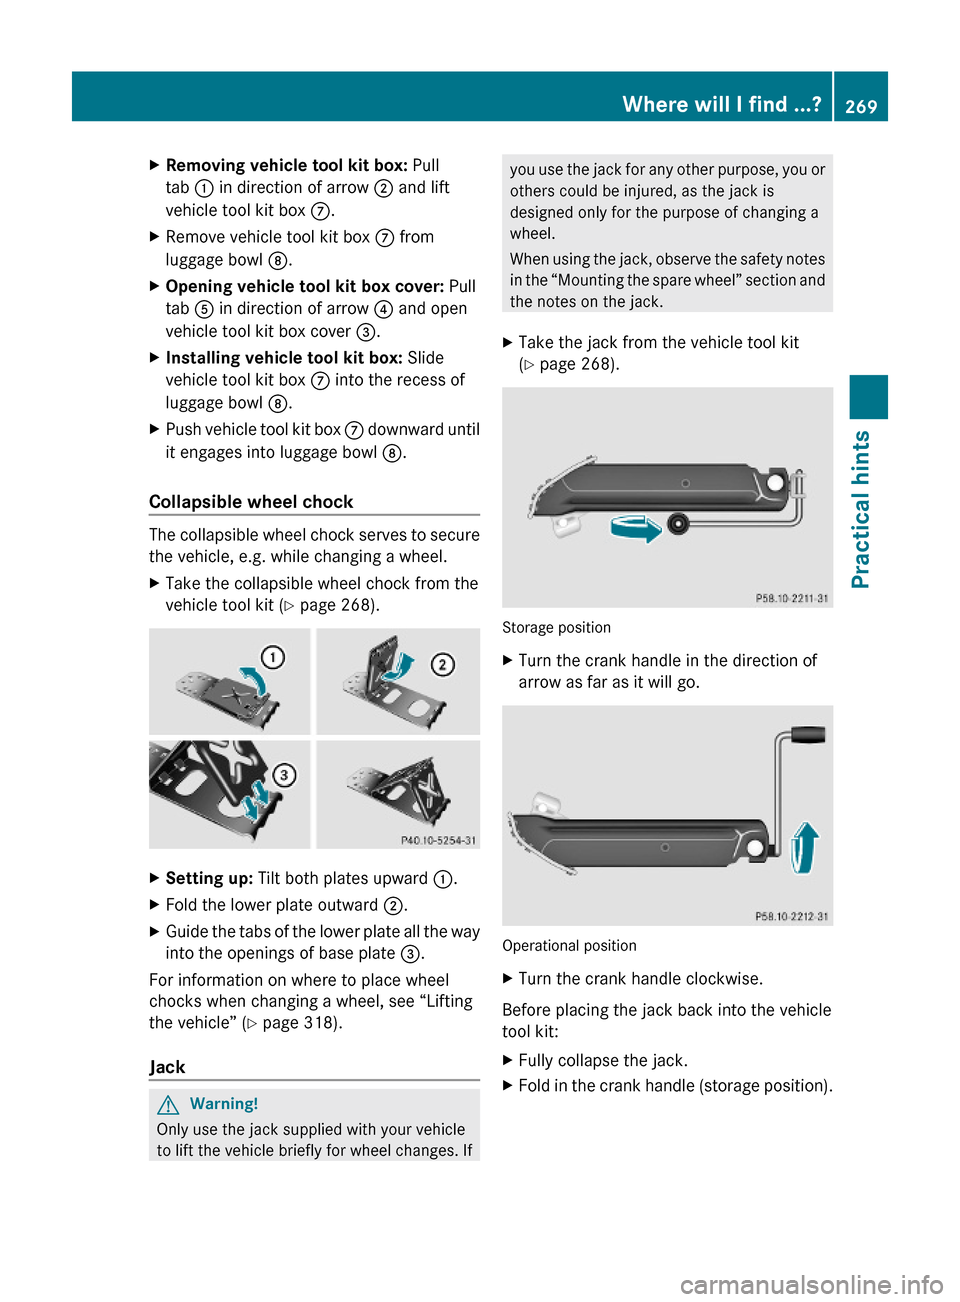
XRemoving vehicle tool kit box: Pull
tab : in direction of arrow ; and lift
vehicle tool kit box C.
XRemove vehicle tool kit box C from
luggage bowl D.
XOpening vehicle tool kit box cover: Pull
tab A in direction of arrow ? and open
vehicle tool kit box cover =.
XInstalling vehicle tool kit box: Slide
vehicle tool kit box C into the recess of
luggage bowl D.
XPush vehicle tool kit box C downward until
it engages into luggage bowl D.
Collapsible wheel chock
The collapsible wheel chock serves to secure
the vehicle, e.g. while changing a wheel.
XTake the collapsible wheel chock from the
vehicle tool kit (Y page 268).
XSetting up: Tilt both plates upward :.XFold the lower plate outward ;.XGuide the tabs of the lower plate all the way
into the openings of base plate =.
For information on where to place wheel
chocks when changing a wheel, see “Lifting
the vehicle” (Y page 318).
Jack
GWarning!
Only use the jack supplied with your vehicle
to lift the vehicle briefly for wheel changes. If
you use the jack for any other purpose, you or
others could be injured, as the jack is
designed only for the purpose of changing a
wheel.
When using the jack, observe the safety notes
in the “Mounting the spare wheel” section and
the notes on the jack.
XTake the jack from the vehicle tool kit
(Y page 268).
Storage position
XTurn the crank handle in the direction of
arrow as far as it will go.
Operational position
XTurn the crank handle clockwise.
Before placing the jack back into the vehicle
tool kit:
XFully collapse the jack.XFold in the crank handle (storage position).Where will I find ...?269Practical hints204_AKB; 5; 23, en-USd2ureepe,Version: 2.11.8.12009-07-16T17:54:06+02:00 - Seite 269Z