2010 MERCEDES-BENZ C300 4MATIC lock
[x] Cancel search: lockPage 301 of 364
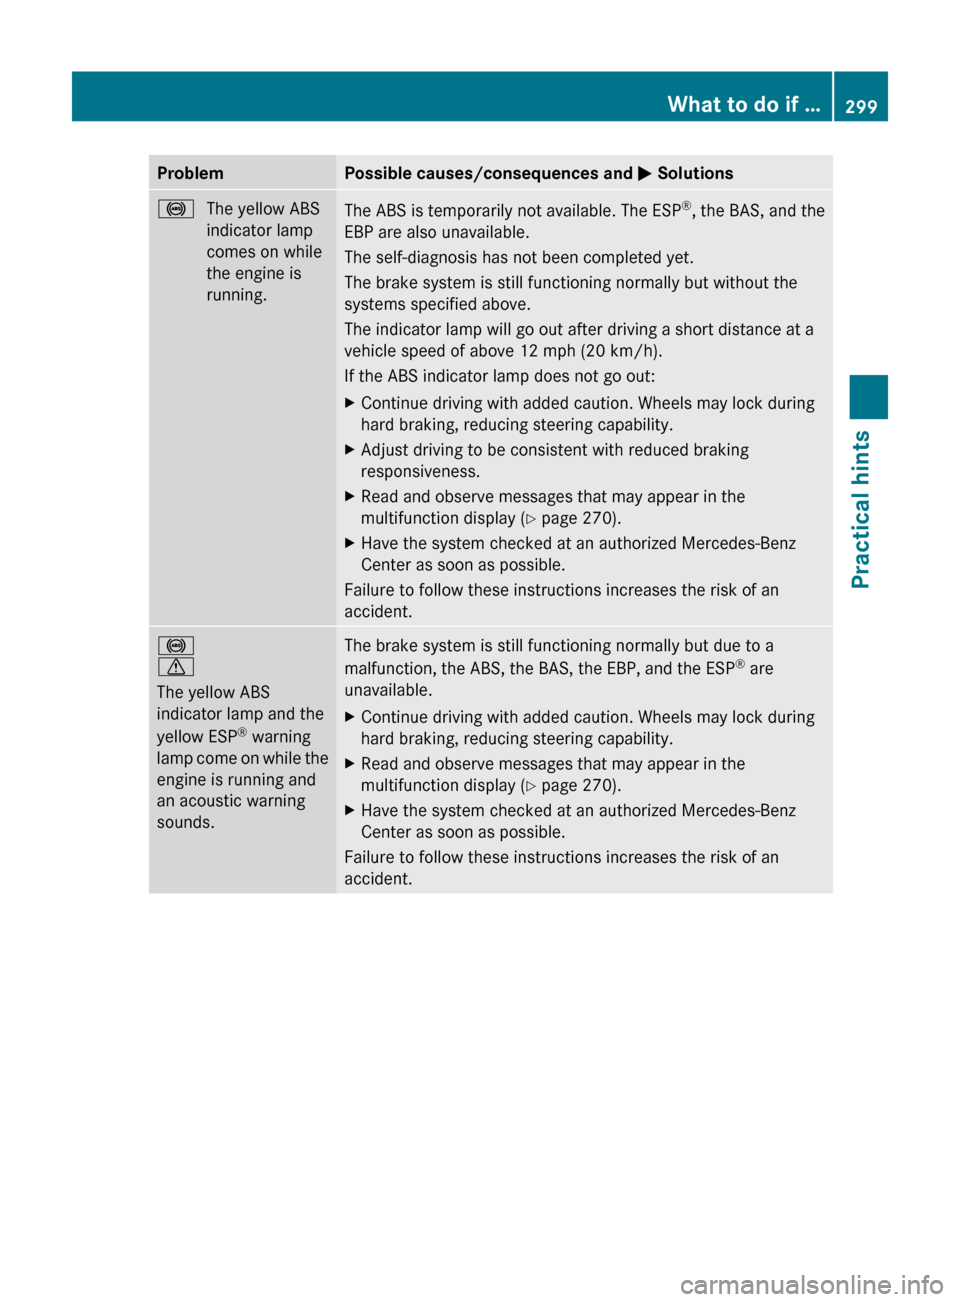
ProblemPossible causes/consequences and M Solutions!The yellow ABS
indicator lamp
comes on while
the engine is
running.The ABS is temporarily not available. The ESP ®
, the BAS, and the
EBP are also unavailable.
The self-diagnosis has not been completed yet.
The brake system is still functioning normally but without the
systems specified above.
The indicator lamp will go out after driving a short distance at a
vehicle speed of above 12 mph (20 km/h).
If the ABS indicator lamp does not go out:XContinue driving with added caution. Wheels may lock during
hard braking, reducing steering capability.XAdjust driving to be consistent with reduced braking
responsiveness.XRead and observe messages that may appear in the
multifunction display ( Y page 270).XHave the system checked at an authorized Mercedes-Benz
Center as soon as possible.
Failure to follow these instructions increases the risk of an
accident.
!
d
The yellow ABS
indicator lamp and the
yellow ESP ®
warning
lamp come on while the
engine is running and
an acoustic warning
sounds.The brake system is still functioning normally but due to a
malfunction, the ABS, the BAS, the EBP, and the ESP ®
are
unavailable.XContinue driving with added caution. Wheels may lock during
hard braking, reducing steering capability.XRead and observe messages that may appear in the
multifunction display ( Y page 270).XHave the system checked at an authorized Mercedes-Benz
Center as soon as possible.
Failure to follow these instructions increases the risk of an
accident.
What to do if …299Practical hints204_AKB; 5; 23, en-USd2ureepe,Version: 2.11.8.12009-07-16T17:54:06+02:00 - Seite 299Z
Page 302 of 364
ProblemPossible causes/consequences and M Solutions!
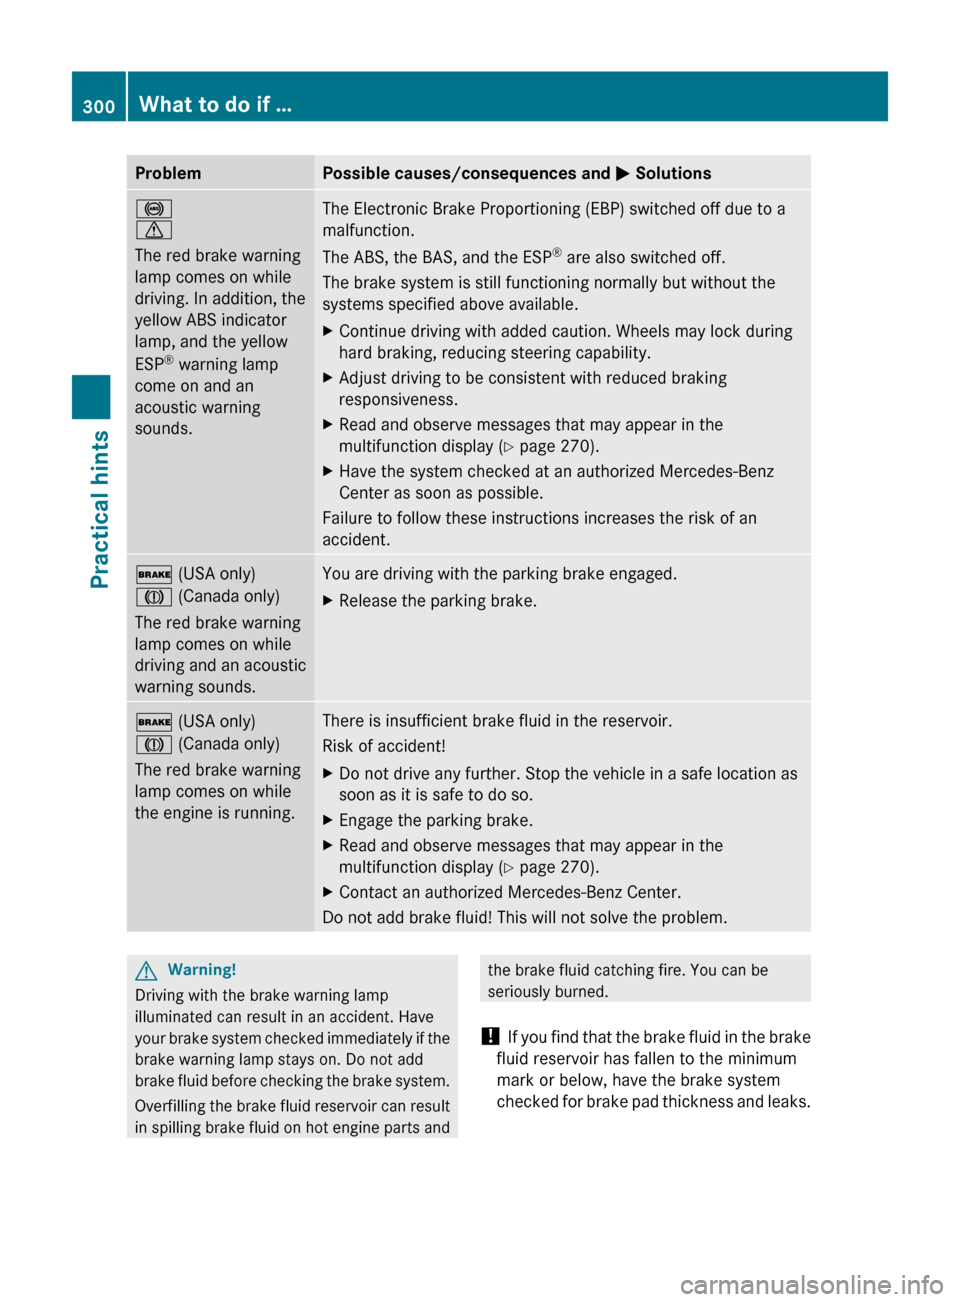
d
The red brake warning
lamp comes on while
driving. In addition, the
yellow ABS indicator
lamp, and the yellow
ESP ®
warning lamp
come on and an
acoustic warning
sounds.The Electronic Brake Proportioning (EBP) switched off due to a
malfunction.
The ABS, the BAS, and the ESP ®
are also switched off.
The brake system is still functioning normally but without the
systems specified above available.XContinue driving with added caution. Wheels may lock during
hard braking, reducing steering capability.XAdjust driving to be consistent with reduced braking
responsiveness.XRead and observe messages that may appear in the
multifunction display ( Y page 270).XHave the system checked at an authorized Mercedes-Benz
Center as soon as possible.
Failure to follow these instructions increases the risk of an
accident.
$ (USA only)
J (Canada only)
The red brake warning
lamp comes on while
driving and an acoustic
warning sounds.You are driving with the parking brake engaged.XRelease the parking brake.$ (USA only)
J (Canada only)
The red brake warning
lamp comes on while
the engine is running.There is insufficient brake fluid in the reservoir.
Risk of accident!XDo not drive any further. Stop the vehicle in a safe location as
soon as it is safe to do so.XEngage the parking brake.XRead and observe messages that may appear in the
multifunction display ( Y page 270).XContact an authorized Mercedes-Benz Center.
Do not add brake fluid! This will not solve the problem.
GWarning!
Driving with the brake warning lamp
illuminated can result in an accident. Have
your brake system checked immediately if the
brake warning lamp stays on. Do not add
brake fluid before checking the brake system.
Overfilling the brake fluid reservoir can result
in spilling brake fluid on hot engine parts and
the brake fluid catching fire. You can be
seriously burned.
! If you find that the brake fluid in the brake
fluid reservoir has fallen to the minimum
mark or below, have the brake system
checked for brake pad thickness and leaks.300What to do if …Practical hints
204_AKB; 5; 23, en-USd2ureepe,Version: 2.11.8.12009-07-16T17:54:06+02:00 - Seite 300
Page 305 of 364
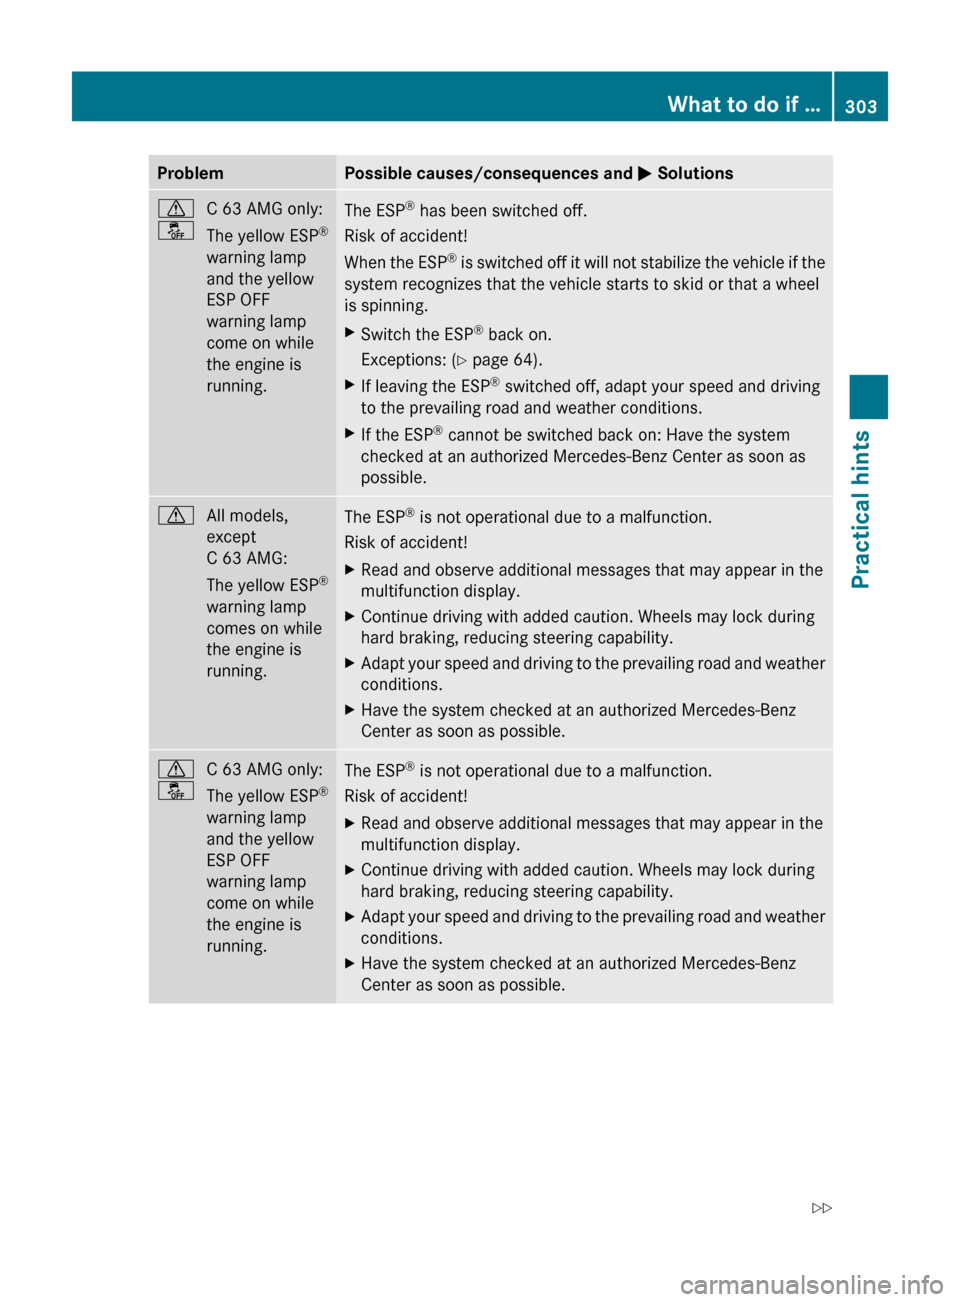
ProblemPossible causes/consequences and M Solutionsd
åC 63 AMG only:
The yellow ESP ®
warning lamp
and the yellow
ESP OFF
warning lamp
come on while
the engine is
running.The ESP ®
has been switched off.
Risk of accident!
When the ESP ®
is switched off it will not stabilize the vehicle if the
system recognizes that the vehicle starts to skid or that a wheel
is spinning.XSwitch the ESP ®
back on.
Exceptions: ( Y page 64).XIf leaving the ESP ®
switched off, adapt your speed and driving
to the prevailing road and weather conditions.XIf the ESP ®
cannot be switched back on: Have the system
checked at an authorized Mercedes-Benz Center as soon as
possible.dAll models,
except
C 63 AMG:
The yellow ESP ®
warning lamp
comes on while
the engine is
running.The ESP ®
is not operational due to a malfunction.
Risk of accident!XRead and observe additional messages that may appear in the
multifunction display.XContinue driving with added caution. Wheels may lock during
hard braking, reducing steering capability.XAdapt your speed and driving to the prevailing road and weather
conditions.XHave the system checked at an authorized Mercedes-Benz
Center as soon as possible.d
åC 63 AMG only:
The yellow ESP ®
warning lamp
and the yellow
ESP OFF
warning lamp
come on while
the engine is
running.The ESP ®
is not operational due to a malfunction.
Risk of accident!XRead and observe additional messages that may appear in the
multifunction display.XContinue driving with added caution. Wheels may lock during
hard braking, reducing steering capability.XAdapt your speed and driving to the prevailing road and weather
conditions.XHave the system checked at an authorized Mercedes-Benz
Center as soon as possible.What to do if …303Practical hints204_AKB; 5; 23, en-USd2ureepe,Version: 2.11.8.12009-07-16T17:54:06+02:00 - Seite 303Z
Page 311 of 364
GWarning!
If the 45 indicator lamp does not
illuminate or remains out with the weight of a
typical 12-month-old child in a standard child
restraint or less on the front passenger seat,
do not transport a child on the front
passenger seat until the system has been
repaired.
Unlocking/locking manually
Unlocking the vehicle
If you cannot unlock the vehicle with the
SmartKey or with KEYLESS-GO, unlock the
driver’s door and the trunk using the
mechanical key.
The anti-theft alarm system will trigger when
you
Runlock the driver’s door or the trunk with
the mechanical key
and
Ropen the driver’s door or the trunk
To cancel the alarm, insert the SmartKey into
the starter switch.
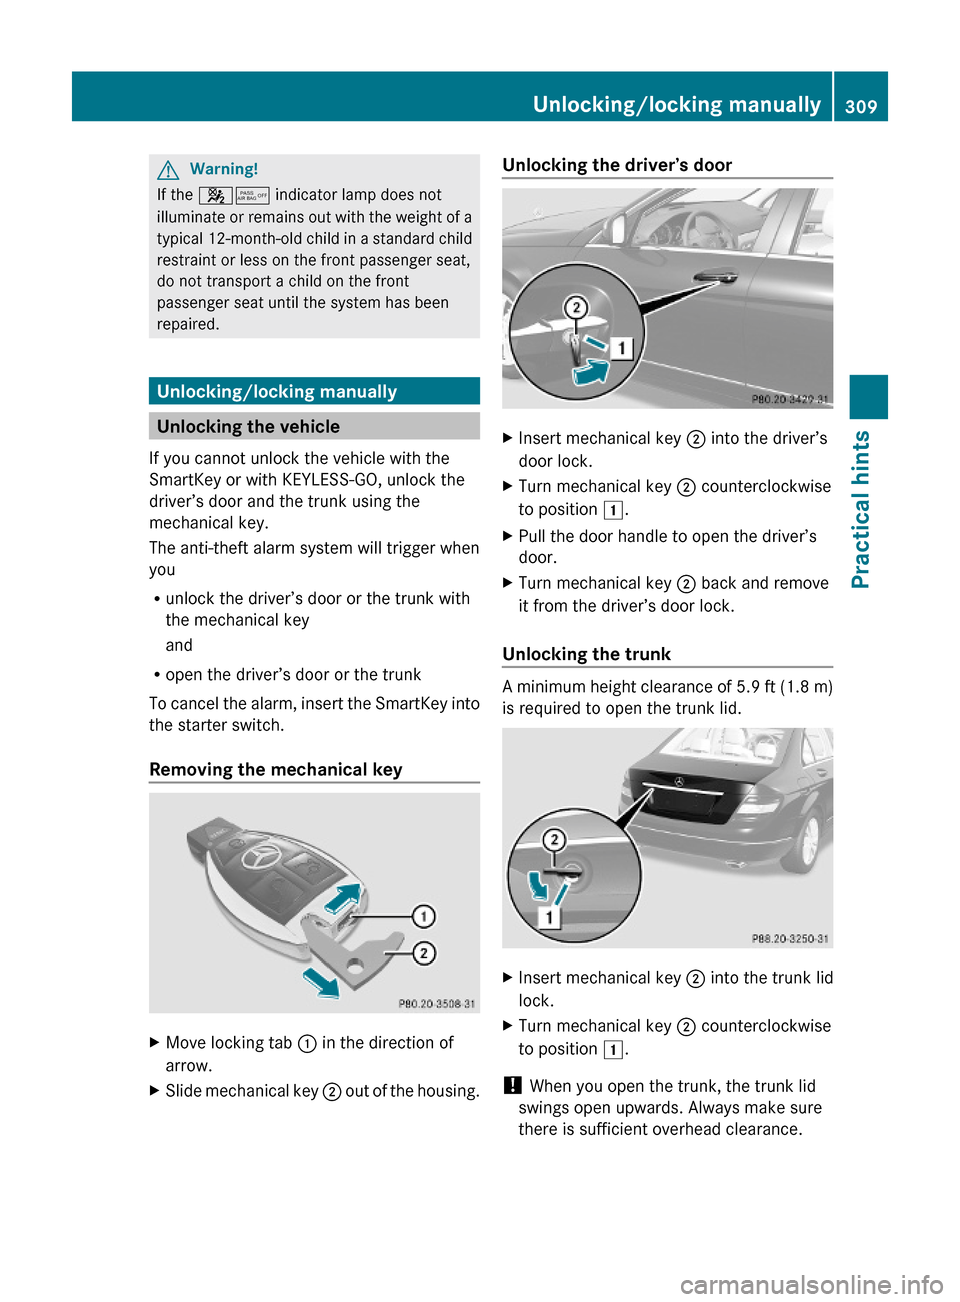
Removing the mechanical key
XMove locking tab : in the direction of
arrow.
XSlide mechanical key ; out of the housing.Unlocking the driver’s doorXInsert mechanical key ; into the driver’s
door lock.
XTurn mechanical key ; counterclockwise
to position 1.
XPull the door handle to open the driver’s
door.
XTurn mechanical key ; back and remove
it from the driver’s door lock.
Unlocking the trunk
A minimum height clearance of 5.9 ft (1.8 m)
is required to open the trunk lid.
XInsert mechanical key ; into the trunk lid
lock.
XTurn mechanical key ; counterclockwise
to position 1.
! When you open the trunk, the trunk lid
swings open upwards. Always make sure
there is sufficient overhead clearance.
Unlocking/locking manually309Practical hints204_AKB; 5; 23, en-USd2ureepe,Version: 2.11.8.12009-07-16T17:54:06+02:00 - Seite 309Z
Page 312 of 364
XTurn mechanical key ; back and remove
it from the trunk lid lock.
Locking the vehicle
If you cannot lock the vehicle with the
SmartKey or with KEYLESS-GO, lock it as
follows:
XOpen the driver’s door.XClose the front passenger door, the rear
doors, and the trunk.
XPress the central locking switch
(Y page 75).
The locking knobs of the front passenger
door and the rear doors move down.
XIf the vehicle battery is disconnected or
drained: Press down the locking knobs on
the front passenger door and the rear
doors.
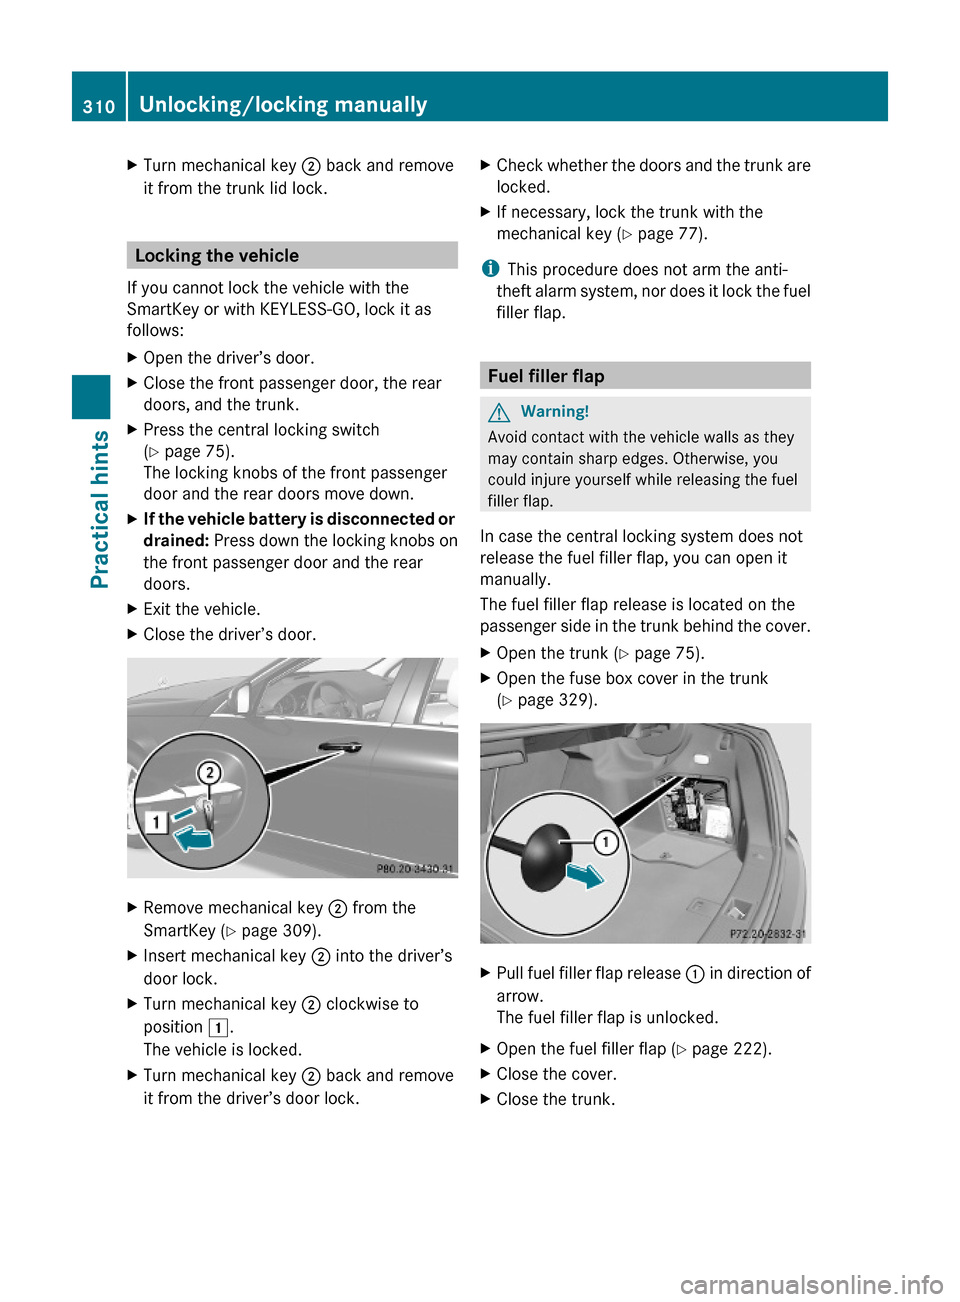
XExit the vehicle.XClose the driver’s door.XRemove mechanical key ; from the
SmartKey (Y page 309).
XInsert mechanical key ; into the driver’s
door lock.
XTurn mechanical key ; clockwise to
position 1.
The vehicle is locked.
XTurn mechanical key ; back and remove
it from the driver’s door lock.
XCheck whether the doors and the trunk are
locked.
XIf necessary, lock the trunk with the
mechanical key (Y page 77).
iThis procedure does not arm the anti-
theft alarm system, nor does it lock the fuel
filler flap.
Fuel filler flap
GWarning!
Avoid contact with the vehicle walls as they
may contain sharp edges. Otherwise, you
could injure yourself while releasing the fuel
filler flap.
In case the central locking system does not
release the fuel filler flap, you can open it
manually.
The fuel filler flap release is located on the
passenger side in the trunk behind the cover.
XOpen the trunk (Y page 75).XOpen the fuse box cover in the trunk
(Y page 329).
XPull fuel filler flap release : in direction of
arrow.
The fuel filler flap is unlocked.
XOpen the fuel filler flap (Y page 222).XClose the cover.XClose the trunk.310Unlocking/locking manuallyPractical hints
204_AKB; 5; 23, en-USd2ureepe,Version: 2.11.8.12009-07-16T17:54:06+02:00 - Seite 310
Page 313 of 364
Manually unlocking the gear selector
lever
If the vehicle’s electrical system is
malfunctioning, the gear selector lever could
remain locked in park position P. In this case
the gear selector lever can be unlocked
manually, e.g. to tow the vehicle.
XEngage the parking brake.
! Do not use sharp objects to loosen the
gear selector lever cover in the center
console, as this could damage the gear
selector lever cover or the center console.
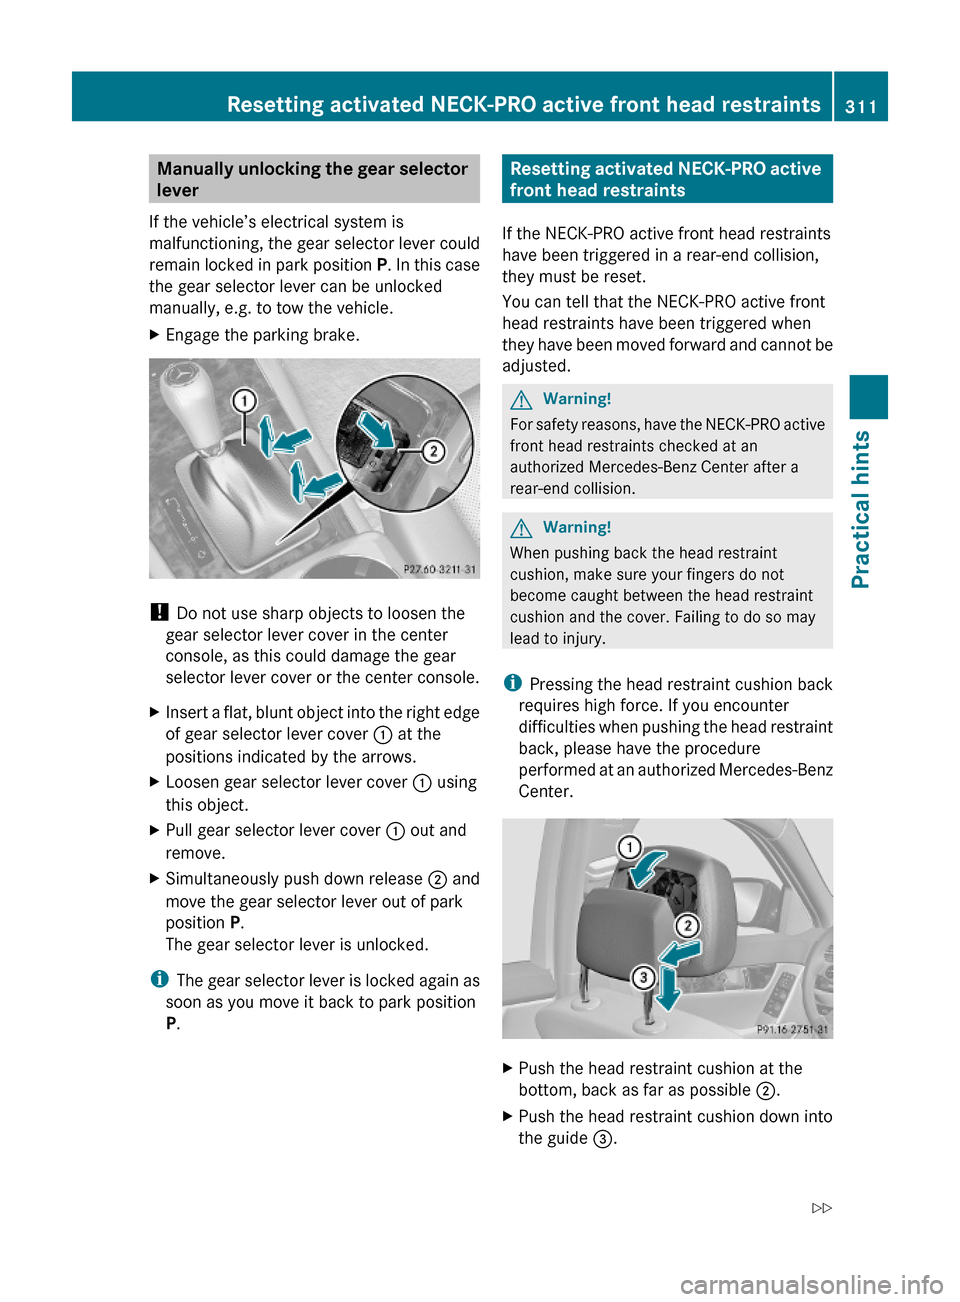
XInsert a flat, blunt object into the right edge
of gear selector lever cover : at the
positions indicated by the arrows.
XLoosen gear selector lever cover : using
this object.
XPull gear selector lever cover : out and
remove.
XSimultaneously push down release ; and
move the gear selector lever out of park
position P.
The gear selector lever is unlocked.
iThe gear selector lever is locked again as
soon as you move it back to park position
P.
Resetting activated NECK-PRO active
front head restraints
If the NECK-PRO active front head restraints
have been triggered in a rear-end collision,
they must be reset.
You can tell that the NECK-PRO active front
head restraints have been triggered when
they have been moved forward and cannot be
adjusted.
GWarning!
For safety reasons, have the NECK-PRO active
front head restraints checked at an
authorized Mercedes-Benz Center after a
rear-end collision.
GWarning!
When pushing back the head restraint
cushion, make sure your fingers do not
become caught between the head restraint
cushion and the cover. Failing to do so may
lead to injury.
iPressing the head restraint cushion back
requires high force. If you encounter
difficulties when pushing the head restraint
back, please have the procedure
performed at an authorized Mercedes-Benz
Center.
XPush the head restraint cushion at the
bottom, back as far as possible ;.
XPush the head restraint cushion down into
the guide =.
Resetting activated NECK-PRO active front head restraints311Practical hints204_AKB; 5; 23, en-USd2ureepe,Version: 2.11.8.12009-07-16T17:54:06+02:00 - Seite 311Z
Page 314 of 364
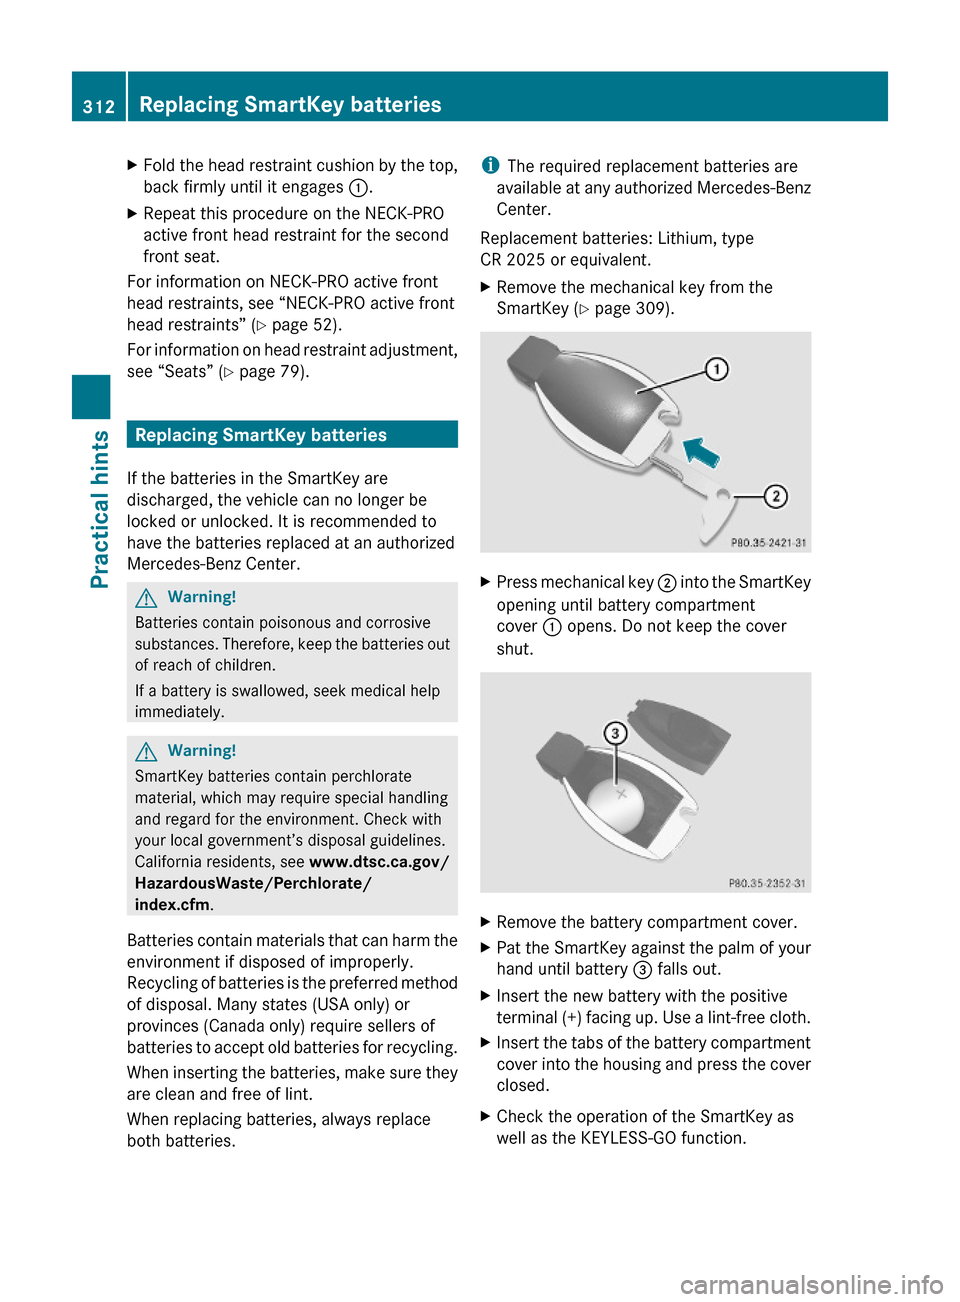
XFold the head restraint cushion by the top,
back firmly until it engages :.
XRepeat this procedure on the NECK-PRO
active front head restraint for the second
front seat.
For information on NECK-PRO active front
head restraints, see “NECK-PRO active front
head restraints” (Y page 52).
For information on head restraint adjustment,
see “Seats” (Y page 79).
Replacing SmartKey batteries
If the batteries in the SmartKey are
discharged, the vehicle can no longer be
locked or unlocked. It is recommended to
have the batteries replaced at an authorized
Mercedes-Benz Center.
GWarning!
Batteries contain poisonous and corrosive
substances. Therefore, keep the batteries out
of reach of children.
If a battery is swallowed, seek medical help
immediately.
GWarning!
SmartKey batteries contain perchlorate
material, which may require special handling
and regard for the environment. Check with
your local government’s disposal guidelines.
California residents, see www.dtsc.ca.gov/
HazardousWaste/Perchlorate/
index.cfm.
Batteries contain materials that can harm the
environment if disposed of improperly.
Recycling of batteries is the preferred method
of disposal. Many states (USA only) or
provinces (Canada only) require sellers of
batteries to accept old batteries for recycling.
When inserting the batteries, make sure they
are clean and free of lint.
When replacing batteries, always replace
both batteries.
iThe required replacement batteries are
available at any authorized Mercedes-Benz
Center.
Replacement batteries: Lithium, type
CR 2025 or equivalent.
XRemove the mechanical key from the
SmartKey (Y page 309).
XPress mechanical key ; into the SmartKey
opening until battery compartment
cover : opens. Do not keep the cover
shut.
XRemove the battery compartment cover.XPat the SmartKey against the palm of your
hand until battery = falls out.
XInsert the new battery with the positive
terminal (+) facing up. Use a lint-free cloth.
XInsert the tabs of the battery compartment
cover into the housing and press the cover
closed.
XCheck the operation of the SmartKey as
well as the KEYLESS-GO function.
312Replacing SmartKey batteriesPractical hints
204_AKB; 5; 23, en-USd2ureepe,Version: 2.11.8.12009-07-16T17:54:06+02:00 - Seite 312
Page 317 of 364

GObserve Safety notes, see page 313.
ROnly use 12-volt bulbs of the same type and
with the specified watt rating.
RSwitch the lights off before changing a bulb
to prevent short circuits.
RAlways use a clean lint-free cloth when
handling bulbs.
RYour hands should be dry and free of oil and
grease.
RIf the newly installed bulb does not come
on, contact an authorized Mercedes-Benz
Center.
iMercedes-Benz recommends using
Longlife (LL) bulbs.
Replacing bulbs for front lamps
XSwitch off the ignition.XTurn the exterior lamp switch to position
$.
XOpen the hood (Y page 224).GWarning!
Do not remove the cover for the Bi-Xenon
headlamp. Because of high voltage in Xenon
lamps, it is dangerous to replace the bulb or
repair the lamp and its components. It is
recommended to have such work done by a
qualified technician.
Low-beam bulb (halogen headlamps
only)
XTurn housing cover : counterclockwise
and remove it.
XPull electric plug ; off the bulb ?.XRemove wire clip = from bulb holder by
pushing down and release from arrestor
hook.
XPull bulb ? at its socket out of bulb holder.XInsert the new bulb so that its socket
locates in the recess of bulb holder and is
level to it.
XFold wire clip = back and press it down on
bulb holder to engage it in the arrestor
hook.
XConnect electric plug ; on bulb ?.XAlign housing cover and turn it clockwise.
Front turn signal lamp bulb
XTurn bulb socket = with handle ;
counterclockwise and remove it.
XPull bulb out of bulb socket =.XGently press the new bulb into bulb socket
= until the bulb engages.
XPlace bulb socket = back into the housing.
Handle ; must be in a horizontal line and
mark : must be on the upper part (driver’s
side headlamp) or lower part (passenger-
side headlamp).
XTurn bulb socket = clockwise until it
engages.
Replacing bulbs315Practical hints204_AKB; 5; 23, en-USd2ureepe,Version: 2.11.8.12009-07-16T17:54:06+02:00 - Seite 315Z