2010 MERCEDES-BENZ C300 4MATIC jump start
[x] Cancel search: jump startPage 7 of 364

System settings ............................. 147
Telephone ...................................... 167
Auto-dimming rear view mirrors ........ 87
Automatic central locking .......... 74, 135
Automatic headlamp mode ................ 91
Automatic interior lighting control .... 95
Automatic locking when driving ...... 135
Automatic shift program .................. 111
Automatic transmission ................... 108
Automatic shift program ................111
Gear range indicator ......................111
Gear ranges ................................... 111
Gear selector lever ........................108
Hill-start assist system ..................183
Kickdown ....................................... 110
Kickdown (manual shift program) ..115
Manual shift program ..................... 113
One-touch gearshifting ..................112
Program mode indicator ................112
Program mode selector switch
(automatic shift program) ..............111
Program mode selector switch
(manual shift program) ..........113, 114
Shifting procedure .........................109
Steering wheel gearshift control ....112
Transmission position indicator .....109
Transmission positions ..................109
AUX socket ........................................ 166
Axle oils .............................................. 351
B
BabySmart™
Air bag deactivation system .............46
Self-test ........................................... 47
Back button ....................................... 141
Backrest see Seats
Backup lamps
Messages in the multifunction
display ........................................... 292
Replacing bulbs ............................. 314
Bar (air pressure unit) ....................... 250
BAS (Brake Assist System) ................. 61
Batteries, SmartKey
Checking condition ..........................73
Replacing ....................................... 312
Battery, Vehicle ................................. 321
Charging ........................................ 323
Jump starting ................................. 323
Messages in the multifunction
display ........................................... 290
Bead (tire) .......................................... 250
Beverage holders see Cup holders
Bluetooth ®
settings .......................... 147
Brake Assist System see BAS
Brake fluid
Checking level ............................... 228
Messages in the multifunction
display ........................................... 282
Brake lamps
Cleaning lenses ............................. 263
Replacing bulbs ............................. 314
Brake pads
Messages in the multifunction
display ........................................... 279
Brakes ................................................ 255
High-performance brake system ....256
Parking brake ................................ 105
Warning lamp ................................. 298
Break-in period .................................. 222
Bulbs see Replacing bulbs
C
CAC (Customer Assistance Center) ... 23
California retail buyers and
lessees, important notice for ............. 21
Calls (phone) .............................. 128, 167
Can holders see Cup holders
Capacities and recommended
fuel/lubricants .................................. 349
Cargo tie-down rings ......................... 203
Carpets, cleaning .............................. 265
CD player ............................................ 158
Center console
Lower part ....................................... 32
Upper part ....................................... 31
Central locking
Automatic ................................ 74, 135
KEYLESS-GO .................................... 71
Index5204_AKB; 5; 23, en-USd2ureepe,Version: 2.11.8.12009-07-16T17:54:06+02:00 - Seite 5
Page 12 of 364

Delayed shut-off ............................ 134
Halogen ......................................... 314
High-beam flasher ............................ 93
High-beam headlamps .....................93
Low-beam headlamps ......................91
Messages in the multifunction
display ........................................... 292
Replacing bulbs ............................. 313
Switch .............................................. 90
Headliner and shelf below rear
window, cleaning and care of .......... 265
Head restraints .................................... 79
Adjustment ................................ 79, 82
Folding back .................................... 83
NECK-PRO active front head
restraints ......................................... 52
Rear seat head restraints ................. 83
Height adjustment
Seat belt outlet ................................ 51
Seats ............................................... 79
High-beam flasher ............................... 93
High-beam headlamps ................ 93, 314
High-performance brake system ..... 256
Hill-start assist system ..................... 183
Hood ................................................... 224
Messages in the multifunction
display ........................................... 286
Horn ...................................................... 27
Hydroplaning ..................................... 257
I
Identification labels .......................... 332
Identification number, vehicle
(VIN) ................................................... 333
Ignition ......................................... 78, 102
Immobilizer .......................................... 66
Infant and child restraint systems see Children in the vehicle
Inflation pressure
see Tires, Inflation pressure
Inside door handle .............................. 74
Instrument cluster ...................... 28, 116
Illumination .................................... 117
Lamps ............................................ 297
Multifunction display .....................120
Instrument lighting
see Instrument cluster, Illumination
Instrument panel
see Instrument cluster
Instruments and controls
see Cockpit
Interior lighting
Delayed shut-off ............................ 135
Emergency lighting ..........................95
Front ................................................ 95
Front reading lamps .........................95
Rear ................................................. 95
Rear reading lamps ..........................95
Interior rear view mirror ..................... 86
Auto-dimming rear view mirrors ....... 87
Interior storage spaces
see Storage compartments
Intermittent wiping ............................. 96
Rain sensor ...................................... 96
ISOFIX (Child seat anchors –
LATCH-type) see Children in the vehicle
J
Jack ..................................................... 269
Jump starting ..................................... 323
K
Key, Mechanical
Loss of ............................................. 73
Replacing ......................................... 74
Unlocking/locking manually ..........309
Valet locking .................................... 77
Key, SmartKey
Battery check lamp ..........................73
Checking batteries ...........................73
Factory setting ........................... 71, 73
Global locking (KEYLESS-
GO) .................................................. 73
Global locking (SmartKey) ................ 71
Global unlocking (KEYLESS-
GO) .................................................. 73
Global unlocking
(SmartKey) ....................................... 71
Important notes on KEYLESS-GO .....72
Locking/unlocking ........................... 70
Loss of ............................................. 73
10Index204_AKB; 5; 23, en-USd2ureepe,Version: 2.11.8.12009-07-16T17:54:06+02:00 - Seite 10
Page 80 of 364
2Ignition (power supply for all electrical
consumers) and driving position
3Starting position
When you switch on the ignition, all lamps in
the instrument cluster come on. The low-
beam headlamp indicator lamp, high-beam
headlamp indicator lamp, turn signal
indicator lamps, and the indicator lamps for
the fog lamps will only come on if activated.
If a lamp in the instrument cluster fails to
come on when the ignition is switched on,
have it checked and replaced if necessary. If
a lamp in the instrument cluster remains on
after starting the engine or comes on while
driving, refer to “Lamps in instrument cluster”
(Y page 297).
If the SmartKey is left in starter switch
position 0 for an extended period of time, it
can no longer be turned in the starter switch.
In this case, the steering is locked. To unlock,
remove SmartKey from the starter switch and
reinsert.
The steering is locked when the SmartKey is
removed from the starter switch.
XAlways remove the SmartKey from the
starter switch when the engine is not in
operation.
This will help to prevent accelerated vehicle
battery discharge or a completely
discharged vehicle battery.
If the SmartKey cannot be turned in the
starter switch, the vehicle battery may not be
sufficiently charged.
XCheck the vehicle battery and charge it if
necessary (Y page 323).
or
XGet a jump start (Y page 323).
iIf the SmartKey does not belong to the
vehicle, the SmartKey can be turned in the
starter switch. However, the ignition does
not switch on and the engine does not start.
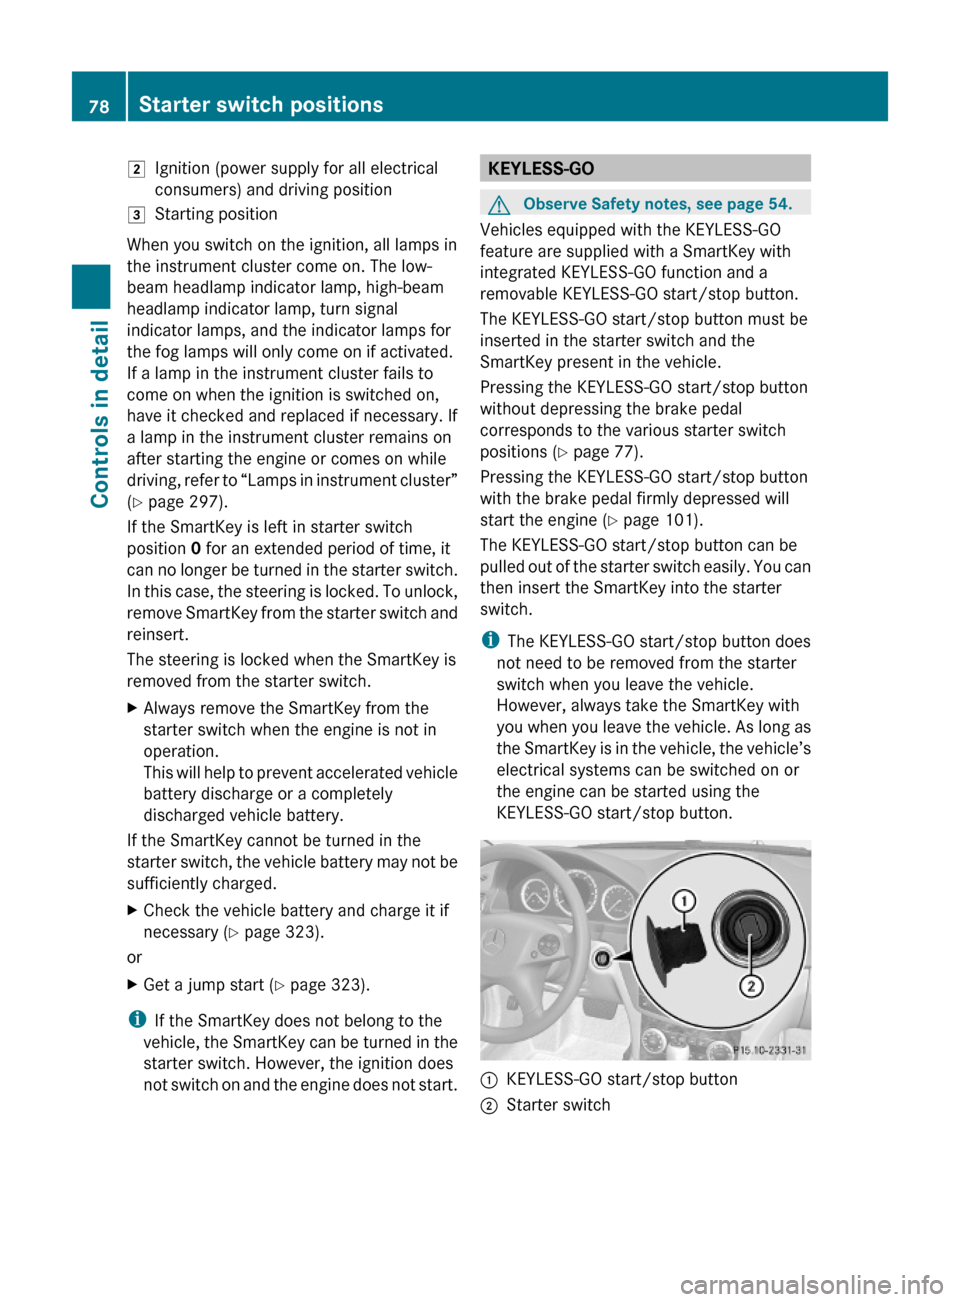
KEYLESS-GOGObserve Safety notes, see page 54.
Vehicles equipped with the KEYLESS-GO
feature are supplied with a SmartKey with
integrated KEYLESS-GO function and a
removable KEYLESS-GO start/stop button.
The KEYLESS-GO start/stop button must be
inserted in the starter switch and the
SmartKey present in the vehicle.
Pressing the KEYLESS-GO start/stop button
without depressing the brake pedal
corresponds to the various starter switch
positions (Y page 77).
Pressing the KEYLESS-GO start/stop button
with the brake pedal firmly depressed will
start the engine (Y page 101).
The KEYLESS-GO start/stop button can be
pulled out of the starter switch easily. You can
then insert the SmartKey into the starter
switch.
iThe KEYLESS-GO start/stop button does
not need to be removed from the starter
switch when you leave the vehicle.
However, always take the SmartKey with
you when you leave the vehicle. As long as
the SmartKey is in the vehicle, the vehicle’s
electrical systems can be switched on or
the engine can be started using the
KEYLESS-GO start/stop button.
:KEYLESS-GO start/stop button;Starter switch78Starter switch positionsControls in detail
204_AKB; 5; 23, en-USd2ureepe,Version: 2.11.8.12009-07-16T17:54:06+02:00 - Seite 78
Page 105 of 364
Carry out the following steps:XIf you are starting the engine with the
SmartKey: Turn the SmartKey in the starter
switch to position 0 and repeat the starting
procedure.XIf you are starting the engine with KEYLESS-
GO: Close any doors that may be open to
allow for better detection of the SmartKey.
or
XRemove the KEYLESS-GO start/stop
button from the starter switch.XStart the engine with the SmartKey as radio
signals from another source may be
interfering with the KEYLESS-GO function.XRepeat the starting procedure.
If the engine does not start after several
starting attempts:
XContact an authorized Mercedes-Benz
Center or call Roadside Assistance.
The engine does not start. You cannot
hear the starter.
The battery may not be charged sufficiently.
XGet a jump start ( Y page 323).
If the engine will not start despite a jump
start:
XContact an authorized Mercedes-Benz
Center or call Roadside Assistance.
The starter has been exposed to excessive
temperatures.
XLet the starter cool for about 2 minutes.XRepeat the starting procedure.
If the engine does not start after several
starting attempts:
XContact an authorized Mercedes-Benz
Center or call Roadside Assistance.Driving offGWarning!
On slippery road surfaces, never downshift in
order to obtain braking action. This could
result in drive wheel slip and reduced vehicle
control. Your vehicle’s ABS will not prevent
this type of loss of control.
! Do not run a cold engine at high engine
speeds. Running a cold engine at high
engine speeds may shorten the service life
of the engine. This is not covered by the
Mercedes-Benz Limited Warranty.
C 63 AMG: At engine temperatures below
68‡ (20†), the engine’s maximum speed
is restricted in order to protect it from
damage. Avoid driving your vehicle at full
speed when the engine is cold to prevent
premature engine wear and/or diminished
comfort.
! If an acoustic warning sounds and the
message Release Parking Brake
appears in the multifunction display when
driving off, you have forgotten to release
the parking brake.
Release the parking brake.
! Avoid spinning of a drive wheel. This may
cause serious damage to the drivetrain
which is not covered by the Mercedes-Benz
Limited Warranty.
! Simultaneously depressing the
accelerator pedal and applying the brakes
reduces engine performance and causes
premature brake and drivetrain wear which
is not covered by the Mercedes-Benz
Limited Warranty.
i Once the vehicle is in motion, the
automatic central locking function engages
and the locking knobs in the doors move
down.
Driving and parking103Controls in detail204_AKB; 5; 23, en-USd2ureepe,Version: 2.11.8.12009-07-16T17:54:06+02:00 - Seite 103Z
Page 216 of 364
XTerminating calls: Press button ~ on
the multifunction steering wheel.
or
XPress the respective button for ending a
telephone call on the audio system or the
COMAND system.
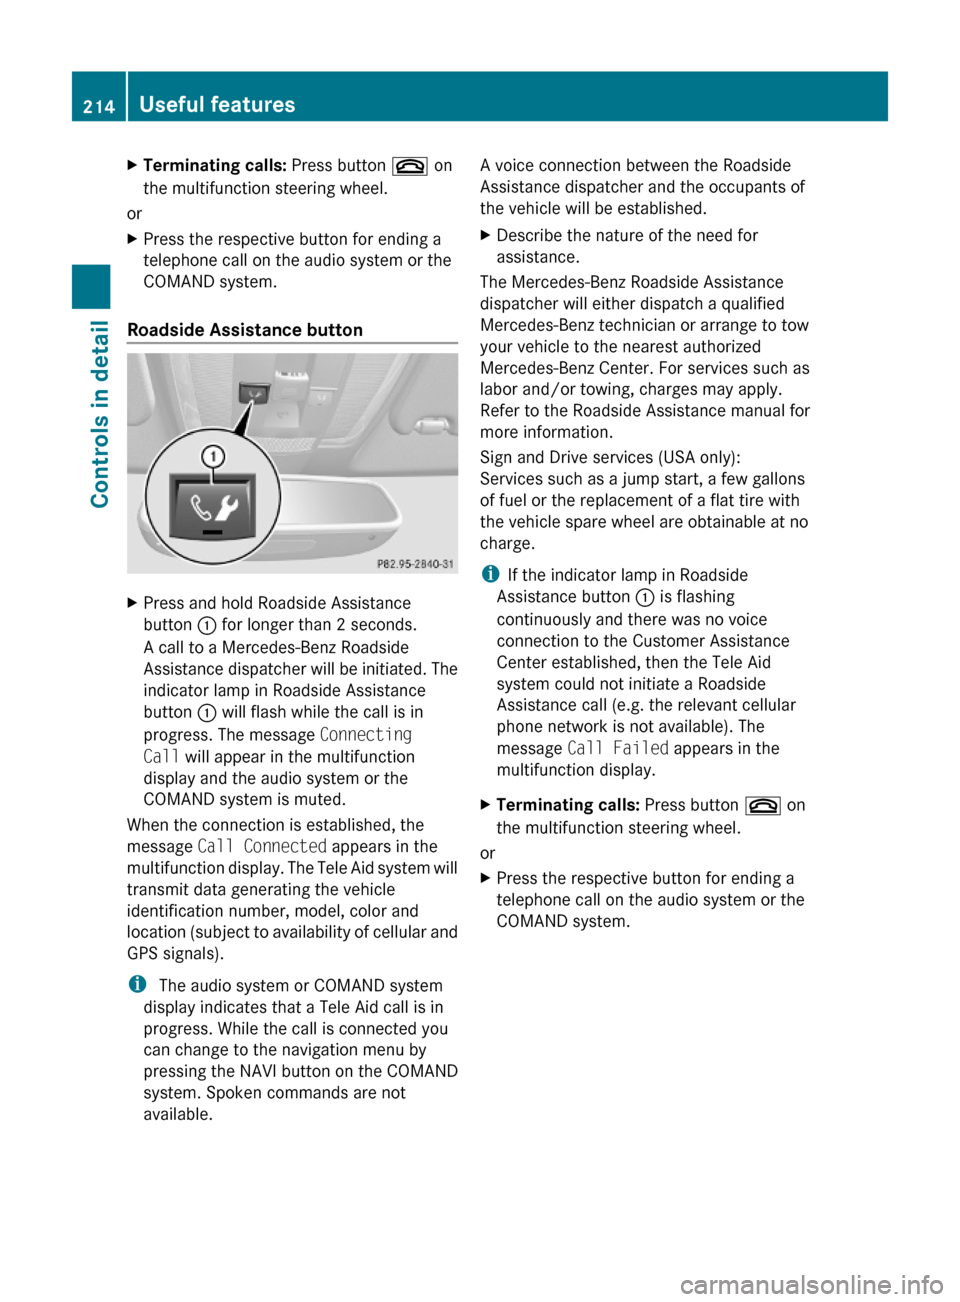
Roadside Assistance button
XPress and hold Roadside Assistance
button : for longer than 2 seconds.
A call to a Mercedes-Benz Roadside
Assistance dispatcher will be initiated. The
indicator lamp in Roadside Assistance
button : will flash while the call is in
progress. The message Connecting
Call will appear in the multifunction
display and the audio system or the
COMAND system is muted.
When the connection is established, the
message Call Connected appears in the
multifunction display. The Tele Aid system will
transmit data generating the vehicle
identification number, model, color and
location (subject to availability of cellular and
GPS signals).
i The audio system or COMAND system
display indicates that a Tele Aid call is in
progress. While the call is connected you
can change to the navigation menu by
pressing the NAVI button on the COMAND
system. Spoken commands are not
available.
A voice connection between the Roadside
Assistance dispatcher and the occupants of
the vehicle will be established.
XDescribe the nature of the need for
assistance.
The Mercedes-Benz Roadside Assistance
dispatcher will either dispatch a qualified
Mercedes-Benz technician or arrange to tow
your vehicle to the nearest authorized
Mercedes-Benz Center. For services such as
labor and/or towing, charges may apply.
Refer to the Roadside Assistance manual for
more information.
Sign and Drive services (USA only):
Services such as a jump start, a few gallons
of fuel or the replacement of a flat tire with
the vehicle spare wheel are obtainable at no
charge.
iIf the indicator lamp in Roadside
Assistance button : is flashing
continuously and there was no voice
connection to the Customer Assistance
Center established, then the Tele Aid
system could not initiate a Roadside
Assistance call (e.g. the relevant cellular
phone network is not available). The
message Call Failed appears in the
multifunction display.
XTerminating calls: Press button ~ on
the multifunction steering wheel.
or
XPress the respective button for ending a
telephone call on the audio system or the
COMAND system.
214Useful featuresControls in detail
204_AKB; 5; 23, en-USd2ureepe,Version: 2.11.8.12009-07-16T17:54:06+02:00 - Seite 214
Page 269 of 364
Vehicle equipment ............................268
Where will I find ...? ..........................268
Vehicle status messages in the
multifunction display .......................270
What to do if … ..................................297
Unlocking/locking manually ...........309
Resetting activated NECK-PRO
active front head restraints .............311
Replacing SmartKey batteries .........312
Replacing bulbs .................................313
Replacing wiper blades ....................316
Flat tire ..............................................317
Battery ...............................................321
Jump starting ....................................323
Towing the vehicle ............................325
Fuses ..................................................328
267Practical hints204_AKB; 5; 23, en-USd2ureepe,Version: 2.11.8.12009-07-16T17:54:06+02:00 - Seite 267
Page 324 of 364
Keep children away.Follow the instructions in
this Operator’s Manual.
A battery contains materials that can harm
the environment if disposed of improperly. A
large 12 V storage battery contains lead.
Recycling of the battery is the preferred
method of disposal. Many states (USA only)
or provinces (Canada only) require sellers of
batteries to accept the old battery for
recycling.
GWarning!
Failure to follow these instructions can result
in severe injury or death.
Never lean over batteries while connecting.
You might get injured.
Battery fluid contains sulfuric acid. Do not
allow this fluid to come in contact with eyes,
skin or clothing. In case it does, immediately
flush affected area with water and seek
medical help if necessary.
A battery will also produce hydrogen gas,
which is flammable and explosive. Keep
flames or sparks away from battery, avoid
improper connection of jumper cables,
smoking etc.
GWarning!
Do not place metal objects on the battery as
this could result in a short circuit.
Use leak-proof batteries only to avoid the risk
of acid burns in the event of an accident.
Take care that you do not become statically
charged, e.g. by wearing synthetic clothing or
rubbing against textiles. For this reason, you
also should not pull or push the battery over
carpets or other synthetic materials.
Never touch the battery first. First touch the
outside body of the vehicle in order to release
any possible electrostatic charges.
Do not rub the battery with rags or cloths. The
battery could explode if touched due to
electrostatic charge or due to spark
formation.
! As any other battery, the battery may
discharge if you do not operate the vehicle
for an extended period of time. Have the
battery disconnected at a qualified
workshop or an authorized Mercedes-Benz
Center in such a case. You may also
connect an accessory battery charge unit
expressly approved by Mercedes-Benz for
your vehicle model to maintain the battery
charge. Contact an authorized Mercedes-
Benz Center for further information.
The battery, the battery ventilation hose
and the lateral plug must always be
securely installed when the vehicle is in
operation.
! Never loosen or detach battery terminal
clamps while the engine is running or the
SmartKey is in the starter switch or
KEYLESS-GO button is in position 1.
Otherwise the alternator and other
electronic components could be severely
damaged.
Have the battery checked regularly at an
authorized Mercedes-Benz Center.
Refer to Maintenance Booklet for
maintenance intervals or contact an
authorized Mercedes-Benz Center for
further information.
i After battery power was interrupted, do
the following:
R Reset the automatic exterior mirror fold
in function ( Y page 88).
R Set the clock (Y page 132). Vehicles with
COMAND: see separate COMAND
operating instructions.322BatteryPractical hints
204_AKB; 5; 23, en-USd2ureepe,Version: 2.11.8.12009-07-16T17:54:06+02:00 - Seite 322
Page 325 of 364

Charging the batteryGWarning!
Never charge a battery while still installed in
the vehicle unless the accessory battery
charge unit approved by Mercedes-Benz is
being used. Gases may escape during
charging and could cause an explosion that
may result in personal injury, paint damage or
corrosion.
An accessory battery charge unit specially
adapted for Mercedes-Benz vehicles and
tested and approved by Mercedes-Benz is
available. It permits the charging of the
battery in its installed position. Contact an
authorized Mercedes-Benz Center for
information and availability.
Charge battery in accordance with the
separate instructions for the accessory
battery charger.
Have the battery charged at an authorized
Mercedes-Benz Center. If you charge the
battery yourself, follow the operating
instructions for your charging device.
Only use a battery charge unit with a
maximum charging voltage of 14.8 V.
XCharge battery in accordance with the
instructions of the battery charger
manufacturer.
Jump starting
GWarning!
Failure to follow these directions will cause
damage to the electronic components, and
can lead to a battery explosion and severe
injury or death.
Never lean over batteries while connecting or
jump starting. You might get injured.
Battery fluid contains sulfuric acid. Do not
allow this fluid to come in contact with eyes,
skin or clothing. In case it does, immediately
flush affected area with water, and seek
medical help if necessary.
A battery will also produce hydrogen gas,
which is flammable and explosive. Keep
flames or sparks away from battery, avoid
improper connection of jumper cables,
smoking, etc.
Attempting to jump start a frozen battery can
result in it exploding, causing personal injury.
Read all instructions before proceeding.
! Vehicles with automatic transmission
and/or 4MATIC:
Do not tow-start the vehicle. You could
otherwise seriously damage the automatic
transmission which is not covered by the
Mercedes-Benz Limited Warranty.
! Jump starting should only be performed
using the jump-start terminals located in
the engine compartment.
Avoid repeated and lengthy starting
attempts.
Do not attempt to start the engine using a
battery quick-charge unit.
If the engine does not run after several
unsuccessful starting attempts, have it
checked at the nearest authorized
Mercedes-Benz Center.
Excessive unburned fuel generated by
repeated failed starting attempts may
damage the catalytic converter and may
present a fire risk.
Make sure the jumper cables do not have
loose or missing insulation.
Make sure the cable clamps do not touch
any other metal part while the other end is
still attached to a battery.
If the battery is discharged, the engine can be
started with jumper cables and the fully
charged battery of another vehicle or an
equivalent starter pack. Observe the
following:
R Access to the battery is not possible on all
vehicles. If you cannot access the batteryJump starting323Practical hints204_AKB; 5; 23, en-USd2ureepe,Version: 2.11.8.12009-07-16T17:54:06+02:00 - Seite 323Z