Page 77 of 407

▫Head Restraints ...................... 87
▫ Front Heated Seats — If Equipped ......... 88
▫ Rear Heated Seats — If Equipped .......... 90
▫ 60/40 Split Rear Seat ................... 91
� Driver Memory Seat — If Equipped ......... 94
▫ Setting Memory Positions And Linking
Remote Keyless Entry Transmitter To
Memory ............................ 95
▫ Memory Position Recall ................. 96
▫ To Disable a RKE Transmitter Linked To
Memory ............................ 96
▫ Easy Entry/Exit Seat ................... 97
� To Open And Close The Hood ............. 98
� Lights ............................. 100 ▫
Multifunction Lever .................. 100
▫ Headlights And Parking Lights .......... 100
▫ Automatic Headlights — If Equipped ...... 101
▫ Headlights On Automatically With Wipers . . 101
▫ Smartbeam™ — If Equipped ............ 102
▫ Daytime Running Lights — If Equipped .... 103
▫ Automatic Headlight Leveling — HID
Headlights Only ..................... 103
▫ Instrument Panel Dimmer .............. 103
▫ Battery Saver Feature ................. 104
▫ Lights-On Reminder .................. 104
▫ Fog Lights — If Equipped .............. 105
▫ Turn Signals ........................ 106
76 UNDERSTANDING THE FEATURES OF YOUR VEHICLE
Page 105 of 407
Rotate the center portion of the lever upward to the last
detent to turn on the interior lighting.Battery Saver Feature
If the multifunction lever is left in the interior light
position, parking light position, or the headlight position
when the ignition switch is moved to the LOCK position,
the battery saver feature will automatically turn off the
exterior and interior lights after eight minutes. Normal
operation will resume when the ignition is turned ON or
when the headlight switch is turned to another position.
Lights-On Reminder
If the headlights or parking lights are on after the ignition
switch has been turned to LOCK/ACC, a chime will
sound when the driver’s door is opened.
Dimmer Control
104 UNDERSTANDING THE FEATURES OF YOUR VEHICLE
Page 129 of 407
Press the lens to turn these lights on. Press a second time
to turn the lights off.
The lights also turn on when a front door or rear door is
opened. The lights will also turn on when the UNLOCK
button on the Remote Keyless Entry (RKE) transmitter is
pressed.
Sunglasses Storage
At the rear of the console a compartment is provided for
the storage of a pair of sunglasses.
The storage compartment access is a “push/push” de-
sign. Push the finger depression on the overhead console
to open. Push the finger depression to close.
GARAGE DOOR OPENER — IF EQUIPPED
HomeLink�replaces up to three remote controls (hand-
held transmitters) that operate devices such as garage
door openers, motorized gates, lighting or home security systems. The HomeLink�
unit operates off your vehicle’s
battery.
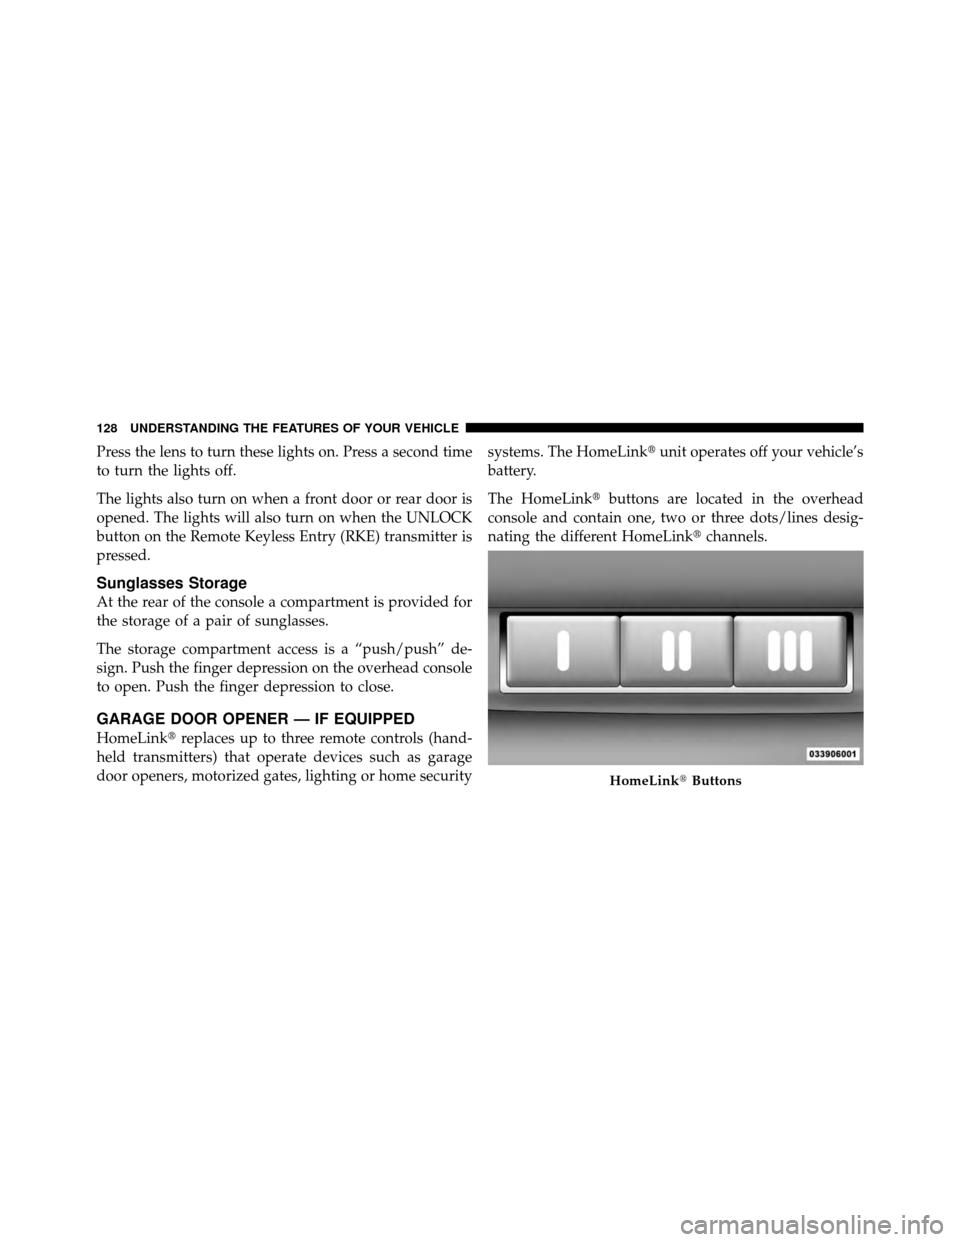
The HomeLink� buttons are located in the overhead
console and contain one, two or three dots/lines desig-
nating the different HomeLink� channels.
HomeLink�Buttons
128 UNDERSTANDING THE FEATURES OF YOUR VEHICLE
Page 130 of 407
NOTE:HomeLink� is disabled when the Vehicle Secu-
rity Alarm is active.
WARNING!
•Your motorized door or gate will open and close
while you are training the Universal Transceiver.
Do not train the transceiver if people, pets or other
objects are in the path of the door or gate. Only use
this transceiver with a garage door opener that has
a “stop and reverse” feature as required by federal
safety standards. This includes most garage door
opener models manufactured after 1982. Do not
use a garage door opener without these safety
features. Call toll-free 1–800–355–3515 or, on the
Internet at www.HomeLink.com for safety infor-
mation or assistance.
(Continued)
WARNING! (Continued)
•Vehicle exhaust contains carbon monoxide, a dan-
gerous gas. Do not run your vehicle in the garage
while training the transceiver. Exhaust gas can
cause serious injury or death.
Programming HomeLink�
Before You Begin
If you have not trained any of the HomeLink� buttons,
erase all channels before you begin training.
To do this, press and hold the two outside buttons for up
to 20 seconds. The EVIC will display “CLEARING
CHANNELS.” Release the buttons when the EVIC mes-
sage states “CHANNELS CLEARED.”
It is recommended that a new battery be placed in the
hand-held transmitter of the device being copied to
3
UNDERSTANDING THE FEATURES OF YOUR VEHICLE 129
Page 131 of 407
HomeLink�for more efficient training and accurate
transmission of the radio-frequency signal.
Your vehicle should be parked outside of the garage
while training.
1. Turn the ignition switch to the ON/RUN position.
2. Place the handheld transmitter 1 to 3 in (3 to 8 cm)
from the HomeLink� buttons while keeping the EVIC
display in view.
For optimal training, point the battery end of the hand-
held transmitter away from the HomeLink�.
3. Simultaneously, press and hold both the chosen
HomeLink� button and the handheld transmitter button
until the EVIC display changes from “CHANNEL #
TRAINING” to “CHANNEL # TRAINED.”
Then release both the HomeLink� and handheld trans-
mitter buttons. If the EVIC display states “DID NOT TRAIN” repeat
Step 3. If the signal is too weak, replace the battery in the
handheld transmitter.
It may take up to 30 seconds or longer in rare cases. The
garage door may open and close while you train.
NOTE:
Some gate operators and garage door openers
may require you to replace Step 3 with procedures noted
in the “Gate Operator/Canadian Programming” section.
4. Press and hold the just-trained HomeLink� button. If
the channel has been trained, the EVIC display will now
state “CHANNEL # TRANSMIT.”
If the EVIC display still states “CHANNEL # TRAIN-
ING” repeat Step 3.
130 UNDERSTANDING THE FEATURES OF YOUR VEHICLE
Page 134 of 407
Then proceed with Step 4 under “Programming
HomeLink�” earlier in this section.
Using HomeLink�
To operate, press and release the programmed
HomeLink�button. Activation will now occur for the
trained device (i.e., garage door opener, gate operator,
security system, entry door lock, home/office lighting,
etc.,). The handheld transmitter of the device may also be
used at any time.
Reprogramming A Single HomeLink� Button
To reprogram a channel that has been previously trained,
follow these steps:
1. Turn the ignition switch to the ON/RUN position.
2. Press and hold the desired HomeLink� button for
20 seconds until the EVIC display states “CHANNEL #
TRAINING.” Do not release the button. 3.
Without releasing the button, proceed with Program-
ming HomeLink� Step 2 and follow all remaining steps.
Security
It is advised to erase all channels before you sell or turn
in your vehicle.
To do this, press and hold the two outside buttons for
20 seconds until the EVIC message states “CHANNELS
CLEARED.” Note that all channels will be erased. Indi-
vidual channels cannot be erased.
The HomeLink�Universal Transceiver is disabled when
the Vehicle Security Alarm is active.
Troubleshooting Tips
If you are having trouble programming HomeLink �, here
are some of the most common solutions:
•Replace the battery in the original transmitter.
3
UNDERSTANDING THE FEATURES OF YOUR VEHICLE 133
Page 138 of 407
NOTE:The sunshade cannot be closed if the sunroof is
open.
Wind Buffeting
Wind buffeting can be described as the perception of
pressure on the ears or a helicopter-type sound in the
ears. Your vehicle may exhibit wind buffeting with the
windows down, or the sunroof (if equipped) in certain
open or partially open positions. This is a normal occur-
rence and can be minimized. If the buffeting occurs with
the rear windows open, open the front and rear windows
together to minimize the buffeting. If the buffeting occurs
with the sunroof open, adjust the sunroof opening to
minimize the buffeting or open any window.
Sunroof Maintenance
Use only a non-abrasive cleaner and a soft cloth to clean
the glass panel.
Ignition OFF Operation
The power sunroof switches remain active for up ap-
proximately ten minutes after the ignition switch has
been turned OFF. Opening either front door will cancel
this feature.
Sunroof Fully Closed
Press the switch forward and release to ensure that the
sunroof is fully closed.
ELECTRICAL POWER OUTLETS
Your vehicle is equipped with 12 Volt (13 Amp) power
outlets that can be used to power cellular phones, small
electronics and other low powered electrical accessories.
The power outlets are labeled with either a “key” or a
“battery” symbol to indicate how the outlet is powered.
Power outlets labeled with a “key” are powered when
the ignition switch is in the ON or ACC position, while
the outlets labeled with a “battery” are connected directly
to the battery and powered at all times.
3
UNDERSTANDING THE FEATURES OF YOUR VEHICLE 137
Page 139 of 407
NOTE:
•All accessories connected to the “battery” powered
outlets should be removed or turned off when the
vehicle is not in use to protect the battery against
discharge.
•To ensure proper operation a MOPAR�knob and
element must be used.
•Do not exceed the maximum power of 160 Watts (13
Amps) at 12 Volts. If the 160 Watt (13 Amp) power
rating is exceeded the fuse protecting the system will
need to be replaced.
The front power outlets are located to the left and right of
the convenience tray (lower center of instrument panel).
Pull lightly on the tab of the plastic cover to access these
power outlets. The power outlet located on the left side of the tray can
be used to power a conventional cigar lighter.
The rear power outlet (if equipped) is located in the left
rear cargo area.
Front Power Outlets
138 UNDERSTANDING THE FEATURES OF YOUR VEHICLE