2010 JAGUAR XFR mirror
[x] Cancel search: mirrorPage 2295 of 3039
On vehicles installed with a driver's power operated memory seat and memory exterior mirrors, a potentiometer is incorporated
within each mirror motor and is used to provide information regarding the actual motor positions. The current position and
memory positions of each door mirror motor are maintained and stored within the corresponding door control module.
The memory exterior mirror positions are also monitored and stored within door control module memory when the reverse gear
mirror dip function is used.
When reverse gear is selected, the door control module stores the current mirror positions and will then dip the passenger
mirror glass to a default dip position. While reverse gear is selected it is possible to store a preferred dipped mirror position by
adjusting the driver/passenger mirror glass to the desired position via the mirror switch pack. When the desired position is
achieved using the switch, the new dip positions will be automatically stored by the door control module when reverse gear is
de-selected. Therefore when reverse gear is re-selected, the dip position recalled by the door control module will be the new
reverse gear mirror dip stored position. When reverse gear is deselected the mirror glass will automatically move to the previous
stored position prior to reverse gear selection.
If the driver selects a memory recall function using the memory seat switch pack, the driver's memory seat and exterior
memory mirrors are moved to a stored memory position.
Exterior mirrors with the power fold/auto fold feature incorporate a motor located in the hinge of each exterior mirror arm.
Operation of the power fold feature is achieved using the exterior mirror switch pack. Operation of the auto fold feature is
achieved using the remote handset.
The power fold function is active when the ignition is in power mode 6 (Ignition).
Both exterior mirrors will power fold when the mirror switch pack 'L' and 'R' switches are pressed together. Pressing the
switches again will unfold the mirrors.
When the instrument cluster is configured for the auto fold feature, the mirrors will fold in when the remote handset lock
button is pressed. The mirrors will unfold when the vehicle is unlocked using the remote handset unlock button.
NOTE: If the mirrors are folded in using the mirror switch pack (power fold) and the vehicle is then locked, subsequent
unlocking of the vehicle will not unfold the mirrors.
When the remote handset unlock button is operated, the CJB recognizes the remote handset for that vehicle and acknowledges the request. The door control modules are connected directly to the AJB (auxiliary junction box) for power supply to the
exterior mirror folding motors.
When the vehicle is locked the door control modules reverse the polarity of the mirror fold motor, power and ground
connections to operate the mirrors in the opposite direction.
Exterior mirror heating is provided with heater elements bonded to the back of the mirror glass. Power supply for the mirror
heating elements is provided by the corresponding driver or passenger door control module via the RJB. The door control modules receive a power supply from the RJB, and are both connected on the medium speed CAN bus to the ATC (automatic temperature control) module. A ground terminal from each door control module completes the circuit. The ATC module automatically controls the mirror heating function whenever the ignition is in power mode 4 (Accessory) and power mode 6
(Ignition).
Operation of the exterior mirror heaters is fully automatic and not controllable by the driver. Exterior mirror heater operation is
determined by ambient air temperature and windshield wiper status. When ambient air temperature reaches a pre-determined
level, the ATC module broadcasts an exterior mirror heating request to the door modules over the medium speed CAN bus. On receipt of this message, the door modules provide feed and ground connections to both exterior mirror heater elements.
The mirror heating is controlled in two phases, the initial heating phase and a second PWM (pulse width modulation) controlled
phase. In the first phase the heater elements in the mirrors are permanently powered for a pre-determined length of time. This
length of time varies with the ambient temperature. During the second PWM phase, the heater elements are turned on and off every 30 seconds. The amount of time the exterior mirror heaters are operational increases if the windshield wipers are
switched on. This ensures the mirrors remain mist free in damp and wet conditions, where there is an increased risk of misting.
Page 2296 of 3039
Rear View Mirrors - Rear View Mirrors
Diagnosis and Testing
Principles of Operation Published: 11-May-2011
For a detailed description of the rear view mirrors and systems, refer to the relevant Description and Operation sections in the
workshop manual. REFER to: (501-09 Rear View Mirrors)
Rear View Mirrors (Description and Operation), Rear View Mirrors (Description and Operation), Rear View Mirrors (Description and Operation).
Inspection and Verification
CAUTION: Diagnosis by substitution from a donor vehicle is NOT acceptable. Substitution of control modules does not
guarantee confirmation of a fault, and may also cause additional faults in the vehicle being tested and/or the donor vehicle.
1. Verify the customer concern.
2. Visually inspect for obvious signs of damage and system integrity.
Visual Inspection
Mechanical Electrical
Exterior rear view mirror glass
Fuse(s)
Relay(s)
Wiring Harness
Electrical connector(s)
3. If an obvious cause for an observed or reported concern is found, correct the cause (if possible) before proceeding to
the next step.
4. If the cause is not visually evident, check for Diagnostic Trouble Codes (DTCs) and refer to the DTC Index.
DTC Index
CAUTION: When probing connectors to take measurements in the course of the pinpoint tests, use the adaptor kit, part
number 3548-1358-00.
NOTES:
If the control module or a component is suspect and the vehicle remains under manufacturer warranty, refer to the
Warranty Policy and Procedures manual (section B1.2), or determine if any prior approval programme is in operation, prior to
the installation of a new module/component.
Generic scan tools may not read the codes listed, or may read only five digit codes. Match the five digits from the scan
tool to the first five digits of the seven digit code listed to identify the fault (the last two digits give additional information
read by the manufacturer approved diagnostic system).
When performing voltage or resistance tests, always use a digital multimeter (DMM) accurate to three decimal places,
and with an up-to-date calibration certificate. When testing resistance always take the resistance of the DMM leads into
account.
Check and rectify basic faults before beginning diagnostic routines involving pinpoint tests.
Inspect connectors for signs of water ingress, and pins for damage and/or corrosion.
If DTCs are recorded and, after performing the pinpoint tests, a fault is not present, an intermittent concern may be the
cause. Always check for loose connections and corroded terminals.
When carrying out repair/diagnosis of the system, on removal of the front or rear bumper inspect the sensor connectors
to ensure they were correctly latched and check fly leads for signs of chaffing or trapped wires.
Page 2297 of 3039
DTC Description Possible Cause Action B116311
Left Mirror Heater
Output
Left mirror heater control
circuit - short to ground Refer to the electrical circuit diagrams and test left mirror
heater control circuit for short to ground B116315
Left Mirror Heater
Output
Left mirror heater control
circuit - short to power,
open circuit Carry out any pinpoint tests associated with this DTC using the
manufacturer approved diagnostic system. Refer to the
electrical circuit diagrams and test left mirror heater control
circuit for short to power, open circuit B116411
Right Mirror Heater
Output
Right mirror heater
control circuit - short to
ground Refer to the electrical circuit diagrams and test right mirror
heater control circuit for short to ground B116415
Right Mirror Heater
Output
Right mirror heater
control circuit - short to
power, open circuit Carry out any pinpoint tests associated with this DTC using the
manufacturer approved diagnostic system. Refer to the
electrical circuit diagrams and test right mirror heater control
circuit for short to power, open circuit B11F711
Passenger Folding
Mirror Motor
Passenger folding mirror
motor control circuit -
short to ground Refer to the electrical circuit diagrams and check passenger
folding mirror motor control circuit for short to ground B11F715
Passenger Folding
Mirror Motor
Passenger folding mirror
motor control circuit -
short to power, open
circuit Carry out any pinpoint tests associated with this DTC using the
manufacturer approved diagnostic system. Refer to the
electrical circuit diagrams and check passenger folding mirror
motor control circuit for short to power, open circuit B1C0911
Driver Left/Right
Mirror Motor Circuit
Driver left/right mirror
motor control circuit -
short to ground Carry out any pinpoint tests associated with this DTC using the
manufacturer approved diagnostic system. Refer to the
electrical circuit diagrams and test driver left/right mirror motor
control circuit for short to ground B1C0915
Driver Left/Right
Mirror Motor Circuit
Driver left/right mirror
motor control circuit -
short to power, open
circuit Carry out any pinpoint tests associated with this DTC using the
manufacturer approved diagnostic system. Refer to the
electrical circuit diagrams and test driver left/right mirror motor
control circuit for short to power, open circuit B1C1011
Driver Up/Down
Mirror Motor Circuit
Driver up/down mirror
motor control circuit -
short to ground Carry out any pinpoint tests associated with this DTC using the
manufacturer approved diagnostic system. Refer to the
electrical circuit diagrams and test driver up/down mirror motor
control circuit for short to ground B1C1015
Driver Up/Down
Mirror Motor Circuit
Driver up/down mirror
motor control circuit -
short to power, open
circuit Carry out any pinpoint tests associated with this DTC using the
manufacturer approved diagnostic system. Refer to the
electrical circuit diagrams and test driver up/down mirror motor
control circuit for short to power, open circuit B1C1111
Passenger
Left/Right Mirror
Motor Circuit
Passenger left/right
mirror motor control
circuit - short to ground Refer to the electrical circuit diagrams and test passenger
left/right mirror motor control circuit for short to ground B1C1115
Passenger
Left/Right Mirror
Motor Circuit
Passenger left/right
mirror motor control
circuit - short to power,
open circuit Carry out any pinpoint tests associated with this DTC using the
manufacturer approved diagnostic system. Refer to the
electrical circuit diagrams and test passenger left/right mirror
motor control circuit for short to power, open circuit B1C1211
Passenger Up/Down
Mirror Motor Circuit
Passenger up/down mirror
motor control circuit -
short to ground Refer to the electrical circuit diagrams and test passenger
up/down mirror motor control circuit for short to ground B1C1215
Passenger Up/Down
Mirror Motor Circuit
Passenger up/down mirror
motor control circuit -
short to power, open
circuit Carry out any pinpoint tests associated with this DTC using the
manufacturer approved diagnostic system. Refer to the
electrical circuit diagrams and test passenger up/down mirror
motor control circuit for short to power, open circuit B1C1311
Driver Up/Down
Mirror Motor
Feedback Circuit
Driver up/down mirror
motor feedback circuit -
short to ground Refer to the electrical circuit diagrams and test driver up/down
mirror motor feedback circuit for short to ground
Page 2298 of 3039
DTC Description Possible Cause Action B1C1315
Driver Up/Down
Mirror Motor
Feedback Circuit
Driver up/down mirror
motor feedback circuit -
short to power, open
circuit Carry out any pinpoint tests associated with this DTC using the
manufacturer approved diagnostic system. Refer to the
electrical circuit diagrams and test driver up/down mirror motor
feedback circuit for short to power, open circuit B1C1411
Driver Left/Right
Mirror Motor
Feedback Circuit
Driver left/right mirror
motor feedback circuit -
short to ground Refer to the electrical circuit diagrams and test driver left/right
mirror motor feedback circuit for short to ground B1C1415
Driver Left/Right
Mirror Motor
Feedback Circuit
Driver left/right mirror
motor feedback circuit -
short to power, open
circuit Carry out any pinpoint tests associated with this DTC using the
manufacturer approved diagnostic system. Refer to the
electrical circuit diagrams and test driver left/right mirror motor
feedback circuit for short to power, open circuit B1C1511
Passenger Up/Down
Mirror Motor
Feedback Circuit
Passenger up/down mirror
motor feedback circuit -
short to ground Refer to the electrical circuit diagrams and test passenger
up/down mirror motor feedback circuit for short to ground B1C1515
Passenger Up/Down
Mirror Motor
Feedback Circuit
Passenger up/down mirror
motor feedback circuit -
short to power, open
circuit Refer to the electrical circuit diagrams and test passenger
up/down mirror motor feedback circuit for short to power, open
circuit B1C1611
Passenger
Left/Right Mirror
Motor Feedback
Circuit
Passenger left/right
mirror motor feedback
circuit - short to ground Refer to the electrical circuit diagrams and test passenger
left/right mirror motor feedback circuit for short to ground B1C1615
Passenger
Left/Right Mirror
Motor Feedback
Circuit
Passenger left/right
mirror motor feedback
circuit - short to power,
open circuit Refer to the electrical circuit diagrams and test passenger
left/right mirror motor feedback circuit for short to power, open
circuit
Page 2299 of 3039
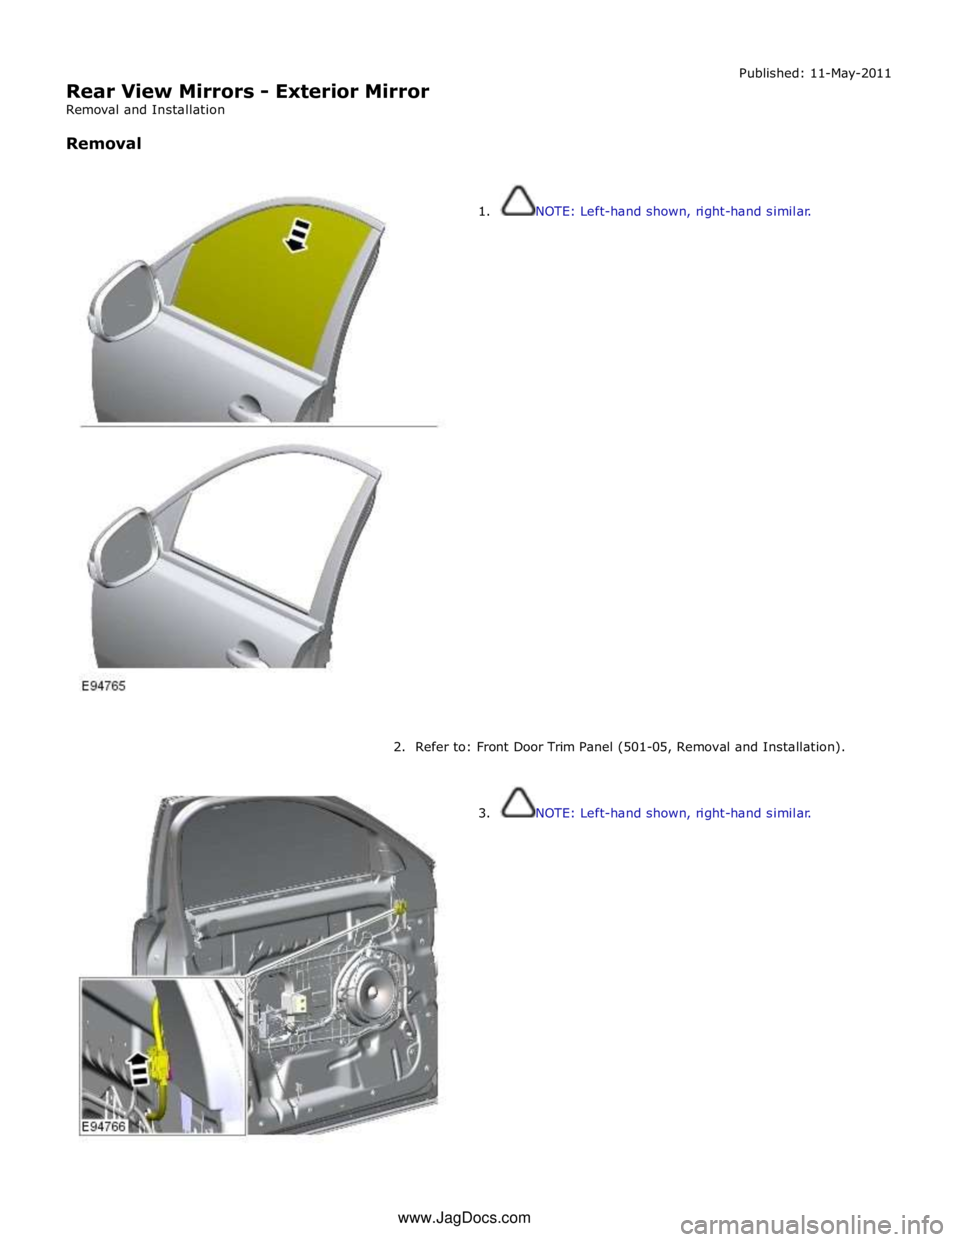
Rear View Mirrors - Exterior Mirror
Removal and Installation
Removal Published: 11-May-2011
1. NOTE: Left-hand shown, right-hand similar.
2. Refer to: Front Door Trim Panel (501-05, Removal and Installation).
3. NOTE: Left-hand shown, right-hand similar. www.JagDocs.com
Page 2301 of 3039
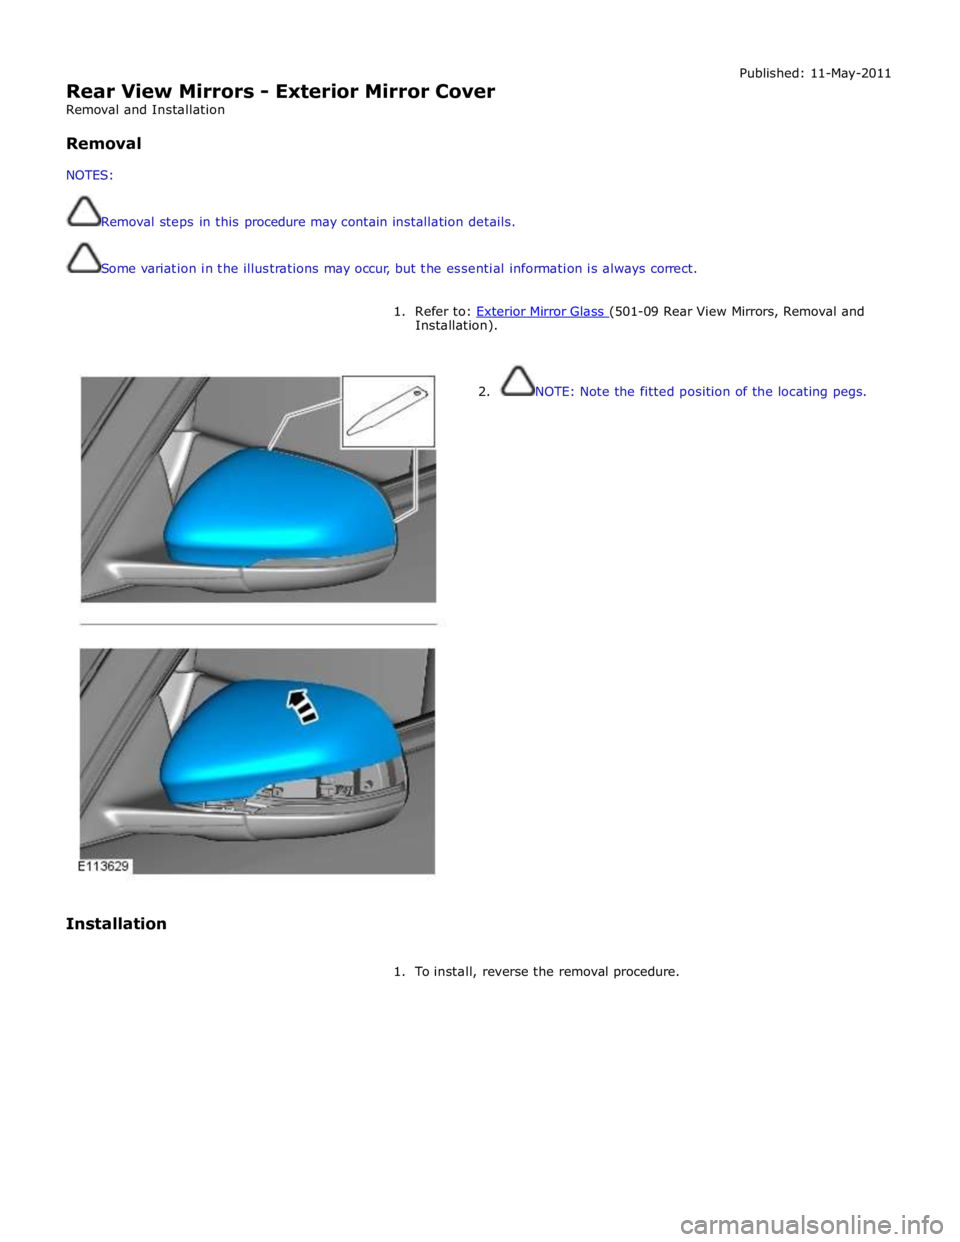
Rear View Mirrors - Exterior Mirror Cover
Removal and Installation
Removal
NOTES:
Removal steps in this procedure may contain installation details.
Some variation in the illustrations may occur, but the essential information is always correct. Published: 11-May-2011
1. Refer to: Exterior Mirror Glass (501-09 Rear View Mirrors, Removal and Installation).
Installation
2. NOTE: Note the fitted position of the locating pegs.
1. To install, reverse the removal procedure.
Page 2302 of 3039
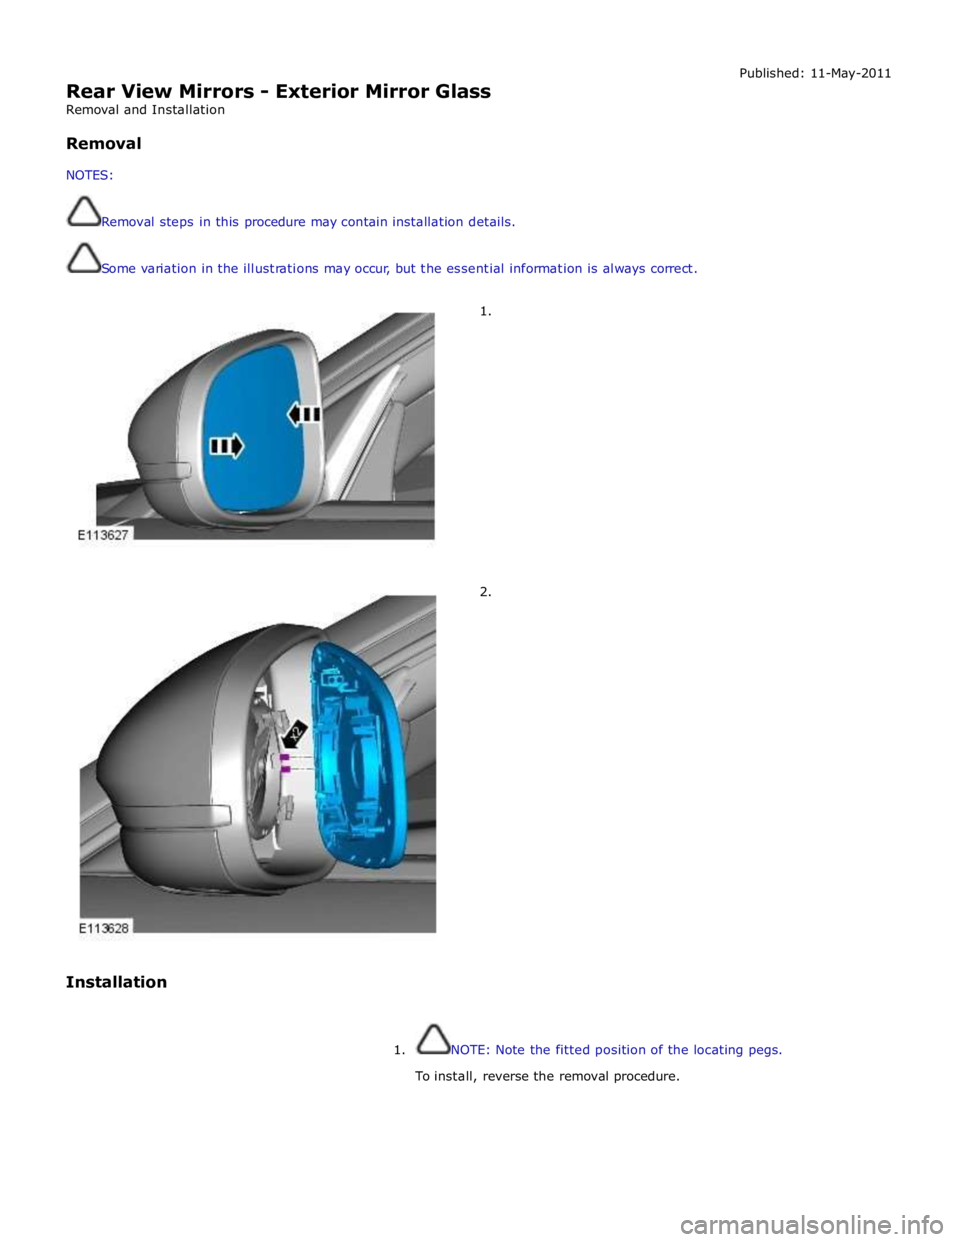
Rear View Mirrors - Exterior Mirror Glass
Removal and Installation
Removal
NOTES:
Removal steps in this procedure may contain installation details.
Some variation in the illustrations may occur, but the essential information is always correct.
1.
2.
Installation Published: 11-May-2011
1. NOTE: Note the fitted position of the locating pegs.
To install, reverse the removal procedure.
Page 2303 of 3039
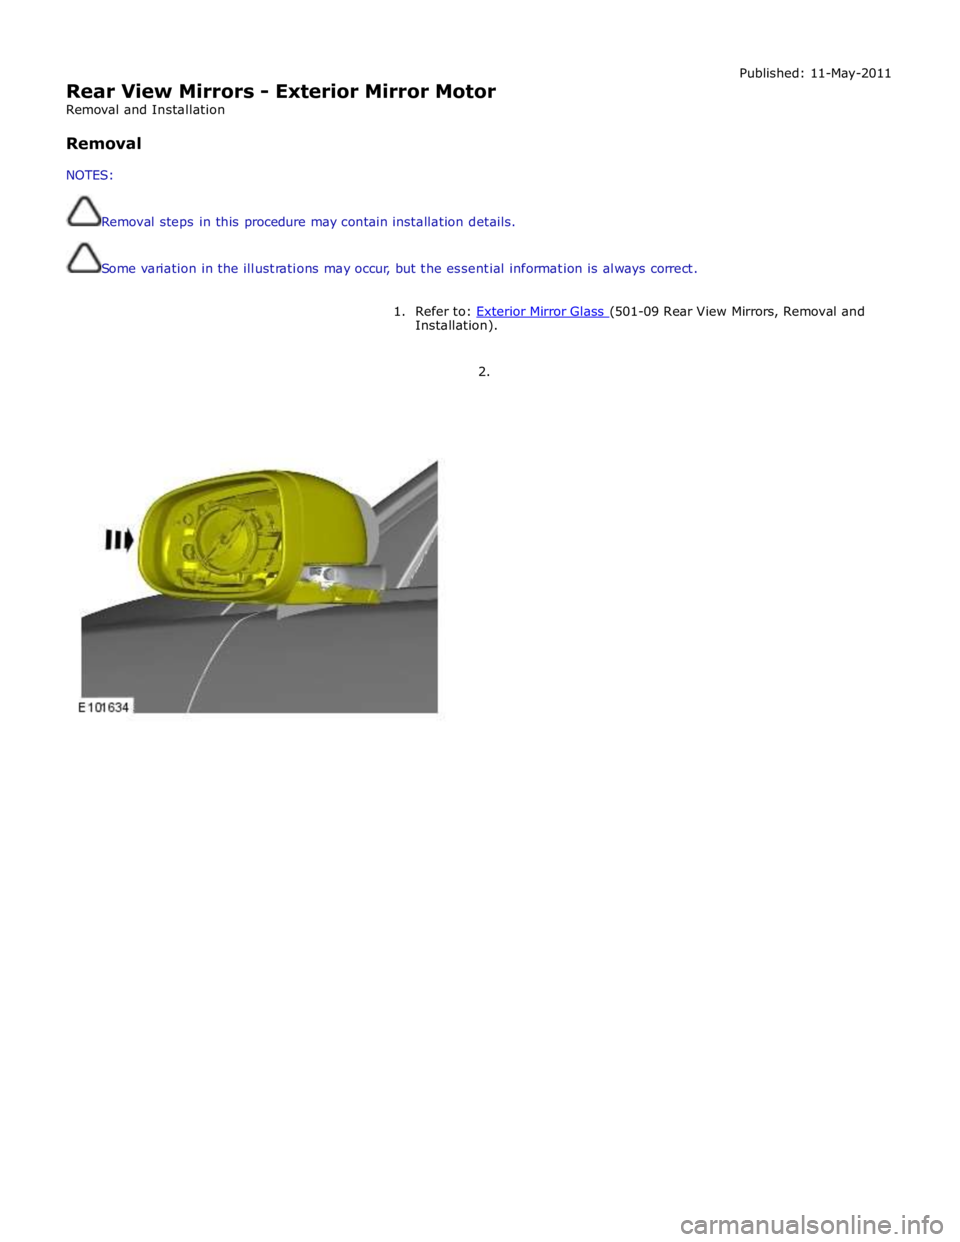
Rear View Mirrors - Exterior Mirror Motor
Removal and Installation
Removal
NOTES:
Removal steps in this procedure may contain installation details.
Some variation in the illustrations may occur, but the essential information is always correct. Published: 11-May-2011
1. Refer to: Exterior Mirror Glass (501-09 Rear View Mirrors, Removal and Installation).
2.