2010 JAGUAR XFR Control module
[x] Cancel search: Control modulePage 2146 of 3039
Check the Starter Relay circuit.
NOTE: On petrol engine variants, due to Smart Start, both sides of Relay Coil are switched directly from ECM (If
conditions correct). On diesel engine variants the low side only is switched directly from the ECM.
Check that the Steering Column Lock correctly operates and the steering wheel can turn freely.
Check that the High Speed CAN network is not malfunctioning, i.e. the CAN circuit is open or short circuit. This would mean
that the instrument cluster and ECM would be unable to communicate resulting in no Challenge being performed to enable the
ECM. This would be supported by LED Flash Code 24, see PATS Fault Code Table.
Also check the CAN network between the ABS module and the CJB. The CJB uses the CAN_BrakePressureTMC signal to
determine if the brake pedal has been pressed in order to allow an engine crank. The CJB uses a value of 0x05, if the CJB sees
a value less than this, it will not enable the Crank Request Output.
Engine cranks but will not start
If the Engine is cranking it means that the ECM has passed the authorisation required with the Instrument Cluster. If this
authorisation failed, the ECM would not engage the starter relay. This could be confirmed by verifying the PATS LED prove out
(illuminated solid for 3 seconds) or by reading DTCs from the instrument cluster and ECM.
In this case, the fuel pump circuit should be verified. The Fuel Pump Delivery Module (FPDM), which is supplied via the RJB
(authentication required with the instrument cluster) and controlled by the ECM, supplies the fuel pump.
In all cases of suspected non-start issues, the most logical failure modes should be eliminated first. i.e.
1. Check all relevant supplies and grounds to the relevant modules listed herein.
2. Note any unusual behaviour from other systems/functionality.
3. Note any functions that are not operating as expected.
PATS Fault Codes
For the various PATS modes/faults listed in the table , the instrument cluster will store a DTC and indicate this to the customer
during the detection period defined in the 'when logged' column, by illuminating the indicator as described for 60 seconds and
then flashing the LED 10 times as appropriate. The indication will stop immediately the ignition status is set to OFF any time
during the fault indication sequence. Up to 4 DTCs could be stored per key read sequence (1-10 read attempts). No DTCs will be
stored until all retry attempts are complete. Only the highest priority fault code will be flashed.
To determine the fault code from the LED: The LED will flash initially ten times with 1.5 seconds between. The LED will remain
OFF for 2.5 seconds then flash a number of times with 0.5 seconds between (the number of times the LED flashes represents
the first digit of the code), the LED will remain OFF for 1.5 seconds then flash a number of times with 1.5 seconds between
(the number of times the LED flashes represents the second digit of the code).
The PATS LED will be commanded on as shown under 'indication'. Normal PATS operations are complete within 400ms of the
ignition switch transition from OFF to ON or START, worst case for ECM communication problems will be less than 2 seconds. If
PATS is not complete during the 2 seconds the ECM will terminate PATS and await the next ignition ON or START event. PATS
faults will be indicated via the LED as soon as possible and will terminate the LED prove out. At ignition OFF all previous
flashing will cease and the perimeter anti-theft system will control the LED when the vehicle is locked and armed.
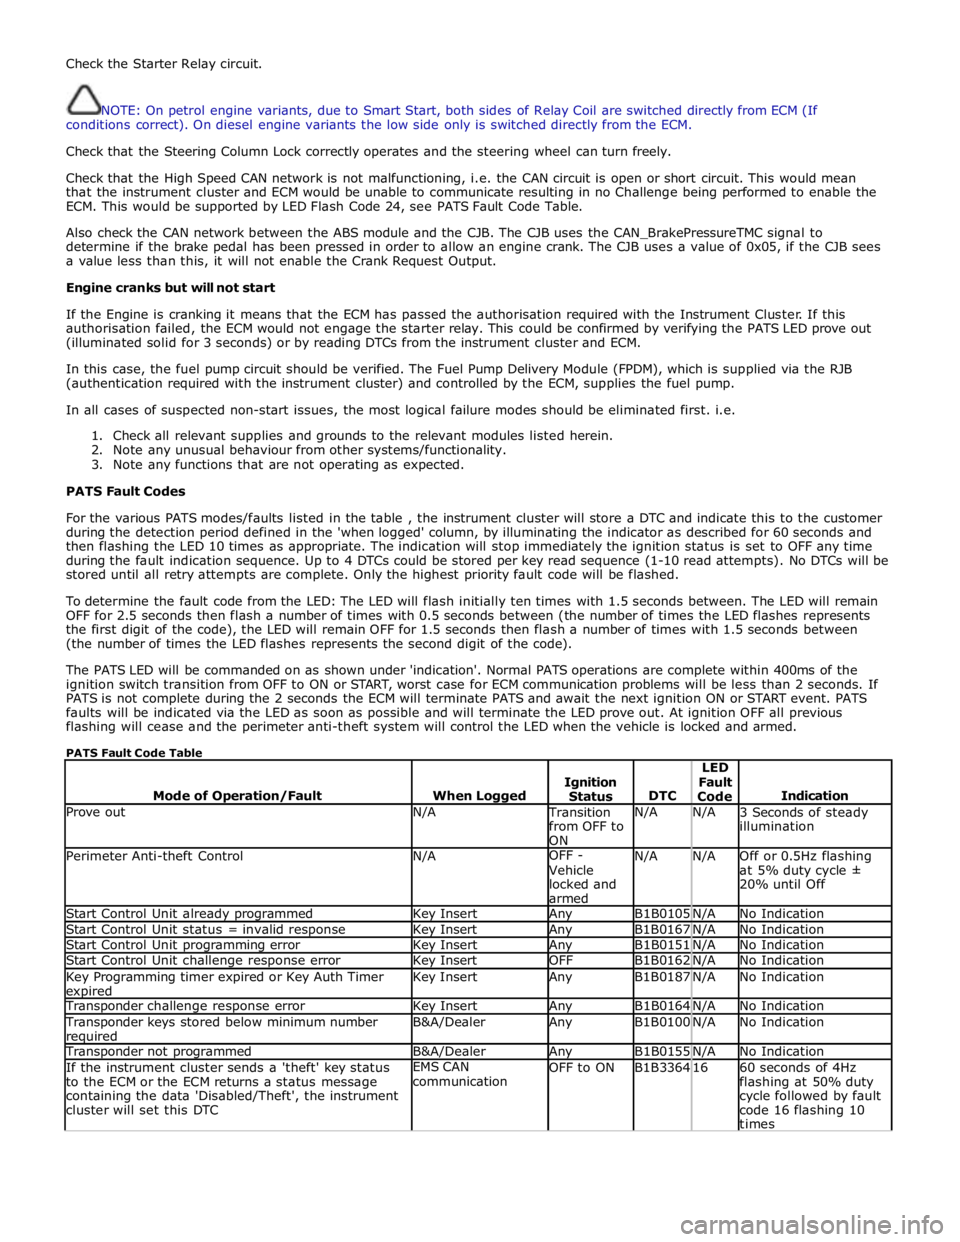
PATS Fault Code Table
Mode of Operation/Fault
When Logged
Ignition
Status
DTC LED
Fault
Code
Indication Prove out N/A Transition
from OFF to
ON N/A N/A
3 Seconds of steady
illumination Perimeter Anti-theft Control N/A OFF -
Vehicle
locked and
armed N/A N/A
Off or 0.5Hz flashing
at 5% duty cycle ±
20% until Off Start Control Unit already programmed Key Insert Any B1B0105 N/A No Indication Start Control Unit status = invalid response Key Insert Any B1B0167 N/A No Indication Start Control Unit programming error Key Insert Any B1B0151 N/A No Indication Start Control Unit challenge response error Key Insert OFF B1B0162 N/A No Indication Key Programming timer expired or Key Auth Timer expired Key Insert Any B1B0187 N/A No Indication Transponder challenge response error Key Insert Any B1B0164 N/A No Indication Transponder keys stored below minimum number required B&A/Dealer Any B1B0100 N/A No Indication Transponder not programmed B&A/Dealer Any B1B0155 N/A No Indication If the instrument cluster sends a 'theft' key status
to the ECM or the ECM returns a status message
containing the data 'Disabled/Theft', the instrument
cluster will set this DTC EMS CAN
communication OFF to ON B1B3364 16
60 seconds of 4Hz
flashing at 50% duty
cycle followed by fault
code 16 flashing 10
times
Page 2149 of 3039
Navigation System - Navigation System
Diagnosis and Testing
Inspection and Verification Published: 15-Jul-2014
CAUTION: Diagnosis by substitution from a donor vehicle is NOT acceptable. Substitution of control modules does not
guarantee confirmation of a fault, and may also cause additional faults in the vehicle being tested and/or the donor vehicle.
NOTES:
If a control module or a component is suspect and the vehicle remains under manufacturer warranty, refer to the Warranty
Policy and Procedures manual, or determine if any prior approval programme is in operation, prior to the installation of a new
module/component.
When performing voltage or resistance tests, always use a digital multimeter accurate to three decimal places, and with
an up-to-date calibration certificate. When testing resistance always take the resistance of the digital multimeter leads into
account.
Check and rectify basic faults before beginning diagnostic routines involving pinpoint tests.
1. Verify the customer concern.
2. Visually inspect for obvious signs of damage, water ingress and system integrity.
Visual Inspection
Mechanical Electrical
Navigation system DVD player Mechanism
Navigation system display
Navigation system module
GPS antenna
Wiring harness for damage and corrosion
ABS Module
Electrical connector(s)
Audio unit
3. If an obvious cause for an observed or reported concern is found, correct the cause (if possible) before proceeding to
the next step.
4. If the cause is not visually evident, check for Diagnostic Trouble Codes (DTCs) and refer to the DTC Index.
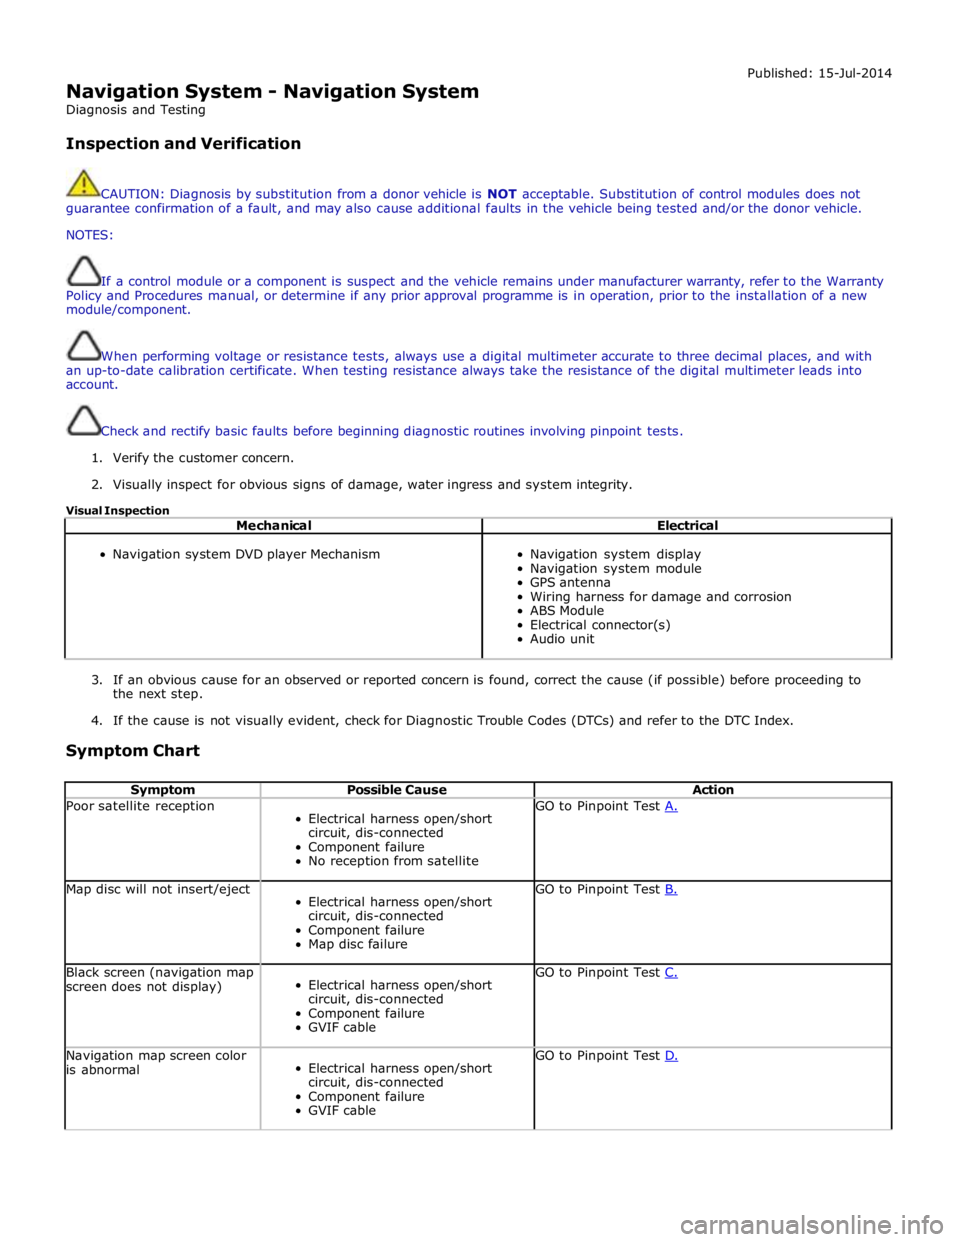
Symptom Chart
Symptom Possible Cause Action Poor satellite reception
Electrical harness open/short
circuit, dis-connected
Component failure
No reception from satellite GO to Pinpoint Test A. Map disc will not insert/eject
Electrical harness open/short
circuit, dis-connected
Component failure
Map disc failure GO to Pinpoint Test B. Black screen (navigation map
screen does not display)
Electrical harness open/short
circuit, dis-connected
Component failure
GVIF cable GO to Pinpoint Test C. Navigation map screen color
is abnormal
Electrical harness open/short
circuit, dis-connected
Component failure
GVIF cable GO to Pinpoint Test D.
Page 2150 of 3039
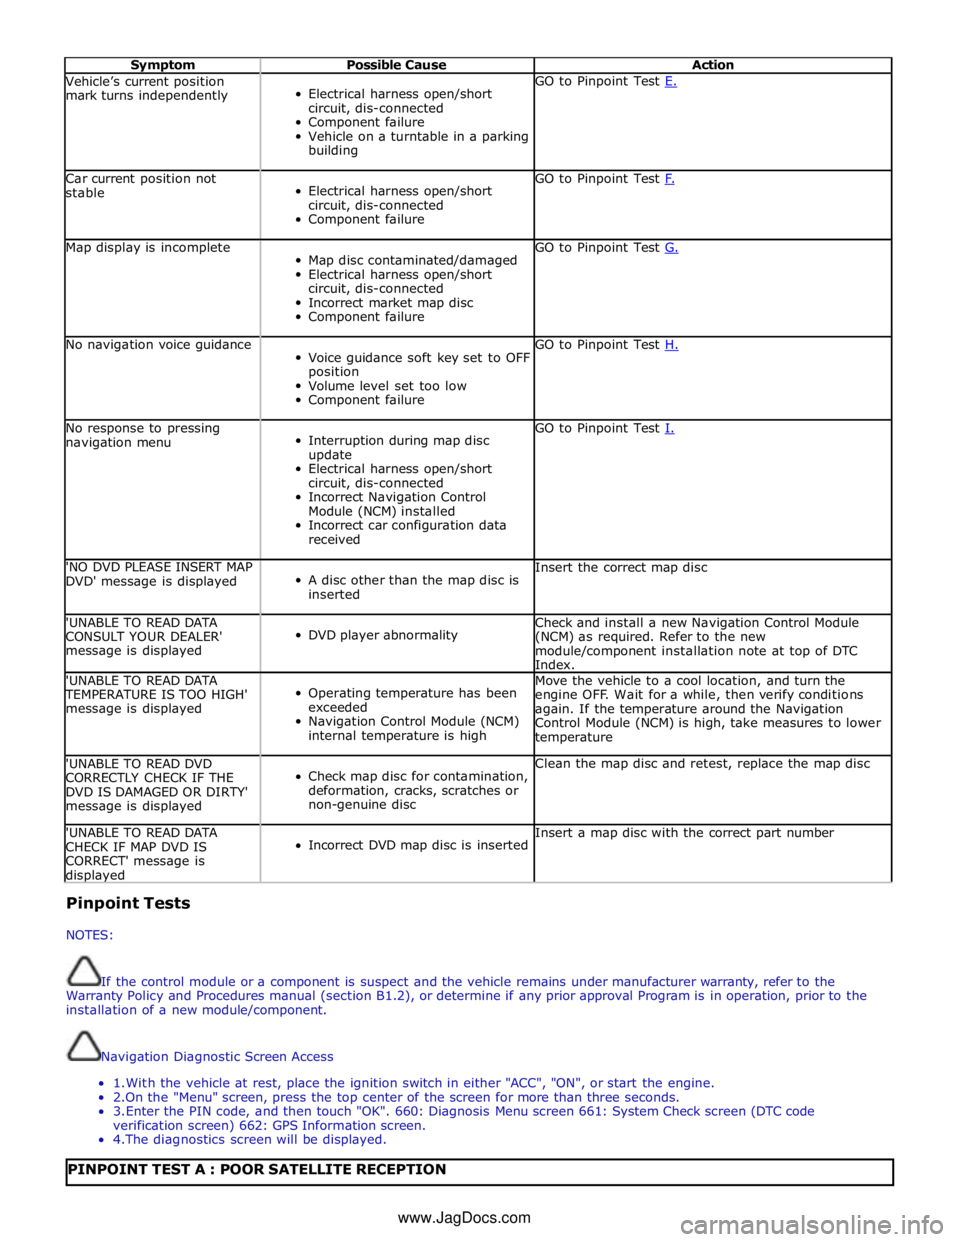
Symptom Possible Cause Action Vehicle’s current position
mark turns independently
Electrical harness open/short
circuit, dis-connected
Component failure
Vehicle on a turntable in a parking
building GO to Pinpoint Test E. Car current position not
stable
Electrical harness open/short
circuit, dis-connected
Component failure GO to Pinpoint Test F. Map display is incomplete
Map disc contaminated/damaged
Electrical harness open/short
circuit, dis-connected
Incorrect market map disc
Component failure GO to Pinpoint Test G. No navigation voice guidance
Voice guidance soft key set to OFF
position
Volume level set too low
Component failure GO to Pinpoint Test H. No response to pressing
navigation menu
Interruption during map disc
update
Electrical harness open/short
circuit, dis-connected
Incorrect Navigation Control
Module (NCM) installed
Incorrect car configuration data
received GO to Pinpoint Test I. 'NO DVD PLEASE INSERT MAP
DVD' message is displayed
A disc other than the map disc is
inserted Insert the correct map disc 'UNABLE TO READ DATA
CONSULT YOUR DEALER'
message is displayed
DVD player abnormality Check and install a new Navigation Control Module
(NCM) as required. Refer to the new
module/component installation note at top of DTC
Index. 'UNABLE TO READ DATA TEMPERATURE IS TOO HIGH'
message is displayed
Operating temperature has been
exceeded
Navigation Control Module (NCM)
internal temperature is high Move the vehicle to a cool location, and turn the
engine OFF. Wait for a while, then verify conditions
again. If the temperature around the Navigation
Control Module (NCM) is high, take measures to lower
temperature 'UNABLE TO READ DVD
CORRECTLY CHECK IF THE
DVD IS DAMAGED OR DIRTY'
message is displayed
Check map disc for contamination,
deformation, cracks, scratches or
non-genuine disc Clean the map disc and retest, replace the map disc 'UNABLE TO READ DATA
CHECK IF MAP DVD IS
CORRECT' message is displayed
Incorrect DVD map disc is inserted Insert a map disc with the correct part number Pinpoint Tests
NOTES:
If the control module or a component is suspect and the vehicle remains under manufacturer warranty, refer to the
Warranty Policy and Procedures manual (section B1.2), or determine if any prior approval Program is in operation, prior to the
installation of a new module/component.
Navigation Diagnostic Screen Access
1. With the vehicle at rest, place the ignition switch in either "ACC", "ON", or start the engine.
2.On the "Menu" screen, press the top center of the screen for more than three seconds.
3. Enter the PIN code, and then touch "OK". 660: Diagnosis Menu screen 661: System Check screen (DTC code
verification screen) 662: GPS Information screen.
4. The diagnostics screen will be displayed.
PINPOINT TEST A : POOR SATELLITE RECEPTION www.JagDocs.com
Page 2151 of 3039
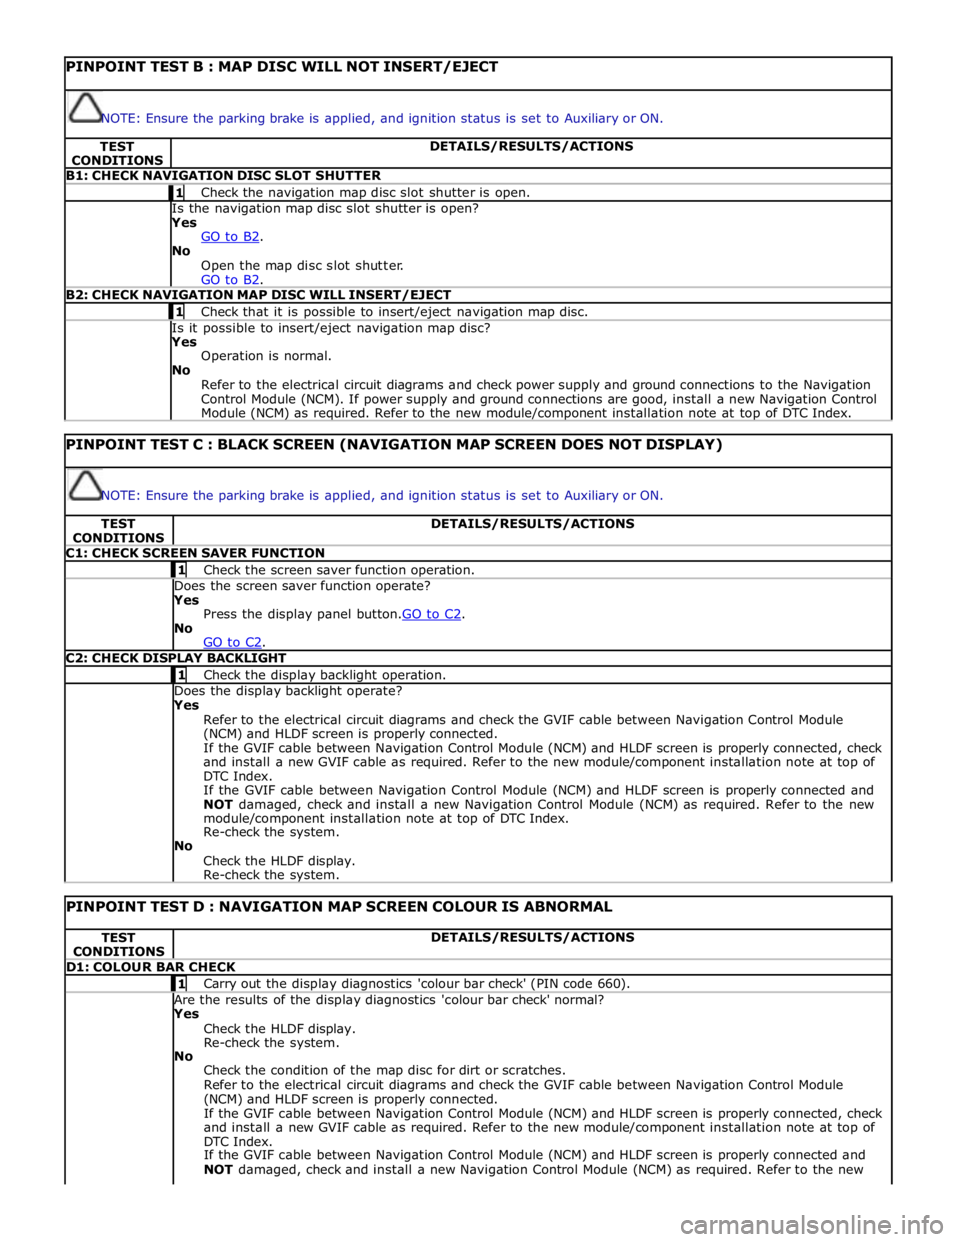
PINPOINT TEST B : MAP DISC WILL NOT INSERT/EJECT
NOTE: Ensure the parking brake is applied, and ignition status is set to Auxiliary or ON. TEST
CONDITIONS DETAILS/RESULTS/ACTIONS B1: CHECK NAVIGATION DISC SLOT SHUTTER 1 Check the navigation map disc slot shutter is open. Is the navigation map disc slot shutter is open? Yes
GO to B2. No
Open the map disc slot shutter.
GO to B2. B2: CHECK NAVIGATION MAP DISC WILL INSERT/EJECT 1 Check that it is possible to insert/eject navigation map disc. Is it possible to insert/eject navigation map disc? Yes
Operation is normal.
No
Refer to the electrical circuit diagrams and check power supply and ground connections to the Navigation
Control Module (NCM). If power supply and ground connections are good, install a new Navigation Control
Module (NCM) as required. Refer to the new module/component installation note at top of DTC Index.
PINPOINT TEST C : BLACK SCREEN (NAVIGATION MAP SCREEN DOES NOT DISPLAY)
NOTE: Ensure the parking brake is applied, and ignition status is set to Auxiliary or ON. TEST
CONDITIONS DETAILS/RESULTS/ACTIONS C1: CHECK SCREEN SAVER FUNCTION 1 Check the screen saver function operation. Does the screen saver function operate? Yes
Press the display panel button.GO to C2. No
GO to C2. C2: CHECK DISPLAY BACKLIGHT 1 Check the display backlight operation. Does the display backlight operate? Yes
Refer to the electrical circuit diagrams and check the GVIF cable between Navigation Control Module
(NCM) and HLDF screen is properly connected.
If the GVIF cable between Navigation Control Module (NCM) and HLDF screen is properly connected, check
and install a new GVIF cable as required. Refer to the new module/component installation note at top of
DTC Index.
If the GVIF cable between Navigation Control Module (NCM) and HLDF screen is properly connected and
NOT damaged, check and install a new Navigation Control Module (NCM) as required. Refer to the new
module/component installation note at top of DTC Index.
Re-check the system.
No
Check the HLDF display.
Re-check the system.
PINPOINT TEST D : NAVIGATION MAP SCREEN COLOUR IS ABNORMAL TEST
CONDITIONS DETAILS/RESULTS/ACTIONS D1: COLOUR BAR CHECK 1 Carry out the display diagnostics 'colour bar check' (PIN code 660). Are the results of the display diagnostics 'colour bar check' normal? Yes
Check the HLDF display.
Re-check the system.
No
Check the condition of the map disc for dirt or scratches.
Refer to the electrical circuit diagrams and check the GVIF cable between Navigation Control Module
(NCM) and HLDF screen is properly connected.
If the GVIF cable between Navigation Control Module (NCM) and HLDF screen is properly connected, check
and install a new GVIF cable as required. Refer to the new module/component installation note at top of
DTC Index.
If the GVIF cable between Navigation Control Module (NCM) and HLDF screen is properly connected and
NOT damaged, check and install a new Navigation Control Module (NCM) as required. Refer to the new
Page 2152 of 3039
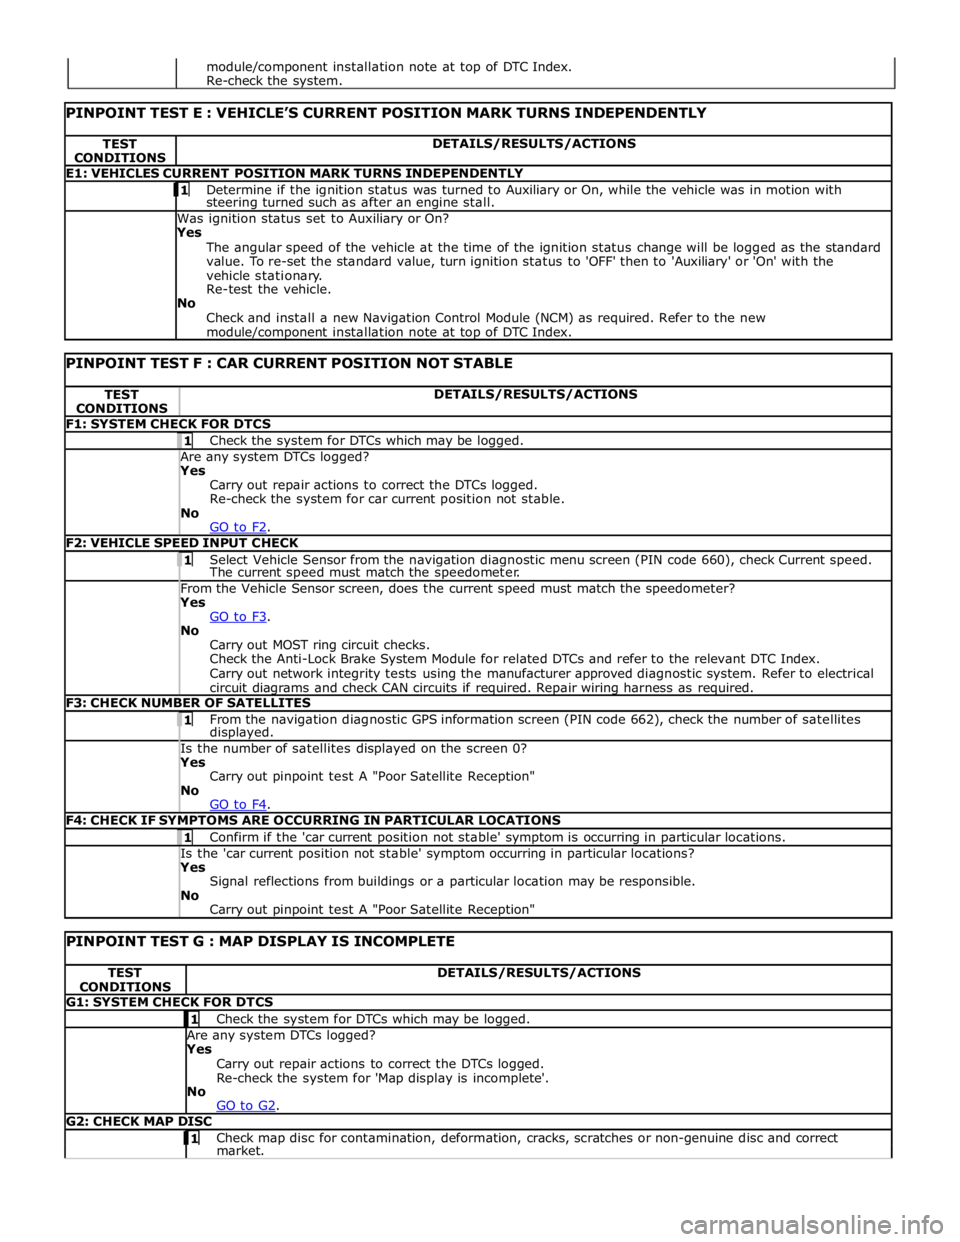
TEST
CONDITIONS DETAILS/RESULTS/ACTIONS E1: VEHICLES CURRENT POSITION MARK TURNS INDEPENDENTLY 1 Determine if the ignition status was turned to Auxiliary or On, while the vehicle was in motion with steering turned such as after an engine stall. Was ignition status set to Auxiliary or On?
Yes
The angular speed of the vehicle at the time of the ignition status change will be logged as the standard
value. To re-set the standard value, turn ignition status to 'OFF' then to 'Auxiliary' or 'On' with the
vehicle stationary.
Re-test the vehicle.
No
Check and install a new Navigation Control Module (NCM) as required. Refer to the new module/component installation note at top of DTC Index.
PINPOINT TEST F : CAR CURRENT POSITION NOT STABLE TEST
CONDITIONS DETAILS/RESULTS/ACTIONS F1: SYSTEM CHECK FOR DTCS 1 Check the system for DTCs which may be logged. Are any system DTCs logged? Yes
Carry out repair actions to correct the DTCs logged.
Re-check the system for car current position not stable.
No
GO to F2. F2: VEHICLE SPEED INPUT CHECK 1 Select Vehicle Sensor from the navigation diagnostic menu screen (PIN code 660), check Current speed. The current speed must match the speedometer. From the Vehicle Sensor screen, does the current speed must match the speedometer? Yes
GO to F3. No
Carry out MOST ring circuit checks.
Check the Anti-Lock Brake System Module for related DTCs and refer to the relevant DTC Index.
Carry out network integrity tests using the manufacturer approved diagnostic system. Refer to electrical
circuit diagrams and check CAN circuits if required. Repair wiring harness as required. F3: CHECK NUMBER OF SATELLITES 1 From the navigation diagnostic GPS information screen (PIN code 662), check the number of satellites displayed. Is the number of satellites displayed on the screen 0? Yes
Carry out pinpoint test A "Poor Satellite Reception"
No
GO to F4. F4: CHECK IF SYMPTOMS ARE OCCURRING IN PARTICULAR LOCATIONS 1 Confirm if the 'car current position not stable' symptom is occurring in particular locations. Is the 'car current position not stable' symptom occurring in particular locations? Yes
Signal reflections from buildings or a particular location may be responsible.
No
Carry out pinpoint test A "Poor Satellite Reception"
PINPOINT TEST G : MAP DISPLAY IS INCOMPLETE TEST
CONDITIONS DETAILS/RESULTS/ACTIONS G1: SYSTEM CHECK FOR DTCS 1 Check the system for DTCs which may be logged. Are any system DTCs logged? Yes
Carry out repair actions to correct the DTCs logged.
Re-check the system for 'Map display is incomplete'.
No
GO to G2. G2: CHECK MAP DISC 1 Check map disc for contamination, deformation, cracks, scratches or non-genuine disc and correct market. module/component installation note at top of DTC Index.
Re-check the system.
Page 2153 of 3039
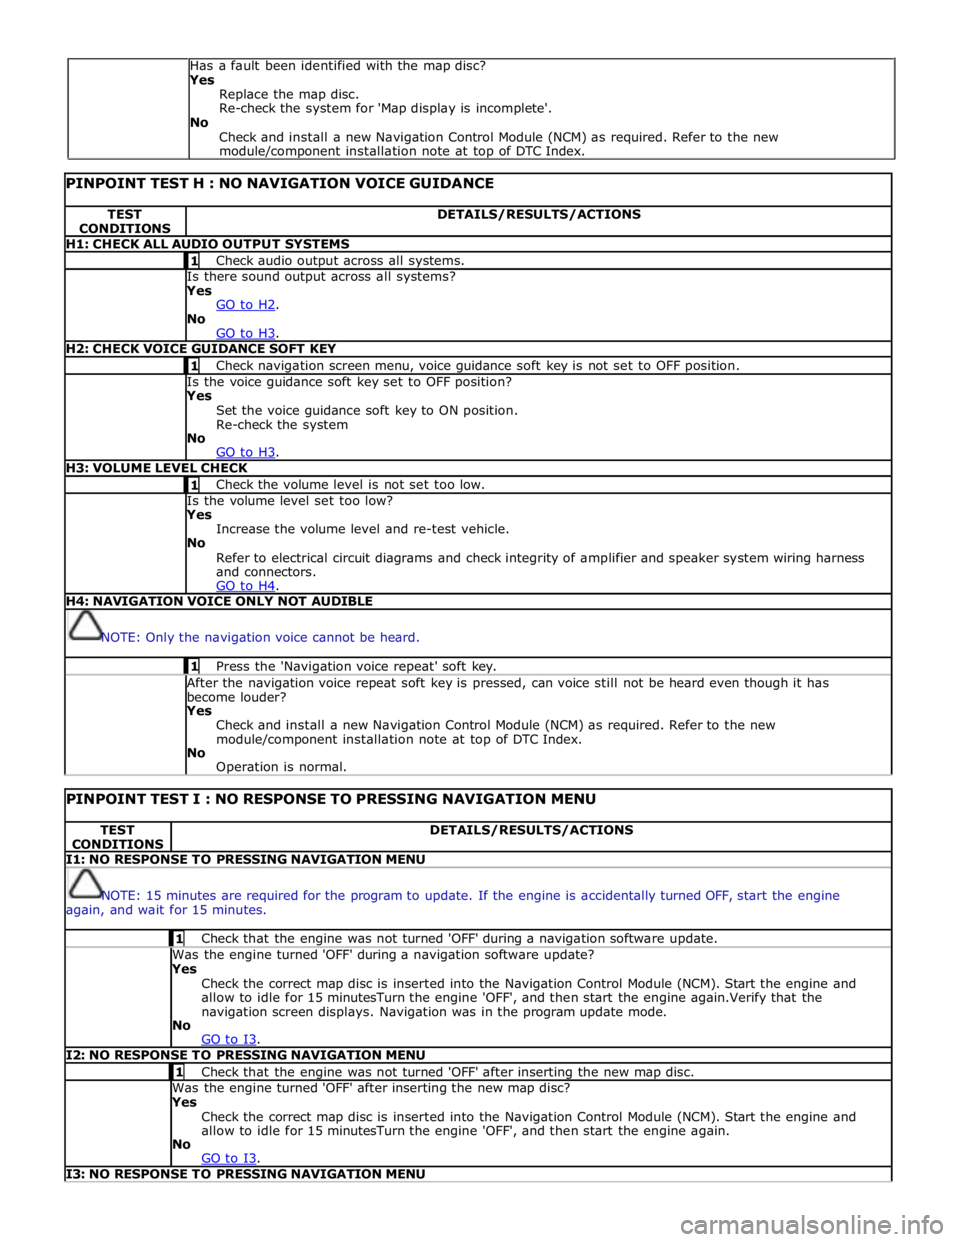
PINPOINT TEST H : NO NAVIGATION VOICE GUIDANCE TEST
CONDITIONS DETAILS/RESULTS/ACTIONS H1: CHECK ALL AUDIO OUTPUT SYSTEMS 1 Check audio output across all systems. Is there sound output across all systems? Yes
GO to H2. No
GO to H3. H2: CHECK VOICE GUIDANCE SOFT KEY 1 Check navigation screen menu, voice guidance soft key is not set to OFF position. Is the voice guidance soft key set to OFF position? Yes
Set the voice guidance soft key to ON position.
Re-check the system
No
GO to H3. H3: VOLUME LEVEL CHECK 1 Check the volume level is not set too low. Is the volume level set too low? Yes
Increase the volume level and re-test vehicle.
No
Refer to electrical circuit diagrams and check integrity of amplifier and speaker system wiring harness
and connectors.
GO to H4. H4: NAVIGATION VOICE ONLY NOT AUDIBLE
NOTE: Only the navigation voice cannot be heard. 1 Press the 'Navigation voice repeat' soft key. After the navigation voice repeat soft key is pressed, can voice still not be heard even though it has
become louder? Yes
Check and install a new Navigation Control Module (NCM) as required. Refer to the new
module/component installation note at top of DTC Index.
No
Operation is normal.
PINPOINT TEST I : NO RESPONSE TO PRESSING NAVIGATION MENU TEST
CONDITIONS DETAILS/RESULTS/ACTIONS I1: NO RESPONSE TO PRESSING NAVIGATION MENU
NOTE: 15 minutes are required for the program to update. If the engine is accidentally turned OFF, start the engine
again, and wait for 15 minutes. 1 Check that the engine was not turned 'OFF' during a navigation software update. Was the engine turned 'OFF' during a navigation software update? Yes
Check the correct map disc is inserted into the Navigation Control Module (NCM). Start the engine and
allow to idle for 15 minutesTurn the engine 'OFF', and then start the engine again.Verify that the
navigation screen displays. Navigation was in the program update mode.
No
GO to I3. I2: NO RESPONSE TO PRESSING NAVIGATION MENU 1 Check that the engine was not turned 'OFF' after inserting the new map disc. Was the engine turned 'OFF' after inserting the new map disc? Yes
Check the correct map disc is inserted into the Navigation Control Module (NCM). Start the engine and
allow to idle for 15 minutesTurn the engine 'OFF', and then start the engine again.
No
GO to I3. I3: NO RESPONSE TO PRESSING NAVIGATION MENU Has a fault been identified with the map disc?
Yes
Replace the map disc.
Re-check the system for 'Map display is incomplete'.
No
Check and install a new Navigation Control Module (NCM) as required. Refer to the new
module/component installation note at top of DTC Index.
Page 2154 of 3039

Check the "Loading" button on the navigation diagnostics screen (PIN code 660) has been pressed, and "YES" has been selected. Has the "Loading" button on the navigation diagnostics screen been pressed, and has "YES" been selected? Yes
Check the correct map disc is inserted into the Navigation Control Module (NCM). Start the engine and
allow to idle for 15 minutesTurn the engine 'OFF', and then start the engine again.
No
Refer to electrical circuit diagrams and check integrity of navigation system wiring harness and
connectors.
GO to I4. I4: SYSTEM CHECK FOR DTCS 1 Check the system for DTCs which may be logged. Is DTC U300055 logged? Yes
Using the manufacturer approved diagnostic system check/amend the Car Configuration File parameter in
block 2, byte 127 to match vehicle market/specification. If the DTC remains check navigation system
module part number and ensure the correct component is installed to vehicle market/specification.
No
GO to I5. I5: NO RESPONSE TO PRESSING NAVIGATION MENU 1 Turn the engine 'OFF', wait for a moment, and then turn the engine 'ON' again. Does the navigation screen fail to display even if the navigation button is pressed? Yes
Check the HLDF is installed correctly.
Check the Navigation Control Module (NCM) is installed correctly.
No
Operation is normal. DTC Index
For a list of Diagnostic Trouble Codes (DTCs) that could be logged on this vehicle, please refer to Section 100-00.
REFER to: Diagnostic Trouble Code (DTC) Index - DTC: Navigation Control Module (NCM) (100-00, Description and Operation).
Page 2163 of 3039

9 RJB (rear junction box) 10 Battery monitoring system module 11 Rear view camera 12 Driver's side rear door module 13 Driver's door module 14 Driver's seat switches 15 Driver's seat module 16 Start control module 17 Clockspring 18 Battery backed sounder 19 TCM (transmission control module) 20 Generator 21 CJB (central junction box) 22 ECM (engine control module)