Page 1613 of 3039
Torque: Bolt: 9 Nm
1. To install, reverse the removal procedure.
Page 1628 of 3039
15.
16. NOTE: Tighten the bolts in the indicated sequence.
Torque: 48 Nm
Page 1629 of 3039
17.
18. Torque: 12 Nm
NOTE: If equipped.
19. Refer to: Air Deflector (501-02 Front End Body Panels, Removal and Installation).
20. Refer to: Battery Disconnect and Connect (414-01 Battery, Mounting and Cables, General Procedures).
Page 1635 of 3039
Acceleration Control - Accelerator Pedal
Removal and Installation
Removal
NOTE: Removal steps in this procedure may contain installation details. Published: 11-May-2011
1. Refer to: Battery Disconnect and Connect (414-01 Battery, Mounting and Cables, General Procedures).
Installation
2.
3. Torque: 9 Nm
1. To install, reverse the removal procedure.
Page 1659 of 3039
Published: 11-May-2011
Speed Control - V8 5.0L Petrol/V8 S/C 5.0L Petrol - Speed Control Sensor
Removal and Installation
Removal
NOTE: Removal steps in this procedure may contain installation details.
1. Refer to: Battery Disconnect and Connect (414-01 Battery, Mounting and Cables, General Procedures).
2. Refer to: Speed Control Sensor Adjustment (310-03C Speed Control - V8 5.0L Petrol/V8 S/C 5.0L Petrol, General Procedures).
3. CAUTION: Protect the surrounding paintwork to avoid
damage.
4. Torque: 5 Nm
Page 1661 of 3039
Published: 11-May-2011
Speed Control - V8 5.0L Petrol/V8 S/C 5.0L Petrol - Speed Control Switch
Removal and Installation
Removal
NOTE: Removal steps in this procedure may contain installation details.
1. Make the SRS system safe.
Refer to: Standard Workshop Practices (100-00 General Information, Description and Operation).
2. Refer to: Driver Air Bag Module (501-20B Supplemental Restraint System, Removal and Installation).
3. Refer to: Upshift Paddle Switch (307-05A Automatic Transmission/Transaxle External Controls - V6 3.0L Petrol, Removal and
Installation).
4. Refer to: Downshift Paddle Switch (307-05A Automatic Transmission/Transaxle External Controls - V6 3.0L Petrol, Removal and
Installation).
5. Torque: 3 Nm 6. Torque: 3 Nm
Page 1663 of 3039

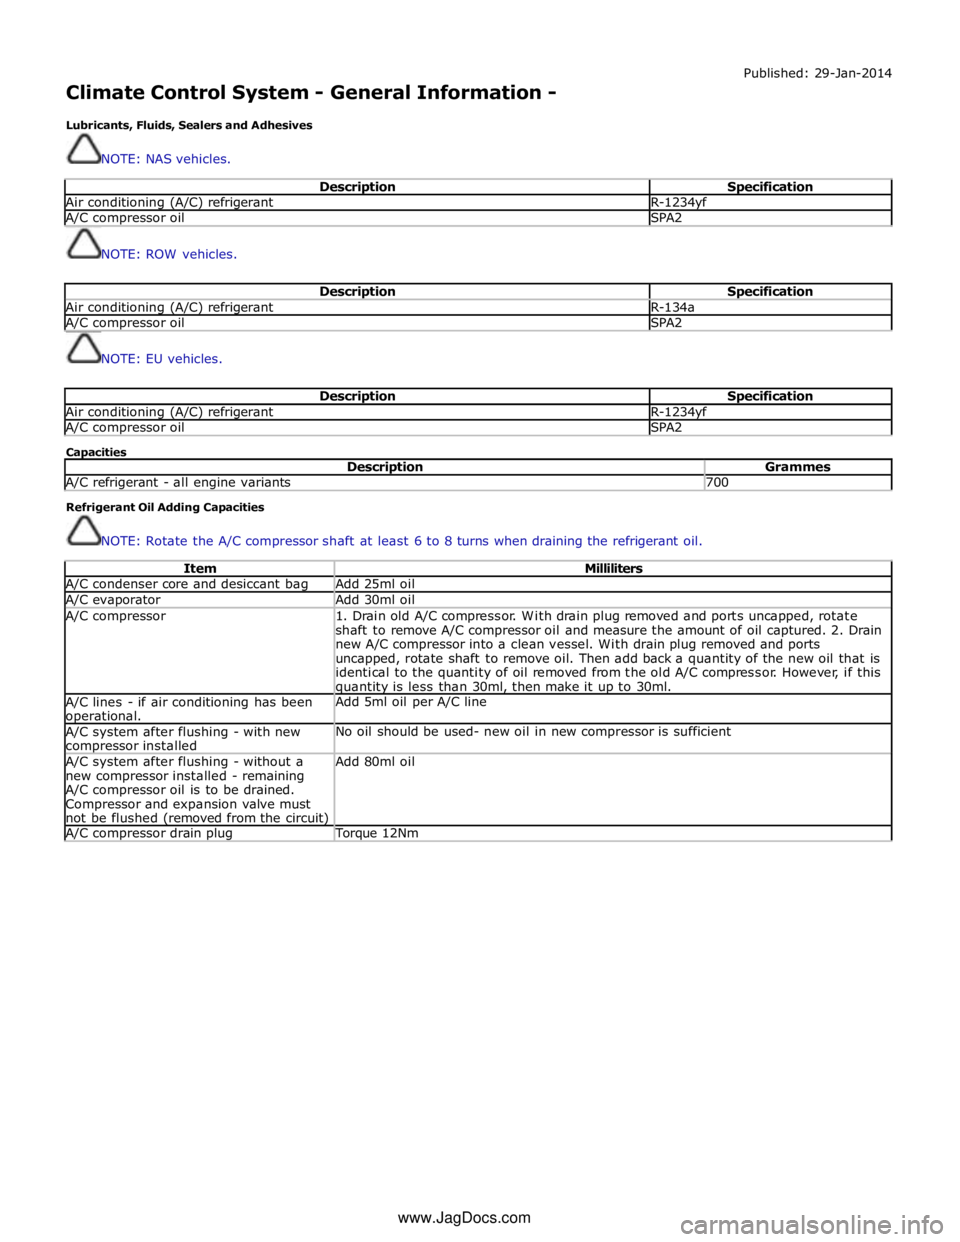
Climate Control System - General Information -
Lubricants, Fluids, Sealers and Adhesives
NOTE: NAS vehicles. Published: 29-Jan-2014
Description Specification Air conditioning (A/C) refrigerant R-1234yf A/C compressor oil SPA2
NOTE: ROW vehicles.
Description Specification Air conditioning (A/C) refrigerant R-134a A/C compressor oil SPA2
NOTE: EU vehicles.
Description Specification Air conditioning (A/C) refrigerant R-1234yf A/C compressor oil SPA2 Capacities
Description Grammes A/C refrigerant - all engine variants 700 Refrigerant Oil Adding Capacities
NOTE: Rotate the A/C compressor shaft at least 6 to 8 turns when draining the refrigerant oil.
Item Milliliters A/C condenser core and desiccant bag Add 25ml oil A/C evaporator Add 30ml oil A/C compressor
1. Drain old A/C compressor. With drain plug removed and ports uncapped, rotate
shaft to remove A/C compressor oil and measure the amount of oil captured. 2. Drain
new A/C compressor into a clean vessel. With drain plug removed and ports
uncapped, rotate shaft to remove oil. Then add back a quantity of the new oil that is
identical to the quantity of oil removed from the old A/C compressor. However, if this quantity is less than 30ml, then make it up to 30ml. A/C lines - if air conditioning has been operational. Add 5ml oil per A/C line A/C system after flushing - with new compressor installed No oil should be used- new oil in new compressor is sufficient A/C system after flushing - without a
new compressor installed - remaining
A/C compressor oil is to be drained.
Compressor and expansion valve must
not be flushed (removed from the circuit) Add 80ml oil A/C compressor drain plug Torque 12Nm www.JagDocs.com
Page 1678 of 3039

Published: 11-May-2011
Climate Control System - General Information - Refrigerant Oil Adding TDV6 3.0L Diesel /V8 5.0L Petrol/V8 S/C 5.0L Petrol
General Procedures
CAUTIONS:
Collect the refrigerant oil in a clean measuring cylinder. Check
Make sure that all openings are sealed. Use new blanking caps.
Be prepared to collect escaping fluids.
NOTE: Removal steps in this procedure may contain installation details.
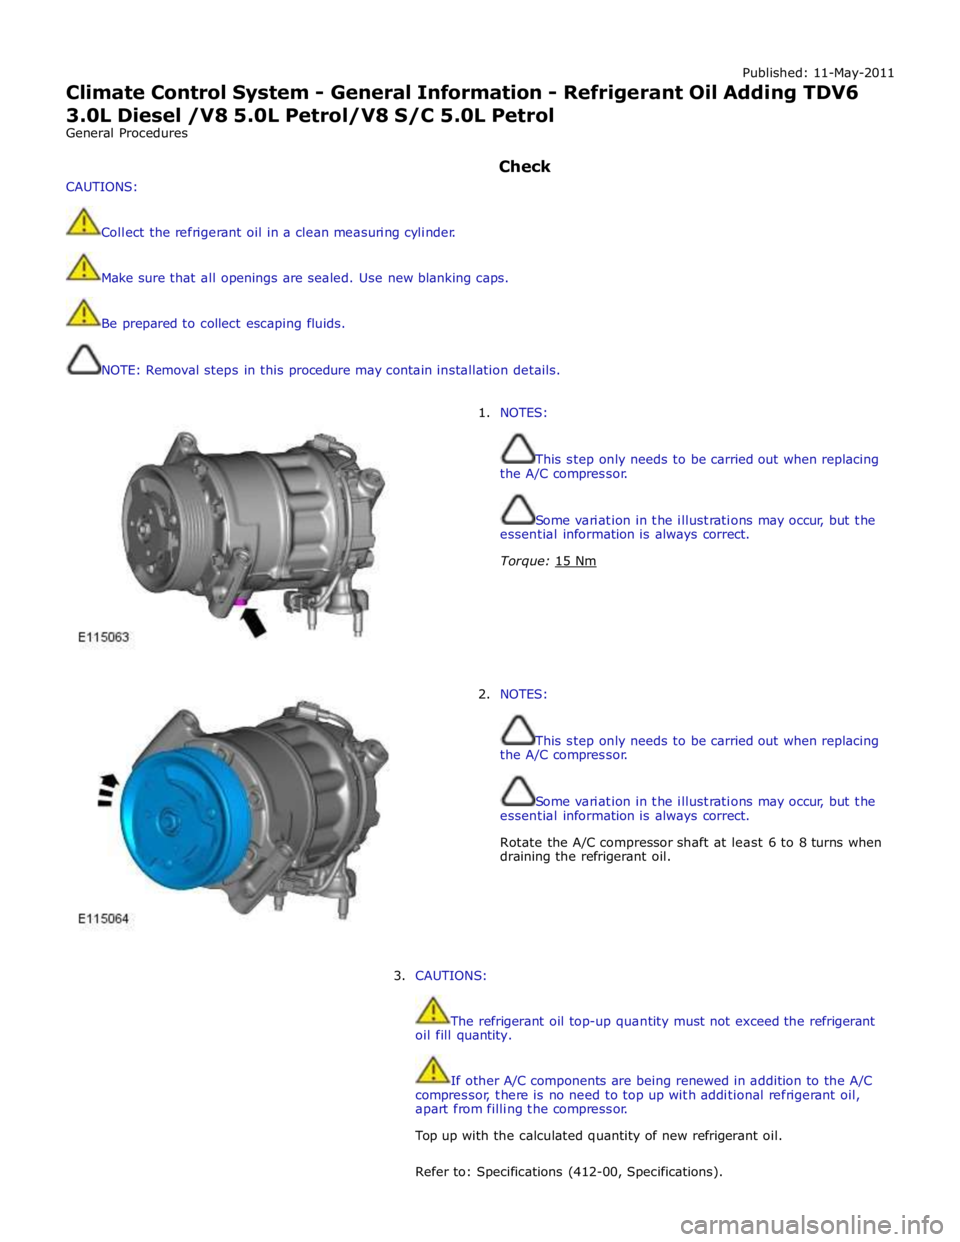
1. NOTES:
This step only needs to be carried out when replacing
the A/C compressor.
Some variation in the illustrations may occur, but the
essential information is always correct.
Torque: 15 Nm
2. NOTES:
This step only needs to be carried out when replacing
the A/C compressor.
Some variation in the illustrations may occur, but the
essential information is always correct.
Rotate the A/C compressor shaft at least 6 to 8 turns when
draining the refrigerant oil.
3. CAUTIONS:
The refrigerant oil top-up quantity must not exceed the refrigerant
oil fill quantity.
If other A/C components are being renewed in addition to the A/C
compressor, there is no need to top up with additional refrigerant oil,
apart from filling the compressor.
Top up with the calculated quantity of new refrigerant oil.
Refer to: Specifications (412-00, Specifications).