2010 JAGUAR XFR srs
[x] Cancel search: srsPage 2360 of 3039
Seating - Front Seat Backrest
Removal and Installation Published: 11-May-2011
Removal
1. Make the air bag supplemental restraint system (SRS) safe.
For additional information, refer to: Standard Workshop Practices (100-00 General Information, Description and Operation).
2. Disconnect the battery ground cable.
For additional information, refer to: Battery Disconnect and Connect (414-01 Battery, Mounting and Cables, General Procedures).
3. Remove the front seat.
For additional information, refer to: Front Seat (501-10 Seating, Removal and Installation).
4. WARNING: This step requires the aid of another
technician.
CAUTION: Take extra care when handling the
component.
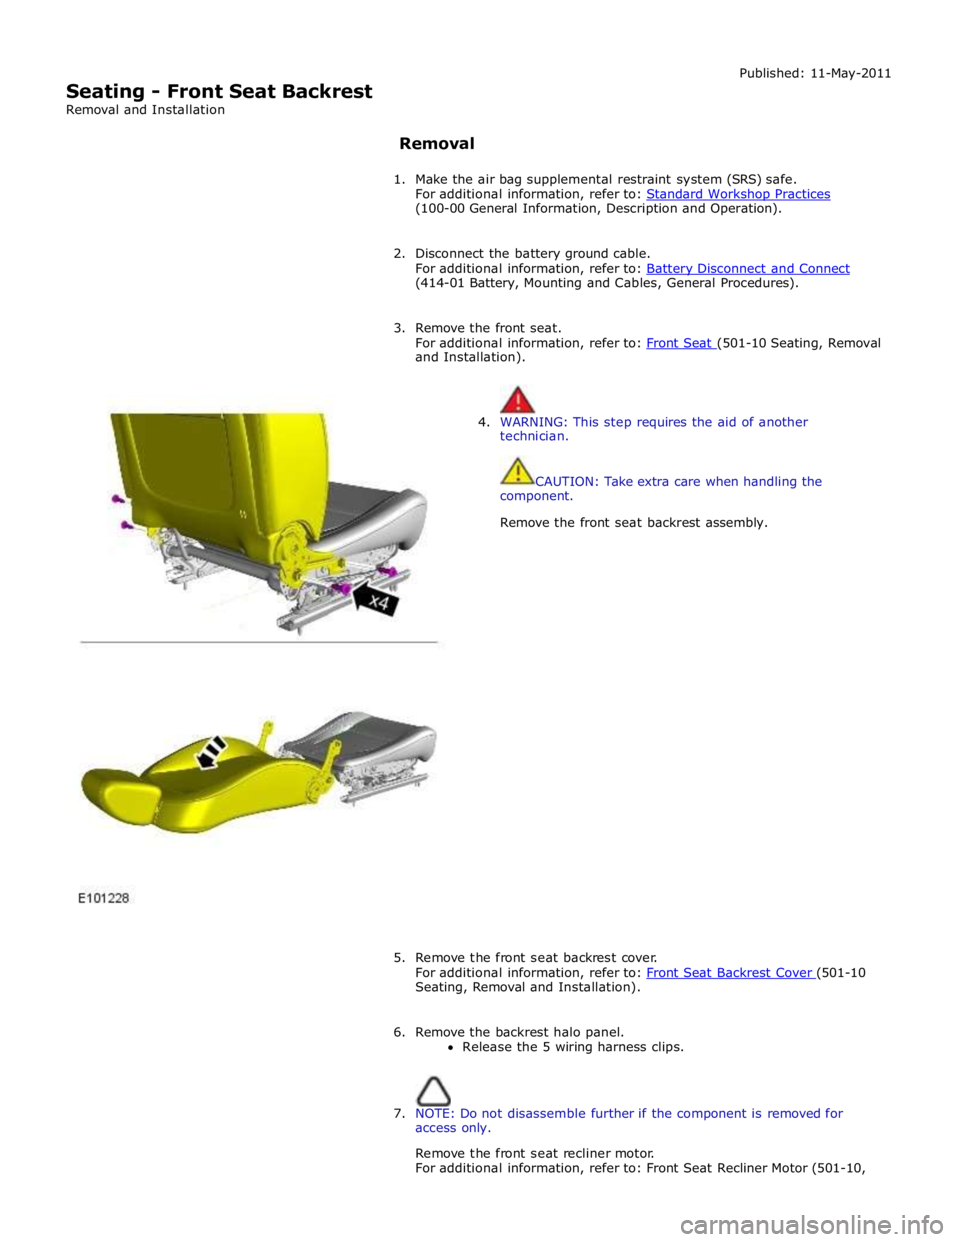
Remove the front seat backrest assembly.
5. Remove the front seat backrest cover.
For additional information, refer to: Front Seat Backrest Cover (501-10 Seating, Removal and Installation).
6. Remove the backrest halo panel.
Release the 5 wiring harness clips.
7. NOTE: Do not disassemble further if the component is removed for
access only.
Remove the front seat recliner motor.
For additional information, refer to: Front Seat Recliner Motor (501-10,
Page 2362 of 3039
Seating - Front Seat Backrest Cover
Removal and Installation
Removal Published: 11-May-2011
1. Make the air bag supplemental restraint system (SRS) safe.
For additional information, refer to: Standard Workshop Practices (100-00 General Information, Description and Operation).
2. Remove the front seat.
For additional information, refer to: Front Seat (501-10 Seating, Removal and Installation).
3. Remove the side air bag module.
For additional information, refer to: Side Air Bag Module (501-20B Supplemental Restraint System, Removal and Installation).
4. NOTE: If equipped.
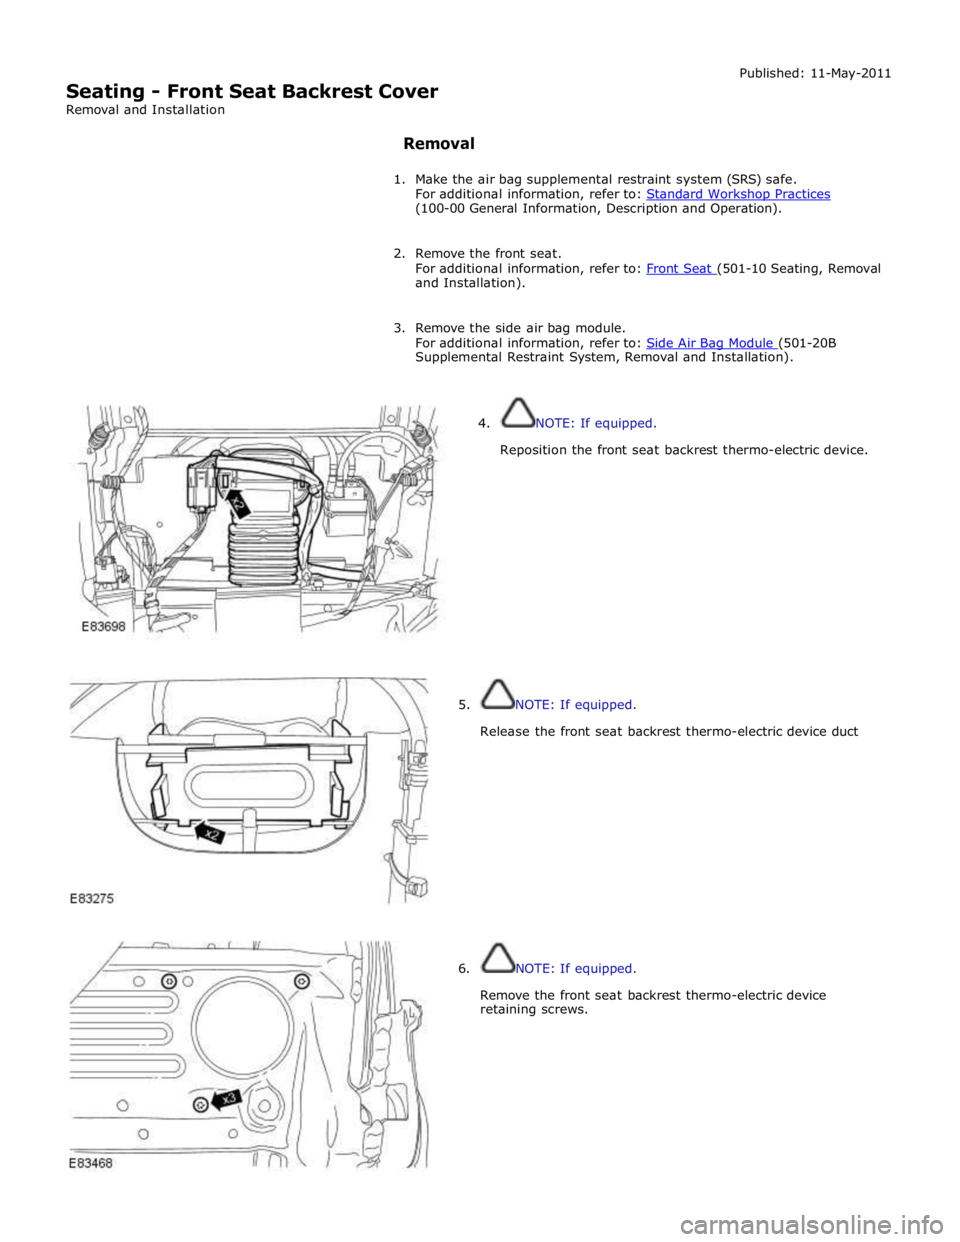
Reposition the front seat backrest thermo-electric device.
5. NOTE: If equipped.
Release the front seat backrest thermo-electric device duct
6. NOTE: If equipped.
Remove the front seat backrest thermo-electric device
retaining screws.
Page 2376 of 3039
Seating - Seat Base
Removal and Installation
Removal
WARNINGS: Published: 11-May-2011
To avoid accidental deployment, the restraints control module backup power supply must be depleted. Wait at least one
minute after disconnecting the battery ground cable(s) before commencing any repair or adjustment to the supplemental
restraint system (SRS), or any component(s) adjacent to the SRS sensors. Failure to follow these instructions may result in
personal injury.
Always wear safety glasses when working on an air bag equipped vehicle and when handling an air bag module. Failure to
follow this instruction may result in personal injury.
To minimize the possibility of premature deployment, do not use radio key code savers when working on the
supplemental restraint system. Failure to follow this instruction may result in personal injury.
To minimize the possibility of injury in the event of premature deployment, always carry a live air bag module with the
bag and trim cover pointed away from the body. Failure to follow this instruction may result in personal injury.
To minimize the possibility of premature deployment, live air bag modules must only be placed on work benches which
have been ground bonded and with the trim cover facing up. Failure to follow these instructions may result in personal injury.
Never probe the electrical connectors of air bag modules or any other supplemental restraint system component. Failure
to follow this instruction may result in personal injury.
Painting over the driver air bag module trim cover or instrument panel could lead to deterioration of the trim cover and air
bags. Do not for any reason attempt to paint discolored or damaged air bag module trim covers or instrument panel. Install a
new component. Failure to follow this instruction may result in personal injury.
NOTES:
Some variation in the illustrations may occur, but the essential information is always correct.
Removal steps in this procedure may contain installation details.
1. Make the air bag supplemental restraint system (SRS) safe.
Refer to: Standard Workshop Practices (100-00 General Information, Description and Operation).
2. Refer to: Front Seat (501-10 Seating, Removal and Installation).
3. Refer to: Front Safety Belt Buckle (501-20A Safety Belt System, Removal and Installation).
4. Refer to: Front Seat Cushion Cover (501-10 Seating, Removal and Installation).
Page 2385 of 3039
Seating - Front Seat Height Adjustment Motor
Removal and Installation
Removal
NOTE: Removal steps in this procedure may contain installation details. Published: 11-May-2011
1. Make the air bag supplemental restraint system (SRS) safe.
Refer to: Standard Workshop Practices (100-00 General Information, Description and Operation).
2. Disconnect the battery ground cable.
Refer to: Battery Disconnect and Connect (414-01 Battery, Mounting and Cables, General Procedures).
3. Remove the front seat.
Refer to: Front Seat (501-10 Seating, Removal and Installation).
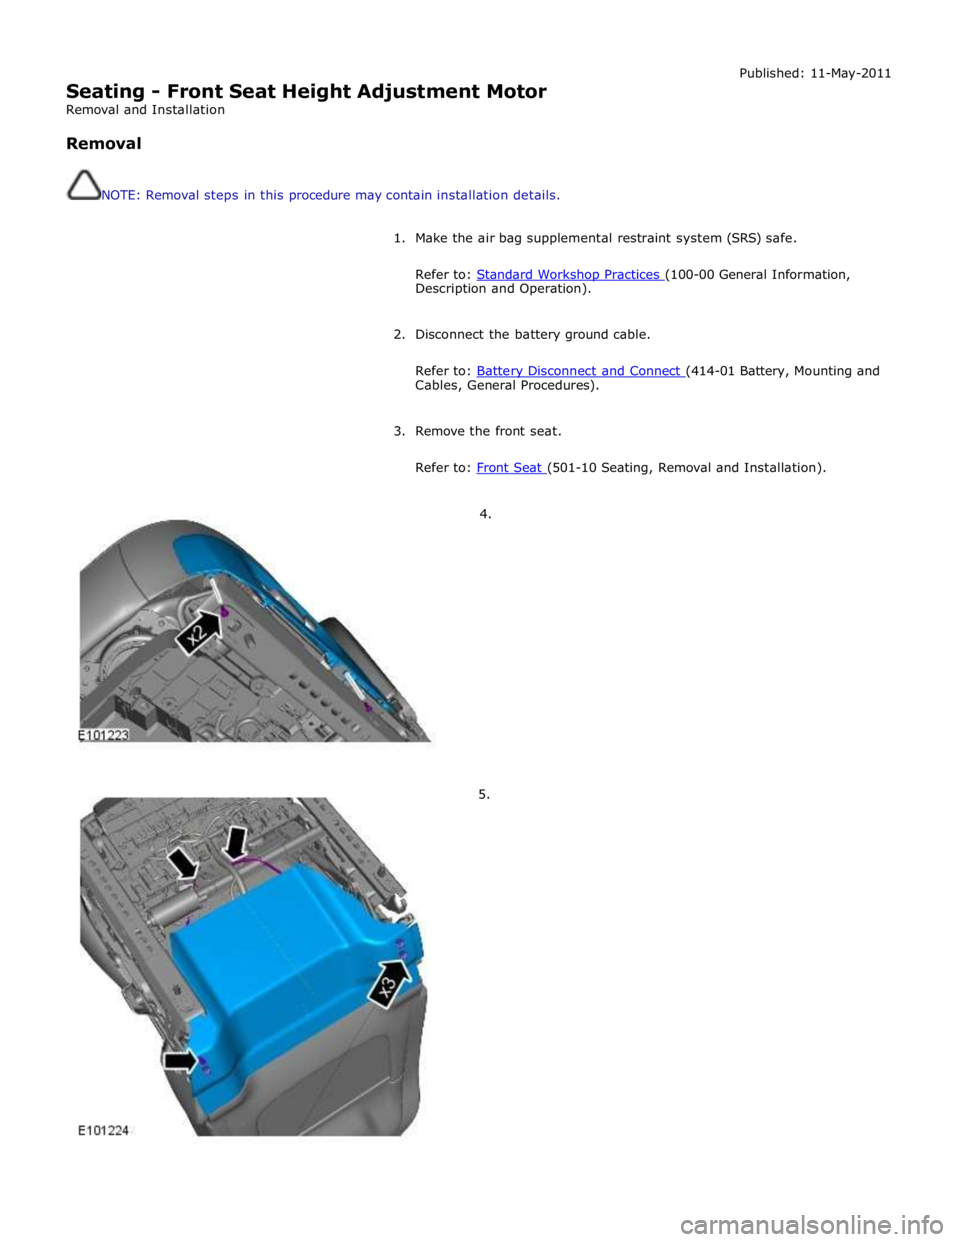
4.
5.
Page 2450 of 3039

Safety Belt System (501-20A Safety Belt System, Description and Operation), Air Bag and Safety Belt Pretensioner Supplemental Restraint System (SRS) (501-20B Supplemental Restraint System, Description and Operation),
Pedestrian Protection System (501-20C Pedestrian Protection System, Description and Operation).
Page 2593 of 3039

Safety Belt System - Safety Belt System - Overview
Description and Operation
Authoring Template
OVERVIEW Published: 11-May-2011
A three point safety belt is fitted to all seating positions. Each safety belt retractor incorporates an emergency locking feature.
The emergency locking retractor incorporates 2 mechanical inertia devices. One inertia device activates if the safety belt is
subjected to a sharp pull. The second inertia device activates if the vehicle is subject to a sudden deceleration or is on a
severe incline.
North American Specification (NAS) safety belt retractors also include an automatic locking feature. The Automatic Locking
Retractor (ALR) is fitted to all passenger seating positions and allows the safety belt to be tensioned to aid the safe fitment
of child or booster seats. For additional information, refer to the Owners Handbook.
NAS vehicles are also fitted with a belt tension sensor on the front passenger seat. The belt tension sensor is incorporated
into the seat belt lower anchorage and is attached to the seat frame by an M10 Torx head bolt. The belt tension sensor forms
part of the SRS (supplemental restraint system) occupancy detection and classification feature.
The center rear safety belt features a mini-buckle lower anchorage. The mini-buckle is disengaged by inserting a suitable tool
into the small aperture on the front face of the housing.
To aid the fitment of child seats, 3 tethers are located on the rear parcel shelf. Each tether is attached to the parcel shelf with
an M10 Torx head bolt.
A safety belt warning indicator is located in the instrument cluster to remind front seat passengers to fasten their safety belts.
The warning indicator will illuminate if the safety belt of an occupied front seat is not fastened.
Refer to: Instrument Cluster (413-01, Description and Operation).
Page 2595 of 3039
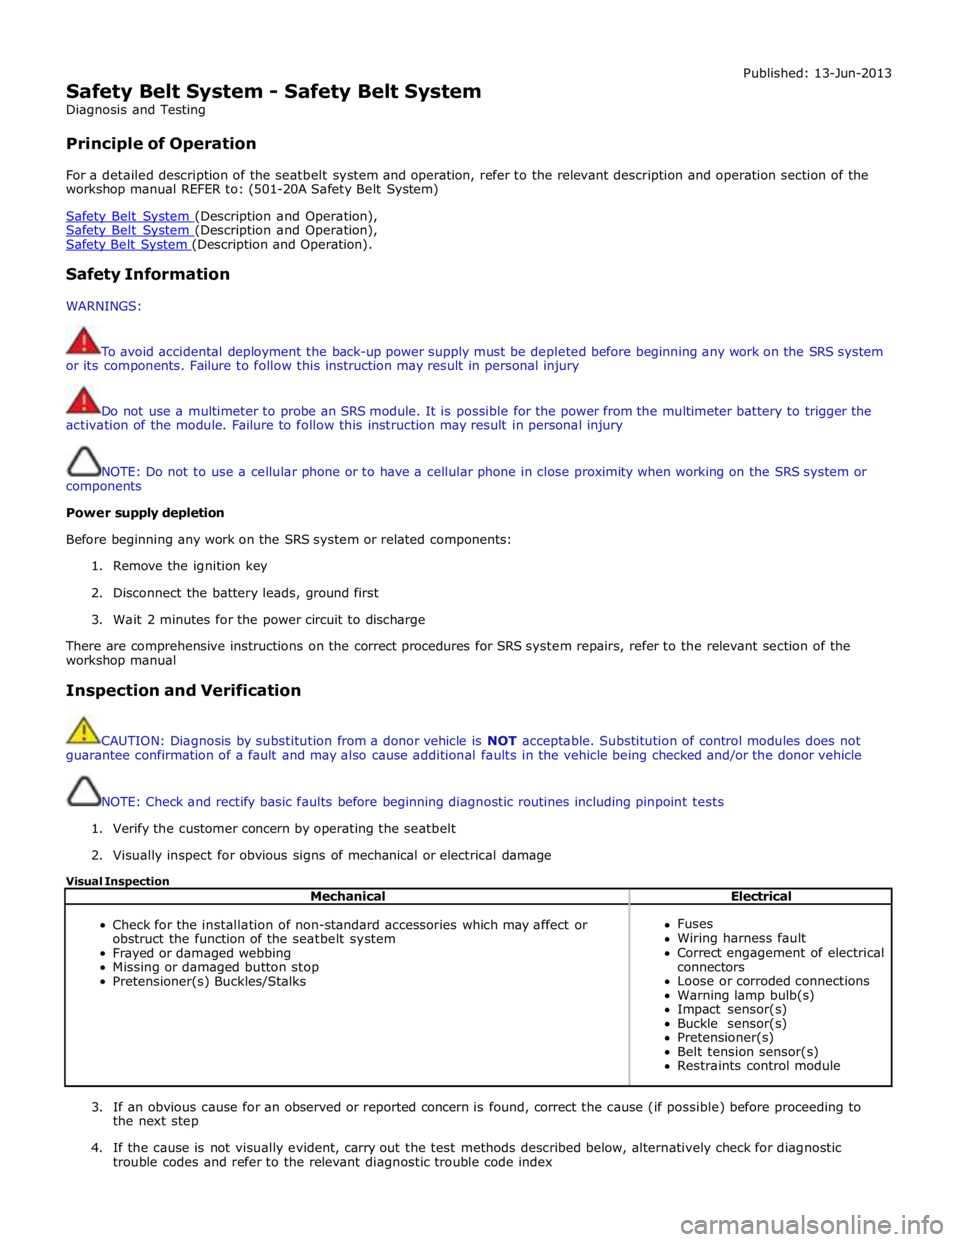
Safety Belt System - Safety Belt System
Diagnosis and Testing
Principle of Operation Published: 13-Jun-2013
For a detailed description of the seatbelt system and operation, refer to the relevant description and operation section of the
workshop manual REFER to: (501-20A Safety Belt System)
Safety Belt System (Description and Operation), Safety Belt System (Description and Operation), Safety Belt System (Description and Operation).
Safety Information
WARNINGS:
To avoid accidental deployment the back-up power supply must be depleted before beginning any work on the SRS system
or its components. Failure to follow this instruction may result in personal injury
Do not use a multimeter to probe an SRS module. It is possible for the power from the multimeter battery to trigger the
activation of the module. Failure to follow this instruction may result in personal injury
NOTE: Do not to use a cellular phone or to have a cellular phone in close proximity when working on the SRS system or
components
Power supply depletion
Before beginning any work on the SRS system or related components:
1. Remove the ignition key
2. Disconnect the battery leads, ground first
3. Wait 2 minutes for the power circuit to discharge
There are comprehensive instructions on the correct procedures for SRS system repairs, refer to the relevant section of the
workshop manual
Inspection and Verification
CAUTION: Diagnosis by substitution from a donor vehicle is NOT acceptable. Substitution of control modules does not
guarantee confirmation of a fault and may also cause additional faults in the vehicle being checked and/or the donor vehicle
NOTE: Check and rectify basic faults before beginning diagnostic routines including pinpoint tests
1. Verify the customer concern by operating the seatbelt
2. Visually inspect for obvious signs of mechanical or electrical damage
Visual Inspection
Mechanical Electrical
Check for the installation of non-standard accessories which may affect or
obstruct the function of the seatbelt system
Frayed or damaged webbing
Missing or damaged button stop
Pretensioner(s) Buckles/Stalks
Fuses
Wiring harness fault
Correct engagement of electrical
connectors
Loose or corroded connections
Warning lamp bulb(s)
Impact sensor(s)
Buckle sensor(s)
Pretensioner(s)
Belt tension sensor(s)
Restraints control module
3. If an obvious cause for an observed or reported concern is found, correct the cause (if possible) before proceeding to
the next step
4. If the cause is not visually evident, carry out the test methods described below, alternatively check for diagnostic
trouble codes and refer to the relevant diagnostic trouble code index
Page 2596 of 3039
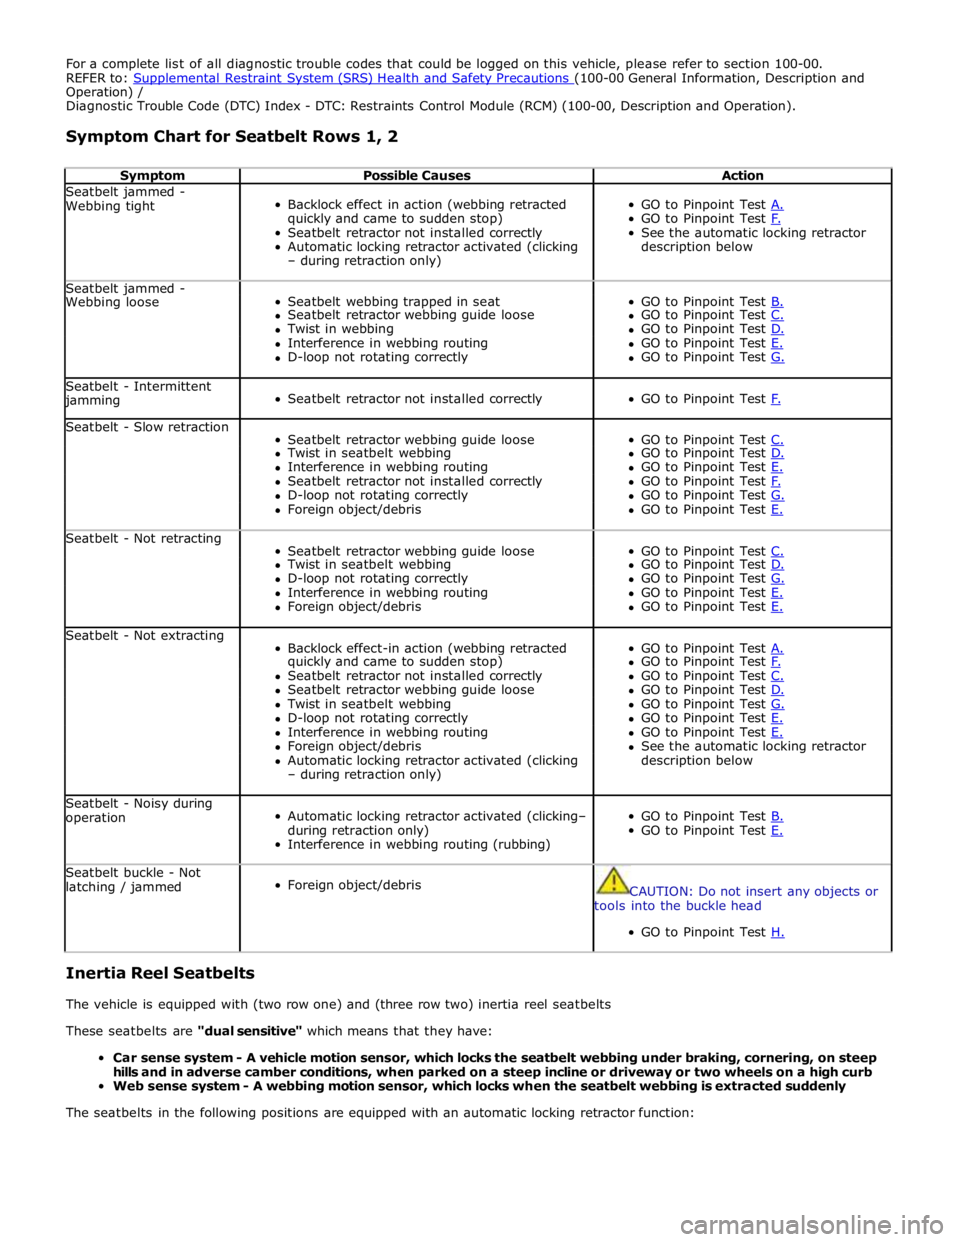
For a complete list of all diagnostic trouble codes that could be logged on this vehicle, please refer to section 100-00.
REFER to: Supplemental Restraint System (SRS) Health and Safety Precautions (100-00 General Information, Description and Operation) /
Diagnostic Trouble Code (DTC) Index - DTC: Restraints Control Module (RCM) (100-00, Description and Operation).
Symptom Chart for Seatbelt Rows 1, 2
Symptom Possible Causes Action Seatbelt jammed -
Webbing tight
Backlock effect in action (webbing retracted
quickly and came to sudden stop)
Seatbelt retractor not installed correctly
Automatic locking retractor activated (clicking
– during retraction only)
GO to Pinpoint Test A. GO to Pinpoint Test F. See the automatic locking retractor
description below Seatbelt jammed -
Seatbelt webbing trapped in seat
GO to Pinpoint Test B. Webbing loose Seatbelt retractor webbing guide loose GO to Pinpoint Test C. Twist in webbing GO to Pinpoint Test D. Interference in webbing routing GO to Pinpoint Test E. D-loop not rotating correctly GO to Pinpoint Test G. Seatbelt - Intermittent jamming
Seatbelt retractor not installed correctly
GO to Pinpoint Test F. Seatbelt - Slow retraction
Seatbelt retractor webbing guide loose
GO to Pinpoint Test C. Twist in seatbelt webbing GO to Pinpoint Test D. Interference in webbing routing GO to Pinpoint Test E. Seatbelt retractor not installed correctly GO to Pinpoint Test F. D-loop not rotating correctly GO to Pinpoint Test G. Foreign object/debris GO to Pinpoint Test E. Seatbelt - Not retracting
Seatbelt retractor webbing guide loose
GO to Pinpoint Test C. Twist in seatbelt webbing GO to Pinpoint Test D. D-loop not rotating correctly GO to Pinpoint Test G. Interference in webbing routing GO to Pinpoint Test E. Foreign object/debris GO to Pinpoint Test E. Seatbelt - Not extracting
Backlock effect-in action (webbing retracted
GO to Pinpoint Test A. quickly and came to sudden stop) GO to Pinpoint Test F. Seatbelt retractor not installed correctly GO to Pinpoint Test C. Seatbelt retractor webbing guide loose GO to Pinpoint Test D. Twist in seatbelt webbing GO to Pinpoint Test G. D-loop not rotating correctly GO to Pinpoint Test E. Interference in webbing routing GO to Pinpoint Test E. Foreign object/debris See the automatic locking retractor Automatic locking retractor activated (clicking description below – during retraction only) Seatbelt - Noisy during
operation
Automatic locking retractor activated (clicking–
during retraction only)
Interference in webbing routing (rubbing)
GO to Pinpoint Test B. GO to Pinpoint Test E. Seatbelt buckle - Not
latching / jammed
Foreign object/debris
CAUTION: Do not insert any objects or
tools into the buckle head
GO to Pinpoint Test H.
Inertia Reel Seatbelts
The vehicle is equipped with (two row one) and (three row two) inertia reel seatbelts
These seatbelts are "dual sensitive" which means that they have:
Car sense system - A vehicle motion sensor, which locks the seatbelt webbing under braking, cornering, on steep
hills and in adverse camber conditions, when parked on a steep incline or driveway or two wheels on a high curb
Web sense system - A webbing motion sensor, which locks when the seatbelt webbing is extracted suddenly
The seatbelts in the following positions are equipped with an automatic locking retractor function: