Page 1223 of 3039
5. CAUTION: Install new high-pressure fuel supply lines.
NOTES:
Engine shown removed for clarity.
Remove and discard the blanking caps.
Install the bolt and unions fully finger tight before final
tightening.
6. CAUTION: Care must be taken when positioning the fuel rail
high-pressure fuel pump cover to one side.
NOTE: Fuel rail high-pressure fuel pump cover shown removed for
clarity.
Torque: 12 Nm
7. Lower the vehicle.
8. NOTES:
Do not tighten at this stage.
Remove and discard the blanking caps.
9. WARNING: Do not work on or under a vehicle supported only by a jack. Always
Page 1229 of 3039

Published: 11-May-2011
Fuel Charging and Controls - V8 S/C 5.0L Petrol - Right-Hand Fuel Rail High-Pressure
Fuel Pump Removal and Installation
Removal
CAUTION: Make sure that tools and equipment are clean, free of foreign material and lubricant.
NOTES:
Removal steps in this procedure may contain installation details.
Some variation in the illustrations may occur, but the essential information is always correct.
All vehicles
1. Refer to: Petrol and Petrol-Ethanol Fuel Systems Health and Safety Precautions (100-00 General Information, Description and Operation).
2. Refer to: Fuel System Pressure Release - V8 5.0L Petrol/V8 S/C 5.0L Petrol (310-00 Fuel System - General Information, General Procedures).
3. Refer to: Secondary Bulkhead Panel LH - TDV6 3.0L Diesel /V8 5.0L Petrol/V8 S/C 5.0L Petrol (501-02 Front End Body Panels, Removal and Installation). 4. Refer to: Secondary Bulkhead Panel RH - TDV6 3.0L Diesel /V8 5.0L Petrol/V8 S/C 5.0L Petrol (501-02 Front End Body Panels, Removal and Installation). 5. Refer to: Engine Cover - V8 5.0L Petrol/V8 S/C 5.0L Petrol (501-05 Interior Trim and Ornamentation, Removal and Installation).
6. Refer to: Fuel Injection Component Cleaning (303-04E Fuel Charging and Controls - V8 S/C 5.0L Petrol, General Procedures).
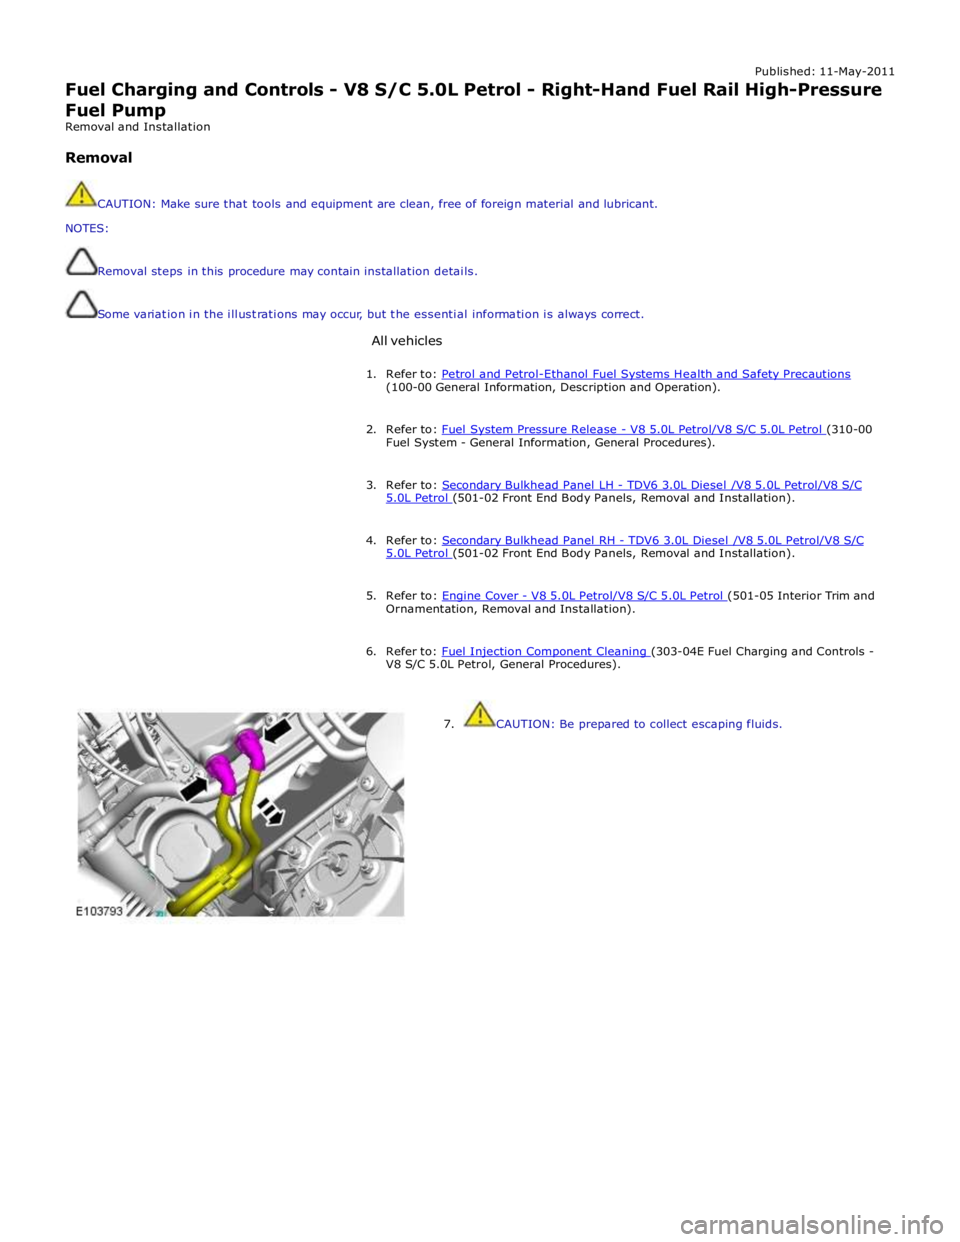
7. CAUTION: Be prepared to collect escaping fluids.
Page 1233 of 3039
21.
22. NOTE: Engine shown removed for clarity.
CAUTIONS:
Remove and discard the high-pressure fuel supply lines.
Be prepared to collect escaping fluids.
Make sure that all openings are sealed. Use new blanking caps.
NOTE: Engine shown removed for clarity.
Page 1236 of 3039
5. CAUTION: Install new high-pressure fuel supply lines.
NOTES:
Engine shown removed for clarity.
Remove and discard the blanking caps.
Install the bolt and unions fully finger tight before final
tightening.
6. CAUTION: Care must be taken when positioning the fuel rail
high-pressure fuel pump cover to one side.
NOTE: Fuel rail high-pressure fuel pump cover shown removed for
clarity.
Torque: 12 Nm
7. Lower the vehicle.
8. NOTES:
Do not tighten at this stage.
Remove and discard the blanking caps.
9. WARNING: Do not work on or under a vehicle supported only by a jack. Always
support the vehicle on safety stands.
Page 1314 of 3039
14.
15.
WARNINGS:
Do not
smoke or
carry lighted
tobacco or
open flame
of any type
when
working on
or near any
fuel related
components.
Highly
flammable
vapors are
always
present and
may ignite.
Failure to
follow these
instructions
may result
in personal
injury.
Do not
smoke or
carry lighted
tobacco or
open flame
of any type
when
working on
or near any
fuel related
components.
Highly
flammable
vapors are
always
present and
may ignite.
Failure to
follow these
instructions
may result
in personal
injury.
CAUTIONS:
Make
sure that
the fuel line
union does
not rotate.
Be
prepared to
collect
escaping
fluids.
Page 1318 of 3039
this stage.
Remove and
discard the
blanking
caps.
3.
WARNING:
Do not
smoke or
carry lighted
tobacco or
open flame
of any type
when working
on or near
any fuel
related
components.
Highly
flammable
vapors are
always
present and
may ignite.
Failure to
follow these
instructions
may result in
personal
injury.
Torque:
Union 21 Nm M6 12 Nm
4. WARNINGS:
Do not smoke or carry lighted tobacco or open flame of any type when
working on or near any fuel related components. Highly flammable vapors
are always present and may ignite. Failure to follow these instructions may
result in personal injury.
After carrying out repairs, the fuel system must be checked visually for
leaks. Failure to follow these instructions may result in personal injury.
Torque: 21 Nm
Page 1344 of 3039

Published: 11-May-2011
Evaporative Emissions - V8 5.0L Petrol/V8 S/C 5.0L Petrol - Evaporative Emissions - System Operation and Component Description
Description and Operation
System Operation DIAGNOSTIC MODULE - TANK LEAKAGE PUMP (NAS ONLY)
To check the fuel tank and the EVAP (evaporative emission) system for leaks, the ECM (engine control module) operates the
DMTL pump and monitors the current draw. Initially, the ECM establishes a reference current by pumping air through the reference orifice and back to atmosphere. Once the reference current is determined, the ECM closes the change-over valve, which seals the EVAP system. The EVAP canister purge valve remains de-energized and is therefore closed. The output from the air pump is diverted from the reference orifice and into the EVAP system.
When the change-over valve is closed, the load on the air pump falls to zero. Providing there are no leaks, the air pump will
begin to pressurize the EVAP system and the load and current draw in the pump increases. By monitoring the rate and level of the current increase, the ECM can determine if there is a leak in the EVAP system.
During normal vehicle operation, 15 seconds after the engine has started, the ECM energizes the heating element in the pump to prevent condensation formation and possible incorrect readings. The heater remains energized until either the engine and
ignition are off (if no DMTL test is running) or until after the DMTL test is completed.
Leaks are classified as:
Minor - equivalent to a hole diameter of 0.5 to 1.0 mm (0.02 to 0.04 in.).
Major - equivalent to a hole diameter of 1.0 mm (0.04 in.) or greater.
The ECM performs a check for major leaks each time the ignition is switched off, providing the following conditions are met: The vehicle speed is zero.
The engine speed is zero.
The atmospheric pressure is above 70 kPa (10.15 lbf/in2
), i.e. the altitude is less than approximately 3047 m (10000
feet).
The ambient temperature is between 0 and 40 °C (32 and 104 °F).
The EVAP canister vapor concentration factor is 5 or less (where 0 is no fuel vapor, 1 is stoichiometric fuel vapor and greater than 1 is rich fuel vapor).
The fuel tank level is valid and between 15 and 85% of nominal capacity.
The engine running time during the previous cycle was more than 10 minutes.
The battery voltage is between 10 and 15 volts.
The last engine off time was more than 180 minutes.
No errors are detected with the EVAP components, the ambient air temperature and the fuel level.
NOTE: A leak test can be performed using a Jaguar recognized diagnostic tool. This overrides the above conditions and is
useful for checking correct system and component operation.
The ECM performs a check for minor leaks after every 2nd major leak check.
When the leak check is complete, the ECM stops the DMTL pump and opens (de-energizes) the change-over valve.
If the fuel filler cap is opened or refueling is detected during the leak check, by a sudden drop in the current draw or a rise in
the fuel level, the ECM aborts the leak check.
If a leak is detected during the check, the ECM stores an appropriate fault code in its memory. If a leak is detected on two consecutive checks, the ECM illuminates the MIL (malfunction indicator lamp) in the instrument cluster on the next drive cycle. The duration of a leak check can be between 60 and 900 seconds depending on the results and fuel tank level.
EVAP CANISTER PURGE VALVE
The ECM waits until the engine is running above 55 °C (131 °F) coolant temperature with closed loop fuel operational before the purging process is activated. Under these conditions the engine should be running smoothly with no warm up enrichment.
The EVAP canister purge valve duty (and flow) is initially ramped slowly because the vapor concentration is unknown (a sudden increase in purge could cause unstable engine running or cause it to stall due to an extremely "rich" air/fuel mixture). The
concentration is then determined from the amount of adjustment that the closed loop fueling is required to make to achieve
the target AFR (air fuel ratio). Once the concentration has been determined, the purge flow can be increased rapidly and the
injected fuel can be pro-actively adjusted to compensate for the known purge vapor and the target AIR control is maintained.
When the purging process is active, fresh air is drawn into the EVAP canister via the DMTL filter and pump on NAS vehicles, or via the vent port on the EVAP canister of non NAS vehicles.
Page 1347 of 3039

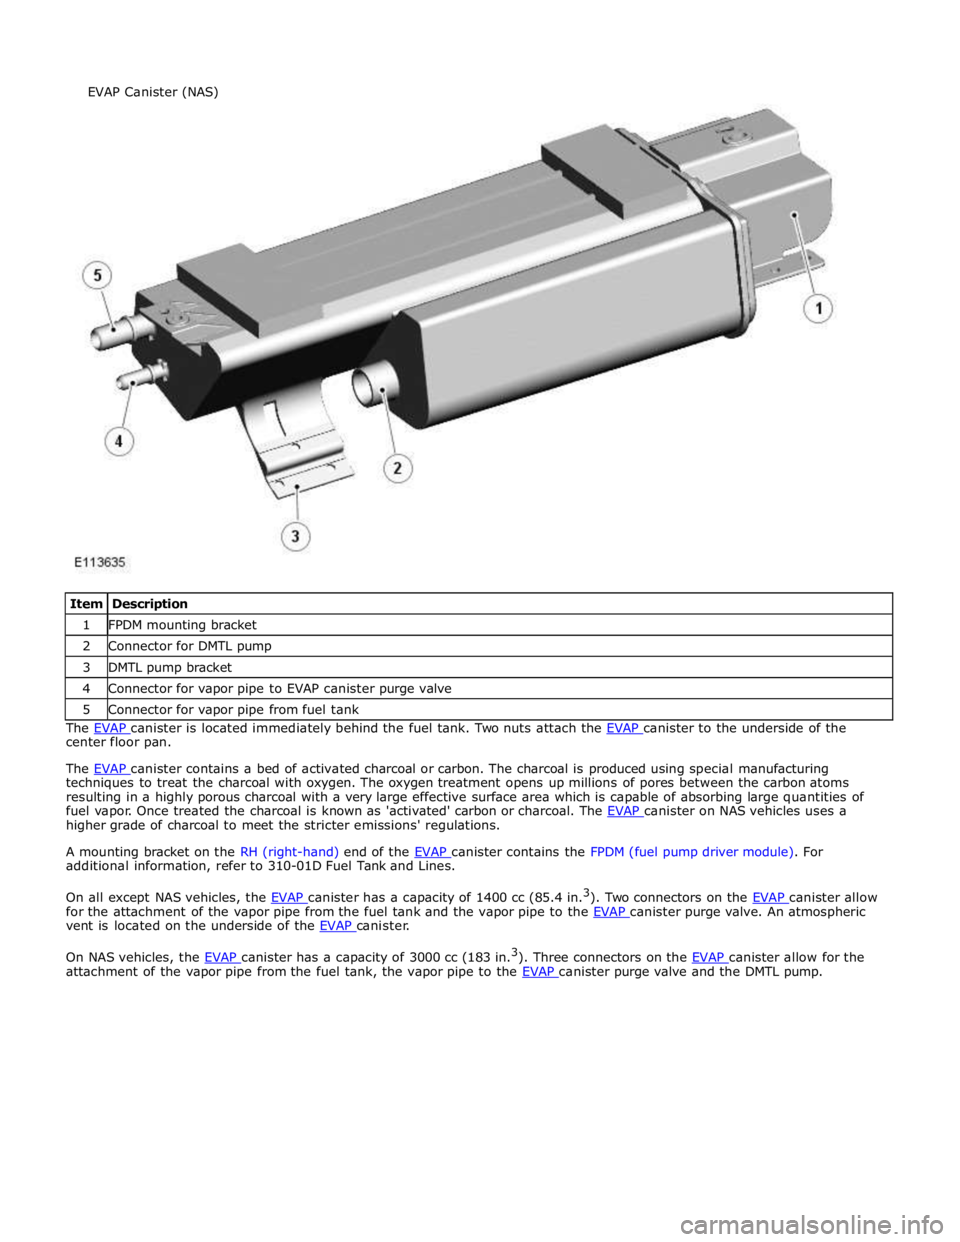
1 FPDM mounting bracket 2 Connector for DMTL pump 3 DMTL pump bracket 4 Connector for vapor pipe to EVAP canister purge valve 5 Connector for vapor pipe from fuel tank The EVAP canister is located immediately behind the fuel tank. Two nuts attach the EVAP canister to the underside of the center floor pan.
The EVAP canister contains a bed of activated charcoal or carbon. The charcoal is produced using special manufacturing techniques to treat the charcoal with oxygen. The oxygen treatment opens up millions of pores between the carbon atoms
resulting in a highly porous charcoal with a very large effective surface area which is capable of absorbing large quantities of
fuel vapor. Once treated the charcoal is known as 'activated' carbon or charcoal. The EVAP canister on NAS vehicles uses a higher grade of charcoal to meet the stricter emissions' regulations.
A mounting bracket on the RH (right-hand) end of the EVAP canister contains the FPDM (fuel pump driver module). For additional information, refer to 310-01D Fuel Tank and Lines.
On all except NAS vehicles, the EVAP canister has a capacity of 1400 cc (85.4 in.3
). Two connectors on the EVAP canister allow for the attachment of the vapor pipe from the fuel tank and the vapor pipe to the EVAP canister purge valve. An atmospheric vent is located on the underside of the EVAP canister.
On NAS vehicles, the EVAP canister has a capacity of 3000 cc (183 in.3
). Three connectors on the EVAP canister allow for the attachment of the vapor pipe from the fuel tank, the vapor pipe to the EVAP canister purge valve and the DMTL pump. EVAP Canister (NAS)