2010 INFINITI QX56 ecm
[x] Cancel search: ecmPage 2250 of 4210

PRECAUTIONSGI-27
< PRECAUTION >
C
DE
F
G H
I
J
K L
M B
GI
N
O P
system. The connectors should be disconnected only when working according to the WORK FLOW of
TROUBLE DIAGNOSES in EC and TM sections.
Three Way CatalystINFOID:0000000005149593
If a large amount of unburned fuel flows into the catalyst, the catalyst temperature will be excessively high. To
prevent this, follow the instructions.
• Use unleaded gasoline only. Leaded gasoline will seriously damage the three way catalyst.
• When checking for ignition spark or measuring engine compression, make tests quickly and only when nec-
essary.
• Do not run engine when the fuel tank level is low, otherwise the engine may misfire, causing damage to the
catalyst.
Do not place the vehicle on flammable material. Keep flammable material off the exhaust pipe and the three
way catalyst.
Precaution for Fuel (Unlead ed Premium Gasoline Required)INFOID:0000000005149594
Use unleaded premium gasoline with an octane rating of at least 91 AKI (Anti-Knock Index) number (Research
octane number 96).
If unleaded premium gasoline is not available, unleaded regular gasoline with an octane rating of at least 87
AKI number (Research octane number 91) can be us ed, but only under the following precautions:
• have the fuel tank filled only partially with unleaded regular gasoline, and fill up with unleaded premium gas- oline as soon as possible.
• avoid full throttle driving and abrupt acceleration.
However, for maximum vehicle performance, the u se of unleaded premium gasoline is recommended.
CAUTION:
Do not use leaded gasoline. Usin g leaded gasoline will damage the three way catalyst. Using a fuel
other than that specified could adversely affect the emission cont rol devices and systems, and could
also affect the warranty coverage validity.
Multiport Fuel Inje ction System or Engine Control SystemINFOID:0000000005149595
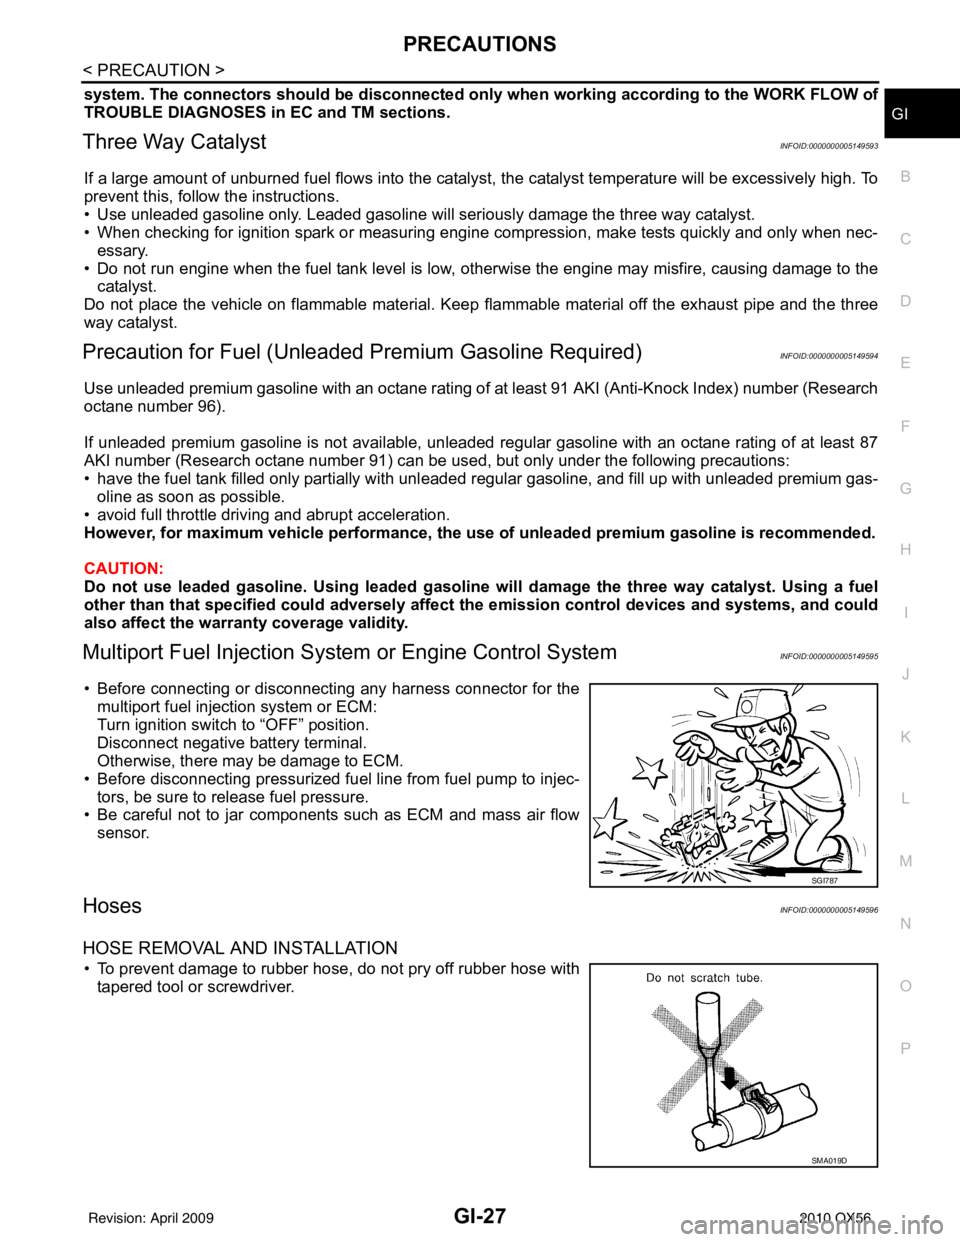
• Before connecting or disconnecting any harness connector for the
multiport fuel injection system or ECM:
Turn ignition switch to “OFF” position.
Disconnect negative battery terminal.
Otherwise, there may be damage to ECM.
• Before disconnecting pressurized fuel line from fuel pump to injec- tors, be sure to release fuel pressure.
• Be careful not to jar components such as ECM and mass air flow
sensor.
HosesINFOID:0000000005149596
HOSE REMOVAL AND INSTALLATION
• To prevent damage to rubber hose, do not pry off rubber hose withtapered tool or screwdriver.
SGI787
SMA019D
Revision: April 20092010 QX56
Page 2259 of 4210

GI-36
< BASIC INSPECTION >
SERVICE INFORMATION FOR ELECTRICAL INCIDENT
HOW TO PROBE CONNECTORS
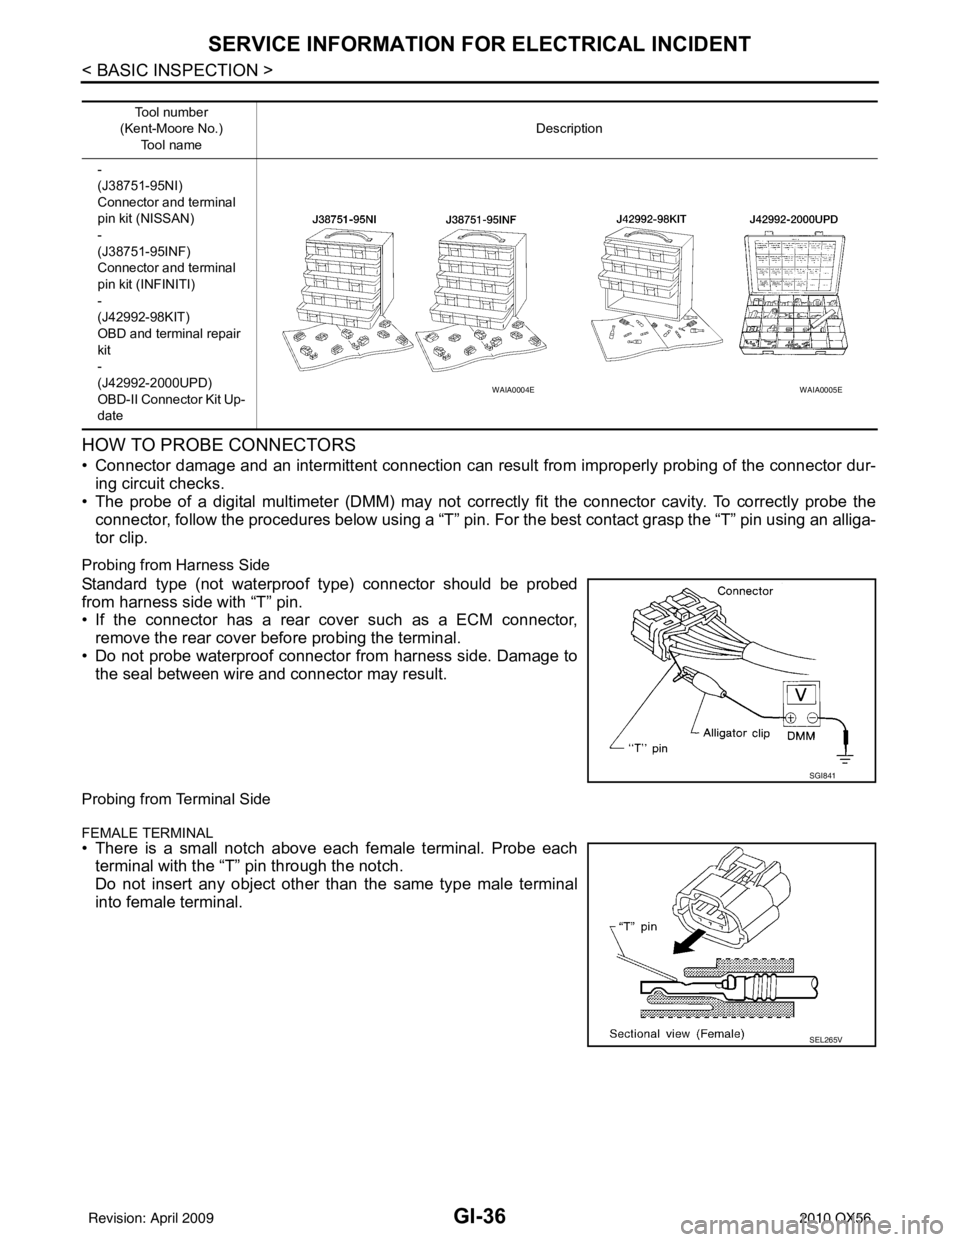
• Connector damage and an intermittent connection can result from improperly probing of the connector dur-ing circuit checks.
• The probe of a digital multimeter (DMM) may not correctly fit the connector cavity. To correctly probe the connector, follow the procedures below using a “T” pin. For the best contact grasp the “T” pin using an alliga-
tor clip.
Probing from Harness Side
Standard type (not waterproof type) connector should be probed
from harness side with “T” pin.
• If the connector has a rear cover such as a ECM connector,remove the rear cover before probing the terminal.
• Do not probe waterproof connector from harness side. Damage to the seal between wire and connector may result.
Probing from Terminal Side
FEMALE TERMINAL
• There is a small notch above each female terminal. Probe each
terminal with the “T” pin through the notch.
Do not insert any object other than the same type male terminal
into female terminal.
Tool number
(Kent-Moore No.) Tool name Description
-
(J38751-95NI)
Connector and terminal
pin kit (NISSAN)
-
(J38751-95INF)
Connector and terminal
pin kit (INFINITI)
-
(J42992-98KIT)
OBD and terminal repair
kit
-
(J42992-2000UPD)
OBD-II Connector Kit Up-
date
WAIA0004EWAIA0005E
SGI841
SEL265V
Revision: April 20092010 QX56
Page 2269 of 4210

GI-46
< BASIC INSPECTION >
CONSULT-III CHECKING SYSTEM
CONSULT-III CHECKING SYSTEM
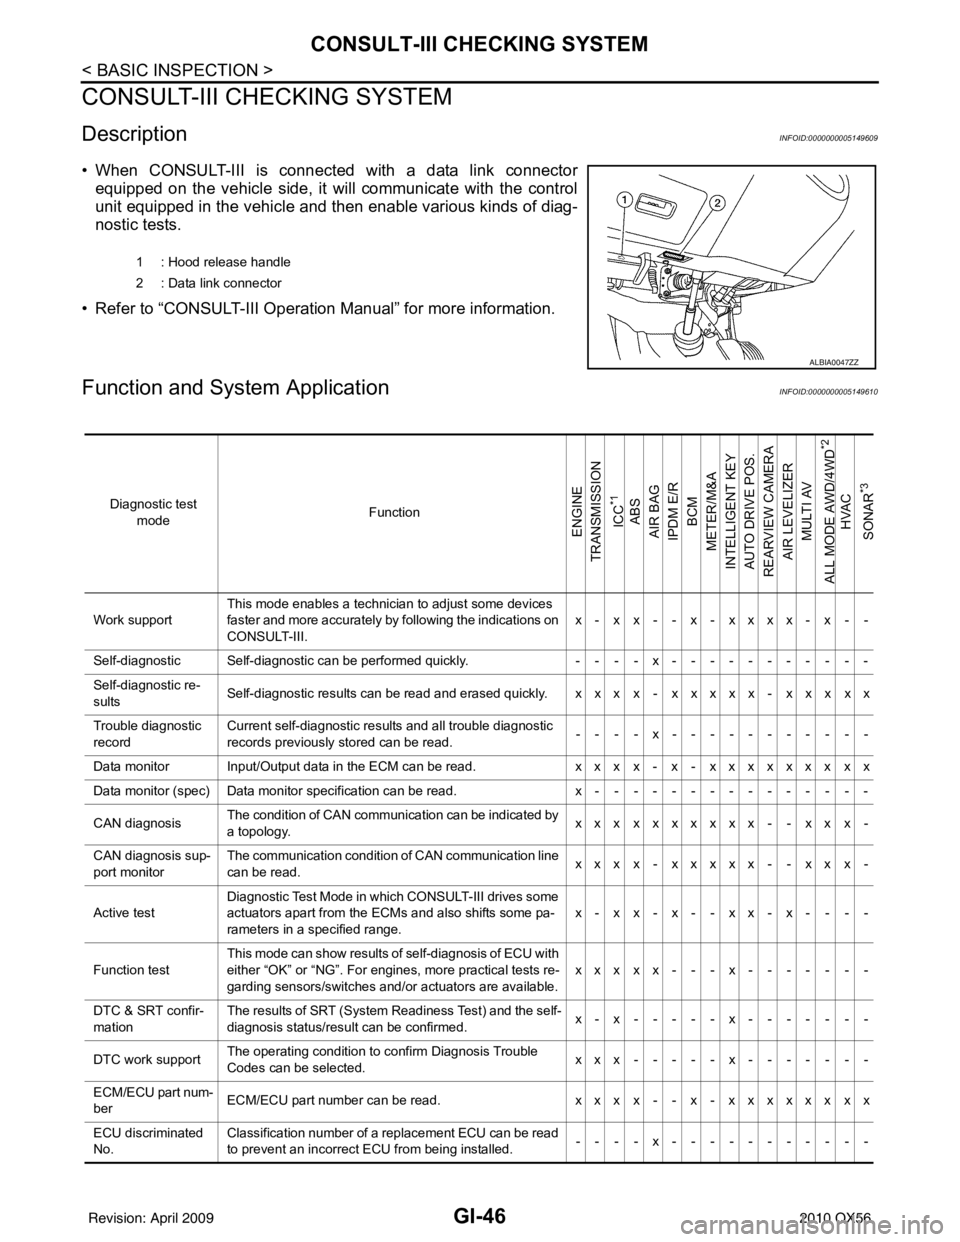
DescriptionINFOID:0000000005149609
• When CONSULT-III is connected with a data link connectorequipped on the vehicle side, it will communicate with the control
unit equipped in the vehicle and then enable various kinds of diag-
nostic tests.
• Refer to “CONSULT-III Operation Manual” for more information.
Function and System ApplicationINFOID:0000000005149610
1 : Hood release handle
2 : Data link connector
ALBIA0047ZZ
Diagnostic test mode Function
ENGINE
TRANSMISSION
ICC
*1
ABS
AIR BAG
IPDM E/R
BCM
METER/M&A
INTELLIGENT KEY
AUTO DRIVE POS.
REARVIEW CAMERA
AIR LEVELIZER MULTI AV
ALL MODE AWD/4WD
*2
HVAC
SONAR
*3
Work support This mode enables a technician to adjust some devices
faster and more accurately by following the indications on
CONSULT-III. x- x x- - x- xxxx- x - -
Self-diagnostic Self-diagnostic can be performed quickly. ----x-----------
Self-diagnostic re-
sults Self-diagnostic results can be read and erased quickly. x x x x - x x x x x - x x x x x
Trouble diagnostic
record Current self-diagnostic results and all trouble diagnostic
records previously stored can be read.
--- - x--- - -------
Data monitor Input/Output data in the ECM can be read. xxx x- x- xxxxxxx xx
Data monitor (spec) Data monitor specification can be read. x---------------
CAN diagnosis The condition of CAN communication can be indicated by
a topology.
xxx xxxxxxx- - xx x-
CAN diagnosis sup-
port monitor The communication condition of CAN communication line
can be read.
xxx x- xxxxx- - xx x-
Active test Diagnostic Test Mode in wh
ich CONSULT-III drives some
actuators apart from the ECMs and also shifts some pa-
rameters in a specified range. x-xx-x--xx-x- - --
Function test This mode can show results of self-diagnosis of ECU with
either “OK” or “NG”. For engines, more practical tests re-
garding sensors/switches and/or actuators are available.
xxxxx---x-------
DTC & SRT confir-
mation The results of SRT (System Readiness Test) and the self-
diagnosis status/result can be confirmed.
x-x-----x-------
DTC work support The operating condition to confirm Diagnosis Trouble
Codes can be selected. xxx-----x-------
ECM/ECU part num-
ber ECM/ECU part number can be read.
xxx x- - x- xxxxxx xx
ECU discriminated
No. Classification number of a replacement ECU can be read
to prevent an incorrect ECU from being installed.
----x-----------
Revision: April 20092010 QX56
Page 2309 of 4210

REFRIGERATION SYSTEMHA-17
< FUNCTION DIAGNOSIS >
C
DE
F
G H
J
K L
M A
B
HA
N
O P
FUNCTION DIAGNOSIS
REFRIGERATION SYSTEM
Refrigerant CycleINFOID:0000000005147642
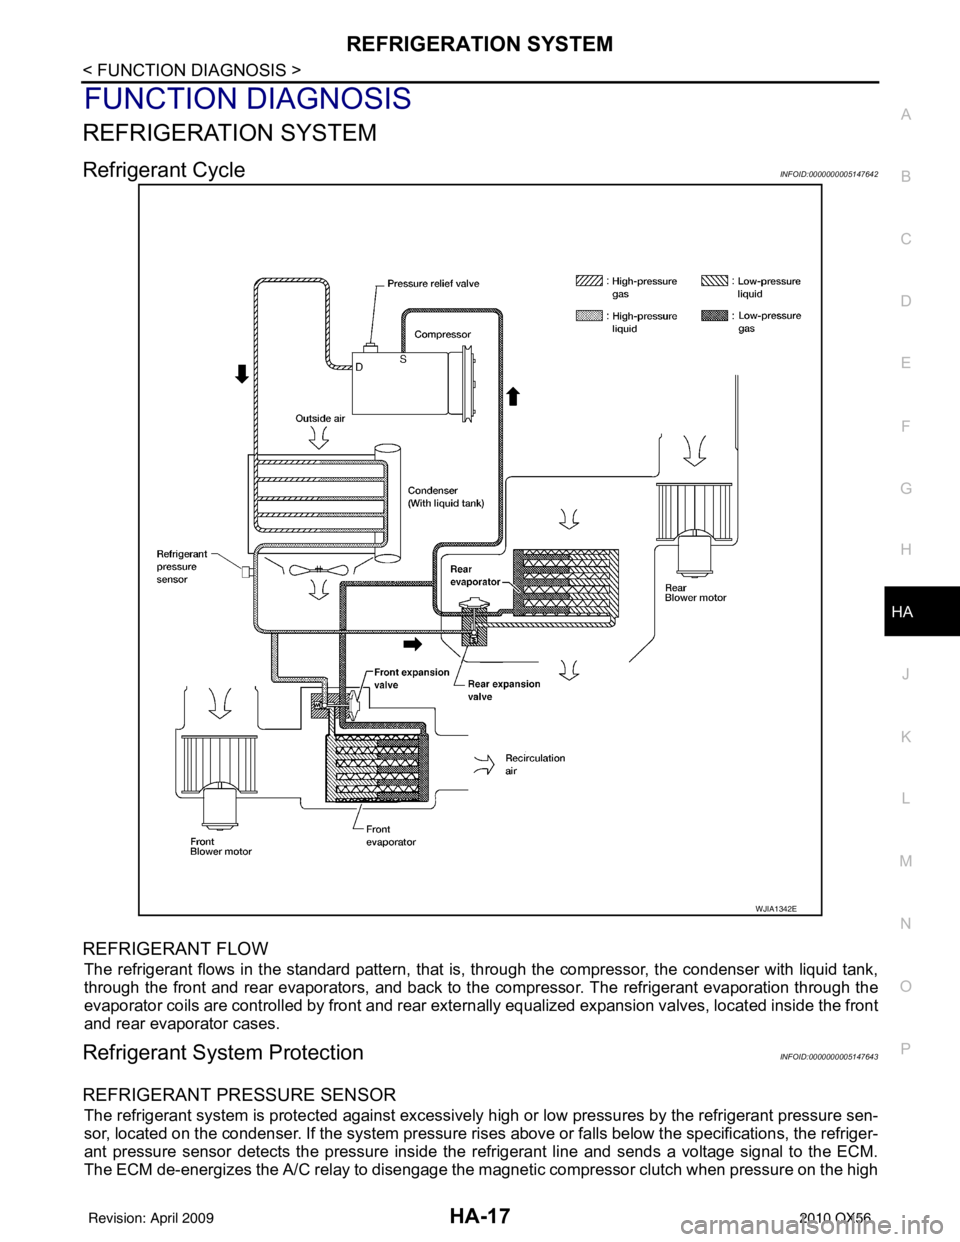
REFRIGERANT FLOW
The refrigerant flows in the standard pattern, that is, through the compressor, the condenser with liquid tank,
through the front and rear evaporators, and back to the compressor. The refrigerant evaporation through the
evaporator coils are controlled by front and rear externally equalized expansion valves, located inside the front
and rear evaporator cases.
Refrigerant System ProtectionINFOID:0000000005147643
REFRIGERANT PRESSURE SENSOR
The refrigerant system is protected against excessively hi gh or low pressures by the refrigerant pressure sen-
sor, located on the condenser. If the system pressure rises above or falls below the specifications, the refriger-
ant pressure sensor detects the pressure inside the refrigerant line and sends a voltage signal to the ECM.
The ECM de-energizes the A/C relay to disengage the magnetic compressor clutch when pressure on the high
WJIA1342E
Revision: April 20092010 QX56
Page 2351 of 4210
![INFINITI QX56 2010 Factory Service Manual REFRIGERATION SYSTEMHAC-11
< FUNCTION DIAGNOSIS > [AUTOMATIC AIR CONDITIONER]
C
D
E
F
G H
J
K L
M A
B
HAC
N
O P
REFRIGERATION SYSTEM
Refrigerant CycleINFOID:0000000005197357
REFRIGERANT FLOW
The refri INFINITI QX56 2010 Factory Service Manual REFRIGERATION SYSTEMHAC-11
< FUNCTION DIAGNOSIS > [AUTOMATIC AIR CONDITIONER]
C
D
E
F
G H
J
K L
M A
B
HAC
N
O P
REFRIGERATION SYSTEM
Refrigerant CycleINFOID:0000000005197357
REFRIGERANT FLOW
The refri](/manual-img/42/57032/w960_57032-2350.png)
REFRIGERATION SYSTEMHAC-11
< FUNCTION DIAGNOSIS > [AUTOMATIC AIR CONDITIONER]
C
D
E
F
G H
J
K L
M A
B
HAC
N
O P
REFRIGERATION SYSTEM
Refrigerant CycleINFOID:0000000005197357
REFRIGERANT FLOW
The refrigerant flows in the standard pattern, that is, through the compressor, the condenser with liquid tank,
through the front and rear evaporators, and back to the compressor. The refrigerant evaporation through the
evaporator coils are controlled by front and rear externally equalized expansion valves, located inside the front
and rear evaporator cases.
Refrigerant System ProtectionINFOID:0000000005197358
REFRIGERANT PRESSURE SENSOR
The refrigerant system is protected against excessively hi gh or low pressures by the refrigerant pressure sen-
sor, located on the condenser. If the system pressure rises above or falls below the specifications, the refriger-
ant pressure sensor detects the pressure inside the refrigerant line and sends a voltage signal to the ECM.
The ECM de-energizes the A/C relay to disengage the magnetic compressor clutch when pressure on the high
pressure side detected by refrigerant pressu re sensor is over about 2,746 kPa (28 kg/cm
2, 398 psi), or below
about 120 kPa (1.22 kg/cm
2, 17.4 psi).
WJIA1342E
Revision: April 20092010 QX56
Page 2355 of 4210
![INFINITI QX56 2010 Factory Service Manual AUTOMATIC AIR CONDITIONER SYSTEMHAC-15
< FUNCTION DIAGNOSIS > [AUTOMATIC AIR CONDITIONER]
C
D
E
F
G H
J
K L
M A
B
HAC
N
O P
Rear Air Controls
REAR TEMPERATURE CONTROL DIAL (FRONT/REAR)
The temperature INFINITI QX56 2010 Factory Service Manual AUTOMATIC AIR CONDITIONER SYSTEMHAC-15
< FUNCTION DIAGNOSIS > [AUTOMATIC AIR CONDITIONER]
C
D
E
F
G H
J
K L
M A
B
HAC
N
O P
Rear Air Controls
REAR TEMPERATURE CONTROL DIAL (FRONT/REAR)
The temperature](/manual-img/42/57032/w960_57032-2354.png)
AUTOMATIC AIR CONDITIONER SYSTEMHAC-15
< FUNCTION DIAGNOSIS > [AUTOMATIC AIR CONDITIONER]
C
D
E
F
G H
J
K L
M A
B
HAC
N
O P
Rear Air Controls
REAR TEMPERATURE CONTROL DIAL (FRONT/REAR)
The temperature increases or dec reases the set temperature.
REAR MODE SWITCHES (FRONT/REAR)
Controls the air discharge outlets.
REAR BLOWER CONTROL DIAL (FRONT)
When the REAR CTRL switch is in the off (indicator off) the rear air control (front) controls the rear blower
motor speed regardless of the rear air control (rear) blow er control dial (rear) position. The rear air control
(front) controls the blower motor speed.
REAR BLOWER CONTROL DIAL (REAR)
When the REAR CTRL switch is in the on (indicator on) the rear air control (rear) controls the rear blower
motor speed regardless of the rear air control (front) blow er control dial (front) position. The rear air control
(rear) controls the blower motor speed.
MAGNET CLUTCH CONTROL
When A/C switch or DEF switch is pressed, A/ C auto amp. inputs compressor ON signal to BCM.
BCM sends compressor ON signal to ECM and A/C auto amp., via CAN communication line.
ECM judges whether compressor can be turned ON, based on each sensor status (refrigerant pressure sen-
sor signal, throttle angle sensor, etc.). If it judges compressor can be turned ON, it sends compressor ON sig-
nal to IPDM E/R, via CAN communication line.
AWIIA0082ZZ
1. Rear air control (front )2. Rear air control (rear)
AWIIA1069GB
Revision: April 20092010 QX56
Page 2356 of 4210
![INFINITI QX56 2010 Factory Service Manual HAC-16
< FUNCTION DIAGNOSIS >[AUTOMATIC AIR CONDITIONER]
AUTOMATIC AIR CONDITIONER SYSTEM
Upon receipt of compressor ON signal from ECM, IPDM E/R turns air conditioner relay ON to operate com-
pressor INFINITI QX56 2010 Factory Service Manual HAC-16
< FUNCTION DIAGNOSIS >[AUTOMATIC AIR CONDITIONER]
AUTOMATIC AIR CONDITIONER SYSTEM
Upon receipt of compressor ON signal from ECM, IPDM E/R turns air conditioner relay ON to operate com-
pressor](/manual-img/42/57032/w960_57032-2355.png)
HAC-16
< FUNCTION DIAGNOSIS >[AUTOMATIC AIR CONDITIONER]
AUTOMATIC AIR CONDITIONER SYSTEM
Upon receipt of compressor ON signal from ECM, IPDM E/R turns air conditioner relay ON to operate com-
pressor.
Discharge Air Flow (Front)INFOID:0000000005147677
Discharge Air Flow (Rear)INFOID:0000000005147678
Mode door positionAir outlet/distribution
Vent Foot Defroster
95% 5% —
60% 40% —
—7 0% 3 0%
—6 0% 4 0%
—1 0% 9 0%
AWIIA0818ZZ
Revision: April 20092010 QX56
Page 2408 of 4210
![INFINITI QX56 2010 Factory Service Manual HAC-68
< COMPONENT DIAGNOSIS >[AUTOMATIC AIR CONDITIONER]
MAGNET CLUTCH
MAGNET CLUTCH
System DescriptionINFOID:0000000005147713
SYSTEM DESCRIPTION
The A/C auto amp. controls compressor operation
base INFINITI QX56 2010 Factory Service Manual HAC-68
< COMPONENT DIAGNOSIS >[AUTOMATIC AIR CONDITIONER]
MAGNET CLUTCH
MAGNET CLUTCH
System DescriptionINFOID:0000000005147713
SYSTEM DESCRIPTION
The A/C auto amp. controls compressor operation
base](/manual-img/42/57032/w960_57032-2407.png)
HAC-68
< COMPONENT DIAGNOSIS >[AUTOMATIC AIR CONDITIONER]
MAGNET CLUTCH
MAGNET CLUTCH
System DescriptionINFOID:0000000005147713
SYSTEM DESCRIPTION
The A/C auto amp. controls compressor operation
based on ambient and intake temperature and a signal
from ECM.
Low Temperature Protection Control
The A/C auto amp. will turn the compressor ON or O FF as determined by a signal detected by the intake sen-
sor and the ambient sensor.
When intake air temperature is higher than the preset va lue, the compressor turns ON. The compressor turns
OFF when intake air temperature is lower than the pres et value. That preset value is dependent on the ambi-
ent temperature, refer to the following table.
Magnet Clutch Com ponent Function CheckINFOID:0000000005147714
INSPECTION FLOW
1.CONFIRM SYMPTOM BY PERFORMING OP ERATIONAL CHECK - MAGNET CLUTCH
1. Turn ignition switch ON.
2. Press the A/C switch.
3. Press vent switch ( ).
4. Display shows , A/C. Confirm that the compress or clutch engages (sound or visual inspection). (Dis-
charge air and blower speed will depend on ambi ent, in-vehicle and set temperatures.)
Is the inspection result normal?
YES >> Inspection End.
NO >> Go to diagnosis procedure. Refer to HAC-68, "
Magnet Clutch Diagnosis Procedure".
Magnet Clutch Diagnosis ProcedureINFOID:0000000005147715
Regarding Wiring Diagram information, refer to HAC-91, "Wiring Diagram".
DIAGNOSTIC PROCEDURE FOR MAGNET CLUTCH
Ambient temperature °C ( °F) Compressor ON intake temperature °C ( °F) Compressor OFF intake temperature °C ( °F)
0 (32) 5.5 (42) 5.0 (41)
10 (50) 5.5 (42) 5.0 (41)
20 (68) 5.5 (42) 5.0 (41)
30 (86) 4.0 (39) 3.5 (38)
40 (104) 3.5 (38) 3.0 (37)
50 (122) 3.5 (38) 3.0 (37)
Revision: April 20092010 QX56