Page 3163 of 4210
SUNROOF SYSTEMRF-35
< ECU DIAGNOSIS >
C
DE
F
G H
I
J
L
M A
B
RF
N
O P
ABKIA1351GB
Revision: April 20092010 QX56
Page 3164 of 4210
RF-36
< ECU DIAGNOSIS >
SUNROOF SYSTEM
ABKIA0162GB
Revision: April 20092010 QX56
Page 3165 of 4210
SUNROOF SYSTEMRF-37
< ECU DIAGNOSIS >
C
DE
F
G H
I
J
L
M A
B
RF
N
O P
ABKIA1414GB
Revision: April 20092010 QX56
Page 3166 of 4210
RF-38
< ECU DIAGNOSIS >
SUNROOF SYSTEM
ABKIA1640GB
Revision: April 20092010 QX56
Page 3167 of 4210
SUNROOF DOES NOT OPERATE PROPERLYRF-39
< SYMPTOM DIAGNOSIS >
C
DE
F
G H
I
J
L
M A
B
RF
N
O P
SYMPTOM DIAGNOSIS
SUNROOF DOES NOT OPERATE PROPERLY
Diagnosis ProcedureINFOID:0000000005147295
1. CHECK BCM POWER SUPPLY AND GROUND CIRCUIT
Check BCM power supply and ground circuit.
Refer to BCS-33, "
Diagnosis Procedure".
>> GO TO 2
2. CHECK SUNROOF MOTOR ASSEMBLY POWER SUPPLY AND GROUND CIRCUIT
Check sunroof motor assembly power supply and ground circuit.
Refer to RF-12, "
ComponentFunctionCheck".
>> GO TO 3
3. CHECK SUNROOF SWITCH CIRCUIT
Check sunroof switch circuit.
Refer to RF-12, "
Diagnosis Procedure".
Is the inspection result normal?
>> Check intermittent incident. Refer to GI-38, "Intermittent Incident".
Revision: April 20092010 QX56
Page 3171 of 4210
SUNROOF DOES NOT OPERATE ANTI-PINCH FUNCTIONRF-43
< SYMPTOM DIAGNOSIS >
C
DE
F
G H
I
J
L
M A
B
RF
N
O P
SUNROOF DOES NOT OPERATE ANTI-PINCH FUNCTION
Diagnosis ProcedureINFOID:0000000005147299
1. PERFORM INITIALIZATION PROCEDURE
Perform initialization procedure.
Refer to RF-5, "
ADDITIONAL SERVICE WHEN REPLACING CO NTROL UNIT : Special Repair Requirement".
Is the inspection result normal?
>> Check intermittent incident. Refer to GI-38, "Intermittent Incident".
Revision: April 20092010 QX56
Page 3175 of 4210

SQUEAK AND RATTLE TROUBLE DIAGNOSESRF-47
< SYMPTOM DIAGNOSIS >
C
DE
F
G H
I
J
L
M A
B
RF
N
O P
Most of these incidents can be repaired by adjusting, se curing or insulating the item(s) or component(s) caus-
ing the noise.
SUNROOF/HEADLINING
Noises in the sunroof/headlining area can often be traced to one of the following:
1. Sunroof lid, rail, linkage or seals making a rattle or light knocking noise
2. Sun visor shaft shaking in the holder
3. Front or rear windshield touching headliner and squeaking
Again, pressing on the components to stop the noise while duplicating the conditions can isolate most of these
incidents. Repairs usually consist of insulating with felt cloth tape.
OVERHEAD CONSOLE (FRONT AND REAR)
Overhead console noises are often caused by the cons ole panel clips not being engaged correctly. Most of
these incidents are repaired by pushing up on the c onsole at the clip locations until the clips engage.
In addition look for:
1. Loose harness or harness connectors.
2. Front console map/reading lamp lens loose.
3. Loose screws at console attachment points.
SEATS
When isolating seat noise it's important to note the position the seat is in and the load placed on the seat when
the noise is present. These conditions should be duplicated when verifying and isolating the cause of the
noise.
Cause of seat noise include:
1. Headrest rods and holder
2. A squeak between the seat pad cushion and frame
3. The rear seatback lock and bracket
These noises can be isolated by moving or pressing on the suspected components while duplicating the con-
ditions under which the noise occurs. Most of thes e incidents can be repaired by repositioning the component
or applying urethane tape to the contact area.
UNDERHOOD
Some interior noise may be caused by components under the hood or on the engine wall. The noise is then
transmitted into the passenger compartment.
Causes of transmitted underhood noise include:
1. Any component installed to the engine wall
2. Components that pass through the engine wall
3. Engine wall mounts and connectors
4. Loose radiator installation pins
5. Hood bumpers out of adjustment
6. Hood striker out of adjustment
These noises can be difficult to isolate since they cannot be reached from the interior of the vehicle. The best
method is to secure, move or insulate one component at a time and test drive the vehicle. Also, engine RPM
or load can be changed to isolate the noise. Repairs can usually be made by moving, adjusting, securing, or
insulating the component causing the noise.
Revision: April 20092010 QX56
Page 3181 of 4210

SUNROOF SYSTEMRF-53
< ON-VEHICLE REPAIR >
C
DE
F
G H
I
J
L
M A
B
RF
N
O P
ON-VEHICLE REPAIR
SUNROOF SYSTEM
InspectionINFOID:0000000005147307
WIND DEFLECTOR
1. Open glass lid assembly fully.
2. Visually check for proper installation, damaged/deteriorated components, or foreign objects within mecha- nism. Correct as required for smooth operation.
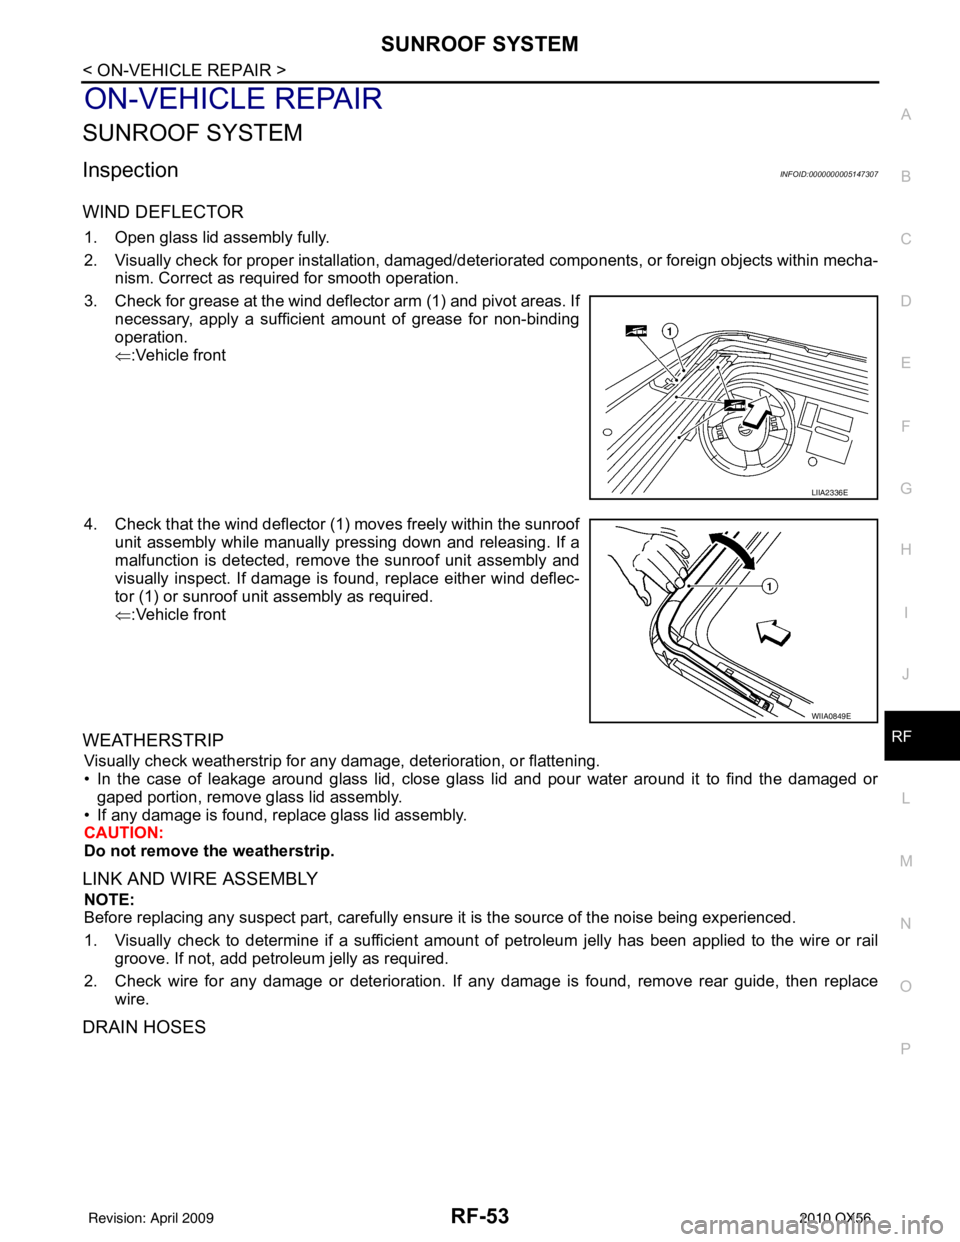
3. Check for grease at the wind deflector arm (1) and pivot areas. If necessary, apply a sufficient amount of grease for non-binding
operation.
⇐:Vehicle front
4. Check that the wind deflector (1) moves freely within the sunroof unit assembly while manually pressing down and releasing. If a
malfunction is detected, remove the sunroof unit assembly and
visually inspect. If damage is found, replace either wind deflec-
tor (1) or sunroof unit assembly as required.
⇐:Vehicle front
WEATHERSTRIP
Visually check weatherstrip for any damage, deterioration, or flattening.
• In the case of leakage around glass lid, close glass lid and pour water around it to find the damaged or
gaped portion, remove glass lid assembly.
• If any damage is found, replace glass lid assembly.
CAUTION:
Do not remove the weatherstrip.
LINK AND WIRE ASSEMBLY
NOTE:
Before replacing any suspect part, carefully ensure it is the source of the noise being experienced.
1. Visually check to determine if a sufficient amount of petroleum jelly has been applied to the wire or rail
groove. If not, add petroleum jelly as required.
2. Check wire for any damage or deterioration. If any damage is found, remove rear guide, then replace
wire.
DRAIN HOSES
LIIA2336E
WIIA0849E
Revision: April 20092010 QX56