2010 INFINITI QX56 roof
[x] Cancel search: roofPage 626 of 4210

BODY REPAIRBRM-15
< SERVICE INFORMATION >
C
DE
F
G H
I
J
L
M A
B
BRM
N
O P
the new parts. Select an excellent anti-corrosive wax which will penetrate after application and has a long shelf
life.
UNDERCOATING
The underside of the floor and wheelhouse are undercoated to prevent rust, vibration, noise and stone chip-
ping. Therefore, when such a panel is replaced or re paired, apply undercoating to that part. Use an undercoat-
ing which is rust preventive, soundproof, vibr ation-proof, shock-resistant, adhesive, and durable.
Precautions in undercoating
1. Do not apply undercoating to any place unless specif ied (such as the areas above the muffler and three
way catalyst which are subjected to heat).
2. Do not undercoat the exhaust pipe or other parts which become hot.
3. Do not undercoat rotating parts.
LIIA0905E
Revision: April 20092010 QX56
Page 835 of 4210

DLK-1
BODY EXTERIOR, DOORS, ROOF & VEHICLE SECURITY
C
DE
F
G H
I
J
L
M
SECTION DLK
A
B
DLK
N
O P
CONTENTS
DOOR & LOCK
WITH INTELLIGENT KEY SYSTEM
BASIC INSPECTION ....... .............................
6
DIAGNOSIS AND REPAIR WORKFLOW ..... .....6
Work Flow ........................................................... ......6
INSPECTION AND ADJUSTMENT .....................9
ADDITIONAL SERVICE WHEN REMOVING BAT-
TERY NEGATIVE TERMINAL ............................... ......
9
ADDITIONAL SERVICE WHEN REMOVING
BATTERY NEGATIVE TERMINAL : Description ......
9
ADDITIONAL SERVICE WHEN REMOVING
BATTERY NEGATIVE TERMINAL : Special Re-
pair Requirement ................................................. ......
9
ADDITIONAL SERVICE WHEN REPLACING
CONTROL UNIT .................................................... ......
9
ADDITIONAL SERVICE WHEN REPLACING
CONTROL UNIT : Description ..................................
9
ADDITIONAL SERVICE WHEN REPLACING
CONTROL UNIT : Special Repair Requirement .......
9
FUNCTION DIAGNOSIS ..............................10
AUTOMATIC DOOR LOCKS ......................... ....10
System Diagram .................................................. ....10
System Description .................................................10
Component Parts Location ....................................12
Component Description ..........................................12
DOOR LOCK FUNCTION ..................................14
DOOR LOCK AND UNLOCK SWITCH ................. ....14
DOOR LOCK AND UNLOCK SWITCH : System
Diagram ...................................................................
14
DOOR LOCK AND UNLOCK SWITCH : System
Description ..............................................................
14
DOOR LOCK AND UNLOCK SWITCH :
Component Parts Location ....................................
15
DOOR LOCK AND UNLOCK SWITCH :
Component Description ..........................................
15
DOOR REQUEST SWITCH ................................... ....16
DOOR REQUEST SWITCH : System Diagram .......16
DOOR REQUEST SWITCH : System Description ....16
DOOR REQUEST SWITCH :
Component Parts Location ....................................
19
DOOR REQUEST SWITCH :
Component Description ..........................................
21
INTELLIGENT KEY ................................................ ....21
INTELLIGENT KEY : System Diagram ....................21
INTELLIGENT KEY : System Description ...............21
INTELLIGENT KEY : Component Parts Location ....24
INTELLIGENT KEY : Component Description ........25
BACK DOOR OPENER FUNCTION .................27
BACK DOOR OPENER SWITCH .......................... ....27
BACK DOOR OPENER SWITCH : System Dia-
gram ........................................................................
27
BACK DOOR OPENER SWITCH : System De-
scription ...................................................................
27
BACK DOOR OPENER SWITCH :
Component Parts Location ....................................
32
BACK DOOR OPENER SWITCH :
Component Description ..........................................
32
INTELLIGENT KEY ................................................ ....33
INTELLIGENT KEY : System Diagram ....................33
INTELLIGENT KEY : System Description ...............33
INTELLIGENT KEY : Component Parts Location ....35
INTELLIGENT KEY : Component Description ........36
WARNING FUNCTION ......................................38
System Description ..................................................38
Component Parts Location ....................................42
KEY REMINDER FUNCTION ............................44
System Description ..................................................44
Component Parts Location ....................................45
HAZARD AND BUZZER REMINDER FUNC-
TION ..................................................................
47
Revision: April 20092010 QX56
Page 1060 of 4210
![INFINITI QX56 2010 Factory Service Manual DLK-226
< SYMPTOM DIAGNOSIS >[WITH INTELLIGENT KEY SYSTEM]
SQUEAK AND RATTLE TROUBLE DIAGNOSES
Most of these incidents can be repaired by adjusting, se
curing or insulating the item(s) or component(s) INFINITI QX56 2010 Factory Service Manual DLK-226
< SYMPTOM DIAGNOSIS >[WITH INTELLIGENT KEY SYSTEM]
SQUEAK AND RATTLE TROUBLE DIAGNOSES
Most of these incidents can be repaired by adjusting, se
curing or insulating the item(s) or component(s)](/manual-img/42/57032/w960_57032-1059.png)
DLK-226
< SYMPTOM DIAGNOSIS >[WITH INTELLIGENT KEY SYSTEM]
SQUEAK AND RATTLE TROUBLE DIAGNOSES
Most of these incidents can be repaired by adjusting, se
curing or insulating the item(s) or component(s) caus-
ing the noise.
SUNROOF/HEADLINING
Noises in the sunroof/headlining area c an often be traced to one of the following:
1. Sunroof lid, rail, linkage or seals making a rattle or light knocking noise
2. Sunvisor shaft shaking in the holder
3. Front or rear windshield touching headlining and squeaking
Again, pressing on the components to stop the noise while duplicating the conditions can isolate most of these
incidents. Repairs usually consist of insulating with felt cloth tape.
SEATS
When isolating seat noise it's important to note the pos ition the seat is in and the load placed on the seat when
the noise is present. These conditions should be duplicated when verifying and isolating the cause of the
noise.
Cause of seat noise include:
1. Headrest rods and holder
2. A squeak between the seat pad cushion and frame
3. The rear seatback lock and bracket
These noises can be isolated by moving or pressing on the suspected components while duplicating the con-
ditions under which the noise occurs. Most of thes e incidents can be repaired by repositioning the component
or applying urethane tape to the contact area.
UNDERHOOD
Some interior noise may be caused by components under the hood or on the engine wall. The noise is then
transmitted into the passenger compartment.
Causes of transmitted underhood noise include:
1. Any component mounted to the engine wall
2. Components that pass through the engine wall
3. Engine wall mounts and connectors
4. Loose radiator mounting pins
5. Hood bumpers out of adjustment
6. Hood striker out of adjustment
These noises can be difficult to isolate since they cannot be reached from the interior of the vehicle. The best
method is to secure, move or insulate one component at a time and test drive the \
vehicle. Also, engine RPM
or load can be changed to isolate the noise. Repairs can usually be made by moving, adjusting, securing, or
insulating the component causing the noise.
Revision: April 20092010 QX56
Page 1286 of 4210
![INFINITI QX56 2010 Factory Service Manual DLN-204
< PRECAUTION >[FRONT FINAL DRIVE: M205]
PRECAUTIONS
5. When the repair work is completed, return the ignition switch to the
″LOCK ″ position before connecting
the battery cables. (At this INFINITI QX56 2010 Factory Service Manual DLN-204
< PRECAUTION >[FRONT FINAL DRIVE: M205]
PRECAUTIONS
5. When the repair work is completed, return the ignition switch to the
″LOCK ″ position before connecting
the battery cables. (At this](/manual-img/42/57032/w960_57032-1285.png)
DLN-204
< PRECAUTION >[FRONT FINAL DRIVE: M205]
PRECAUTIONS
5. When the repair work is completed, return the ignition switch to the
″LOCK ″ position before connecting
the battery cables. (At this time, the steering lock mechanism will engage.)
6. Perform a self-diagnosis check of a ll control units using CONSULT-III.
Precaution for Servicing Front Final DriveINFOID:0000000005148912
• Before starting diagnosis of the vehicle, understand the symptoms well. Perform correct and systematic
operations.
• Check for the correct installation status prior to re moval or disassembly. When matching marks are required,
be certain they do not interfere with the function of the parts they are applied to.
• Overhaul should be done in a clean work area, a dust proof area is recommended.
• Before disassembly, completely remove sand and mud from the exterior of the unit, preventing them from
entering into the unit during disassembly or assembly.
• Always use shop paper for cleaning the inside of components.
• Avoid using cotton gloves or a shop cloth to prevent the entering of lint.
• Check appearance of the disassembled parts for dam age, deformation, and abnormal wear. Replace them
with new ones if necessary.
• Gaskets, seals and O-rings should be replaced any time the unit is disassembled.
• Clean and flush the parts sufficiently and blow them dry.
• Be careful not to damage sliding surfaces and mating surfaces.
• When applying sealant, remove the old sealant from the mating surface; then remove any moisture, oil, and
foreign materials from the application and mating surfaces.
• In principle, tighten nuts or bolts gradually in severa l steps working diagonally from inside to outside. If a
tightening sequence is specified, observe it.
• During assembly, observe the specified tightening torque.
• Add new differential gear oil, petroleum jelly, or multi-purpose grease, as specified.
Revision: April 20092010 QX56
Page 1319 of 4210
![INFINITI QX56 2010 Factory Service Manual PRECAUTIONSDLN-237
< PRECAUTION > [REAR FINAL DRIVE: R230]
C
EF
G H
I
J
K L
M A
B
DLN
N
O P
5. When the repair work is completed, return the ignition switch to the ″LOCK ″ position before connect INFINITI QX56 2010 Factory Service Manual PRECAUTIONSDLN-237
< PRECAUTION > [REAR FINAL DRIVE: R230]
C
EF
G H
I
J
K L
M A
B
DLN
N
O P
5. When the repair work is completed, return the ignition switch to the ″LOCK ″ position before connect](/manual-img/42/57032/w960_57032-1318.png)
PRECAUTIONSDLN-237
< PRECAUTION > [REAR FINAL DRIVE: R230]
C
EF
G H
I
J
K L
M A
B
DLN
N
O P
5. When the repair work is completed, return the ignition switch to the ″LOCK ″ position before connecting
the battery cables. (At this time, the steering lock mechanism will engage.)
6. Perform a self-diagnosis check of al l control units using CONSULT-III.
Precaution for Servicing Rear Final DriveINFOID:0000000005148925
• Before starting diagnosis of the vehicle, understand the symptoms well. Perform correct and systematic
operations.
• Check for the correct installation status prior to removal or disassembly. When matching marks are required,
be certain they do not interfere with the function of the parts they are applied to.
• Overhaul should be done in a clean work area, a dust proof area is recommended.
• Before disassembly, completely remove sand and mud fr om the exterior of the unit, preventing them from
entering into the unit during disassembly or assembly.
• Always use shop paper for cleaning the inside of components.
• Avoid using cotton gloves or a shop cloth to prevent the entering of lint.
• Check appearance of the disassembled parts for damage, deformation, and abnormal wear. Replace them with new ones if necessary.
• Gaskets, seals and O-rings should be replaced any time the unit is disassembled.
• Clean and flush the parts sufficiently and blow them dry.
• Be careful not to damage sliding surfaces and mating surfaces.
• When applying sealant, remove the old sealant from the mating surface; then remove any moisture, oil, and
foreign materials from the application and mating surfaces.
• In principle, tighten nuts or bolts gradually in several steps working diagonally from inside to outside. If a tightening sequence is specified, observe it.
• During assembly, observe the specified tightening torque.
• Add new differential gear oil, petroleum jell y, or multi-purpose grease, as specified.
Revision: April 20092010 QX56
Page 1898 of 4210

TIMING CHAINEM-47
< ON-VEHICLE REPAIR >
C
DE
F
G H
I
J
K L
M A
EM
NP
O
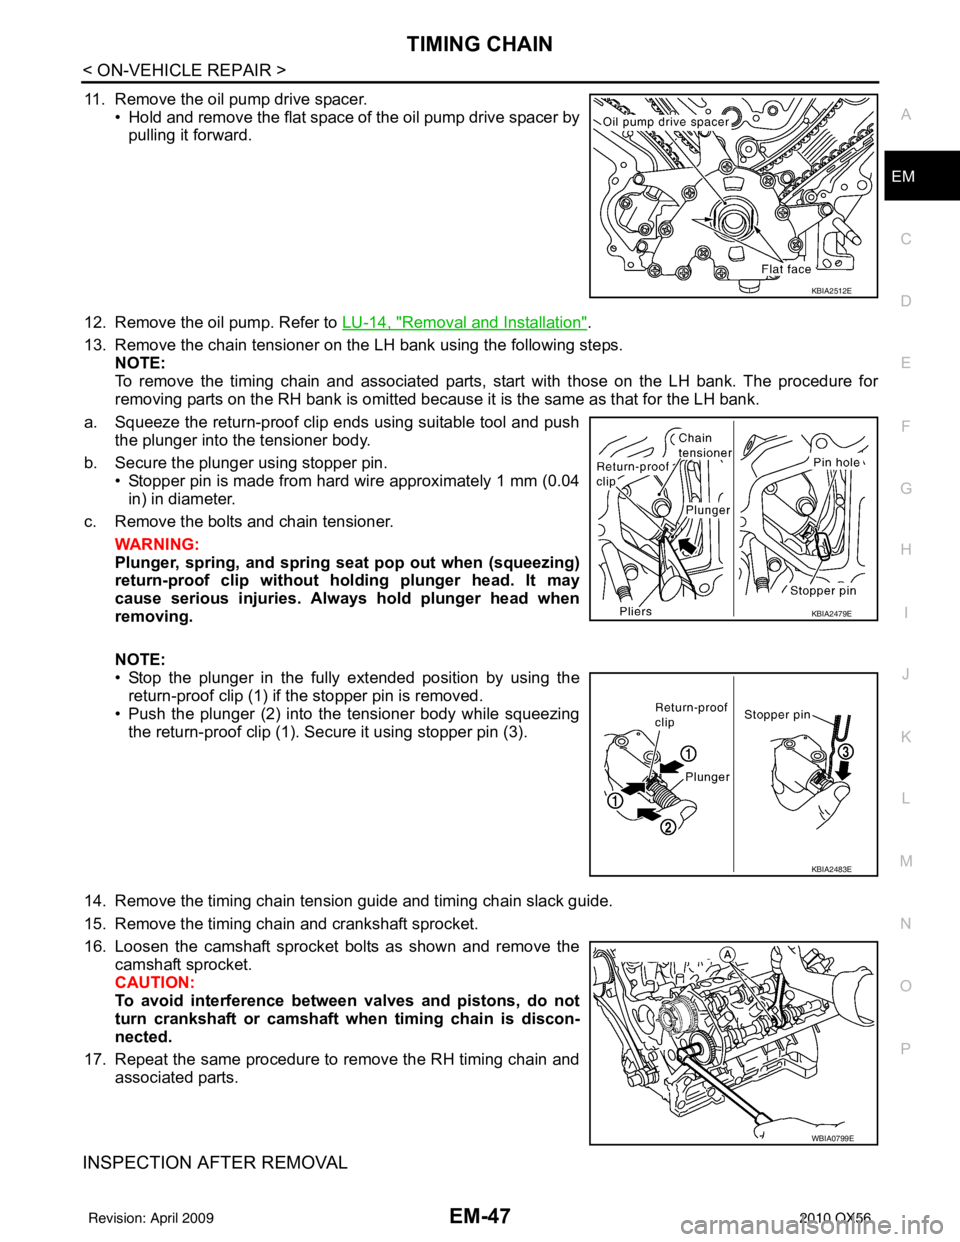
11. Remove the oil pump drive spacer.
• Hold and remove the flat space of the oil pump drive spacer bypulling it forward.
12. Remove the oil pump. Refer to LU-14, "
Removal and Installation".
13. Remove the chain tensioner on the LH bank using the following steps. NOTE:
To remove the timing chain and associated parts, start with those on the LH bank. The procedure for
removing parts on the RH bank is omitted because it is the same as that for the LH bank.
a. Squeeze the return-proof clip ends using suitable tool and push the plunger into the tensioner body.
b. Secure the plunger using stopper pin. • Stopper pin is made from hard wire approximately 1 mm (0.04in) in diameter.
c. Remove the bolts and chain tensioner.
WARNING:
Plunger, spring, an d spring seat pop out when (squeezing)
return-proof clip without holding plunger head. It may
cause serious injuries. Always hold plunger head when
removing.
NOTE:
• Stop the plunger in the fully extended position by using the
return-proof clip (1) if the stopper pin is removed.
• Push the plunger (2) into the tensioner body while squeezing
the return-proof clip (1). Secure it using stopper pin (3).
14. Remove the timing chain tension guide and timing chain slack guide.
15. Remove the timing chain and crankshaft sprocket.
16. Loosen the camshaft sprocket bolts as shown and remove the camshaft sprocket.
CAUTION:
To avoid interference between valves and pistons, do not
turn crankshaft or camshaft wh en timing chain is discon-
nected.
17. Repeat the same procedure to remove the RH timing chain and associated parts.
INSPECTION AFTER REMOVAL
KBIA2512E
KBIA2479E
KBIA2483E
WBIA0799E
Revision: April 20092010 QX56
Page 1905 of 4210

EM-54
< ON-VEHICLE REPAIR >
CAMSHAFT
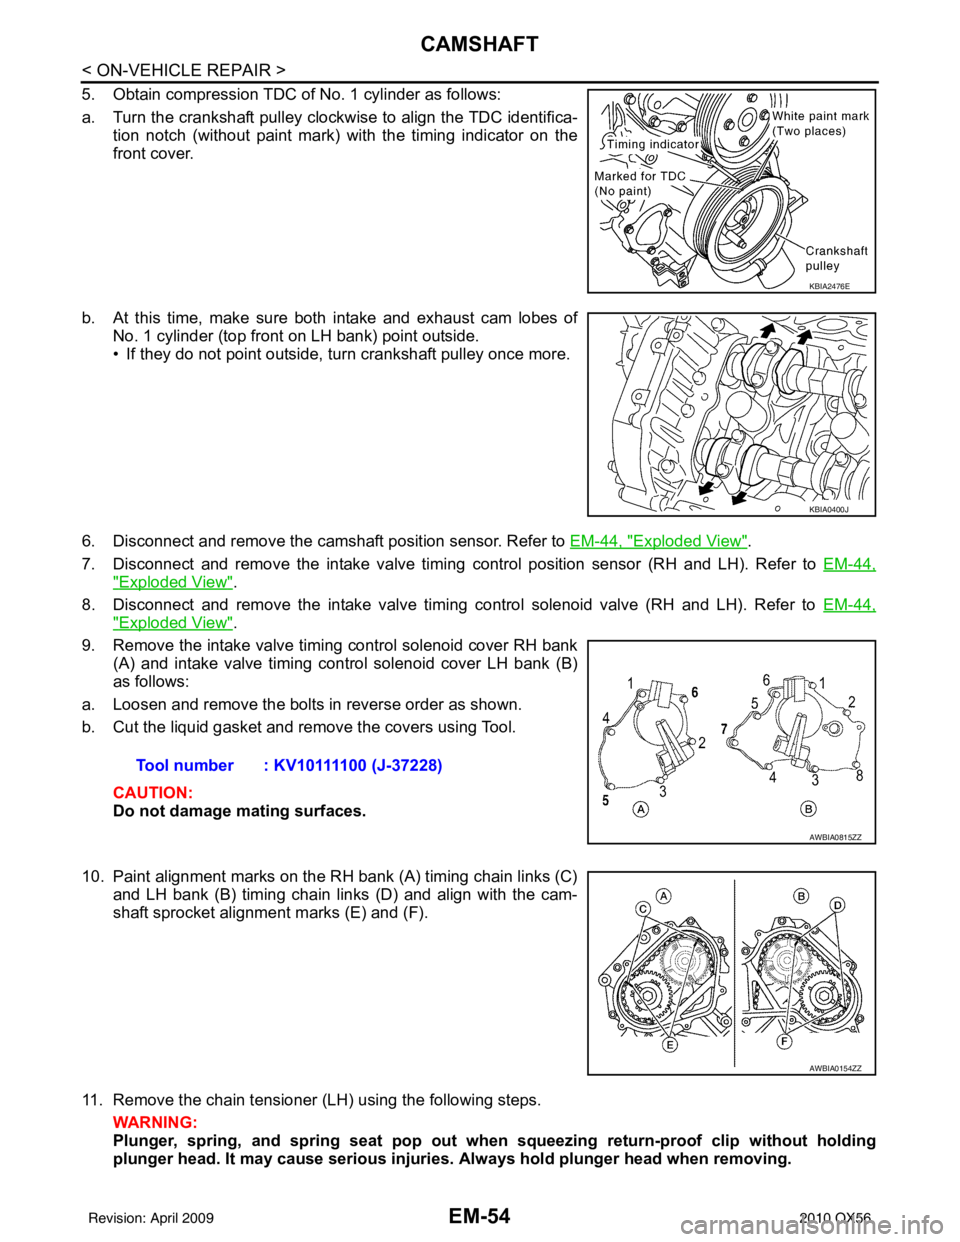
5. Obtain compression TDC of No. 1 cylinder as follows:
a. Turn the crankshaft pulley clockwise to align the TDC identifica-tion notch (without paint mark) with the timing indicator on the
front cover.
b. At this time, make sure both intake and exhaust cam lobes of No. 1 cylinder (top front on LH bank) point outside.
• If they do not point outside, turn crankshaft pulley once more.
6. Disconnect and remove the camshaft position sensor. Refer to EM-44, "
Exploded View".
7. Disconnect and remove the intake valve timing c ontrol position sensor (RH and LH). Refer to EM-44,
"Exploded View".
8. Disconnect and remove the intake valve timing control solenoid valve (RH and LH). Refer to EM-44,
"Exploded View".
9. Remove the intake valve timing control solenoid cover RH bank (A) and intake valve timing control solenoid cover LH bank (B)
as follows:
a. Loosen and remove the bolts in reverse order as shown.
b. Cut the liquid gasket and remove the covers using Tool.
CAUTION:
Do not damage mating surfaces.
10. Paint alignment marks on the RH bank (A) timing chain links (C) and LH bank (B) timing chain links (D) and align with the cam-
shaft sprocket alignment marks (E) and (F).
11. Remove the chain tensioner (LH) using the following steps. WARNING:
Plunger, spring, and spring seat pop out when squeezing return-proof clip without holding
plunger head. It may cause serious injuries. Always hold plunger head when removing.
KBIA2476E
KBIA0400J
Tool number : KV10111100 (J-37228)
AWBIA0815ZZ
AWBIA0154ZZ
Revision: April 20092010 QX56
Page 1906 of 4210

CAMSHAFTEM-55
< ON-VEHICLE REPAIR >
C
DE
F
G H
I
J
K L
M A
EM
NP
O
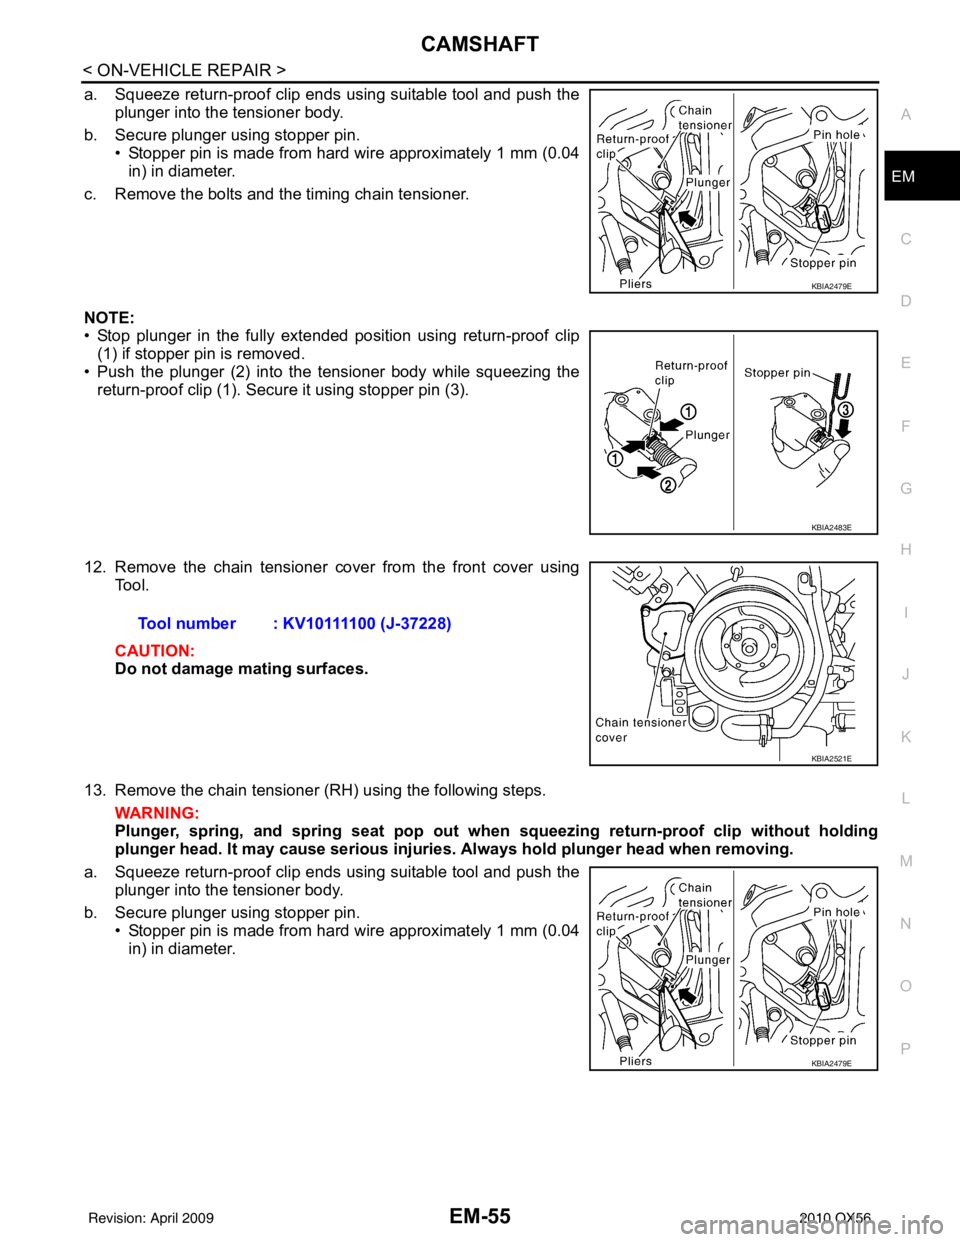
a. Squeeze return-proof clip ends using suitable tool and push the
plunger into the tensioner body.
b. Secure plunger using stopper pin. • Stopper pin is made from hard wire approximately 1 mm (0.04in) in diameter.
c. Remove the bolts and the timing chain tensioner.
NOTE:
• Stop plunger in the fully extended position using return-proof clip (1) if stopper pin is removed.
• Push the plunger (2) into the tensioner body while squeezing the return-proof clip (1). Secure it using stopper pin (3).
12. Remove the chain tensioner cover from the front cover using Tool.
CAUTION:
Do not damage mating surfaces.
13. Remove the chain tensioner (RH) using the following steps. WARNING:
Plunger, spring, and spring seat pop out when squeezing return -proof clip without holding
plunger head. It may cause serious injuries. Always hold plunger head when removing.
a. Squeeze return-proof clip ends using suitable tool and push the plunger into the tensioner body.
b. Secure plunger using stopper pin. • Stopper pin is made from hard wire approximately 1 mm (0.04in) in diameter.
KBIA2479E
KBIA2483E
Tool number : KV10111100 (J-37228)
KBIA2521E
KBIA2479E
Revision: April 20092010 QX56