2010 INFINITI QX56 4WD
[x] Cancel search: 4WDPage 2821 of 4210
MWI
COMBINATION METERMWI-59
< ECU DIAGNOSIS >
C
DE
F
G H
I
J
K L
M B A
O P
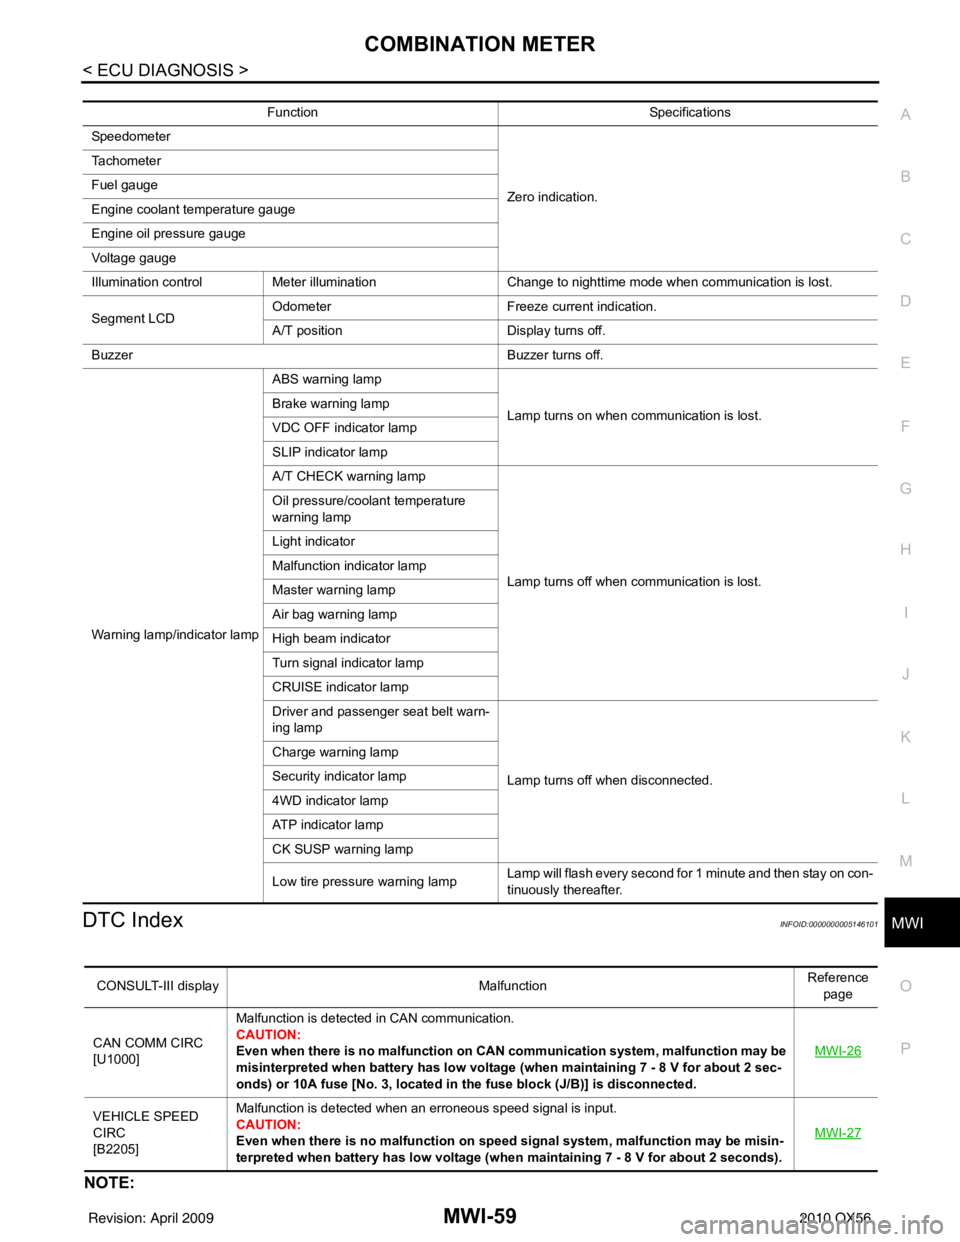
DTC IndexINFOID:0000000005146101
NOTE:
Function Specifications
Speedometer
Zero indication.
Tachometer
Fuel gauge
Engine coolant temperature gauge
Engine oil pressure gauge
Voltage gauge
Illumination control
Meter illumination Change to nighttime mode when communication is lost.
Segment LCD Odometer
Freeze current indication.
A/T position Display turns off.
Buzzer Buzzer turns off.
Warning lamp/indicator lamp ABS warning lamp
Lamp turns on when communication is lost.
Brake warning lamp
VDC OFF indicator lamp
SLIP indicator lamp
A/T CHECK warning lamp
Lamp turns off when communication is lost.
Oil pressure/coolant temperature
warning lamp
Light indicator
Malfunction indicator lamp
Master warning lamp
Air bag warning lamp
High beam indicator
Turn signal indicator lamp
CRUISE indicator lamp
Driver and passenger seat belt warn-
ing lamp
Lamp turns off when disconnected.
Charge warning lamp
Security indicator lamp
4WD indicator lamp
ATP indicator lamp
CK SUSP warning lamp
Low tire pressu
re warning lamp Lamp will flash every second for 1 minute and then stay on con-
tinuously thereafter.
CONSULT-III display
MalfunctionReference
page
CAN COMM CIRC
[U1000] Malfunction is detected in CAN communication.
CAUTION:
Even when there is no ma
lfunction on CAN communication system, malfunction may be
misinterpreted when battery has low voltag e (when maintaining 7 - 8 V for about 2 sec-
onds) or 10A fuse [No. 3, located in the fuse block (J/B)] is disconnected. MWI-26
VEHICLE SPEED
CIRC
[B2205]Malfunction is detected when an erroneous speed signal is input.
CAUTION:
Even when there is no malfunction on speed signal system, malfunction may be misin-
terpreted when battery has low voltage (whe
n maintaining 7 - 8 V for about 2 seconds). MWI-27
Revision: April 20092010 QX56
Page 2953 of 4210
PG
HARNESSPG-43
< COMPONENT DIAGNOSIS >
C
DE
F
G H
I
J
K L
B A
O P
N
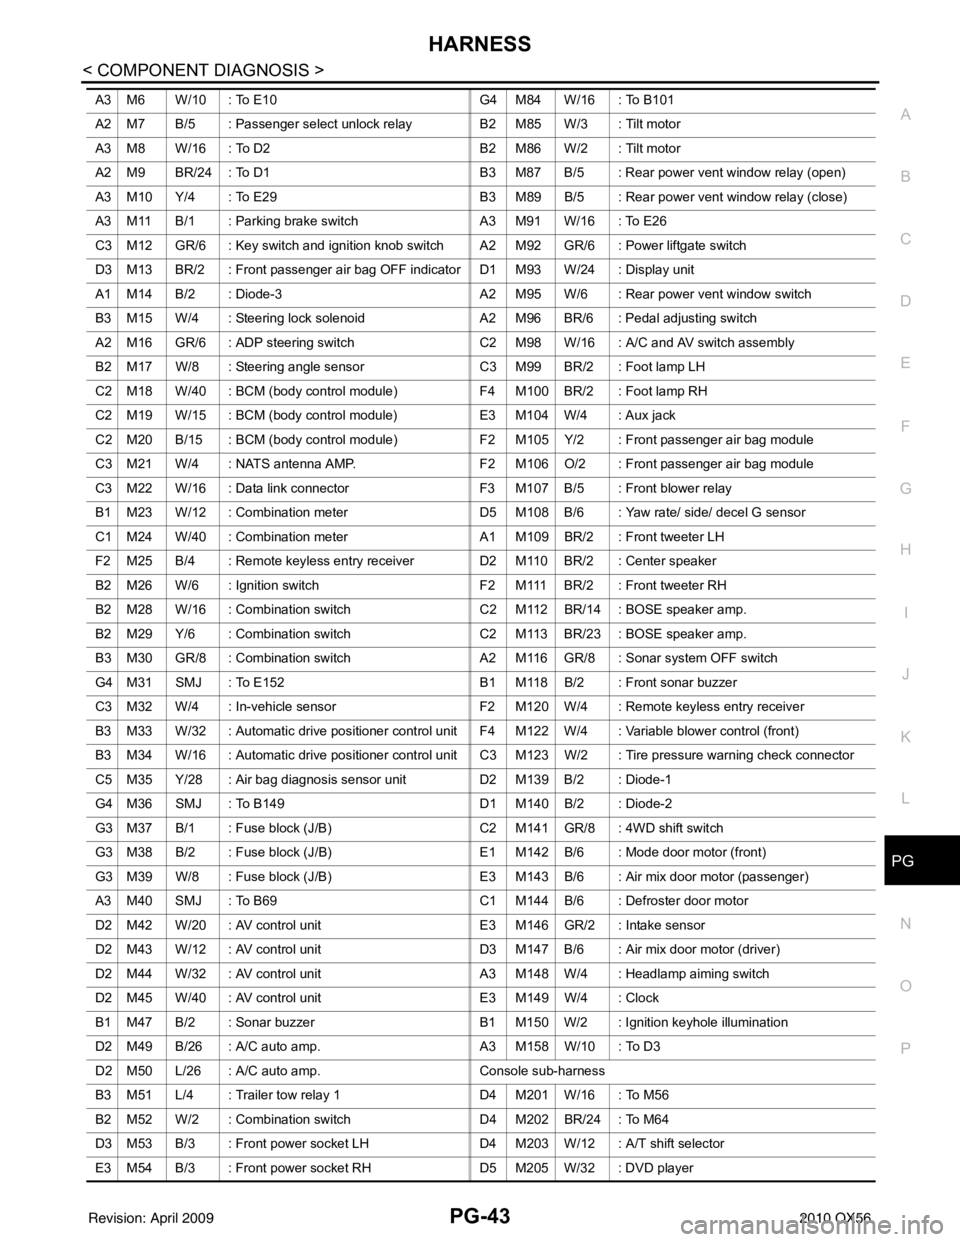
A3 M6 W/10 : To E10
G4 M84 W/16 : To B101
A2 M7 B/5 : Passenger select unlock relay B2 M85 W/3 : Tilt motor
A3 M8 W/16 : To D2 B2 M86 W/2 : Tilt motor
A2 M9 BR/24 : To D1 B3 M87 B/5 : Rear power vent window relay (open)
A3 M10 Y/4 : To E29 B3 M89 B/5 : Rear power vent window relay (close)
A3 M11 B/1 : Parking brake switch A3 M91 W/16 : To E26
C3 M12 GR/6 : Key switch and ignition knob switch A2 M92 GR/6 : Power liftgate switch
D3 M13 BR/2 : Front passenger air bag OFF indicator D1 M93 W/24 : Display unit
A1 M14 B/2 : Diode-3 A2 M95 W/6 : Rear power vent window switch
B3 M15 W/4 : Steering lock solenoid A2 M96 BR/6 : Pedal adjusting switch
A2 M16 GR/6 : ADP steering switch C2 M98 W/16 : A/C and AV switch assembly
B2 M17 W/8 : Steering angle sensor C3 M99 BR/2 : Foot lamp LH
C2 M18 W/40 : BCM (body control module) F4 M100 BR/2 : Foot lamp RH
C2 M19 W/15 : BCM (body control module) E3 M104 W/4 : Aux jack
C2 M20 B/15 : BCM (body control module) F2 M105 Y/2 : Front passenger air bag module
C3 M21 W/4 : NATS antenna AMP. F2 M106 O/2 : Front passenger air bag module
C3 M22 W/16 : Data link connector F3 M107 B/5 : Front blower relay
B1 M23 W/12 : Combination meter D5 M108 B/6 : Yaw rate/ side/ decel G sensor
C1 M24 W/40 : Combination meter A1 M109 BR/2 : Front tweeter LH
F2 M25 B/4 : Remote keyless entry receiver D2 M110 BR/2 : Center speaker
B2 M26 W/6 : Ignition switch F2 M111 BR/2 : Front tweeter RH
B2 M28 W/16 : Combination switch C2 M112 BR/14 : BOSE speaker amp.
B2 M29 Y/6 : Combination switch C2 M113 BR/23 : BOSE speaker amp.
B3 M30 GR/8 : Combination switch A2 M116 GR/8 : Sonar system OFF switch
G4 M31 SMJ : To E152 B1 M118 B/2 : Front sonar buzzer
C3 M32 W/4 : In-vehicle sensor F2 M120 W/4 : Remote keyless entry receiver
B3 M33 W/32 : Automatic drive positioner control unit F4 M122 W/4 : Variable blower control (front)
B3 M34 W/16 : Automatic drive positioner control unit C3 M123 W/2 : Tire pressure warning check connector
C5 M35 Y/28 : Air bag diagnosis sensor unit D2 M139 B/2 : Diode-1
G4 M36 SMJ : To B149 D1 M140 B/2 : Diode-2
G3 M37 B/1 : Fuse block (J/B) C2 M141 GR/8 : 4WD shift switch
G3 M38 B/2 : Fuse block (J/B) E1 M142 B/6 : Mode door motor (front)
G3 M39 W/8 : Fuse block (J/B) E3 M143 B/6 : Air mix door motor (passenger)
A3 M40 SMJ : To B69 C1 M144 B/6 : Defroster door motor
D2 M42 W/20 : AV control unit E3 M146 GR/2 : Intake sensor
D2 M43 W/12 : AV control unit D3 M147B/6 : Air mix door motor (driver)
D2 M44 W/32 : AV control unit A3 M148 W/4 : Headlamp aiming switch
D2 M45 W/40 : AV control unit E3 M149 W/4 : Clock
B1 M47 B/2 : Sonar buzzer B1 M150 W/2 : Ignition keyhole illumination
D2 M49 B/26 : A/C auto amp. A3 M158 W/10 : To D3
D2 M50 L/26 : A/C auto amp. Console sub-harness
B3 M51 L/4 : Trailer tow relay 1 D4 M201 W/16 : To M56
B2 M52 W/2 : Combination switch D4 M202 BR/24 : To M64
D3 M53 B/3 : Front power socket LH D4 M203 W/12 : A/T shift selector
E3 M54 B/3 : Front power socket RH D5 M205 W/32 : DVD player
Revision: April 20092010 QX56
Page 3217 of 4210
RSU-30
< SERVICE DATA AND SPECIFICATIONS (SDS)
SERVICE DATA AND SPECIFICATIONS (SDS)
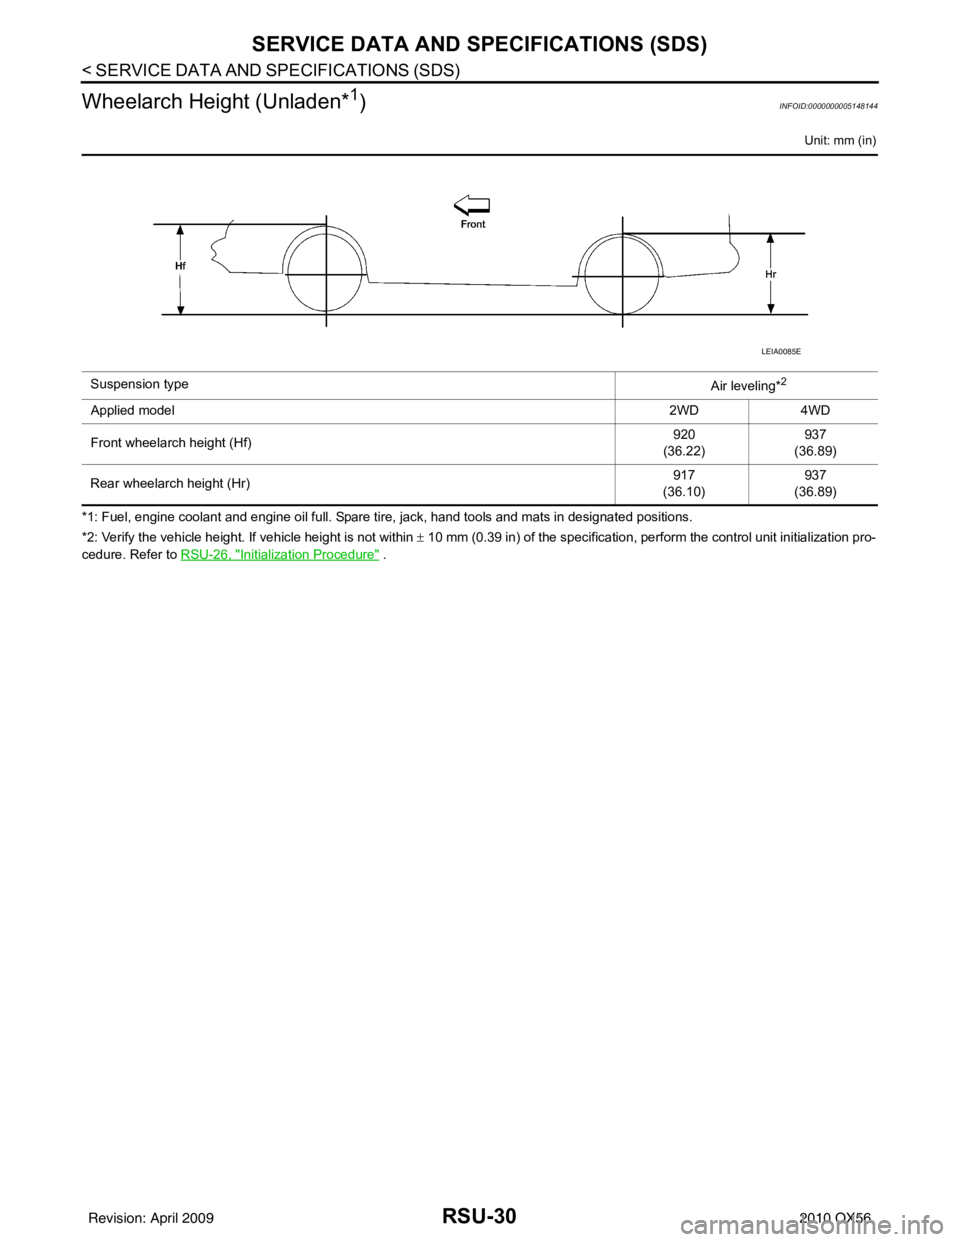
Wheelarch Height (Unladen*
1)INFOID:0000000005148144
Unit: mm (in)
*1: Fuel, engine coolant and engine oil full. Spare tire, jack, hand tools and mats in designated positions.
*2: Verify the vehicle height. If vehicle height is not within ± 10 mm (0.39 in) of the specification, perform the control unit initialization pro-
cedure. Refer to RSU-26, "
Initialization Procedure" .
Suspension type
Air leveling*
2
Applied model2WD4WD
Front wheelarch height (Hf) 920
(36.22) 937
(36.89)
Rear wheelarch height (Hr) 917
(36.10) 937
(36.89)
LEIA0085E
Revision: April 20092010 QX56
Page 3696 of 4210

TM-1
TRANSMISSION & DRIVELINE
CEF
G H
I
J
K L
M
SECTION TM
A
B
TM
N
O P
CONTENTS
TRANSAXLE & TRANSMISSION
BASIC INSPECTION ....... .............................5
DIAGNOSIS AND REPAIR WORKFLOW ..... .....5
Work Flow ........................................................... ......5
Diagnostic Work Sheet ..............................................6
FUNCTION DIAGNOSIS ...............................8
A/T CONTROL SYSTEM ................................ .....8
Cross-Sectional View (2WD models) .................. ......8
Cross-Sectional View (4WD models) ........................9
Shift Mechanism ........................................................9
TCM Function ..........................................................20
CAN Communication ...............................................21
Input/Output Signal of TCM .....................................22
Line Pressure Control .............................................22
Shift Control ........................................................ ....24
Lock-up Control .......................................................25
Engine Brake Control ..............................................26
Control Valve ...........................................................26
Component Parts Location ......................................28
A/T SHIFT LOCK SYSTEM ............................ ....29
System Description ............................................. ....29
Component Parts Location ......................................29
ON BOARD DIAGNOSTIC (OBD) SYSTEM ......30
Introduction ......................................................... ....30
OBD-II Function for A/T System ..............................30
One or Two Trip Detection Logic of OBD-II ............30
OBD-II Diagnostic Trouble Code (DTC) ..................30
Malfunction Indicator Lamp (MIL) ............................31
DIAGNOSIS SYSTEM (TCM) .............................32
CONSULT-III Function (TRANSMISSION) ......... ....32
Diagnosis Procedure without CONSULT-III ........ ....37
COMPONENT DIAGNOSIS .........................40
U1000 CAN COMM CI RCUIT .............................40
Description .......................................................... ....40
On Board Diagnosis Logic ......................................40
Possible Cause .................................................... ....40
DTC Confirmation Procedure ..................................40
Diagnosis Procedure ...............................................40
P0615 STARTER RELAY .................................41
Description ...............................................................41
CONSULT-III Reference Value in Data Monitor
Mode .................................................................... ....
41
On Board Diagnosis Logic .......................................41
Possible Cause ........................................................41
DTC Confirmation Procedure ..................................41
Diagnosis Procedure ...............................................41
P0700 TRANSMISSION CONTROL .................44
Description ...............................................................44
On Board Diagnosis Logic .......................................44
Possible Cause ........................................................44
DTC Confirmation Procedure ..................................44
Diagnosis Procedure ...............................................44
P0705 TRANSMISSION RANGE SWITCH A ...45
Description ...............................................................45
CONSULT-III Reference Value in Data Monitor
Mode .................................................................... ....
45
On Board Diagnosis Logic .......................................45
Possible Cause ........................................................45
DTC Confirmation Procedure ..................................45
Diagnosis Procedure ...............................................45
P0717 INPUT SPEED SENSOR A ....................48
Description ...............................................................48
CONSULT-III Reference Value in Data Monitor
Mode .................................................................... ....
48
On Board Diagnosis Logic .......................................48
Possible Cause ........................................................48
DTC Confirmation Procedure ..................................48
Diagnosis Procedure ...............................................48
P0720 OUTPUT SPEED SENSOR ...................50
Description ...............................................................50
CONSULT-III Reference Value in Data Monitor
Mode .................................................................... ....
50
Revision: April 20092010 QX56
Page 3699 of 4210

TM-4
STALL TEST ....................................................155
Inspection and Judgment .................................... ..155
LINE PRESSURE TEST ..................................157
Inspection and Judgment .................................... ..157
ROAD TEST .....................................................159
Description ........................................................... ..159
Check Before Engine Is Started ............................159
Check At Idle ....................................................... ..159
Cruise Test - Part 1 ...............................................160
Cruise Test - Part 2 ...............................................162
Cruise Test - Part 3 ...............................................162
Vehicle Speed When Shifting Gears .....................163
Vehicle Speed When Performing and Releasing
Complete Lock-up .................................................
163
A/T POSITION .................................................164
Adjustment of A/T Position .................................. ..164
Checking of A/T Position .......................................164
ON-VEHICLE REPAIR ...............................165
SHIFT CONTROL SYSTEM ........................... .165
A/T Shift Selector Removal and Installation ..........165
AIR BREATHER HOSE .................................. .166
Removal and Installation ..................................... ..166
OIL PAN ...........................................................170
Oil Pan ................................................................. ..170
CONTROL VALVE WITH TCM ........................172
Control Valve with TCM and A/T Fluid Tempera-
ture Sensor 2 and Plug ........................................ ..
172
REAR OIL SEAL ..............................................184
Rear Oil Seal ....................................................... ..184
FLUID COOLER SYSTEM ...............................185
Exploded View ..................................................... ..185
Removal and Installation .......................................185
REMOVAL AND INSTALLATION ..............186
TRANSMISSION ASSEMBLY ........................ .186
Removal and Installation (2WD) .......................... .186
Removal and Installation (4WD) ...........................188
DISASSEMBLY AND ASSEMBLY ...........192
OVERHAUL ......................................................192
Component .......................................................... .192
Oil Channel ...........................................................199
Location of Adjusting Shims, Needle Bearings,
Thrust Washers and Snap Rings ......................... .
201
DISASSEMBLY .............................................. ..204
Disassembly ......................................................... .204
REPAIR FOR COMPONENT PARTS ..............223
Oil Pump .............................................................. .223
Front Sun Gear, 3rd One-Way Clutch ...................225
Front Carrier, Input Clutch, Rear Internal Gear .....227
Mid Sun Gear, Rear Sun Gear, High and Low Re-
verse Clutch Hub ................................................. .
232
High and Low Reverse Clutch ..............................237
Direct Clutch .........................................................239
ASSEMBLY .................................................... ..242
Assembly (1) ........................................................ .242
Adjustment ............................................................255
Assembly (2) .........................................................257
SERVICE DATA AND SPECIFICATIONS
(SDS) ........ .................................................
265
SERVICE DATA AND SPECIFICATIONS
(SDS) .............................................................. ..
265
General Specification ........................................... .265
Vehicle Speed at Which Gear Shifting Occurs .....265
Vehicle Speed at Which Lock-up Occurs/Releas-
es ......................................................................... .
266
Stall Speed ............................................................266
Line Pressure ........................................................266
Input Speed Sensor ..............................................266
Output Speed Sensor ...........................................266
Reverse Brake ......................................................266
Total End Play .......................................................267
Torque Converter ..................................................267
Revision: April 20092010 QX56
Page 3704 of 4210
A/T CONTROL SYSTEMTM-9
< FUNCTION DIAGNOSIS >
CEF
G H
I
J
K L
M A
B
TM
N
O P
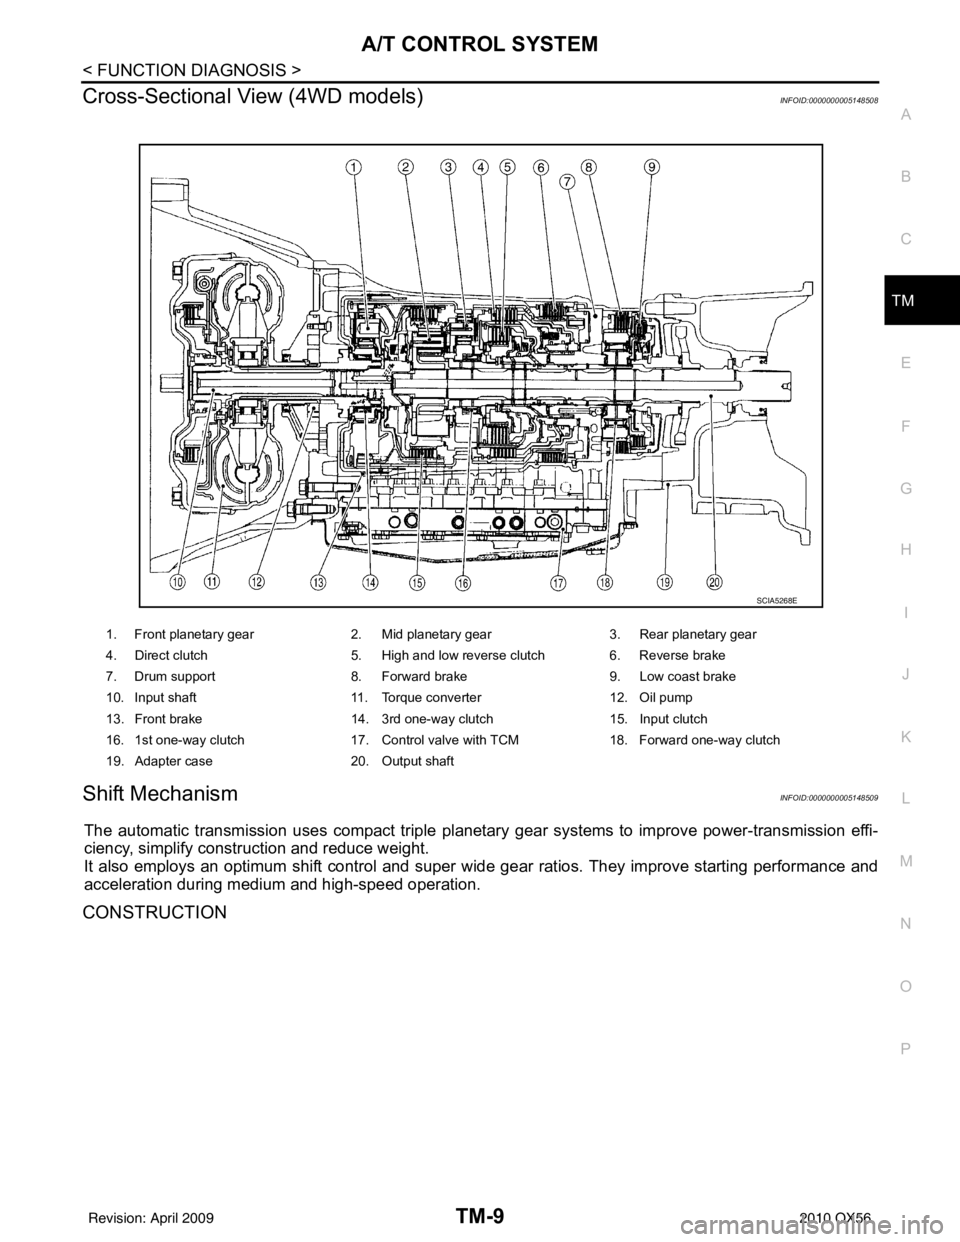
Cross-Sectional View (4WD models)INFOID:0000000005148508
Shift MechanismINFOID:0000000005148509
The automatic transmission uses compact triple planet ary gear systems to improve power-transmission effi-
ciency, simplify construction and reduce weight.
It also employs an optimum shift control and super wide gear ratios. They improve starting performance and
acceleration during medium and high-speed operation.
CONSTRUCTION
1. Front planetary gear 2. Mid planetary gear 3. Rear planetary gear
4. Direct clutch 5. High and low reverse clutch 6. Reverse brake
7. Drum support 8. Forward brake 9. Low coast brake
10. Input shaft 11. Torque converter 12. Oil pump
13. Front brake 14. 3rd one-way clutch 15. Input clutch
16. 1st one-way clutch 17. Control valve with TCM 18. Forward one-way clutch
19. Adapter case 20. Output shaft
SCIA5268E
Revision: April 20092010 QX56
Page 3843 of 4210
TM-148
< ON-VEHICLE MAINTENANCE >
A/T FLUID
ON-VEHICLE MAINTENANCE
A/T FLUID
Checking the A/T Fluid (ATF)INFOID:0000000005148722
CAUTION:
If using the vehicle for towing, the A/T fluid must be replaced as specified. Refer to MA-9, "
Introduc-
tion of Periodic Maintenance".
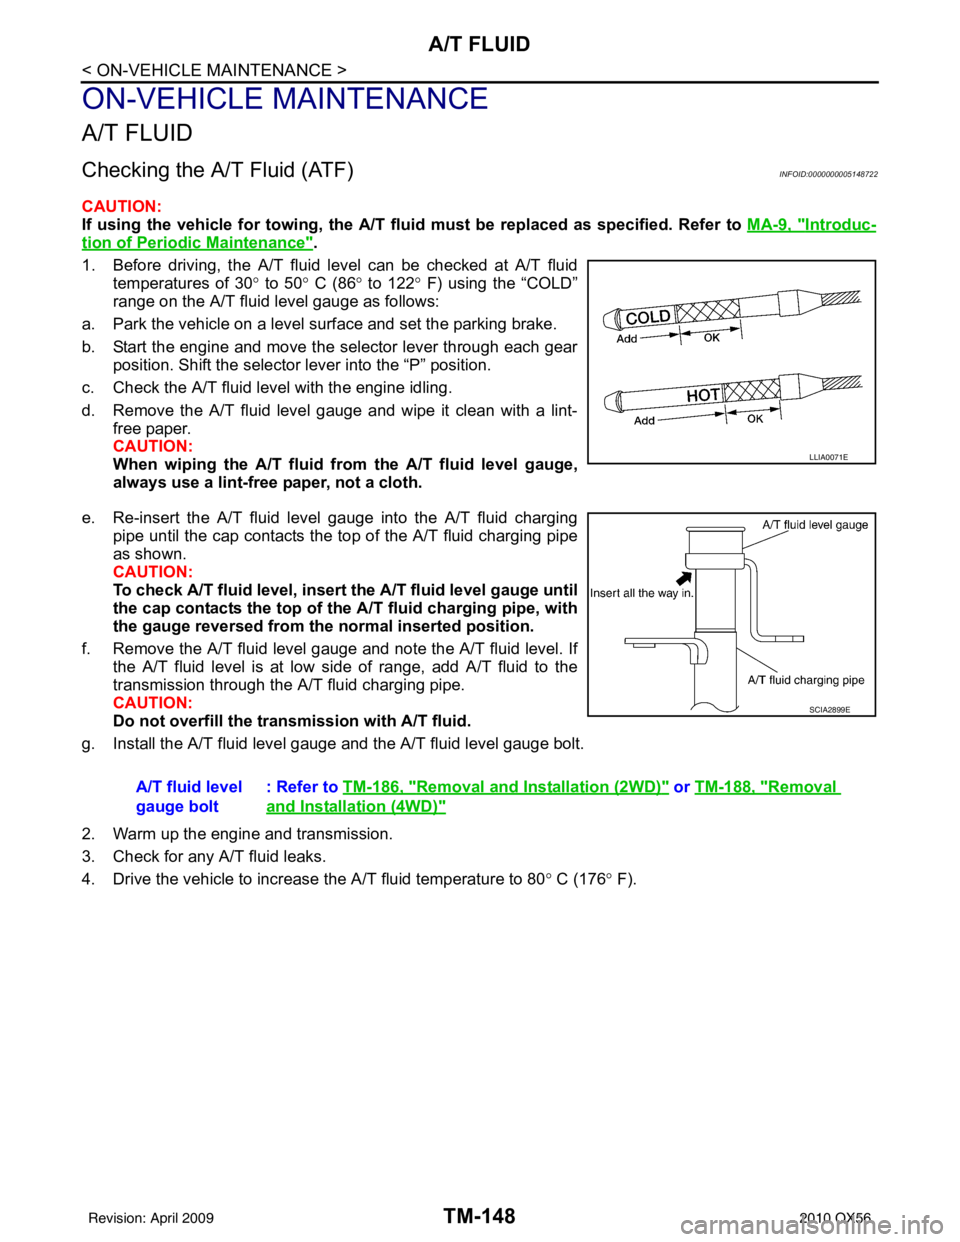
1. Before driving, the A/T fluid level can be checked at A/T fluid temperatures of 30 ° to 50° C (86° to 122° F) using the “COLD”
range on the A/T fluid level gauge as follows:
a. Park the vehicle on a level surface and set the parking brake.
b. Start the engine and move the selector lever through each gear position. Shift the selector lever into the “P” position.
c. Check the A/T fluid level with the engine idling.
d. Remove the A/T fluid level gauge and wipe it clean with a lint- free paper.
CAUTION:
When wiping the A/T fluid from the A/ T fluid level gauge,
always use a lint-free paper, not a cloth.
e. Re-insert the A/T fluid level gauge into the A/T fluid charging pipe until the cap contacts the t op of the A/T fluid charging pipe
as shown.
CAUTION:
To check A/T fluid level, insert th e A/T fluid level gauge until
the cap contacts the top of the A/T fluid charging pipe, with
the gauge reversed from th e normal inserted position.
f. Remove the A/T fluid level gauge and note the A/T fluid level. If the A/T fluid level is at low si de of range, add A/T fluid to the
transmission through the A/T fluid charging pipe.
CAUTION:
Do not overfill the transmission with A/T fluid.
g. Install the A/T fluid level gauge and the A/T fluid level gauge bolt.
2. Warm up the engine and transmission.
3. Check for any A/T fluid leaks.
4. Drive the vehicle to increase the A/T fluid temperature to 80 ° C (176 ° F).
LLIA0071E
A/T fluid level
gauge bolt : Refer to
TM-186, "Removal and Installation (2WD)" or TM-188, "Removal
and Installation (4WD)"
SCIA2899E
Revision: April 20092010 QX56
Page 3844 of 4210
A/T FLUIDTM-149
< ON-VEHICLE MAINTENANCE >
CEF
G H
I
J
K L
M A
B
TM
N
O P
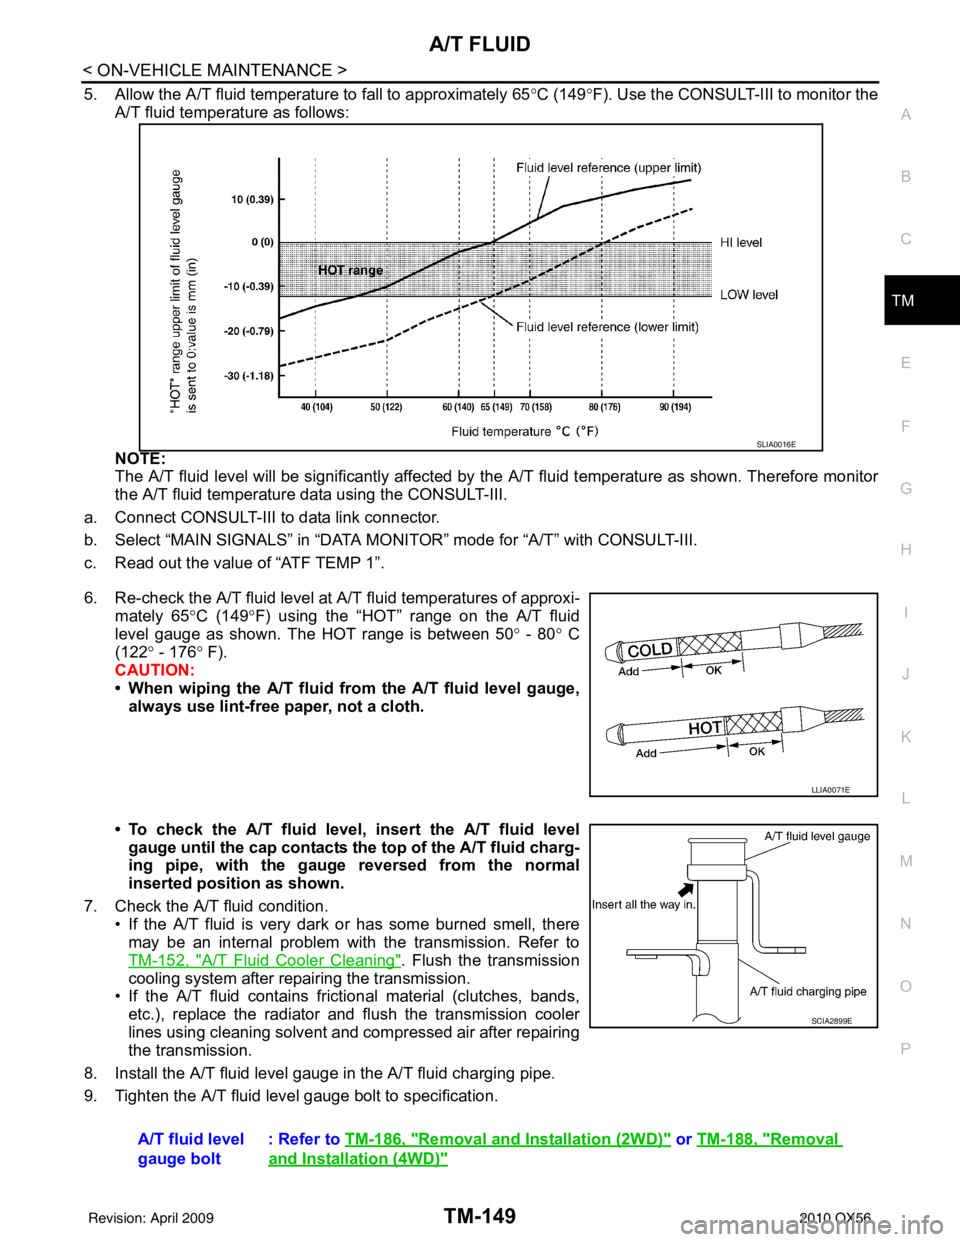
5. Allow the A/T fluid temperature to fall to approximately 65 °C (149° F). Use the CONSULT-III to monitor the
A/T fluid temperature as follows:
NOTE:
The A/T fluid level will be significantly affected by the A/T fluid temperature as shown. Therefore monitor
the A/T fluid temperature data using the CONSULT-III.
a. Connect CONSULT-III to data link connector.
b. Select “MAIN SIGNALS” in “DATA MO NITOR” mode for “A/T” with CONSULT-III.
c. Read out the value of “ATF TEMP 1”.
6. Re-check the A/T fluid level at A/T fluid temperatures of approxi-
mately 65° C (149°F) using the “HOT” range on the A/T fluid
level gauge as shown. The HOT range is between 50 ° - 80° C
(122° - 176 ° F).
CAUTION:
• When wiping the A/T fluid from the A/T fluid level gauge, always use lint-free paper, not a cloth.
• To check the A/T fluid level, insert the A/T fluid level gauge until the cap contacts the top of the A/T fluid charg-
ing pipe, with the gauge reversed from the normal
inserted position as shown.
7. Check the A/T fluid condition. • If the A/T fluid is very dark or has some burned smell, there
may be an internal problem with the transmission. Refer to
TM-152, "
A/T Fluid Cooler Cleaning". Flush the transmission
cooling system after repairing the transmission.
• If the A/T fluid contains frictional material (clutches, bands, etc.), replace the radiator and flush the transmission cooler
lines using cleaning solvent and compressed air after repairing
the transmission.
8. Install the A/T fluid level gauge in the A/T fluid charging pipe.
9. Tighten the A/T fluid level gauge bolt to specification.
SLIA0016E
LLIA0071E
A/T fluid level
gauge bolt : Refer to
TM-186, "Removal and Installation (2WD)" or TM-188, "Removal
and Installation (4WD)"
SCIA2899E
Revision: April 20092010 QX56