Page 246 of 351

The anti-lock brake system (ABS)
helps prevent the wheels from
locking up, and helps you retain
steering control by pumping the
brakes rapidly, much faster than a
person can do it.
The electronic brake distribution
(EBD) system, which is part of the
ABS, also balances the front-to-rear
braking distribution according to
vehicle loading.
You should never pump the brake pedal.
Let the ABS work for you by always
keeping firm, steady pressure on the
brake pedal. This is sometimes
referred to as‘‘stomp and steer. ’’You will feel a pulsation in the brake
pedal when the ABS activates, and
you may hear some noise. This is
normal: it is the ABS rapidly
pumping the brakes. On dry
pavement, you will need to press on
the brake pedal very hard before the
ABS activates. However, you may
feel the ABS activate immediately if
you are trying to stop on snow or ice.
ABS Indicator
If the ABS indicator comes on, the
anti-lock function of the braking
system has shut down. The brakes
still work like a conventional system,
but without anti-lock. You should
have your dealer inspect your vehicle
as soon as possible.
If the ABS indicator comes on while
driving, test the brakes as shown on
page 305.
CONTINUED
Anti-lock Brakes (ABS)
231
Driving
Table of Contents
Page 247 of 351

If the ABS indicator and the brake
system indicator come on together,
and the parking brake is fully
released, the EBD system may also
be shut down.
Test your brakes as instructed on
page 305. If the brakes feel normal,
drive slowly and have your vehicle
repaired by your dealer as soon as
possible. Avoid sudden hard braking
which could cause the rear wheels to
lock up and possibly lead to a loss ofcontrol.
On vehicles with VSA system
The VSA indicator will come on
along with the ABS indicator.Important Safety Reminders
ABS does not reduce the time or
distance it takes to stop thevehicle.
It only helps with the
steering control during braking.
ABS will not prevent a skid that
results from changing directionabruptly, such as trying to take a
corner too fast or making a sudden
lane change. Always drive at a safe
speed for the road and weatherconditions.
ABS cannot prevent a loss of stability. Always steer moderately
when you are braking hard. Severe
or sharp steering wheel movement
can still cause your vehicle to veer
into oncoming traffic or off the road. A vehicle with ABS may require a
longer distance to stop
on loose or
uneven surfaces, such as gravel or
snow, than a vehicle without anti-lock.
Anti-lock Brakes (ABS)
232
Table of Contents
Page 253 of 351

Towing a Trailer
Your vehicle is not designed to tow a
trailer. Attempting to do so can void
your warranties.Towing Your Vehicle Behind aMotorhome
Your vehicle can be towed behind a
motorhome at legal highway speeds
up to 65 mph (100 km/h). Do not
exceed 65 mph (100 km/h).
Otherwise, severe transmission
damage will occur.
When purchasing a tow bar, make
sure you select a reputable
manufacturer and installer. Follow
the manufacturer's attachment
instructions carefully.
The steering system can be damaged if
the steering wheel is locked. Leave the
ignition switch in the ACCESSORY (I)
position, and make sure the steering
wheel turns freely before you begintowing.
Automatic transmission:
Perform the following procedure
every day immediately before you
begin towing. Otherwise severe
automatic transmission damage willoccur.
1. Check the transmission fluid level
(see page 259).
Do not overfill.
2. Start the engine.
3. Press on the brake pedal. Move
the shift lever through all its positions.
4. Shift to the D position and hold for 5 seconds, then to N. Let the
engine run for 3 minutes, then turn
it off.
Severe transmission damage will occur
if the vehicle is shifted from reverse to
neutral and then towed with the drive
wheels on the ground.
Towing a Trailer, Towing Your Vehicle Behind a Motorhome
238
Table of Contents
Page 254 of 351

5. Release the parking brake.
Manual transmission:
1. Move the shift lever into theNeutral position.
2. Release the parking brake.
Leave the ignition switch in the
ACCESSORY (I) position so the
steering wheel does not lock. Make
sure the radio and any items plugged
into the accessory power sockets are
turned off so you do not run down
the battery.
When you stop towing your vehicle
and shift out of the neutral position,
you may not be able to move the shift
lever from neutral to reverse or Park.
If this happens, press the brake pedal
and turn the ignition switch to the
ON (II) position, then shift out ofneutral.
Extended Towing
If you tow more than 8 hours in one
day, you should repeat the above
procedure at least every 8 hours
(when you stop for fuel, etc.).Failure to follow the recommended
instructions exactly will result in severe
automatic transmission damage. If you
cannot shift the transmission or start
the engine, your vehicle must be
transported on a flat-bed truck ortrailer.
CONTINUED
Towing Your Vehicle Behind a Motorhome
239
Driving
Table of Contents
Page 270 of 351

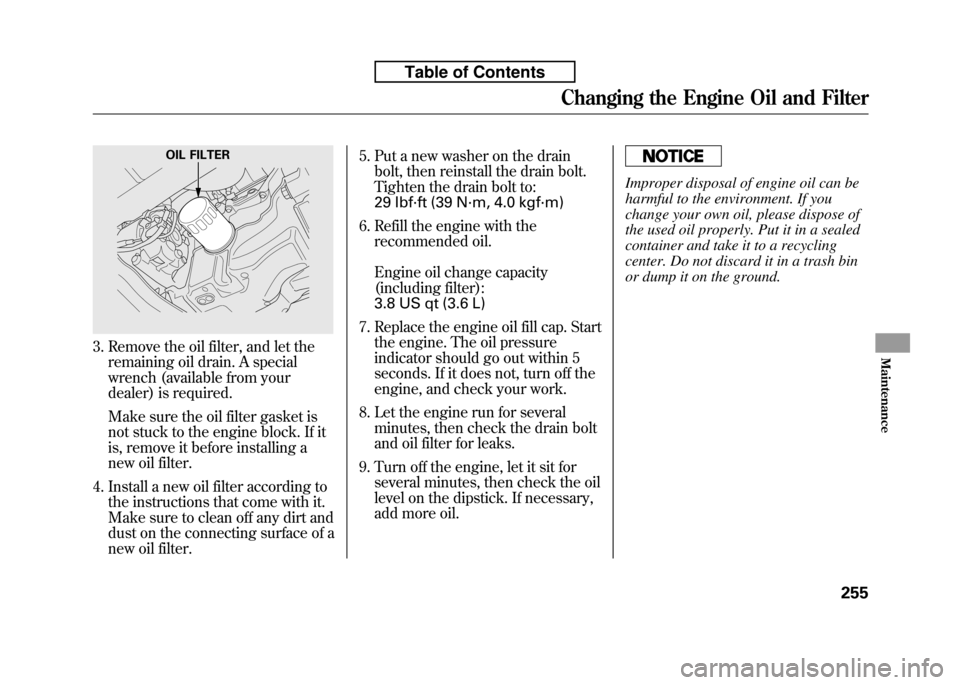
3. Remove the oil filter, and let theremaining oil drain. A special
wrench (available from your
dealer) is required.
Make sure the oil filter gasket is
not stuck to the engine block. If it
is, remove it before installing a
new oil filter.
4. Install a new oil filter according to the instructions that come with it.
Make sure to clean off any dirt and
dust on the connecting surface of a
new oil filter. 5. Put a new washer on the drain
bolt, then reinstall the drain bolt.
Tighten the drain bolt to:
29 lbf·ft (39 N·m, 4.0 kgf·m)
6. Refill the engine with the recommended oil.
Engine oil change capacity
(including filter):
3.8 US qt (3.6 L)
7. Replace the engine oil fill cap. Start the engine. The oil pressure
indicator should go out within 5
seconds. If it does not, turn off the
engine, and check your work.
8. Let the engine run for several minutes, then check the drain bolt
and oil filter for leaks.
9. Turn off the engine, let it sit for several minutes, then check the oil
level on the dipstick. If necessary,
add more oil.
Improper disposal of engine oil can be
harmful to the environment. If you
change your own oil, please dispose of
the used oil properly. Put it in a sealed
container and take it to a recycling
center. Do not discard it in a trash bin
or dump it on the ground.
OIL FILTER
Changing the Engine Oil and Filter
255
Maintenance
Table of Contents
Page 272 of 351
1. Make sure the engine and radiatorare cool.
2. Relieve any pressure in the cooling system by turning the radiator cap
counterclockwise, without
pressing down.
3. Remove the radiator cap by pushing down and turningcounterclockwise.4. The coolant level should be up tothe base of the filler neck. Add
coolant if it is low.
Pour the coolant slowly and
carefully so you do not spill any.
Clean up any spill immediately; it
could damage components in the
engine compartment.
5. Put the radiator cap back on, and tighten it fully. 6. Pour coolant into the reserve tank.
Fill it halfway between the MAX
and MIN marks. Put the cap back
on the reserve tank.
Do not add any rust inhibitors or
other additives to your vehicle's
cooling system. They may not be
compatible with the coolant or
engine components.
RADIATOR CAPRESERVE TANK
Engine Coolant
257
Maintenance
Table of Contents
Page 278 of 351

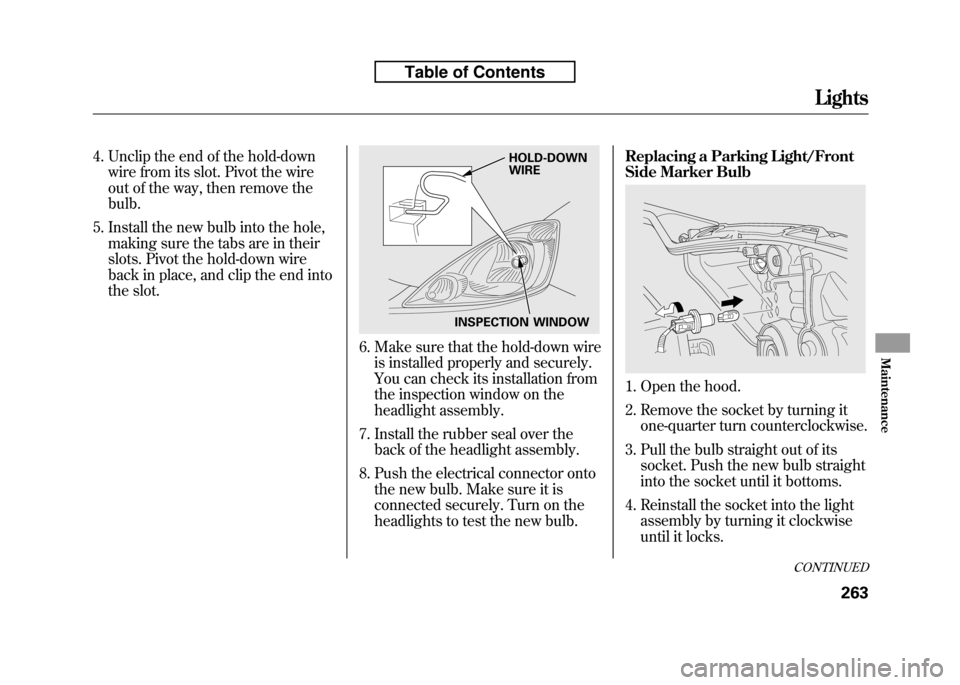
4. Unclip the end of the hold-downwire from its slot. Pivot the wire
out of the way, then remove thebulb.
5. Install the new bulb into the hole, making sure the tabs are in their
slots. Pivot the hold-down wire
back in place, and clip the end into
the slot.
6. Make sure that the hold-down wireis installed properly and securely.
You can check its installation from
the inspection window on the
headlight assembly.
7. Install the rubber seal over the back of the headlight assembly.
8. Push the electrical connector onto the new bulb. Make sure it is
connected securely. Turn on the
headlights to test the new bulb. Replacing a Parking Light/Front
Side Marker Bulb
1. Open the hood.
2. Remove the socket by turning it
one-quarter turn counterclockwise.
3. Pull the bulb straight out of its socket. Push the new bulb straight
into the socket until it bottoms.
4. Reinstall the socket into the light assembly by turning it clockwise
until it locks.
INSPECTION WINDOW HOLD-DOWN WIRE
CONTINUED
Lights
263
Maintenance
Table of Contents
Page 279 of 351
5. Turn on the lights to make surethe new bulb is working. Replacing a Front Turn Signal
Light Bulb
1. Open the hood.
2. Remove the socket by turning it
one-quarter turn counterclockwise.
3. Remove the bulb from the socket by pushing the bulb in and turning
it counterclockwise until it unlocks.
4. Install the new bulb in the socket. Turn it clockwise to lock it in place. 5. Reinstall the socket into the light
assembly by turning it clockwise
until it locks.
6. Turn on the lights to make sure the new bulb is working.
Lights
264
Table of Contents