Page 109 of 351
Front Seat Adjustments
See pages 11-12 for important safety
information and warnings about how to properly position the seats and seat-
backs.
Make all seat adjustments before you
start driving.
To adjust the seat forward or
backward, pull up on the bar under
the seat cushion's front edge. Move
the seat to the desired position, and
release the bar. Try to move the seat
to make sure it is locked in position.To change the seat-back angle, pull
up the lever on the outside of the
seat bottom.
Once a seat is adjusted correctly,
rock it back and forth to make sure it
is locked in position.
CONTINUED
Seats
93
Instruments and Controls
Table of Contents
Page 111 of 351

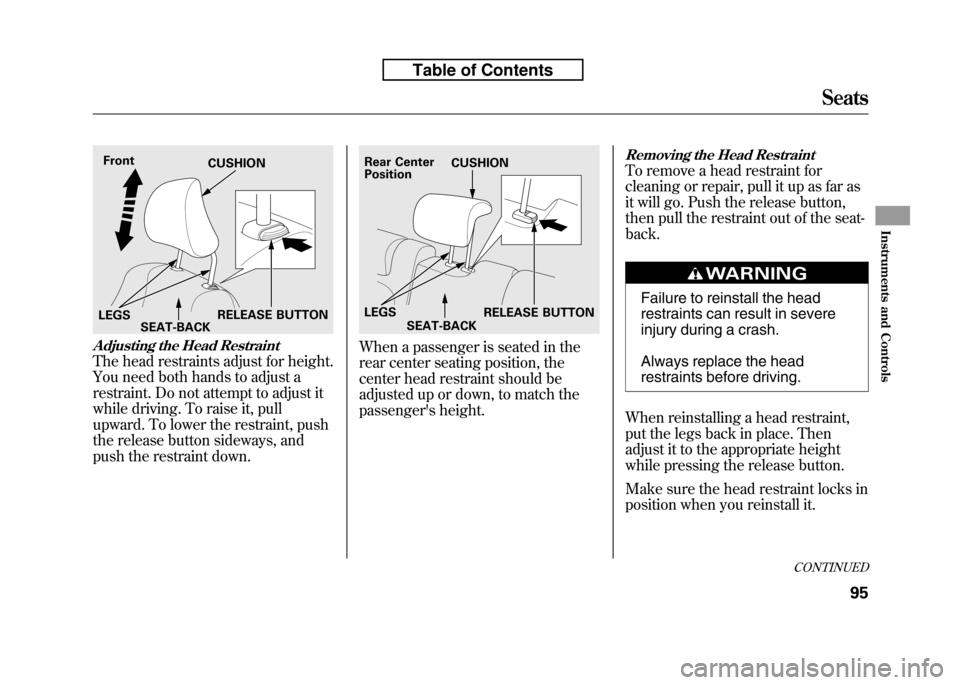
Adjusting the Head Restraint
The head restraints adjust for height.
You need both hands to adjust a
restraint. Do not attempt to adjust it
while driving. To raise it, pull
upward. To lower the restraint, push
the release button sideways, and
push the restraint down.
When a passenger is seated in the
rear center seating position, the
center head restraint should be
adjusted up or down, to match the
passenger's height.
Removing the Head Restraint
To remove a head restraint for
cleaning or repair, pull it up as far as
it will go. Push the release button,
then pull the restraint out of the seat-back.
Failure to reinstall the head
restraints can result in severe
injury during a crash.
Always replace the head
restraints before driving.
When reinstalling a head restraint,
put the legs back in place. Then
adjust it to the appropriate height
while pressing the release button.
Make sure the head restraint locks in
position when you reinstall it.
Front
RELEASE BUTTON
CUSHION
LEGS SEAT-BACKRear Center Position
RELEASE BUTTON
CUSHION
LEGS SEAT-BACK
CONTINUED
Seats
95
Instruments and Controls
Table of Contents
Page 113 of 351
Pull up the rear seat cushion, and
fold the seat leg down. Push the seat
cushion firmly against the seat-back
to lock it.To return the seat cushion to its
original position, first make sure
there are no items or seat belts on
the floor, then pull up the seat leg
fully, and push down the seat
cushion slowly while holding it with
your hands. Set the seat leg in the
floor guide. A latch comes out when
the leg is set properly.Folding the Rear Seat Down
The rear seat-backs can be folded
down for more cargo room.
Each side folds down separately, so
you can still carry a passenger in the
rear outer seating position.
Remove any items from the seat
before folding down the seat-back.
Make sure the seat belt buckles are
on the seat ( see page96).
Make sure there are no items or seat
belts on the floor before folding
down the seats.
FLOOR GUIDE
LEG
LATCH
CONTINUED
Seats
97
Instruments and Controls
Table of Contents
Page 114 of 351

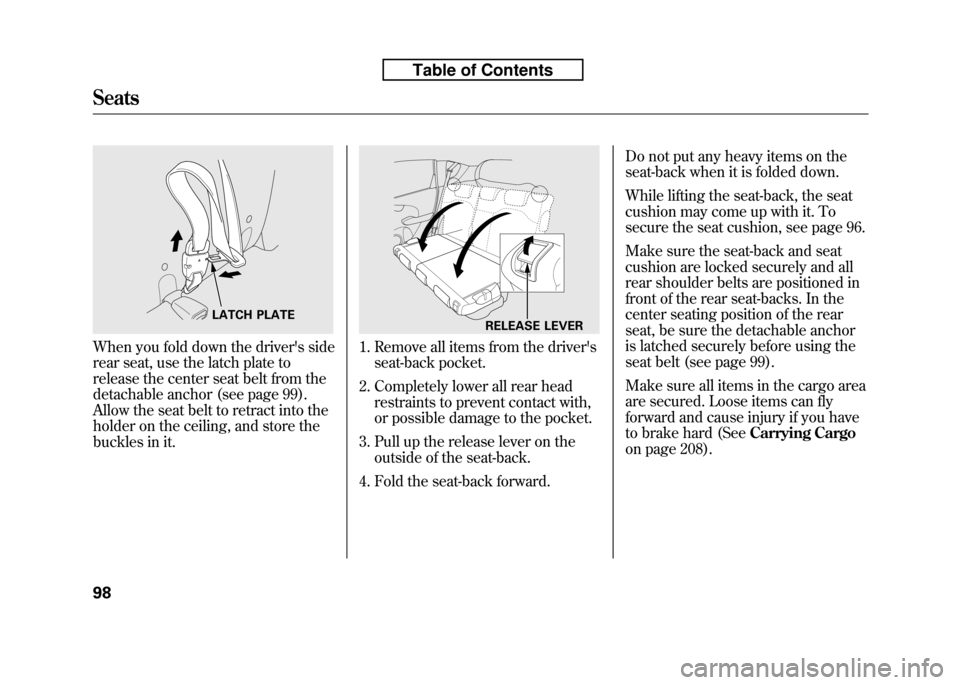
When you fold down the driver's side
rear seat, use the latch plate to
release the center seat belt from the
detachable anchor (see page 99).
Allow the seat belt to retract into the
holder on the ceiling, and store the
buckles in it.1. Remove all items from the driver'sseat-back pocket.
2. Completely lower all rear head restraints to prevent contact with,
or possible damage to the pocket.
3. Pull up the release lever on the outside of the seat-back.
4. Fold the seat-back forward. Do not put any heavy items on the
seat-back when it is folded down.
While lifting the seat-back, the seat
cushion may come up with it. To
secure the seat cushion, see page 96.
Make sure the seat-back and seat
cushion are locked securely and all
rear shoulder belts are positioned in
front of the rear seat-backs. In the
center seating position of the rear
seat, be sure the detachable anchor
is latched securely before using the
seat belt (see page 99).
Make sure all items in the cargo area
are secured. Loose items can fly
forward and cause injury if you have
to brake hard (See
Carrying Cargo
on page 208).
LATCH PLATERELEASE LEVER
Seats
98
Table of Contents
Page 123 of 351
Ceiling Light
The ceiling light has a three-position
switch: ON, Door Activated, and
OFF. In the Door Activated (center)
position, the light comes on whenyou:● Open any door.
● Unlock the doors and the tailgate
with the key or the remote
transmitter (if equipped). After all doors are closed tightly, the
light fades out in about 30 seconds.
The ceiling light (with the switch in
the door activated position) comes on
when you remove the key from the
ignition switch. If you do not open a
door, the light fades out in about 30seconds.
If you leave any door open without
the key in the ignition switch, the
ceiling light will go off after 15minutes.
DOOR ACTIVATED
ON
OFF
Interior Lights
107
Instruments and Controls
Table of Contents
Page 124 of 351

The heating and air conditioning
system in your vehicle provides a
comfortable driving environment in
all weather conditions.
The standard audio system has many
features. This section describes
those features and how to use them.
Your vehicle has an anti-theft audio
system that requires a code number
to enable it.
The security system helps to
discourage vandalism and theft of
your vehicle.Vents, Heating, and A/C.............
110
Playing the FM/AM Radio (Models without navigationsystem) ...............................
115
Playing a Disc (Models without navigation system) ..................
122
Disc Player Error Messages (Models without navigationsystem) ...............................
128
Playing an iPod
®(Models without
navigation system) ..................
129
iPod
®Error Messages (Models
without navigation system) .....
135
Playing a USB Flash Memory Device (Models without
navigation system) ..............
136
USB Flash Memory Device Error
Messages (Models withoutnavigation system) ..............
142
Playing the AM/FM Radio
(Models with navigation
system) ...............................
143
Playing a Disc (Models with
navigation system) ..................
149Disc Player Error Messages
(Models with navigation
system) ...............................
157
Playing a PC card (Models with
navigation system) ..................
158
Playing an iPod
®(Models with
navigation system) ..................
170
iPod
®Error Messages (Models
with navigation system) ..........
176
Playing a USB Flash Memory
Device (Models withnavigation system) ..............
177
USB Flash Memory Device Error Messages (Models withnavigation system) ..............
183
FM/AM Radio Reception ............
184
Protecting Your Discs .................
186
Remote Audio Controls ...............
189
Auxiliary Input Jack ....................
190
Radio Theft Protection ................
191
Setting the Clock .........................
192
Security System ..........................
193
Cruise Control ............................
194
Features
109
Features
Page 126 of 351

Airflow Controls
Fan Control Dial
Turn this dial to increase or decrease
the fan speed and airflow.
Temperature Control Dial
Turning this dial clockwise increases
the temperature of the airflow.
Air Conditioning (A/C) Button
If equipped
This button turns the air
conditioning on and off. The
indicator in the button is on when the
A/C is on.
Fresh Air/Recirculation Lever
This lever controls the source of the
air going into the system. When you
slide the lever to the
side, air is
brought in from outside the vehicle
(fresh air mode). When you selectthe
side, air from the vehicle's
interior is sent through the system
again (recirculation mode). The outside air intakes for the
heating and cooling system are at the
base of the windshield. Keep this
area clear of leaves and other debris.
The system should be left in fresh air
mode under almost all conditions.
Keeping the system in recirculation
mode, particularly with the A/C off,
can cause the windows to fog up.
Switch to recirculation mode when
driving through dusty or smoky
conditions, then return to fresh airmode.
Rear Window Defogger Button
/
This button turns the rear window
defogger on and off (see page 76).
On some models, this button also
operates the heated outside mirrors
(see page 102).
Mode Control Dial
Use the mode control dial to select
the vents the air flows from. Some air
will flow from the dashboard corner
vents in all modes.
Air flows from the center and
corner vents in the dashboard.
Airflow is divided between the
vents in the dashboard and the floor vents.
Air flows from the floor vents.
Airflow is divided between the
floor vents and defroster vents at the
base of the windshield.
Air flows from the defroster
vents at the base of the windshield.
CONTINUED
Vents, Heating, and A/C
111
Features
Table of Contents
Page 152 of 351

To Play a USB Flash Memory Device
This audio system can operate the
audio files on a USB flash memory
device with the same controls used
for the in-dash disc player. To play a
USB flash memory device, connect it
to the USB adapter cable in the
upper glove box, then press the AUX
button. The ignition switch must be
in the ACCESSORY (I) or ON (II)position.
The audio system reads and plays
the audio files on the USB flash
memory device in MP3, WMA orAAC
ꭧformats. Depending on the
format, the display shows MP3,
WMA or AAC when a USB flash
memory device is playing. The USB
flash memory device limit is up to
700 folders or up to 65535 files. ꭧ : Only AAC format files recorded
with iTunes are playable on this
audio unit. The recommended USB flash
memory devices are 256 Mbyte or
higher, and formatted with the FAT
file system. Some digital audio
players may be compatible as well.
Some USB flash memory device
(such as devices with security
lockout features, etc.) will not work
in this audio unit. NOTE:
● Do not use a device such as a card
reader or hard drive as the device
or your files may be damaged.
● Do not connect your USB flash
memory device using a HUB.
● Do not use an extension cable to
the USB adapter cable equipped
with your vehicle.
● Do not keep the USB flash
memory device in the vehicle.
Direct sunlight and high heat will
damage it. ●
We recommend backing up your
data before playing a USB flash
memory device.
● Depending on the type and
number of files, it may take some
time before they begin to play.
● Depending on the software the
files were made with, it may not be
possible to play some files, or
display some text data.
The specifications for compatible
MP3 files are: – Sampling frequency:
32/44.1/48 kHz (MPEG1)
16/22.05/24 kHz (MPEG2)
– Bit rate:
32/40/48/56/64/80/96/112/128/
160/192/224/256/320/VBR kbps(MPEG1)
8/16/24/32/40/48/56/64/80/96/
112/128/144/160/VBR kbps(MPEG2)
CONTINUED
Playing a USB Flash Memory Device (Models without navigation system)
137
Features
Table of Contents