Page 97 of 410

Instruments and Controls 4-5
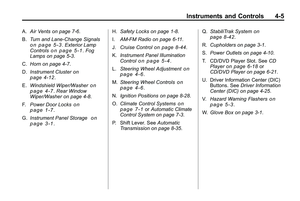
A.Air Vents on page 7‑6.
B. Turn and Lane-Change Signals
on page 5‑3.Exterior Lamp
Controlson page 5‑1. Fog
Lamps on page 5‑3.
C. Horn on page 4‑7.
D. Instrument Cluster
on
page 4‑12.
E. Windshield Wiper/Washer
on
page 4‑7. Rear Window
Wiper/Washer on page 4‑8.
F. Power Door Locks
on
page 1‑7.
G. Instrument Panel Storage
on
page 3‑1. H.
Safety Locks on page 1‑8.
I. AM-FM Radio on page 6‑11.
J. Cruise Control
on page 8‑44.
K. Instrument Panel Illumination
Control
on page 5‑4.
L. Steering Wheel Adjustment
on
page 4‑6.
M. Steering Wheel Controls
on
page 4‑6.
N. Ignition Positions on page 8‑28.
O. Climate Control Systems
on
page 7‑1or Automatic Climate
Control System on page 7‑3.
P. Shift Lever. See Automatic
Transmission on page 8‑35. Q.
StabiliTrak System
on
page 8‑42.
R. Cupholders on page 3‑1.
S. Power Outlets on page 4‑10.
T. CD/DVD Player Slot. See CD
Player
on page 6‑18or
CD/DVD Player on page 6‑21.
U. Driver Information Center (DIC) Buttons. See Driver Information
Center (DIC) on page 4‑25.
V. Hazard Warning Flashers
on
page 5‑3.
W. Glove Box on page 3‑1.
Page 98 of 410
4-6 Instruments and Controls
Controls
Steering Wheel
Adjustment
The adjustment lever is located on
the left side of the steering column.To adjust the steering wheel:
1. Pull the lever down.
2. Move the steering wheel up or
down and in or out to a
comfortable position.
3. Pull the lever up to lock the steering wheel in place.
Do not adjust the steering wheel
while driving.
Steering Wheel Controls
For vehicles with audio steering
wheel controls, some audio controls
can be adjusted at the steering
wheel.
b/g(Push to Talk): For vehicles
with an OnStar®, Bluetooth®,
or navigation system, press to
interact with those systems. See
OnStar
®Systemon page 4‑41,
Bluetooth (Overview)on page 6‑41or Bluetooth (Infotainment Controls)on page 6‑42orBluetooth (Voice
Recognition)on page 6‑45or
Page 99 of 410

Instruments and Controls 4-7
Bluetooth (Navigation)on
page 6‑56, or the separate
navigation manual for more
information.
$/c(Mute/End Call): Press to
silence the vehicle speakers only.
Press again to turn the sound on.
For vehicles with OnStar or
Bluetooth systems, press to
reject an incoming call, or end a
current call.
_SRC^(Toggle Switch): Press
to select an audio source.
Toggle up or down to select the next
or previous favorite radio station or
CD track, DVD, if equipped, track,
or MP3 track.
+
x− (Volume): Press + to
increase the volume, press −to
decrease the volume.
Horn
Press near the horn symbols or
press on the steering wheel pad to
sound the horn.
Windshield Wiper/Washer
The windshield wiper/washer lever
is located on the right side of the
steering column.
Move the lever to one of the
following positions:
8(Mist): Single wipe, move the
lever to
zand then release. The
wipers stop after one wipe.
((Off): Turns the wipers off.
&(Adjustable Interval Wipes):
The time between wipes can be
adjusted. Turn the
&band up for
more frequent wipes or down for
less frequent wipes.
1 (Low Speed): Slow wipes.
2 (High Speed): Fast wipes.
Clear snow and ice from the wiper
blades before using them. If frozen
to the windshield, carefully loosen or
thaw them. Damaged wiper blades
should be replaced. See Wiper
Blade Replacement on page 9‑28.
Heavy snow or ice can overload the
wiper motor. A circuit breaker will
stop the motor until it cools down.
Page 100 of 410

4-8 Instruments and Controls
Windshield Washer
Pull the lever toward you to spray
washer fluid on the windshield. The
spray continues until the lever is
released. The wipers will run a few
times. SeeWasher Fluid
on
page 9‑22for information on filling
the windshield washer fluid
reservoir.
{WARNING
In freezing weather, do not use
your washer until the windshield
is warmed. Otherwise the washer
fluid can form ice on the
windshield, blocking your vision.
Rear Window
Wiper/Washer
The rear wiper controls are on the
end of the windshield wiper lever.
Press the upper or lower portion of
the button to control the rear wiper
and rear wiper delay.
The system turns off when the
button is returned to the middle
position.
Z(Rear Wiper): For continuous
rear window wipes.
5(Rear Wiper Delay): Sets a
delay between wipes.
=(Rear Washer): Push the
windshield wiper lever forward to
spray washer fluid on the rear
window. The lever returns to its
starting position when released.
The windshield washer reservoir is
used for the windshield and the rear
window. Check the fluid level in the
reservoir if either washer is not
working. See Washer Fluid
on
page 9‑22.
{WARNING
In freezing weather, do not use
your washer until the windshield
is warmed. Otherwise the washer
fluid can form ice on the
windshield, blocking your vision.
Page 101 of 410

Instruments and Controls 4-9
Compass
The vehicle may have a compass
display on the Driver Information
Center (DIC). The compass
receives its heading and other
information from Global Positioning
System (GPS) antenna, StabiliTrak,
and vehicle speed information.
Avoid covering the GPS antenna for
long periods of time with objects
that may interfere with the antenna's
ability to receive a satellite signal.
SeeMulti-Band Antenna
on
page 6‑18for the location of the
vehicle's antennas. The compass
system is designed to operate for a
certain number of miles or degrees
of turn before needing a signal from
the GPS satellites. When the
compass display shows CAL, drive
the vehicle for a short distance in
an open area where it can receive a
GPS signal. The compass system
will automatically determine when GPS signal is restored and provide
a heading again. See
Compass
Messages
on page 4‑30for more
information on the messages that
may be displayed for the compass.
Clock (With Date Display)
The infotainment system controls,
located on the instrument panel, are
used to access the time and date
settings through the menu system.
See Operation
on page 6‑7for
information about how to use the
menu system.
Setting the Time and Date
1. Turn the infotainment
system ON.
2. Press the CONFIG button and select Time and Date Settings.
3. Select Set Time or Set Date.
4. Turn the MENU/SEL knob to adjust the highlighted value. 5. Press the MENU/SEL knob
to select the next value.
6. To save the time or date and return to the Time and
Date Settings menu, press
the
0BACK button at any time
or press the MENU/SEL knob
after adjusting the minutes
or year.
Setting the 12/24 Hour Format
1. Turn the infotainment system ON.
2. Press the CONFIG button and select Time and Date Settings.
3. Highlight 12/24 Hour Format.
4. Press the MENU/SEL knob to select the 12 hour or 24 hour
display format.
Page 102 of 410

4-10 Instruments and Controls
Setting the Month & Day
Format
1. Turn the infotainmentsystem ON.
2. Press the CONFIG button and select Time and Date Settings.
3. Highlight Month & Day Format.
4. Press the MENU/SEL knob to select MM/DD (month/day) or
DD/MM (day/month).
Setting the Auto Time Adjust
1. Turn the infotainmentsystem ON.
2. Press the CONFIG button and select Time and Date Settings.
3. Highlight Auto Time Adjust.
4. Press the MENU/SEL knob to turn Auto Time Adjust on or off.
5. Press the MENU/SEL knob to select Time Zone, and then
select the Time Zone.
6. Press the MENU/SEL knob to turn Daylight Savings on or off.
Clock (Without Date
Display)
The infotainment system controls,
located on the instrument panel, are
used to access the time and date
settings through the menu system.
See Operation
on page 6‑7for
information about how to use the
menu system.
Setting the Time
1. Turn the infotainment system ON.
2. Press the CONFIG button and select Time Settings, or press
the
Hbutton.
3. Select Set Time.
4. Turn the MENU/SEL knob to adjust the highlighted value.
5. Press the MENU/SEL knob to select the next value. 6. To save the time and return to
the Time Settings menu, press
the
0BACK button at any time
or press the SELECT button
after adjusting the minutes.
Setting the 12/24 Hour Format
1. Turn the infotainment system ON.
2. Press the CONFIG button and select Time Settings, or press
the
Hbutton.
3. Highlight 12/24 Hour Format.
4. Press the MENU/SEL knob to select the 12 hour or 24 hour
display format.
Power Outlets
The accessory power outlets can
be used to connect electrical
equipment, such as a cellular
phone.
Page 103 of 410

Instruments and Controls 4-11
There are four accessory power
outlets in the following locations,
below the CD slot, inside the center
console storage, on the rear of the
center console storage, and in the
rear cargo compartment.
To use the outlets, remove the
cover. Close the outlet cover, when
not in use.
Notice:If electrical devices are
left plugged into a power outlet,
the battery may drain causing the
vehicle not to start or damage to
the battery. This would not be
covered by the vehicle warranty.
Always unplug all electrical
devices when turning off the
vehicle.
Certain electrical accessories may
not be compatible with the
accessory power outlets and could
result in blown vehicle or adapter
fuses. If you experience a problem,
see your dealer/retailer for
additional information on the
accessory power outlet. Notice:
Adding any electrical
equipment to the vehicle can
damage it or keep other
components from working as
they should. The repairs would
not be covered by the vehicle
warranty. Do not use equipment
exceeding maximum amperage
rating of 20 amperes. Check with
your dealer/retailer before adding
electrical equipment.
When adding electrical equipment,
be sure to follow the installation
instructions included with the
equipment.
Notice: Improper use of the
power outlet can cause damage
not covered by the vehicle
warranty. Do not hang any type of
accessory or accessory bracket
from the plug because the power
outlets are designed for
accessory power plugs only.Warning Lights,
Gauges, and
Indicators
Warning lights come on when there
could be a problem with a vehicle
function. Some warning lights come
on briefly when the engine is started
to indicate they are working.
Gauges can indicate when there
could be a problem with a vehicle
function. Often gauges and warning
lights work together to indicate a
problem with the vehicle.
When one of the warning lights
comes on and stays on while
driving, or when one of the gauges
shows there may be a problem,
check the section that explains what
to do. Follow this manual's advice.
Waiting to do repairs can be costly
and even dangerous.
Page 104 of 410
4-12 Instruments and Controls
Instrument Cluster
United States Version Shown, Canada Similar