Page 362 of 484
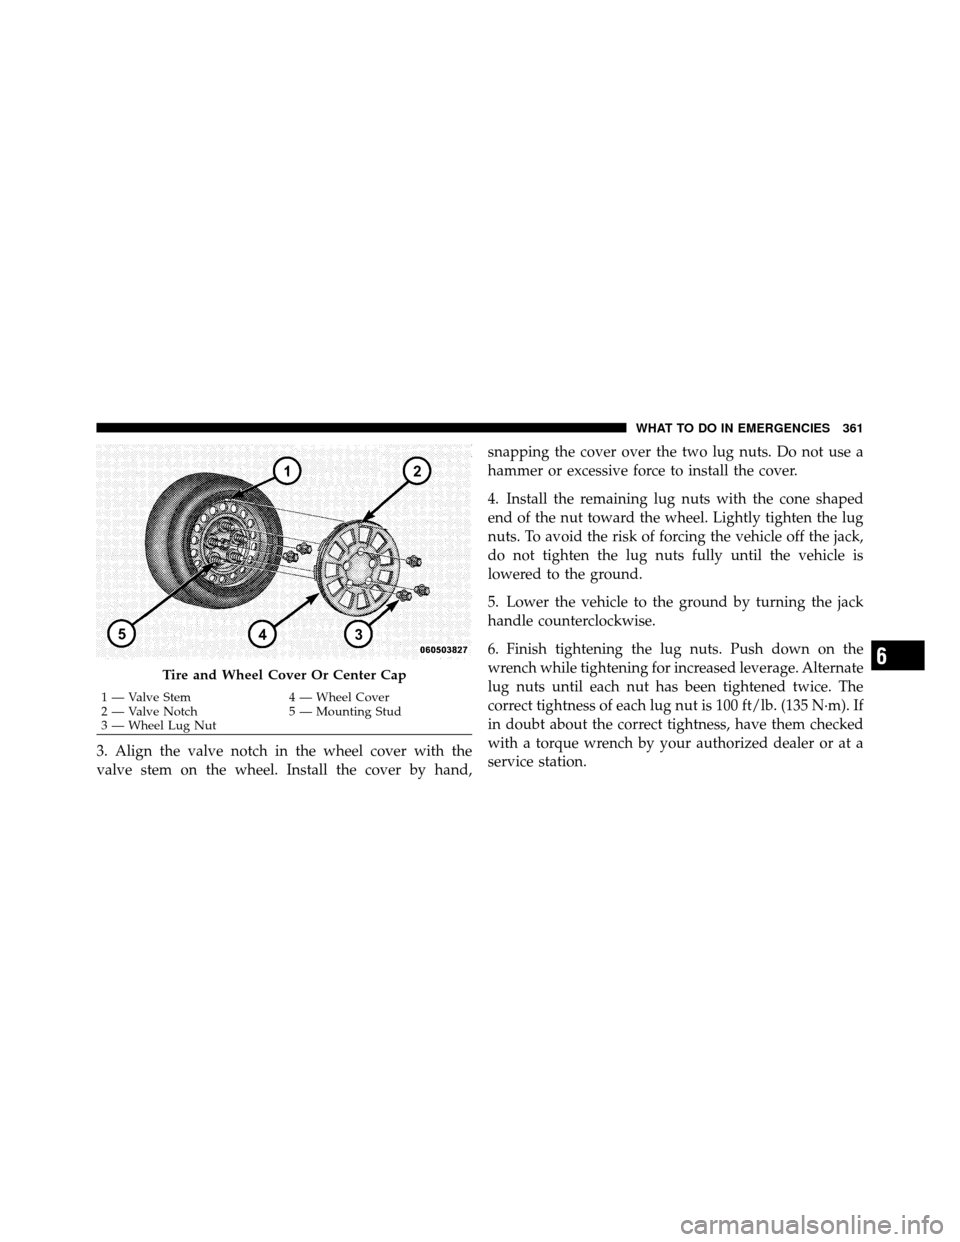
3. Align the valve notch in the wheel cover with the
valve stem on the wheel. Install the cover by hand,snapping the cover over the two lug nuts. Do not use a
hammer or excessive force to install the cover.
4. Install the remaining lug nuts with the cone shaped
end of the nut toward the wheel. Lightly tighten the lug
nuts. To avoid the risk of forcing the vehicle off the jack,
do not tighten the lug nuts fully until the vehicle is
lowered to the ground.
5. Lower the vehicle to the ground by turning the jack
handle counterclockwise.
6. Finish tightening the lug nuts. Push down on the
wrench while tightening for increased leverage. Alternate
lug nuts until each nut has been tightened twice. The
correct tightness of each lug nut is 100 ft/lb. (135 N·m). If
in doubt about the correct tightness, have them checked
with a torque wrench by your authorized dealer or at a
service station.
Tire and Wheel Cover Or Center Cap
1 — Valve Stem
4 — Wheel Cover
2 — Valve Notch 5 — Mounting Stud
3 — Wheel Lug Nut
6
WHAT TO DO IN EMERGENCIES 361
Page 367 of 484
8. Disconnect the opposite end of the positive(+)jumper
cable from the positive (+)post of the booster battery.
9. Disconnect the positive (+)end of the jumper cable
from the remote positive (+)post of the discharged
vehicle.
If frequent jump-starting is required to start your vehicle
you should have the battery and charging system in-
spected at your authorized dealer.
CAUTION!
Accessories that can be plugged into the vehicle
power outlets draw power from the vehicle’s battery,
even when not in use (i.e., cellular phones, etc.).
Eventually, if plugged in long enough, the vehicle’s
battery will discharge sufficiently to degrade battery
life and/or prevent the engine from starting.
FREEING A STUCK VEHICLE
If your vehicle becomes stuck in mud, sand, or snow, it
can often be moved by a rocking motion. Turn your
steering wheel right and left to clear the area around the
front wheels. Then shift back and forth between RE-
VERSE and DRIVE. Using minimal accelerator pedal
pressure to maintain the rocking motion, without spin-
ning the wheels, is most effective.
NOTE: Turn off the Electronic Stability Program (ESP)
— if equipped, or Traction Control System (TCS) — if
equipped before rocking the vehicle. Refer to “Electronic
Brake Control” in “Starting and Operating” for further
information.
366 WHAT TO DO IN EMERGENCIES
Page 368 of 484
CAUTION!
•When “rocking” a stuck vehicle by moving be-
tween 1st and REVERSE, do not spin the wheels
faster than 15 mph (24 km/h), or drivetrain damage
may result.
•Revving the engine or spinning the wheels too fast
may lead to transmission overheating and failure.
It can also damage the tires. Do not spin the
wheels above 30 mph (48 km/h) while in gear (no
transmission shifting occurring).
WARNING!
Fast spinning tires can be dangerous. Forces gener-
ated by excessive wheel speeds may cause damage, or
even failure, of the axle and tires. A tire could
explode and injure someone. Do not spin your vehi-
cle’s wheels faster than 30 mph (48 km/h) or for
longer than 30 seconds continuously without stop-
ping when you are stuck and do not let anyone near
a spinning wheel, no matter what the speed.
TOWING A DISABLED VEHICLE
Without The Ignition Key
Special care must be taken when the vehicle is towed
with the ignition in the LOCK position. The only ap-
proved method of towing without the ignition key is
with a flatbed truck. Proper towing equipment is neces-
sary to prevent damage to the vehicle.
6
WHAT TO DO IN EMERGENCIES 367
Page 369 of 484
Towing This Vehicle Behind Another Vehicle
Flatbed towing is recommended. DO NOT tow an AWD
vehicle with the rear wheels on the ground unless the
rear driveshaft is removed and the transmission is in
NEUTRAL.
Vehicles WITHOUT AWD may be towed (with rear
wheels on the ground) with the transmission in NEU-
TRAL under the following conditions:
•The distance to be traveled must not exceed 15 miles
(24 km).
•The towing speed must not exceed 30 mph (48 km/h).
CAUTION!
Exceeding these towing limits may cause severe
transmission damage. Such damage is not covered by
the New Vehicle Limited Warranty.Vehicles equipped with AWD can be towed with the
transmission in NEUTRAL and the rear wheels OFF the
ground (or the rear driveshaft removed) with no limita-
tion on speed or distance.
CAUTION!
•Do not attempt to tow this vehicle from the front
with sling-type towing equipment. Damage to the
front fascia will result.
•If the transmission is not operative or if the
vehicle is to be towed more than 15 miles (24 km),
then the only approved method of towing is with
a flatbed truck. Otherwise, damage to the trans-
mission may result.
•Do not tow the vehicle from the rear. Damage to
the rear sheet metal and fascia will occur.
(Continued)
368 WHAT TO DO IN EMERGENCIES
Page 373 of 484

▫Adding Washer Fluid ................. 390
▫ Exhaust System ..................... 391
▫ Cooling System ..................... 393
▫ Brake System ....................... 399
▫ Automatic Transmission ............... 401
▫ All Wheel Drive (AWD) – If Equipped ..... 403
▫ Rear Axle .......................... 403
▫ Appearance Care And Protection From
Corrosion .......................... 404
� Fuses .............................. 409
▫ Integrated Power Module .............. 409
▫ Rear Power Distribution Center .......... 412
� Vehicle Storage ....................... 417
� Replacement Bulbs .................... 417 �
Bulb Replacement ..................... 418
▫ Low Beam Headlamp, High Beam
Headlamp, Park/Turn Lamp, And Front Side
Marker Lamp — Models With Halogen
Headlamps ......................... 418
▫ Low Beam Headlamp, High Beam
Headlamp, And Park/Turn Lamp — Models
With High Intensity Discharge Headlamps
(HID) ............................. 421
▫ Backup Lamp, Side Marker Lamp, Tail/Turn
Lamp, And Tail/Stop Lamp ............. 422
▫ License Lamp ....................... 425
� Fluid Capacities ...................... 426
� Fluids, Lubricants, And Genuine Parts ....... 428
▫ Engine ............................ 428
▫ Chassis ........................... 429
372 MAINTAINING YOUR VEHICLE
Page 404 of 484

All Wheel Drive (AWD) – If Equipped
The all wheel drive system consists of a transfer case and
front differential. The exterior surface of these compo-
nents should be inspected for evidence of fluid leaks.
Confirmed leaks should be repaired as soon as possible.
The transfer case fluid fill/inspection plug is located in
the middle of the rear housing. To inspect the transfer
case fluid level, remove the fill/inspection plug. The
fluid level should be even with the bottom of the hole.
Use this plug to add fluid as required.
The front differential fill plug is located on the outer
cover near the halfshaft attachment. To inspect the differ-
ential fluid level, remove the fill plug. The fluid level
should be even with or slightly below the bottom of the
hole.
Fluid Changes
Refer to “Maintenance Schedule” for further information.
Rear Axle
For normal service, periodic fluid level checks are not
required. When the vehicle is serviced for other reasons
the exterior surfaces of the axle assembly should be
inspected. If gear oil leakage is suspected inspect the
fluid level. Refer to “Fluids, Lubricants, and Genuine
Parts” in “Maintaining Your Vehicle” for further informa-
tion.
Fluid Level Check
Check the fluid level by removing the fill plug on the
axle. The fluid level should be at the bottom of the fill
hole. Add fluid, if necessary, to maintain the proper level.
Refer to “Fluids, Lubricants, and Genuine Parts” in
“Maintaining Your Vehicle” for further information.
Change Axle Fluid
Refer to “Maintenance Schedule” for further information.
7
MAINTAINING YOUR VEHICLE 403
Page 407 of 484
•If you carry special cargo such as chemicals, fertilizers,
de-icer salt, etc., be sure that such materials are well
packaged and sealed.
•If a lot of driving is done on gravel roads, consider
mud or stone shields behind each wheel.
•Use MOPAR�Touch Up Paint or equivalent on
scratches as soon as possible. Your authorized dealer
has touch up paint to match the color of your vehicle.
Wheel and Wheel Trim Care
All wheels and wheel trim, especially aluminum and
chrome-plated wheels should be cleaned regularly with a
mild soap and water to prevent corrosion. To remove
heavy soil and/or excessive brake dust, use MOPAR�
Wheel Cleaner or equivalent or select a nonabrasive,
non-acidic cleaner. Do not use scouring pads, steel wool,
a bristle brush, or metal polishes. Only MOPAR� or
equivalent is recommended. Do not use oven cleaner. Avoid automatic car washes that use acidic solutions or
harsh brushes that may damage the wheels’ protective
finish.
Stain Repel Fabric Cleaning Procedure – If
Equipped
Stain Repel seats may be cleaned in the following man-
ner:
•Remove as much of the stain as possible by blotting
with a clean, dry towel.
•Blot any remaining stain with a clean, damp towel.
•For tough stains, apply MOPAR�
Total Clean or a mild
soap solution to a clean, damp cloth and remove the
stain. Use a fresh, damp towel to remove soap residue.
•For grease stains, apply MOPAR� Multi-Purpose
Cleaner or equivalent high quality cleaner to a clean,
damp cloth and remove the stain. Use a fresh, damp
towel to remove soap residue.
406 MAINTAINING YOUR VEHICLE
Page 427 of 484
FLUID CAPACITIES
U.S.Metric
Fuel (Approximate)
2.7 Liter Engine 18 Gallons68 Liters
3.5 Liter Engine without All Wheel Drive 18 Gallons68 Liters
3.5 Liter Engine with All Wheel Drive 19 Gallons72 Liters
5.7 Liter Engine 19 Gallons72 Liters
Engine Oil with Filter
2.7 Liter Engine (SAE 5W-20, API Certified) 6.0 Quarts5.7 Liters
3.5 Liter Engine (SAE 10W-30, API Certified) 6.0 Quarts5.7 Liters
5.7 Liter Engine (SAE 5W-20, API Certified) 7.0 Quarts6.6 Liters
426 MAINTAINING YOUR VEHICLE