Page 49 of 76
WARNING!
A loose tire or jack, thrown forward in a collision or hard stop, could endanger the
occupants of the vehicle. Always stow the jack parts and the spare tire in the places
provided.
• Secure the tire, jack and tools in their proper locations.
JUMP-STARTING
• If your vehicle has a discharged battery it can be jump-started using a set of jumper cables and a battery in another vehicle or by using a portable battery booster pack.
• Jump-starting can be dangerous if done improperly so please follow the procedures in this section carefully.
NOTE: When using a portable battery booster pack follow the manufacturer’s operating
instructions and precautions.
CAUTION!
Do not use a portable battery booster pack or any other booster source with a system
voltage greater than 12 Volts or damage to the battery, starter motor, alternator or
electrical system may occur.
47
WHAT TO DO IN EMERGENCIES
Page 50 of 76

WARNING!
When temperatures are below the freezing point, electrolyte in a discharged battery
may freeze. Do not attempt jump-startingbecause the battery could rupture or
explode and cause personal injury. Battery temperature must be brought above the
freezing point before attempting a jump-start.
Preparations for Jump-Start
• The battery in your vehicle is located between the left front headlight assembly and
the left front wheel splash shield. To allow jump-starting there are remote battery
posts located on the left side of the engine compartment.
WARNING!
• Take care to avoid the radiator coolin g fan whenever the hood is raised. It can start
anytime the ignition switch is on. You can be injured by moving fan blades.
• Remove any metal jewelry, such as watch bands or bracelets, that might make an inadvertent electrical contact. You could be seriously injured.
• Batteries contain sulfuric acid that can burn your skin or eyes and generate hydrogen gas which is flammable and explosive. Keep open flames or sparks away
from the battery.
• Set the parking brake, shift the autom atic transmission into PARK and turn the ignition
to LOCK.
• Turn off the heater, radio, and all unnecessary electrical accessories.
• Remove the protective cover over the remote positive(+)battery post. To remove the
cover, press the locking tab and pull upward on the cover.
• If using another vehicle to jump-start the battery, park the vehicle within the jumper cables reach, set the parking brake and make sure the ignition is OFF.
WARNING!
WARNING! Do not allow vehicles to touch each other as this could establish a ground
connection and personal injury could result.
WHAT TO DO IN EMERGENCIES
48
Page 51 of 76

Jump-Starting Procedure
WARNING!
Failure to follow this procedure could result in personal injury or property damage due
to battery explosion.
CAUTION!
Failure to follow these procedures couldresult in damage to the charging system of
the booster vehicle or the discharged vehicle.
• Connect the positive (+)end of the jumper cable to the remote positive (+)post of the
discharged vehicle.
• Connect the opposite end of the positive (+)jumper cable to the positive (+)post of
the booster battery.
• Connect the negative end (-)of the jumper cable to the negative (-)post of the booster
battery.
• Connect the opposite end of the negative (-)jumper cable to the remote negative (-)
post of the vehicle with the discharged battery.
WARNING!
Do not connect the cable to the negative post (-)of the discharged battery. The
resulting electrical spark could cause the battery to explode and could result in
personal injury.
• Start the engine in the vehicle that has the booster battery, let the engine idle a few minutes, and then start the engine in the vehicle with the discharged battery.
Once the engine is started, remove the jumper cables in the reverse sequence:
• Disconnect the negative (-)jumper cable from the remote negative (-)post of the
vehicle with the discharged battery.
• Disconnect the negative end (-)of the jumper cable from the negative (-)post of the
booster battery.
• Disconnect the opposite end of the positive (+)jumper cable from the positive (+)
post of the booster battery.
• Disconnect the positive (+)end of the jumper cable from the remote positive (+)post
of the discharged vehicle.
49
WHAT TO DO IN EMERGENCIES
Page 52 of 76
• Reinstall the protective cover over the remote positive(+)battery post of the
discharged vehicle.
• If frequent jump-starting is required to start your vehicle you should have the battery and charging system inspected at your authorized dealer.
CAUTION!
Accessories that can be plugged into the vehicle power outlets draw power from the
vehicle’s battery, even when not in use (i.e., cellular phones, etc.). Eventually, if
plugged in long enough, the vehi cle’s battery will discharge sufficiently to degrade
battery life and/or prevent the engine from starting.
WHAT TO DO IN EMERGENCIES
50
Page 53 of 76
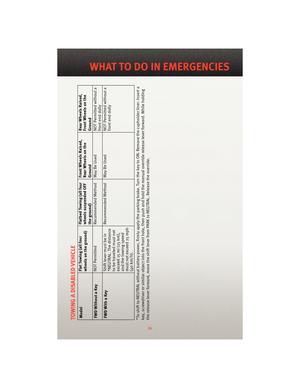
TOWING A DISABLED VEHICLEModelFlat Towing (all four
wheels on the ground)Flatbed Towing (all four
wheels suspended OFF
the ground)Front Wheels Raised,
Rear Wheels on the
GroundRear Wheels Raised,
Front Wheels on the
Ground
FWD Without a Key NOT Permitted
Recommended Method May Be Used NOT Permitted without a
front end dolly
FWD With a Key Shift lever must be in
*NEUTRAL. The distance
to be traveled must not
exceed 15 mi (25 km),
and the towing speed
must not exceed 25 mph
(40 km/h).Recommended Method May Be Used
NOT Permitted without a
front end dolly
*To shift to NEUTRAL without battery power, firmly apply the parking brake. Turn the key to ON. Remove the cupholder liner. Insert a
key, screwdriver or similar object into the front hole, then push and hold the manual override release lever forward. While holding
the release lever forward, move the shift l ever from PARK to NEUTRAL. Release the override.
51
WHAT TO DO IN EMERGENCIES
Page 54 of 76

FREEING A STUCK VEHICLE
• If your vehicle becomes stuck in mud, sand or snow, it can often be moved by arocking motion. Turn your steering wheel right and left to clear the area around the
front wheels. Then move the shift lever back and forth between REVERSE and DRIVE.
Using minimal accelerator pedal pressure to maintain the rocking motion, without
spinning the wheels, is most effective.
NOTE: To improve the vehicle's traction when starting off in deep snow, sand or gravel,
it may be desirable to switch the Electronic Stability Control (ESC) to “Partial Off” mode
by momentarily pressing the ESC Off
switch. For further information on ESC, refer to
the Owner's Manual on the DVD.
WARNING!
Fast spinning tires can be dangerous. Forces generated by excessive wheel speeds
may cause tire damage or failure. A tire could explode and injure someone. Do not
spin your vehicle's wheels faster than 30 mph (48 km/h) when you are stuck. Do not
let anyone near a spinning wheel, no matter what the speed.
CAUTION!
• When “rocking” a stuck vehicle by moving between 1st and REVERSE, do not spin the wheels faster than 15 mph (24 km/h), or drivetrain damage may result.
• Revving the engine or s pinning the wheels too fast ma y lead to transmission
overheating and failure. It can also damage the tires. Do not spin the wheels above
30 mph (48 km/h) while in gear (no transmission shifting occurring).
WHAT TO DO IN EMERGENCIES
52
Page 55 of 76

• In the event of an accident, your vehicle is designed to record up to five seconds ofspecific vehicle data parameters (see list below) in an event data recorder prior to")
EVENT DATA RECORDER (EDR)
• In the event of an accident, your vehicle is designed to record up to five seconds ofspecific vehicle data parameters (see list below) in an event data recorder prior to the
moment of airbag deployment, or ne ar deployment (if applicable), and up to a quarter
second of either high-speed deceleration data or change in velocity during and/or
after airbag deployment or ne ar-deployment. EDR data is ONLY recorded if an airbag
deploys, or nearly deploys, and is otherwise unavailable.
NOTE:
• A near-deployment event occurs when the airbag sensor detects severe vehicle
deceleration usually indicative of a crash, but not severe enough to warrant airbag
deployment.
• Under certain circumstances, EDR data ma y not be recorded (e.g., loss of battery
power).
• In conjunction with other data gathered during a complete accident investigation, the electronic data may be used by Chrysler Group LLC and others to learn more about the
possible causes of crashes and associa ted injuries in order to assess and improve
vehicle performance. In addition to crash i nvestigations initiated by Chrysler Group
LLC, such investigations may be requested by customers, insurance carriers,
government officials, and professional crash researchers, such as those associated
with universities, and with hospital and insurance organizations.
• In the event that an investigation is undertaken by Chrysler Group LLC (regardless of initiative), the company or its de signated representative will first obtain permission of
the appropriate custodial entity for the vehicle (usually the vehicle owner or lessee)
before accessing the electronic data stored, unless ordered to image the data by a
court with legal jurisdiction (i.e., pursuant to a warrant). A copy of the data will be
provided to the custodial entity upon request. General data that does not identify
particular vehicles or crashes may be released for incorporation in aggregate crash
databases, such as those maintained by the U.S. government and various states. Data
of a potentially sensitive nature, such as would identify a particular driver, vehicle, or
crash, will be treated confidentially. Confidential data will not be disclosed by Chrysler
Group LLC to any third party except when:
• Used for research purposes, such as to match data with a particular crash record in an aggregate database, provided c onfidentiality of personal data is thereafter
preserved.
• Used in defense of litigation involvin g a Chrysler Group LLC product.
• Requested by police under a legal warrant.
• Otherwise required by law.
Data parameters that are recorded:
• Diagnostic trouble code(s) and warning light st atus for electronically-controlled safety
systems, including the airbag system.
• Vehicle speed, Engine RPM, Brake switch status, Pedal position, and other parameters depending on vehicle configuration.
53
WHAT TO DO IN EMERGENCIES
Page 56 of 76
OPENING THE HOOD
• Pull the release lever located belowthe instrument panel and in front of the driver’s
door.
• Raise the hood and locate the safety latch, in the middle of the hood opening.
• Move the safety latch while lifting the hood at the same time.
• Insert the support rod into the slot on the hood.
• To close the hood, remove the support rod and place it in the retaining clip, then lower the hood slowly.
WARNING!
Be sure the hood is fully latched before driving your vehicle. If the hood is not fully
latched, it could open when the vehicle is in motion and block your vision. Failure to
follow this warning could result in serious injury or death.
MAINTAINING YOUR VEHICLE
54


battery post of the
discharged vehicle.
• If frequent jump-starting is required to start your vehicle you should have the battery and ch")
Flatbed Towing (all four
wheels suspended OFF
the ground)Front Wheels Raised,
Rear Wheels on the
GroundRear Wheels Raised,
Fron")
