Page 33 of 76

REMOTE AUDIO CONTROLS
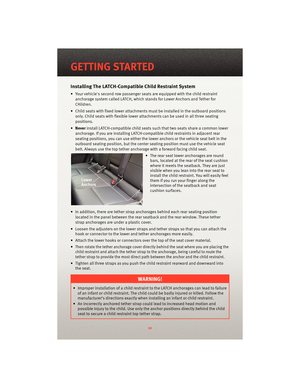
• The remote audio controls are located onthe rear surface of the steering wheel.
Right Switch
• Press the switch up or down to increase ordecrease the volume.
• Press the button in the center to change modes AM/FM/CD/SAT.
Left Switch
• Press the switch up or down to search forthe next listenable station or select the next
or previous CD track.
• Press the button in the center to select the next preset station (radio) or to change CDs
if equipped with a CD Changer.
ELECTRONIC VEHICLE INFORMATION CENTER (EVIC)
• The EVIC features a driver interactivedisplay that is located in the instrument
cluster. The system allows the driver to
select information by pressing the buttons
on the instrument panel switch bank
located below the climate controls. For
additional information refer to
Programmable Features in this guide.
• Press and release the MENU
button
to advance the display to Trip Functions or
Personal settings or to return to the default
System status display.
• Press and release the STEP
button to advance the display through the various
Trip Functions or Personal settings.
• Press and release the COMPASS
button to display the compass heading and the
outside temperature.
• Press and release the RESET
button to accept a selection. The RESET button
also resets various Trip Functions.
31
ELECTRONICS
Page 34 of 76

Programming HomeLink®
Begin Programming
• The HomeLink®buttons are located in the
overhead console.
• Erase all channels before you begin training by ho")
UNIVERSAL GARAGE DOOR OPENER (HomeLink®)
Programming HomeLink®
Begin Programming
• The HomeLink®buttons are located in the
overhead console.
• Erase all channels before you begin training by holding the two outside buttons for up to
20 seconds until the red indicator flashes.
• Park your vehicle outside of the garage and turn the ignition switch to the ON/RUN
position.
• Place the hand-held transmitter 1 to 3 in (3 to 8 cm) from the HomeLink
®buttons
while keeping the indicator light in view.
• Simultaneously, press and hold both the chosen HomeLink
®button and the
hand-held transmitter button until the HomeLink®indicator flash rate changes from a
slow to a rapidly blinking light, then release both the HomeLink®and the hand-held
transmitter buttons. This may take up to 30 seconds, or longer in rare cases.
• Press and hold the just-trained HomeLink
®button; if the indicator light stays on
constantly, programming is complete and the garage door should open.
WARNING!
• Your motorized door or gate will open and close while you are training the universal transceiver. Do not train the transceiver if people or pets are in the path of the door
or gate. Only use this transceiver with a garage door opener that has a “stop and
reverse” feature as required by Federal sa fety standards. This includes most garage
door opener models manufactured after 1982. Do not use a garage door opener
without these safety features. Call toll-free 1–800–355–3515 or, on the Internet, at
www.HomeLink.com for safety inf ormation orassistance.
• Vehicle exhaust contains Carbon Monoxide (CO), a dangerous gas. Do not run your vehicle in the garage while training the transceiver. Exhaust gas can cause serious
injury or death.
NOTE: If you are having difficulty training your HomeLink
®and your garage door opener
was manufactured after 1995, you may have a rolling code. Follow the steps below for
Programming A Rolling Code System.
ELECTRONICS
32
Page 35 of 76
, locate the “learn” or “training”button. This can usually be found where the hanging antenna wire is attac")
Programming A Rolling Code System
• At the garage door opener motor (in the garage), locate the “learn” or “training”button. This can usually be found where the hanging antenna wire is attached to the
garage door opener motor (it is NOT the button normally used to open and close the
door).
• Firmly press and release the “learn” or “training” button. The name and color of the
button may vary by manufacturer. Within 30 seconds, return to the vehicle and press
the programmed HomeLink
®button twice (holding the button for two seconds each
time). If the device is plugged in and activates, programming is complete.
• If the device does not activate, press the button a third time (for two seconds) to
complete the training.
Using HomeLink®
• To operate, simply press and release the programmed HomeLink®button and the
trained device will operate.
• Refer to your Owner’s Manual on the DVD for further details. If you have any problems programming HomeLink
®, or require assistance, please call toll-free 1–800–355–3515
or, on the Internet, at www.HomeLink.com.
POWER OUTLET
• There are two 12 Volt electrical outlets on this vehicle.
• The outlet on the front console has power available only when the ignition is in the ON/RUN position. If desired, this outlet can be converted by your authorized dealer to
provide power with the ignition switch in the LOCK position.
• The second outlet in the center console is p owered directly from the battery (power
available at all times). Items plugged into this outlet may discharge the battery and/or
prevent engine starting.
NOTE: Do not exceed the maximum power of 160 Watts (13 Amps) at 12 Volts. If the 160
Watt (13 Amp) power rating is exceeded the fuse protecting the system will need to be
replaced.
Uconnect™ Phone
• The Uconnect™ Phone is a voice-activated, hands-free, in-vehicle communications system.
• The Uconnect™ Phone allows you to dial a phone number with your cellular phone using simple voice commands.
• For vehicles equipped with Video Entertainment System (VES)™, refer to the Uconnect™ Phone section of the Uconnect™ User's Manual on the DVD for further
details.
• For vehicles not equipped with VES™, refer to your vehicle Owner's Manual on the DVD for further details.
33
ELECTRONICS
Page 36 of 76

WARNING!
• Any voice commanded system should be used only in safe driving conditionsfollowing local laws and phone use. All attention should be kept on the roadway
ahead. Failure to do so may result in an accident causing serious injury or death.
• Your phone must be turned on and paired to the Uconnect™ Phone to allow use of this vehicle feature in emergency situations, when the cellular phone has network
coverage and stays paired to the Uconnect™ Phone.
NOTE: The Uconnect™ Phone requires a cellular phone equipped with the Bluetooth
®
Hands-Free Profile, Version 0.96 or higher. For Uconnect™ customer support, call
1–877–855–8400.
Phone Pairing
NOTE:Pairing is a one-time initial setup before using the phone. You will also need to
follow the Bluetooth®instructions in your cell phone user guide to complete the phone
pairing setup.
• Press the Phone button
to begin.
• Wait for the “ready” prompt and beep.
• (After the BEEP), say “Uconnect setup”.
• (After the BEEP), say “phone pairing”.
• (After the BEEP), say “pair a phone”.
• Follow the audible prompts.
• You will be asked to enter a four-digit Personal Identification Number (PIN), which you will later need to enter into your cellular phone. You can enter any four-digit PIN. You
will not need to remember this PIN after the initial pairing process.
• You will then be prompted to give the phone pairing a name (each phone paired
should have a unique name).
• Next you will be asked to give this new pairing a priority of 1 thru 7 (up to seven phones may be paired).
Making A Phone Call
• Press the Phone button.
• (After the BEEP), say “dial” (or “call” to a name).
• (After the BEEP), say number (or name).
Phonebook (Uconnect™ Local) Edit
• Press the Phone button.
• (After the BEEP), say “phonebook”.
• (After the BEEP), say “new entry” or “list names” or “delete”.
• Follow the prompts.
ELECTRONICS
34
Page 37 of 76

• When an incoming call rings/is announced on Uconnect™, press the Phonebutton
.
• To end a call, press the Phone button
.
Mute (Or Unmute) Microphone Durin")
Receiving A Call – Accept (And End)
• When an incoming call rings/is announced on Uconnect™, press the Phonebutton
.
• To end a call, press the Phone button
.
Mute (Or Unmute) Microphone During Call
• During a call, press the Voice Command button.
• (After the BEEP), say “mute on” (or “mute off”).
Transfer Ongoing Call Between Handset And Vehicle
• During a call, press the Voice Command button.
• (After the BEEP), say “transfer call”.
Changing The Volume
• Start a dialogue by pressing the Phone button, then adjust the volume during a
normal call.
• Use the radio ON/OFF VOLUME rotary knob to adjust the volume to a comfortable level while the Uconnect™ system is speaking. Please note the volume setting for
Uconnect™ is different than the audio system.
NOTE: To access the tutorial, press the Uconnect™ hard-key. After the BEEP, say
“tutorial”. Press any hard-key or touch the display to cancel the tutorial.
VOICE COMMAND
• The Voice Command system allows you to control your AM, FM radio, satellite radio, disc player, Uconnect™ Phone and a memo recorder. When you press the Voice
Command button
, you will hear a beep. The beep is your signal to give a
command. If you do not say a command within a few seconds, the system will present
you with a list of options. If you ever wish to interrupt the system while it lists options,
press the Voice Command button
, listen for the BEEP, and say your command.
• For vehicles equipped with Video Entertainment System (VES)™, refer to the Voice Command section of the Uconnect™ User's Manual on the DVD for further details.
• For vehicles not equipped with VES™, refer to your vehicle Owner's Manual on the DVD for Voice Command information.
35
ELECTRONICS
Page 38 of 76
Changing The Volume
• Start a dialogue by pressing the Voice Command button, then say a command
(e.g., “tutorial”).
• Use the radio ON/OFF VOLUME rotary knob to adjust the volume to a comfortable level while the Voice Command system is speaking. Please note the volume setting for
Voice Command is different than the audio system.
WARNING!
Any voice commanded system should be used only in safe driving conditions and all
attention should be kept on the roadway ahead. Failure to do so may result in an
accident causing serious injury or death.
NOTE: To access the tutorial, press the Voice Command button
. After the BEEP,
say “tutorial”. Press any hard-key or touch the display to cancel the tutorial.
ELECTRONICS
36
Page 39 of 76

Maximum Trailer Weight Ratings
Engine/Transaxle Max. Frontal AreaMax. GTW (Gross Trailer Wt.) Max. Trailer Tongue Wt.
1
2.4L/Auto See Note
2
1,0")
TRAILER TOWING WEIGHTS (MAXIMUM TRAILER WEIGHT RATINGS)
Maximum Trailer Weight Ratings
Engine/Transaxle Max. Frontal AreaMax. GTW (Gross Trailer Wt.) Max. Trailer Tongue Wt.
1
2.4L/Auto See Note
2
1,000 lbs (450 kg)100 lbs (45 kg)
2.7L/Auto See Note
2
1,500 lbs (680 kg)150 lbs (68 kg)
3.5L/Auto 22 sq.ft. (2.0 sq.m)2,000 lbs (900 kg) 200 lbs (90 kg)
Refer to local laws for maximum trailer towing speeds.
1The trailer tongue weight must be considered as part of the c ombined weight of occupants and cargo, and it should never exceed
the weight referenced on the Tire and Loading Information placard.2Enclosed trailers or open utility trailers with front shields/guards are not recommended for use with all four-cylinder and 2.7L
engines with automatic transaxle. Please see your authorized dealer for additional information.
CAUTION!
Towing a trailer with a larger than recommended frontal area could cause the engine to overheat or cause severe engine damage
under extreme conditions.
37
UTILITY
Page 40 of 76

Towing This Vehicle Behind
Another Vehicle (Flat Towing
With All Four Wheels On The
Ground)
CAUTION!
DO NOT flat tow this vehicle. Damage
to the drivetrain")
RECREATIONAL TOWING
(BEHIND MOTORHOME,
ETC.)
Towing This Vehicle Behind
Another Vehicle (Flat Towing
With All Four Wheels On The
Ground)
CAUTION!
DO NOT flat tow this vehicle. Damage
to the drivetrain will result.
NOTE: If the vehicle requires towing,
make sure all four wheels are off the
ground.
BRAKE/TRANSAXLE
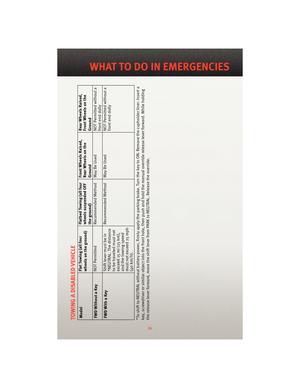
INTERLOCK MANUAL
OVERRIDE
• The manual override may be used in the event that the shift lever should
fail to move from PARK with the Key
Fob in the ON position and the brake
pedal pressed. • To operate the shift lock manual
override, perform the following steps:
• Firmly apply the parking brake, insert the ignition Key Fob and
rotate it to the ON position.
• Remove the cup holder liner.
• Insert a key, screwdriver, or finger into the front hole then push and
hold the manual override release
lever forward.
• While holding the release lever forward, move the shift lever from
PARK to NEUTRAL. Release the
override.
• Release the parking brake.
• Have your vehicle inspected by your local authorized dealer if the shift
lock manual override has been used.
NOTE: If a malfunction occurs, the
system will trap the Key Fob in the
ignition cylinder to warn you that this
safety feature is inoperable. The engine
can be started and stopped, but the Key
Fob cannot be removed until you obtain
service.
UTILITY
38


.
• Use the radio ON/OFF VOLUME rotary knob to adjust the volume to a comforta")