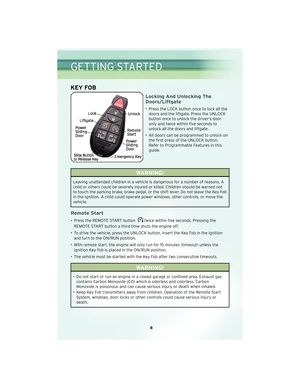
Page 33 of 92
STOW ’N GO®SEATING
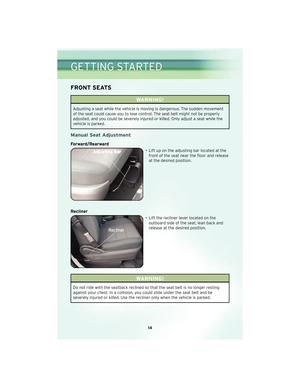
• Move the front seat fully forward. Lower the head restraints and raise the armrestson the second row seat.
• Slide the storage bin locking mechanism to the “LOCK“ position and then pull up on the storage bin latch to open the cover.
• Pull up on the seatback recliner lever, located on the outboard side of the seat, and fold the seatback down. To assure the seatback is latched in the folded position,
additional downward pressure on the seatback may be required when folding.
• Pull rearward on the release strap, located at the rear of the seat, and tumble the seat forward into the storage bin.
• Close the storage bin cover.
31
OPERATING YOUR VEHICLE
Page 34 of 92
SWIVEL N’ GO™ SEATING WITH TABLE
To Swivel The Seats
• Pull the lower handle on the outboard side of the seat and push the side of theseatback to begin rotation. Once the seat begins to rotate, the handle may be
released. The seat locks in position once reaching the forward or rearward
positions only.
Table Installation
• Open the floor storage cover in front of the second row seats.
• Remove the pole and table top by loosening the hook and loop straps.
• Pull the lower handle to swivel the second row seats so they are facing the rear.
• Insert the pole into the base by aligning the lock button into the notch of the base.
• Twist the pole in a clockwise rotation until it stops.
NOTE: You will hear an audible “click” when the lock buttons engage.
• Place the table top over the installed pole aligning with the mating feature of the underside of the table top. Apply pressure on the table top and press downward.
OPERATING YOUR VEHICLE
32
Page 35 of 92

To Remove The Seats
• Remove any obstructions from the floor behind the seat, and stow the third rowseat.
• Pull up on the release bar located at the bottom front edge of the swivel seat.
• From behind the seat, lift up on the rear of the seat cushion while pulling the seat in a rearward direction.
• Remove the seat from the vehicle through the liftgate. Rollers are part of the seat frame and will ease the removal process.
• Lower the release handle located at the bottom front edge of the seat.
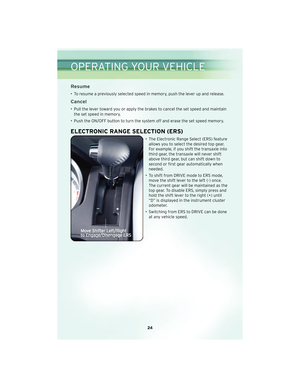
THIRD ROW POWER RECLINER
• The power recline feature, located on the side of the seat cushion, adjusts the seatback angle forward/rearward for occupant comfort.
Third Row Power Seat Switch
• A one-touch power folding seat switch islocated in the left rear trim panel as part
of a switch bank.
• Left and right third row seats can be folded individually or together. The third row
power folding seats adjust to multiple
positions.
• The switch is only functional when the liftgate is open and the vehicle is in PARK.
NOTE:
• Disconnect the center shoulder belt from the small buckle and lower the head restraints before attempting to fold/stow the power third row seats.
• To abort seat operation while the seat is in motion, press a different seat position selector switch to stop the seat. Once the seat stops moving, then the desired
position can be selected.
• The third row power seat system includes obstacle detection for safe operation. When the system detects an obstacle, the motors will stop and reverse the motion
a short distance to move the seat away from the obstacle. Should this occur,
remove the obstacle and press the button again for the desired position.
• Refer to your Owner’s Manual on the DVD for manual third row seat folding instructions.
33
OPERATING YOUR VEHICLE
Page 36 of 92

POWER LIFTGATE
• The power liftgate may be opened and closed by pressing the button on the KeyFob or the button located on the overhead console. Press the button once to open,
and a second time to close the power liftgate.
• The power liftgate may be closed by the button, located in the upper left trim in the liftgate opening. Pressing once will only close the liftgate. This button cannot be
used to open the liftgate.
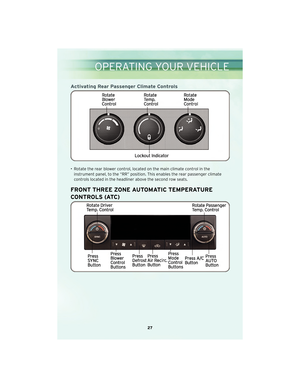
POWER SUNROOF
• The power sunroof switch is located on the overhead console.
WARNING!
• Never leave children in a vehicle with the key in the ignition switch. Occupants,particularly unattended children, can become entrapped by the power sunroof
while operating the power sunroof switch. Such entrapment may result in
serious injury or death.
• In an accident, there is a greater risk of being thrown from a vehicle with an open sunroof. You could also be seriously injured or killed. Always fasten your
seat belt properly and make sure all passengers are properly secured too.
• Do not allow small children to operate the sunroof. Never allow your fingers, other body parts, or any object to project through the sunroof opening. Injury
may result.
Opening Sunroof
Express
• Press the switch rearward and release. The sunroof will fully open and stopautomatically.
Closing Sunroof
Express
• Press the switch forward and release. The sunroof will close automatically from anyposition.
OPERATING YOUR VEHICLE
34
Page 37 of 92

Manual Open/Close
• Press and hold the switch rearward to open or forward to close the sunroof. Anyrelease of the switch will stop the movement, and the sunroof will remain in a
partially open or cl osed position until the swit ch is pressedagain.
Venting Sunroof
• Press and release the “V“ button, and the sunroof will open to the vent position.
This is called “Express Vent” and will occur regardless of sunroof position. During
Express Vent operation, any movement of the switch will stop the sunroof.
Pinch Protection Feature
• This feature will detect an obstruction in the opening of the sunroof during ExpressClose operation. If an obstruction in the path of the sunroof is detected, the
sunroof will automatically return to the open position.
NOTE: Pinch protection is disabled while the s witch ispressed and held during
manual opening and closing of the sunroof.
WIND BUFFETING
• Wind buffeting can be described as a helicopter-type percussion sound. If buffeting occurs with the rear windows open, adjust the front and rear windows together.
• If buffeting occurs with the sunroof open, adjust the sunroof opening, or adjust any window. This will minimize buffeting.
35
OPERATING YOUR VEHICLE
Page 38 of 92
NON-TOUCH-SCREEN RADIOS
Media Center 130 (RES)
Media Center 130 (RES/RSC)
ELECTRONICS
36
Page 39 of 92

NOTE:Uconnect™ Phone and Voice Command are vehicle options which must be
ordered separately. The buttons on the radio will only be active if the vehicle has
been equipped with the option.
• Your radio has many features that add to the comfort and convenience of you and your passengers. Some of these radio features should not be used when driving
because they take your eyes from the road or your attention from driving.
• The radio sales code is located on the lower right side of the radio faceplate.
• Unless otherwise noted, the information provided on the operation and functionality of the radios in this section is common to all non-touch-screen radios.
Your new vehicle has many features for the comfort and convenience of you and
your passengers. Some of these should not be used when driving because they take
your eyes from the road or your attention from driving. Never text while driving or
take your eyes more than momentarily off the road.
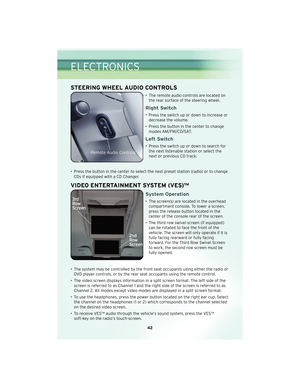
Seek Up/Down Buttons
• Press to seek through radio stations in AM, FM, or SAT bands. Seek through tracks in CD mode.
• Hold either button to bypass stations without stopping.
Audio Settings
• Press the TUNE/SCROLL control knob and BASS, MID, TREBLE, BALANCE and FADE will display. Rotate the TUNE/SCROLL control knob to select the desired setting.
Auxiliary Mode
• The auxiliary (AUX) jack allows a portable device, such as an MP3 player or acassette player, to be plugged into the radio and utilize the vehicle’s audio system
to amplify the source and play through the vehicle speakers.
• Pressing the AUX button will change the mode to auxiliary device if the AUX jack is connected.
• The control of the external device cannot be provided by the radio; use the device controls instead.
Clock Setting
• Press and hold the TIME button until the hours blink; turn the TUNE/SCROLLcontrol knob to set the hours.
• Press the TUNE/SCROLL control knob until the minutes begin to blink; turn the TUNE/SCROLL control knob to set the minutes.
• Press the TUNE/SCROLL control knob to save the time change.
• To exit, press any button/knob or wait five seconds.
Station Presets
• Press the SET/RND button once and SET 1 will show in the display. Then select the button (1–6).
• A second station may be added to each push button. Press the SET/RND button twice and SET 2 will show in the display, then select button (1–6).
37
ELECTRONICS
Page 40 of 92
TOUCH-SCREEN RADIOS
Navigation Radio – Sales Code RER
Multimedia Radio – Sales Code RBZ
ELECTRONICS
38


Media Center 130 (RES/RSC)
ELECTRONICS
36")
