Page 33 of 88

NOTE:Uconnect™ Phone and Voice Command are vehicle options which must be
ordered separately. The buttons on the radio will only be active if the vehicle has
been equipped with the option.
• The radio sales code is located on the lower right side of the radio faceplate.
• Unless otherwise noted, the information provided on the operation and functionality of the radios in this section is common to all non-touch-screen radios.
Seek Up/Down Buttons
• Press to seek through radio stations in AM, FM, or SAT bands. Seek through tracksin CD mode.
• Hold either button to bypass stations without stopping.
Audio Settings
• Press the TUNE/SCROLL control knob and BASS, MID, TREBLE, BALANCE and FADE will display. Rotate the TUNE/SCROLL control knob to select the desired setting.
Auxiliary Mode
• The auxiliary (AUX) jack allows a portable device, such as an MP3 player or acassette player, to be plugged into the radio and utilize the vehicle’s audio system
to amplify the source and play through the vehicle speakers.
• Pressing the AUX button will change the mode to auxiliary device if the AUX jack is connected.
• The control of the external device cannot be provided by the radio; use the device controls instead.
Clock Setting
• Press and hold the TIME button until the hours blink; turn the TUNE/SCROLLcontrol knob to set the hours.
• Press the TUNE/SCROLL control knob until the minutes begin to blink; turn the TUNE/SCROLL control knob to set the minutes.
• Press the TUNE/SCROLL control knob to save the time change.
• To exit, press any button/knob or wait five seconds.
Station Presets
• Press the SET/RND button once and SET 1 will show in the display. Then select the button (1–6).
• A second station may be added to each push button. Press the SET/RND button twice and SET 2 will show in the display, then select button (1–6).
31
ELECTRONICS
Page 34 of 88
TOUCH-SCREEN RADIOS
Navigation Radio – Sales Code RER
Multimedia Radio – Sales Code REN
ELECTRONICS
32
Page 35 of 88

Multimedia Radio – Sales Code RBZ
NOTE:Uconnect™ Phone and Voice Command are vehicle options which must be
ordered separately. The buttons on the radio will only be active if the vehicle has
been equipped with the option.
• The radio sales code is located on the lower right side of the radio faceplate.
• Unless otherwise noted, the information provided on the operation and functionality of the radios in this section is common to all touch-screen radios.
Seek Up/Down
• REN and RER Radios – Press the SEEK hard-key to seek through radio stations inAM, FM, or SAT bands. Seek through tracks in CD or iPod®modes or through songs
in the HDD playlist.
• RBZ Radio – Touch the SCAN soft-key, right or left arrow soft-keys to change the currently playing station in AM, FM or SAT bands.
Radio Mode
• Press the RADIO/MEDIA (RER and REN) or RADIO (RBZ) hard-key to display thedifferent radio modes, then press the desired soft-key to select AM, FM, SAT, HDD,
Disk or AUX modes.
Auxiliary Mode
• The auxiliary (AUX) jack allows a portable device, such as an MP3 player or acassette player, to be plugged into the radio and utilize the vehicle’s audio system
to amplify the source and play through the vehicle speakers.
33
ELECTRONICS
Page 36 of 88

• The display will switch automatically to the AUX mode when a 3.5 mm stereomini-jack cable has been connected.
• To change radio modes while the cable is connected to the unit, press the RADIO/MEDIA (RER and REN) or MEDIA (RBZ) hard-key until the AUX tab is
displayed on the top of the screen. Touch the AUX tab to return to the AUX mode.
• The control of the external device cannot be provided by the radio; use the device controls instead.
Clock Setting
• Turn the radio on, then touch the screen where the time is displayed.
• Touch the USER CLOCK soft-key (Navigation radio only).
• To adjust the hours, touch either the HOUR FORWARD or HOUR BACKWARDsoft-key.
• To adjust the minutes, touch either the MINUTE FORWARD or MINUTE BACKWARD soft-key.
• To save the new time setting, touch the screen where the word “Save” is displayed.
Store Radio Presets
• For REN and RER: Press the RADIO/MEDIA hard-key repeatedly until AM FM SAT is displayed in the upper left corner of the screen.
• For RBZ: Press the RADIO hard-key to display AM FM SAT in the upper left corner of the screen.
• Select the radio band by touching either the AM, FM, or SAT soft-key.
• Find the station to store by either pressing the SEEK UP/DOWN hard-key (REN and RER), touching the right and left arrow soft-keys (RBZ), touching the SCAN
soft-key, or by using the DIRECT TUNE soft-key.
• Once the station is found, touch and hold one of the PRESET soft-keys in the list to the right, until you hear a confirmation beep.
Hard Disc Drive Operation
Copy Complete Audio Disc To Hard-Drive
• Press the OPEN/CLOSE hard-key (REN and RER) or LOAD hard-key (RBZ) andinsert a disc, then press the MENU hard-key.
• Touch the MY FILES soft-key, then select MY MUSIC.
• Touch the IMPORT MUSIC soft-key, then touch the FROM DISC soft-key in the next screen to start the process.
Copying From USB
• Insert a USB device, then select MY MUSIC.
• Touch the IMPORT MUSIC FILES soft-key, then touch the FROM USB soft-key in thenext screen.
ELECTRONICS
34
Page 37 of 88

• Select the folders or titles you would like to copy, then touch the DONE soft-key tostart the copy process.
Copy Pictures To The Hard-Drive
• Insert either a CD or a USB device containing your pictures.
• Touch the MY FILES soft-key, then go to the MANAGE MY FILES screen.
• Touch the MY PICTURES soft-key to get an overview of the currently stored images.
• Touch one of the ADD PICTURES soft-keys, then select the type of media inserted.
• Use the PAGE soft-keys to page through a list of pictures and press the picture youwould like to import.
• Confirm your selection by touching the YES soft-key. The imported picture is now available in the MANAGE MY PICTURES screen.
• In order to display the imported picture in the radio screen, touch the desired picture soft-key.
• Select this picture by pressing the PICTURE VIEW soft-key. A check mark indicates the currently used picture.
Cleaning Your Touch-Screen Radio
• Do not spray any liquid or caustic chemicals directly on the screen. Use a clean anddry micro fiber lens cleaning cloth in order to clean the touch-screen.
• If necessary, use a lint-free cloth dampened with a cleaning solution such as isopropyl alcohol or an isopropyl alcohol and water solution ratio of 50:50. Be sure
to follow the solvent manufacturer’s precautions and directions.
Navigation
Navigation Radio – RER Only
• Navigation radios require digital data from a navigation database. The data in thenavigation database is licensed from Navigation Technologies®. Not all roads are
digitized.
• For software updates, visit http://www.chrysler.com/en/owners/mygig/ website, visit http://www.navteq.com website, or contact your authorized dealer for the latest
available software.
NOTE: Many features of this radio are speed dependent. For your own safety, it is
not possible to use the touch-screen keyboard to enter a name (e.g., street name)
while the vehicle is in motion. Pull over at a safe location to complete your task.
• The Navigation system receives GPS signals from satellites to display the position of your vehicle.
New Destination
• Press the NAV hard-key to access the Navigation Main Menu.
• Touch the NEW DESTINATION soft-key to program a destination, then select thedestination soft-key of your choice.
35
ELECTRONICS
Page 38 of 88

Program/Storing Home Address
• Press the NAV hard-key to access the Navigation Main Menu.
• Touch the GUIDE ME HOME soft-key, then touch the STREET ADDRESS soft-key.
• Touch the STATE soft-key, then enter your state name into the speller; select yourstate from the list and press the CHANGE soft-key.
• Touch the INPUT STREET NAME soft-key and enter your street name into the speller.
• Touch the CONTINUE soft-key and enter your address into the speller; then touch the CONTINUE soft-key again.
• Touch the city name and touch the SAVE soft-key to complete programming.
Change Stored Home Address
• Press the MENU hard-key, then touch the MY FILES soft-key.
• Touch the MY ADDRESS BOOK soft-key, then touch the HOME soft-key.
• In the Home Address Information screen, touch the EDIT CONTACT soft-key, then touch the CHANGE ADDRESS soft-key in the next screen.
• Touch the INPUT STREET NAME soft-key and enter your street name into the speller.
• Touch the CONTINUE soft-key and enter your address into the speller; touch the CONTINUE soft-key again.
• Touch the city name and touch the SAVE soft-key to complete programming.
Guide Me Home
• Press the NAV hard-key to access the Navigation Main Menu.
• Touch the GUIDE ME HOME soft-key to route you back to your home destination from your current location. Touch the GO soft-key to start your trip.
Map
• Press the NAV hard-key to access the Navigation Main Menu.
• Touch the MAP soft-key to display a map of your current position.
ELECTRONICS
36
Page 39 of 88

REMOTE AUDIO CONTROLS
• The remote sounds system controls arelocated on the steering wheel.
• Press the top or bottom of the Volume button
to increase or decrease the
sound level.
• Press the Audio Mode button
to select
radio mode information.
• Press the Function Select button
in
radio mode to advance preset stations.
• Press the Scroll button
in radio mode to seek up and down radio stations or
tracks on a CD.
UNIVERSAL CONSUMER INTERFACE
• This feature allows you to plug an iPod®
into the vehicle’s sound system through a
16–pin connector using the provided
interface cable.
• The 16–pin connector port is located in the glove box or on the center console.
Location may vary. To get into the UCI
(iPod
®) mode from a non-touch-screen
radio, press the AUX button on the radio
faceplate. From touch-screen radios, press
the MEDIA hard-key, then touch the iPod
®
soft-key. When connected to this feature:
• The iPod
®audio can be played on the vehicle’s sound system.
• The iPod
®can be controlled using the radio buttons to Play, Browse, and List the
iPod®contents. Refer to the Owner’s Manual on the DVD for details.
• The iPod
®battery charges when plugged into the UCI connector.
WARNING!
Do not plug in or remove the iPod®while driving. Failure to follow this warning
could result in an accident.
37
ELECTRONICS
Page 40 of 88

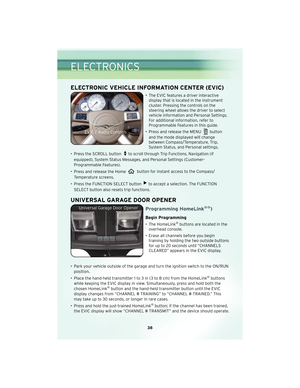
• The EVIC features a driver interactivedisplay that is located in the instrument
cluster. Pressing the controls on the
steering wheel allows the driver")
ELECTRONIC VEHICLE INFORMATION CENTER (EVIC)
• The EVIC features a driver interactivedisplay that is located in the instrument
cluster. Pressing the controls on the
steering wheel allows the driver to select
vehicle information and Personal Settings.
For additional information, refer to
Programmable Features in this guide.
• Press and release the MENU
button
and the mode displayed will change
between Compass/Temperature, Trip,
System Status, and Personal settings.
• Press the SCROLL button
to scroll through Trip Functions, Navigation (if
equipped), System Status Messages, and Personal Settings (Customer-
Programmable Features).
• Press and release the Home
button for instant access to the Compass/
Temperature screens.
• Press the FUNCTION SELECT button
to accept a selection. The FUNCTION
SELECT button also resets trip functions.
UNIVERSAL GARAGE DOOR OPENER
Programming HomeLink®®)
Begin Programming
• The HomeLink®buttons are located in the
overhead console.
• Erase all channels before you begin training by holding the two outside buttons
for up to 20 seconds until “CHANNELS
CLEARED” appears in the EVIC display.
• Park your vehicle outside of the garage and turn the ignition switch to the ON/RUN position.
• Place the hand-held transmitter 1 to 3 in (3 to 8 cm) from the HomeLink
®buttons
while keeping the EVIC display in view. Simultaneously, press and hold both the
chosen HomeLink
®button and the hand-held transmitter button until the EVIC
display changes from “CHANNEL # TRAINING” to “CHANNEL # TRAINED.” This
may take up to 30 seconds, or longer in rare cases.
• Press and hold the just-trained HomeLink
®button; if the channel has been trained,
the EVIC display will show “CHANNEL # TRANSMIT” and the device should operate.
ELECTRONICS
38