Page 17 of 88

Power Seats
• The power seat switches are located on theoutboard side of the front seat cushions.
• The seat switch controls, forward/ backward, up/down or to recline the seat.
The passenger’s seat will move up or down,
forward or rearward.
• The recline switch controls the angle of the seatback. Press the switch forward or
rearward and the seatback will move in
either direction.
CAUTION!
DO NOT place any article under a power seat or impede its ability to move as it
may cause damage to the seat controls. Seat travel may become limited if
movement is stopped by an obstruction in the seat’s path.
Lumbar Support
• Rotate the control lever forward to increase and rearward to decrease the desired
amount of lumbar support.
CAUTION!
DO NOT place any article under a power seat or impede its ability to move as it
may cause damage to the seat controls. Seat travel may become limited if
movement is stopped by an obstruction in the seat’s path.
WARNING!
Do not ride with the seatback reclined so that the seat belt is no longer resting
against your ch est. In a collision, you could slide under the seat belt and be
seriously or even fatally injured. Use the recliner only when the vehicle is parked.
15
GETTING STARTED
Page 18 of 88

Memory Seats
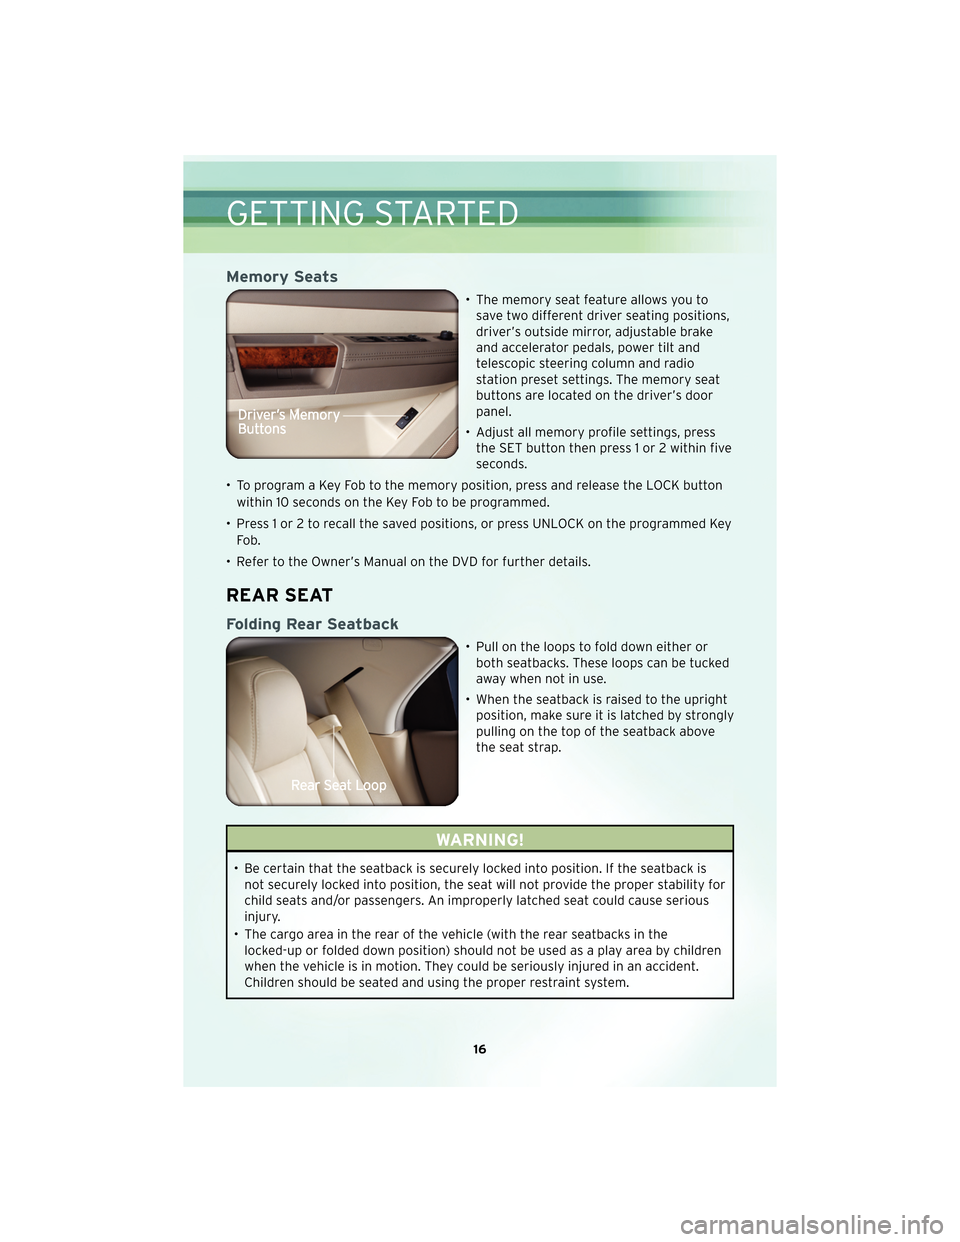
• The memory seat feature allows you tosave two different driver seating positions,
driver’s outside mirror, adjustable brake
and accelerator pedals, power tilt and
telescopic steering column and radio
station preset settings. The memory seat
buttons are located on the driver’s door
panel.
• Adjust all memory profile settings, press the SET button then press 1 or 2 within five
seconds.
• To program a Key Fob to the memory position, press and release the LOCK button within 10 seconds on the Key Fob to be programmed.
• Press 1 or 2 to recall the saved positions, or press UNLOCK on the programmed Key Fo b .
• Refer to the Owner’s Manual on the DVD for further details.
REAR SEAT
Folding Rear Seatback
• Pull on the loops to fold down either or both seatbacks. These loops can be tucked
away when not in use.
• When the seatback is raised to the upright position, make sure it is latched by strongly
pulling on the top of the seatback above
the seat strap.
WARNING!
• Be certain that the seatback is securely locked into position. If the seatback isnot securely locked into position, the seat will not provide the proper stability for
child seats and/or passengers. An improperly latched seat could cause serious
injury.
• The cargo area in the rear of the vehicle (with the rear seatbacks in the locked-up or folded down position) should not be used as a play area by children
when the vehicle is in motion. They could be seriously injured in an accident.
Children should be seated and using the proper restraint system.
GETTING STARTED
16
Page 19 of 88

HEATED SEATS
Front Heated Seats
• The controls for front heated seats arelocated near the bottom of the center
instrument panel.
• Press the switch once to select High-level heating. Press the switch a second time to
select Low-level heating. Press the switch a
third time to shut the heating elements
Off.
Rear Heated Seats
• Rear seat heated seat switches are locatedon the rear of the center console.
• Press the switch once to select High-level heating. Press the switch a second time to
select Low-level heating. Press the switch a
third time to shut the heating elements
Off.
WARNING!
• Persons who are unable to feel pain to the skin because of advanced age,chronic illness, diabetes, spinal cord injury, medication, alcohol use, exhaustion
or other physical conditions must exercise care when using the seat heater. It
may cause burns even at low temperatures, especially if used for long periods of
time.
• Do not place anything on the seat that insulates against heat, such as a blanket or cushion. This may cause the seat heater to overheat. Sitting in a seat that has
been overheated could cause serious burns due to the increased surface
temperature of the seat.
17
GETTING STARTED
Page 20 of 88
CAUTION!
Repeated overheating of the seat could damage the heating element and/or
degrade the material of the seat.
ADJUSTABLE PEDALS
• The adjustable pedal switch is located onthe front side of the driver’s seat cushion
side shield.
• Press the switch forward to move the pedals forward (toward the front of the
vehicle).
• Press the switch rearward to move the pedals rearward (toward the driver).
NOTE: The pedals cannot be adjusted when the vehicle is in REVERSE or when the
Electronic Speed Control is set.
WARNING!
Do not adjust the pedals while the vehicle is moving. You could lose control and
have an accident. Always adjust the pedals while the vehicle is parked.
CAUTION!
Do not place any article under the adjustable pedals or impede its ability to move,
as it may cause damage to the pedal controls. Pedal travel may become limited if
movement is stopped by an obstruction in the adjustable pedal’s path.
GETTING STARTED
18
Page 21 of 88

TILT / TELESCOPING STEERING COLUMN
Manual - Tilt / Telescoping Steering Column
• The tilt/telescoping control handle islocated below the steering wheel at the
end of the steering column.
• Pull the handle rearward to unlock the steering column.
• To tilt the steering column, move the steering wheel upward or downward as
desired. To lengthen or shorten the
steering column, pull the steering wheel
outward or push it inward as desired.
• Push forward on the handle to lock the column firmly in place.
WARNING!
Do not adjust the steering wheel while driving. The tilt/telescoping adjustment
must be locked while driving. Adjusting the steering wheel while driving or driving
without the tilt/telescoping adjustment locked could cause the driver to lose
control of the vehicle. Failure to follow this warning may result in serious injury or
death.
Power - Tilt / Telescoping Steering Column
• The power tilt/telescoping steering lever is located below the turn signal/wiper/
washer/high beam lever on the steering
column.
• To tilt the steering column, move the power tilt/telescoping lever up or down as
desired. To lengthen or shorten the
steering column, pull the lever toward you
or push the lever away from you as
desired.
WARNING!
Moving the steering column while the vehicle is moving is dangerous. Without a
stable steering column, you could lose control of the vehicle and have an accident.
Adjust the column only while the vehicle is stopped.
19
GETTING STARTED
Page 22 of 88

PROGRAMMABLE FEATURES
Electronic Vehicle Information Center (EVIC) – If Equipped
• The EVIC can be used to program the following Personal Settings. Press andrelease the MENU button
until Personal Settings displays, then press the
SCROLL button
to scroll through the settings. Press the FUNCTION SELECT
button
to change the setting.
• Language • Key-Off Power Delay
• Auto Door Locks • AWD System Displays
• Auto UNLK On Exit • Display ECO
• RKE Unlock • Turn-by-Turn Navigation
• RKE Linked To Memory • Confirmation of Voice Commands
• Sound Horn With RKE Lock • Park ASST. System
• Flash Lamp Lock • Display Units of Measure
• Headlamp Off Delay • Automatic High Beams
• Easy Exit Seat • Rain Sensing Intermittent Wipers
• Tilt MIRR. In Reverse • Turn Headlamps On With Wipers
• Turn Headlamps On With Remote Key Unlock • Passive Entry
Key Fob Programmable Features
• The following features may also be programmed by using the Key Fob transmitter
or the ignition switch and driver’s door lock switch.
NOTE: Pressing the LOCK button while you are inside the vehicle will activate the
Vehicle Security Alarm. Opening a door with the Vehicle Security Alarm activated will
cause the alarm to sound. Press the UNLOCK button to deactivate the Vehicle
Security Alarm.
Unlock On First Press
• To unlock either the driver’s side, or all doors, on the first press of the UNLOCK button:
• Press and hold the LOCK button for at least 4 seconds, but no longer than 10 seconds. Then, press and hold the UNLOCK button while still holding the
LOCK button.
• Release both buttons at the same time.
Auto Unlock Doors On Exit
• To have all of the vehicle doors unlock when any door is opened: • Enter your vehicle and close all the doors.
• Within 15 seconds, cycle the ignition switch between LOCK and ON and then backto LOCK four times, ending up in the LOCK position (do not start the engine).
• Within 30 seconds, press the power door UNLOCK switch to unlock the doors. A single chime will indicate that programming is complete.
GETTING STARTED
20
Page 23 of 88

Auto Door Lock
• To have the doors lock automatically when the vehicle’s speed exceeds 15 mph(24 km/h):
• Enter your vehicle and close all the doors.
• Cycle the ignition switch between LOCK and ON and then back to LOCK four times, ending up in the LOCK position (do not start the engine).
• Press the power door LOCK switch to lock the doors. A single chime will indicate that programming is complete.
Sound Horn With Lock
• To turn the horn chirp on or off when the doors are locked:
• Press the LOCK button for at least 4 seconds, but no longer than 10 seconds.Then, press the PANIC button while still holding the LOCK button.
• Release both buttons at the same time.
Flashing Lights With Lock
• The turn signal lights flashing, when the doors are locked or unlocked, feature can be turned on or off. To turn this feature on or off:
• Press and hold the UNLOCK button for at least 4 seconds, but no longer than 10 seconds. Then, press and hold the LOCK button while still holding the
UNLOCK button.
• Release both buttons at the same time.
21
GETTING STARTED
Page 24 of 88

TURN SIGNAL/WIPER/WASHER/HIGH BEAM LEVER
Turn Signal/Lane Change Assist
• Tap the lever up or down once and the turn signal (right or left) will flash threetimes and automatically turn off.
Front Wipers
Intermittent, Low And High Operation
• Rotate the end of the lever to the first detent position for one of five intermittentsettings, the second detent for low wiper operation and the third detent for high
wiper operation.
Rain Sensing Wipers
• This feature senses moisture on the vehicle’s windshield and automaticallyactivates the wipers for the driver when the switch is in the intermittent positions.
Refer to Programmable Features in Getting Started for further details.
Mist
• Push the end of the lever inward to the first detent when a single wipe is desired.
Washer Operation
• Push the end of the lever inward to the second detent and hold for as long as sprayis desired.
High Beam Operation
• Push the lever forward to activate the high beams. Pull the lever toward you forflash to pass.
NOTE: For safe driving, turn off high beams when oncoming traffic is present to
prevent headlight glare and as a courtesy to other motorists.
OPERATING YOUR VEHICLE
22