Page 143 of 465
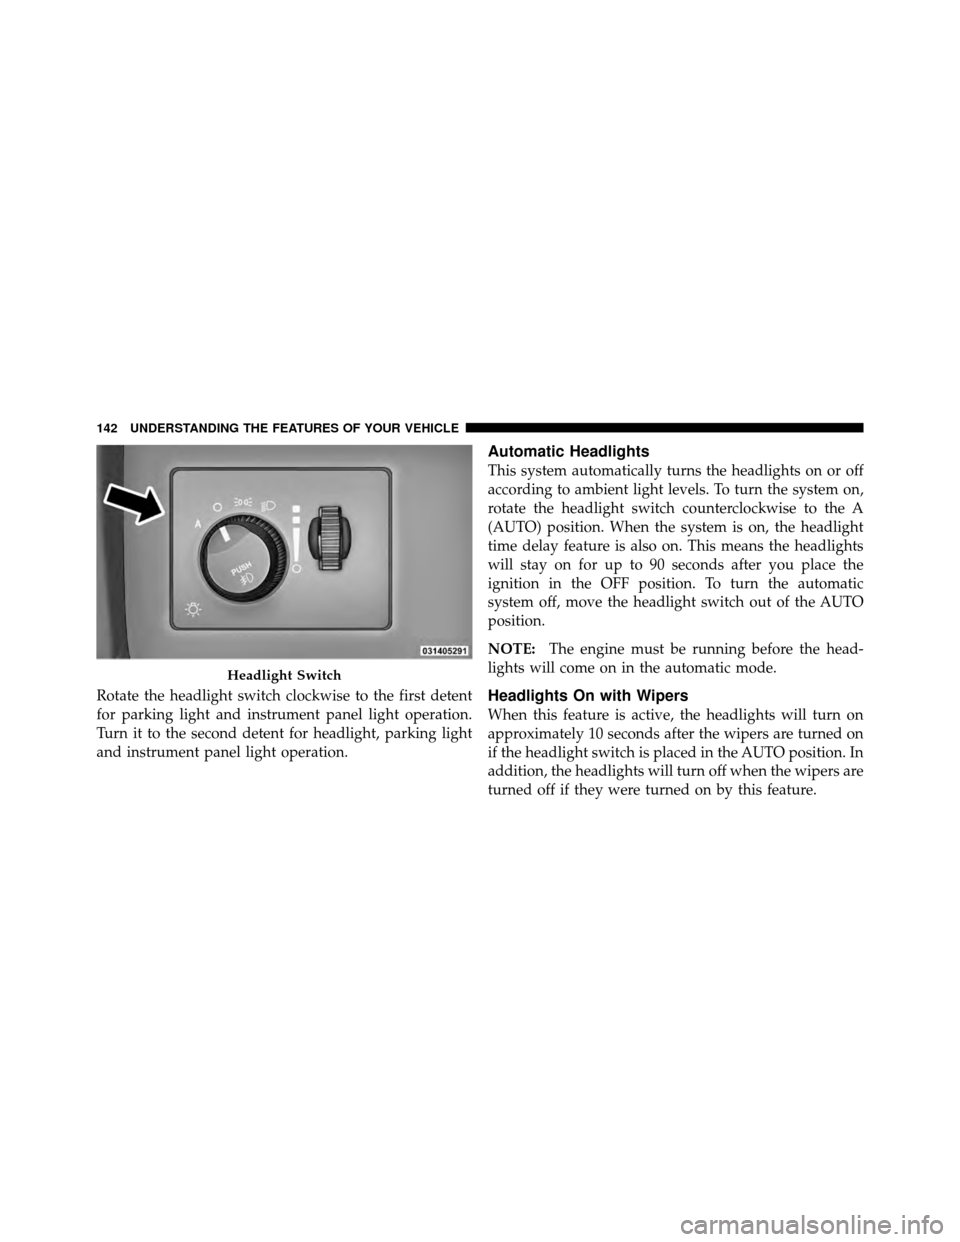
Rotate the headlight switch clockwise to the first detent
for parking light and instrument panel light operation.
Turn it to the second detent for headlight, parking light
and instrument panel light operation.
Automatic Headlights
This system automatically turns the headlights on or off
according to ambient light levels. To turn the system on,
rotate the headlight switch counterclockwise to the A
(AUTO) position. When the system is on, the headlight
time delay feature is also on. This means the headlights
will stay on for up to 90 seconds after you place the
ignition in the OFF position. To turn the automatic
system off, move the headlight switch out of the AUTO
position.
NOTE:The engine must be running before the head-
lights will come on in the automatic mode.
Headlights On with Wipers
When this feature is active, the headlights will turn on
approximately 10 seconds after the wipers are turned on
if the headlight switch is placed in the AUTO position. In
addition, the headlights will turn off when the wipers are
turned off if they were turned on by this feature.
Headlight Switch
142 UNDERSTANDING THE FEATURES OF YOUR VEHICLE
Page 149 of 465
Interior Light Defeat (OFF)
Rotate the dimmer control to the extreme bottom off
position. The interior lights will remain off when the
doors are open.
Parade Mode (Daytime Brightness Feature)
Rotate the dimmer control upward to the first detent.
This feature brightens all text displays such as the
odometer, EVIC, and radio when the parking lights or
headlights are on.
WINDSHIELD WIPERS AND WASHERS
The multifunction lever operates the windshield
wipers and washer when the ignition is placed in
the RUN position. The multifunction lever is
located on the left side of the steering column. Rotate the end of the multifunction lever to the first
detent past the intermittent settings for low-speed wiper
operation, or to the second detent past the intermittent
settings for high-speed wiper operation.Windshield Wiper/Washer Control
148 UNDERSTANDING THE FEATURES OF YOUR VEHICLE
Page 195 of 465
CAUTION!
Driving with a hot cooling system could damage
your vehicle. If the temperature gauge reads 240°F
(116°C) or greater, pull over and stop the vehicle. Idle
the vehicle with the air conditioner turned off until
the pointer drops back into the normal range 200–
230°F (93–110°C). If the pointer remains at 240°F
(116°C) or greater and you hear a chime, turn the
engine OFF immediately, and call for service.
WARNING!
A hot engine cooling system is dangerous. You or
others could be badly burned by steam or boiling
coolant. You may want to call a service center if your
vehicle overheats. If you decide to look under the
hood yourself, refer to “Maintaining Your Vehicle”
and follow the warnings under the Cooling System
Pressure Cap paragraph.
15. Trip Odometer Button
Press this button to change the display from odometer to
either of two trip odometer settings. The letter “A” or “B”
will appear when in the trip odometer mode. Push in and
hold the button for two seconds to reset the trip odometer
to 0 miles (km). The odometer must be in TRIP mode to
reset it.
194 UNDERSTANDING YOUR INSTRUMENT PANEL
Page 208 of 465
Press the SCROLL button to cycle through all the Trip
Computer functions.
The Trip Functions mode displays the following informa-
tion.
•Average Fuel Economy
Shows the average fuel economy since the last reset.
When the fuel economy is reset, the display will read
“RESET” or show dashes for two seconds. Then, the
history information will be erased, and the averaging will
continue from the last fuel average reading before the
reset.
•Distance To Empty (DTE)
Shows the estimated distance that can be traveled with
the fuel remaining in the tank. This estimated distance is
determined by a weighted average of the instantaneous
and average fuel economy, according to the current fuel
tank level. DTE cannot be reset through the FUNCTION
SELECT button. NOTE:
Significant changes in driving style or vehicle
loading will greatly affect the actual drivable distance of
the vehicle, regardless of the DTE displayed value.
When the DTE value is less than 30 miles (48 km)
estimated driving distance, the DTE display will change
to a text display of �LOW FUEL.�This display will
continue until the vehicle runs out of fuel. Adding a
significant amount of fuel to the vehicle will turn off the
�LOW FUEL� text and a new DTE value will display.
•Trip A
Shows the total distance traveled for Trip A since the last
reset.
•Trip B
Shows the total distance traveled for Trip B since the last
reset.
4
UNDERSTANDING YOUR INSTRUMENT PANEL 207
Page 214 of 465
•Video Surround
•Audio Surround
While in the Surround Sound menu, press the FUNC-
TION SELECT button to change surround modes. The
Video Surround Mode will only be available for video
media sources (DVDs, Video CDs, or other video media
supported by the radio).
Compass Display
The compass readings indicate the direction
the vehicle is facing. Press and release the
HOME button to display one of eight compass
readings and the outside temperature.
NOTE: The system will display the last known outside
temperature when starting the vehicle and may need to
be driven several minutes before the updated tempera-
ture is displayed. Engine temperature can also affect the displayed temperature, therefore temperature readings
are not updated when the vehicle is not moving.
Automatic Compass Calibration
This compass is self-calibrating, which eliminates the
need to set the compass manually. When the vehicle is
new, the compass may appear erratic and the EVIC will
display “CAL” until the compass is calibrated. You may
also calibrate the compass by completing one or more 360
degree turns (in an area free from large metal or metallic
objects) until the “CAL” message displayed in the EVIC
turns off. The compass will now function normally.
Manual Compass Calibration
If the compass appears erratic and the “CAL” message
does not appear in the EVIC display, you must put the
compass into the Calibration Mode manually as follows:
1. Turn the ignition switch ON.
2. Press and hold the HOME button for approximately
two seconds.HOME
Button
4
UNDERSTANDING YOUR INSTRUMENT PANEL 213
Page 216 of 465

2. Press and hold the HOME button for approximately
two seconds.
3. Press the SCROLL button until “Compass Variance”
message and the last variance zone number displays in
the EVIC.
4. Press and release FUNCTION SELECT button until
the proper variance zone is selected according to the
map.
5. Press and release the HOME button to exit.
Uconnect™ gps — If Equipped
Uconnect™ gps Display Control
Press and release the MENU button until Navigation
displays in the EVIC. When the Navigation System is On,
the steering wheel buttons can be used to select the Map
or Menu display on the Navigation Unit. When the Menu
display is active, the SCROLL button can be used to scroll
through the list, the FUNCTION SELECT button can beused to select an item, and the AUDIO MODE button can
be used to return to the previous menu. When the Map
display is active, pressing the FUNCTION SELECT but-
ton will change the Navigation Unit Display to the Menu.
Turn-by-Turn Directions
The EVIC displays turn-by-turn directions to a pro-
grammed destination when Turn-by-Turn Navigation is
enabled through Personal Settings. When enabled, the
EVIC displays the name of the approaching road at the
top of the screen, followed by an arrow to indicate the
direction to turn the vehicle, and a count down to
indicate the distance to the turn.
NOTE:
Refer to your “Navigation User’s Manual” for
detailed operating instructions.
4
UNDERSTANDING YOUR INSTRUMENT PANEL 215
Page 228 of 465
Power Switch/Volume Control (Rotary)
Push the ON/VOLUME control knob to turn on the
radio. Push the ON/VOLUME control knob a second
time to turn off the radio.
Electronic Volume Control
The electronic volume control turns continuously (360
degrees) in either direction, without stopping. Turning
the ON/VOLUME control knob to the right increases the
volume, and to the left decreases it.
When the audio system is turned on, the sound will be
set at the same volume level as last played.
SEEK Buttons
Press and release the SEEK buttons to search for the next
listenable station in AM/FM mode. Press the right switch
to seek up and the left switch to seek down. The radio
will remain tuned to the new station until you make
another selection. Holding either button will bypass
stations without stopping, until you release it.
TIME Button
Press the TIME button to alternate display of the time
and radio frequency.
Clock Setting Procedure
1. Press and hold the TIME button until the hours blink.
2. Adjust the hours by turning the right side TUNE/
SCROLL control knob.
3. After adjusting the hours, press the right side TUNE/
SCROLL control knob to set the minutes. The minutes
will begin to blink.
4. Adjust the minutes using the right side TUNE/
SCROLL control knob. Press the TUNE/SCROLL control
knob to save time change.
5. To exit, press any button/knob, or wait five seconds.
4
UNDERSTANDING YOUR INSTRUMENT PANEL 227
Page 229 of 465
RW/FF
Pressing the RW (Rewind) or FF (Fast Forward) buttons
causes the tuner to search for the next frequency in the
direction of the arrows. This feature operates in either
AM or FM frequencies.
TUNE Control
Turn the rotary TUNE/SCROLL control knob clockwise
to increase or counterclockwise to decrease the frequency.
Setting the Tone, Balance, and Fade
Push the rotary TUNE/SCROLL control knob and BASS
will display. Turn the TUNE/SCROLL control knob to
the right or left to increase or decrease the bass tones.
Push the rotary TUNE/SCROLL control knob a second
time and MID will display. Turn the TUNE/SCROLL
control knob to the right or left to increase or decrease the
mid-range tones.Push the rotary TUNE/SCROLL control knob a third
time and TREBLE will display. Turn the TUNE/SCROLL
control knob to the right or left to increase or decrease the
treble tones.
Push the rotary TUNE/SCROLL control knob a fourth
time and BALANCE will display. Turn the TUNE/
SCROLL control knob to the right or left to adjust the
sound level from the right or left side speakers.
Push the rotary TUNE/SCROLL control knob a fifth time
and FADE will display. Turn the TUNE/SCROLL control
knob to the left or right to adjust the sound level between
the front and rear speakers.
Push the rotary TUNE/SCROLL control knob again to
exit setting tone, balance, and fade.
AM/FM Button
Press the buttons to select either AM or FM mode.
228 UNDERSTANDING YOUR INSTRUMENT PANEL