2010 CHEVROLET SILVERADO buttons
[x] Cancel search: buttonsPage 212 of 626
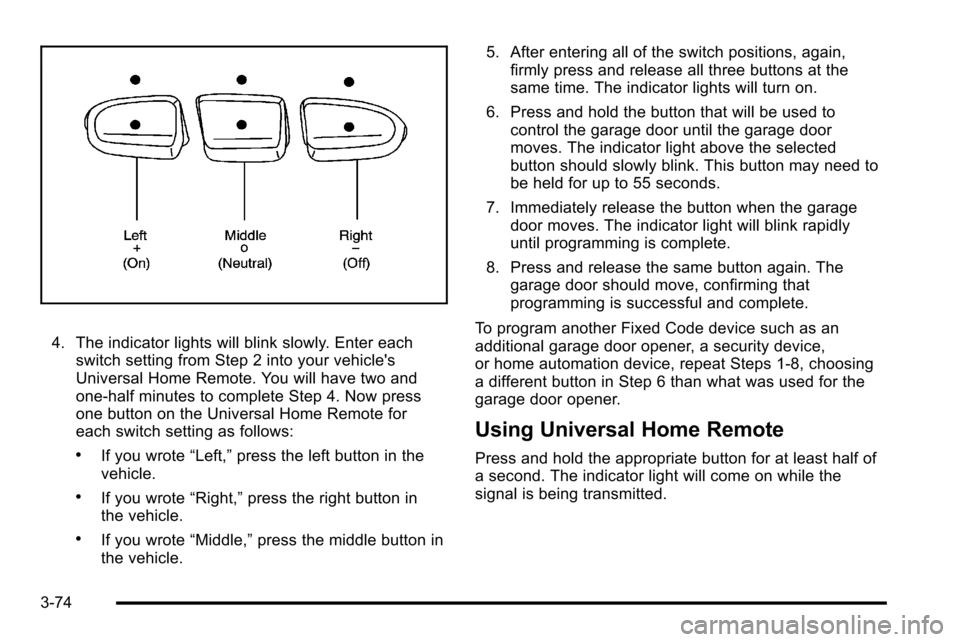
4. The indicator lights will blink slowly. Enter eachswitch setting from Step 2 into your vehicle's
Universal Home Remote. You will have two and
one-half minutes to complete Step 4. Now press
one button on the Universal Home Remote for
each switch setting as follows:
.If you wrote “Left,”press the left button in the
vehicle.
.If you wrote “Right,”press the right button in
the vehicle.
.If you wrote “Middle,”press the middle button in
the vehicle. 5. After entering all of the switch positions, again,
firmly press and release all three buttons at the
same time. The indicator lights will turn on.
6. Press and hold the button that will be used to control the garage door until the garage door
moves. The indicator light above the selected
button should slowly blink. This button may need to
be held for up to 55 seconds.
7. Immediately release the button when the garage door moves. The indicator light will blink rapidly
until programming is complete.
8. Press and release the same button again. The garage door should move, confirming that
programming is successful and complete.
To program another Fixed Code device such as an
additional garage door opener, a security device,
or home automation device, repeat Steps 1-8, choosing
a different button in Step 6 than what was used for the
garage door opener.
Using Universal Home Remote
Press and hold the appropriate button for at least half of
a second. The indicator light will come on while the
signal is being transmitted.
3-74
Page 213 of 626
Reprogramming Universal Home
Remote Buttons
Any of the three buttons can be reprogrammed by
repeating the instructions.
Erasing Universal Home Remote
Buttons
The programmed buttons should be erased when the
vehicle is sold or the lease ends.
To erase either Rolling Code or Fixed Code on the
Universal Home Remote device:1. Press and hold the two outside buttons at the same time for approximately 20 seconds, until the
indicator lights, located directly above the buttons,
begin to blink rapidly.
2. Once the indicator lights begin to blink, release both buttons. The codes from all buttons will be
erased.
For help or information on the Universal Home Remote
System, call the customer assistance phone number
under Customer Assistance Offices on page 8‑6.
Storage Areas
Glove Box
Lift up on the glove box lever to open it.
Cupholders
Vehicles with cupholders have them located on and
behind the center console and in the rear seat armrest.
Pull the loop down on the rear seat armrest to access
the cupholders.
Pull downward on the cover to access the cupholders
behind the center console.
3-75
Page 220 of 626

Section 4 Instrument Panel
Oil Pressure Gauge . . . . . . . . . . . . . . . . . . . . . . . . . . . . 4-44
Oil Pressure Light . . . . . . . . . . . . . . . . . . . . . . . . . . . . . 4-45
Security Light . . . . . . . . . . . . . . . . . . . . . . . . . . . . . . . . . . 4-46
Fog Lamp Light . . . . . . . . . . . . . . . . . . . . . . . . . . . . . . . . 4-46
Cruise Control Light . . . . . . . . . . . . . . . . . . . . . . . . . . . 4-46
Highbeam On Light . . . . . . . . . . . . . . . . . . . . . . . . . . . . 4-46
Four-Wheel-Drive Light . . . . . . . . . . . . . . . . . . . . . . . . 4-47
Tow/Haul Mode Light . . . . . . . . . . . . . . . . . . . . . . . . . . 4-47
Fuel Gauge . . . . . . . . . . . . . . . . . . . . . . . . . . . . . . . . . . . . 4-47
Low Fuel Warning Light . . . . . . . . . . . . . . . . . . . . . . . . 4-48
Driver Information Center (DIC) . . . . . . . . . . . . . . . . . .4-49
DIC Operation and Displays (With DIC Buttons) . . . . . . . . . . . . . . . . . . . . . . . . . . . . . . . . . . . . . 4-49
DIC Operation and Displays (Without DIC Buttons) . . . . . . . . . . . . . . . . . . . . . . . . . . . . . . . . . . . . . 4-56
DIC Compass . . . . . . . . . . . . . . . . . . . . . . . . . . . . . . . . . . 4-60
DIC Warnings and Messages . . . . . . . . . . . . . . . . . . 4-63
DIC Vehicle Customization (With DIC Buttons) . . . . . . . . . . . . . . . . . . . . . . . . . . . . . . . . . . . . . 4-73 Audio System(s)
. . . . . . . . . . . . . . . . . . . . . . . . . . . . . . . . . . 4-82
Setting the Clock . . . . . . . . . . . . . . . . . . . . . . . . . . . . . . 4-82
Radio(s) . . . . . . . . . . . . . . . . . . . . . . . . . . . . . . . . . . . . . . . 4-85
Using an MP3 (Radios with CD) . . . . . . . . . . . . . . 4-105
Using an MP3 (Radios with CD and DVD) . . . . 4-112
XM Radio Messages . . . . . . . . . . . . . . . . . . . . . . . . . 4-120
Navigation/Radio System . . . . . . . . . . . . . . . . . . . . . 4-121
Bluetooth
®. . . . . . . . . . . . . . . . . . . . . . . . . . . . . . . . . . . . 4-121
Rear Seat Entertainment (RSE) System . . . . . . 4-132
Rear Seat Audio (RSA) . . . . . . . . . . . . . . . . . . . . . . . 4-141
Theft-Deterrent Feature . . . . . . . . . . . . . . . . . . . . . . 4-143
Audio Steering Wheel Controls . . . . . . . . . . . . . . . 4-143
Radio Reception . . . . . . . . . . . . . . . . . . . . . . . . . . . . . . 4-146
Fixed Mast Antenna . . . . . . . . . . . . . . . . . . . . . . . . . . 4-147
XM™ Satellite Radio Antenna System . . . . . . . . 4-147
4-2
Page 226 of 626
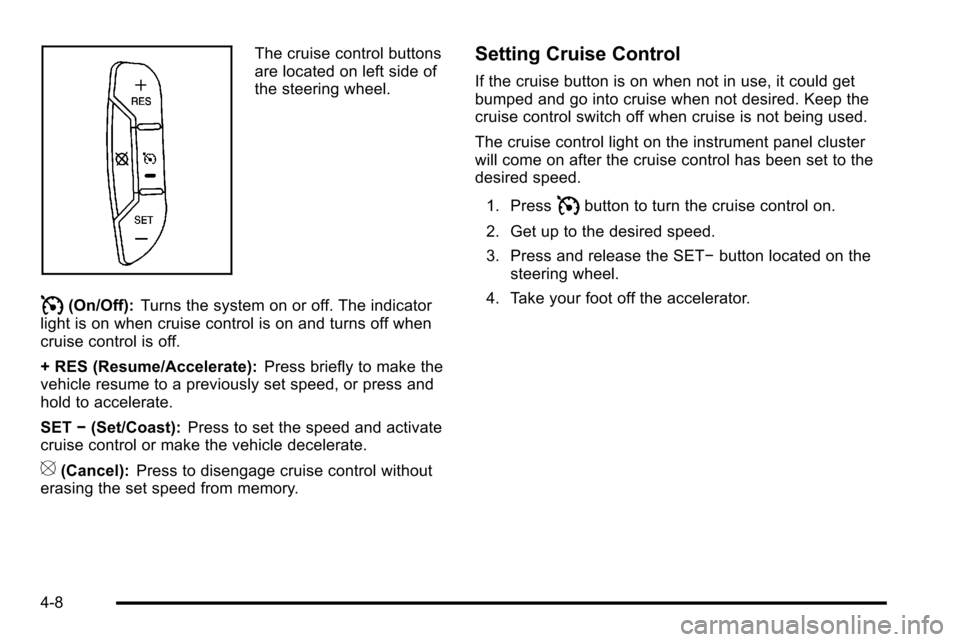
The cruise control buttons
are located on left side of
the steering wheel.
I(On/Off):Turns the system on or off. The indicator
light is on when cruise control is on and turns off when
cruise control is off.
+ RES (Resume/Accelerate): Press briefly to make the
vehicle resume to a previously set speed, or press and
hold to accelerate.
SET −(Set/Coast): Press to set the speed and activate
cruise control or make the vehicle decelerate.
[(Cancel): Press to disengage cruise control without
erasing the set speed from memory.
Setting Cruise Control
If the cruise button is on when not in use, it could get
bumped and go into cruise when not desired. Keep the
cruise control switch off when cruise is not being used.
The cruise control light on the instrument panel cluster
will come on after the cruise control has been set to the
desired speed.
1. Press
Ibutton to turn the cruise control on.
2. Get up to the desired speed.
3. Press and release the SET− button located on the
steering wheel.
4. Take your foot off the accelerator.
4-8
Page 231 of 626
If the vehicle is started in a dark garage, the automatic
headlamp system comes on immediately. Once the
vehicle leaves the garage, it takes approximately
one minute for the automatic headlamp system to
change to DRL if it is bright enough outside. During that
delay, the instrument panel cluster may not be as bright
as usual. Make sure the instrument panel brightness
control is in the full bright position. SeeInstrument
Panel Brightness on page 4‑14.
To idle the vehicle with the automatic headlamp system
off, turn the control to the off position.
The headlamps will also stay on after you exit the
vehicle. This feature can be programmed using the
Driver Information Center (DIC), if equipped. See DIC
Vehicle Customization (With DIC Buttons)
on
page 4‑73.
If the vehicle is not equipped with DIC buttons, exit
lighting is automatic. When it is dark enough outside,
the exterior lamps remain on for 30 seconds after the
ignition is moved from ON/RUN to LOCK/OFF.
For vehicles without a radio, the instrument panel light
remains on for 30 seconds with the driver's door closed.
For vehicles with a radio, the instrument panel light
remains on for 10 minutes with the driver's door closed.
See Retained Accessory Power (RAP) on page 3‑23.
The regular headlamp system can be turned on when
needed.
Fog Lamps
For vehicles with fog lamps, the control is located next
to the exterior lamps control on the instrument panel, to
the left of the steering column.
The ignition must be in the ON/RUN position for the fog
lamps to come on.
#(Fog Lamps): Press to turn the fog lamps on or off.
A light will come on in the instrument panel cluster.
When the fog lamps are turned on, the parking lamps
automatically turn on.
When the headlamps are changed to high-beam, the
fog lamps also go off. When the high-beam headlamps
are turned off, the fog lamps will come on again.
Some localities have laws that require the headlamps to
be on along with the fog lamps.
4-13
Page 240 of 626
Dual Automatic Climate Control
System
The heating, cooling, and ventilation in the vehicle can
be controlled with this system. The vehicle also has a
flow-through ventilation system described later in this
section.
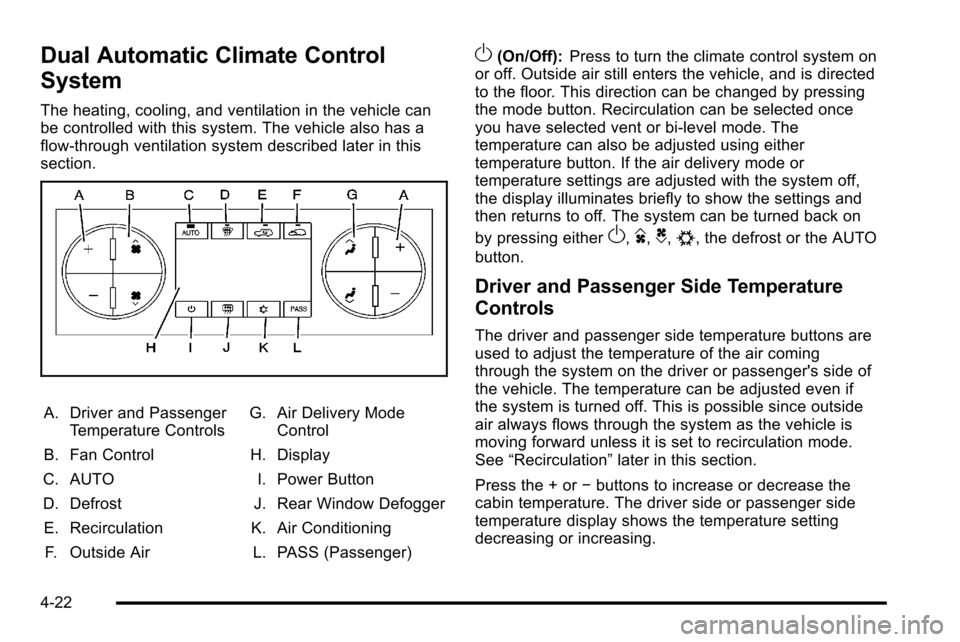
A. Driver and PassengerTemperature Controls
B. Fan Control
C. AUTO
D. Defrost E. Recirculation F. Outside Air G. Air Delivery Mode
Control
H. Display
I. Power Button
J. Rear Window Defogger
K. Air Conditioning L. PASS (Passenger)
O(On/Off): Press to turn the climate control system on
or off. Outside air still enters the vehicle, and is directed
to the floor. This direction can be changed by pressing
the mode button. Recirculation can be selected once
you have selected vent or bi-level mode. The
temperature can also be adjusted using either
temperature button. If the air delivery mode or
temperature settings are adjusted with the system off,
the display illuminates briefly to show the settings and
then returns to off. The system can be turned back on
by pressing either
O,D,C,#, the defrost or the AUTO
button.
Driver and Passenger Side Temperature
Controls
The driver and passenger side temperature buttons are
used to adjust the temperature of the air coming
through the system on the driver or passenger's side of
the vehicle. The temperature can be adjusted even if
the system is turned off. This is possible since outside
air always flows through the system as the vehicle is
moving forward unless it is set to recirculation mode.
See “Recirculation” later in this section.
Press the + or −buttons to increase or decrease the
cabin temperature. The driver side or passenger side
temperature display shows the temperature setting
decreasing or increasing.
4-22
Page 241 of 626
The passenger's temperature setting can be set to
match the driver's temperature setting by pressing the
PASS button and turning off the PASS indicator. When
the passenger's temperature setting is set different than
the driver's setting, the indicator on the PASS button
illuminates and both the driver side and passenger side
temperature displays are shown.
When in defrost mode the passenger temperature
setting cannot be changed.
Automatic Operation
AUTO (Automatic):When automatic operation is active
the system controls the inside temperature, the air
delivery, and the fan speed.
Use the steps below to place the entire system in
automatic mode:
1. Press the AUTO button.
When AUTO is selected, the display changes to
show the current temperature(s) and AUTO is lit on
the display. The current air delivery mode and fan
speed are also displayed for about 5 seconds. When AUTO is selected, the air conditioning
operation and air inlet are automatically controlled.
The air conditioning compressor may run when the
outside temperature is above freezing. The air inlet
will normally be set to outside air. If it is hot
outside, the air inlet may automatically switch to
the recirculate mode to help quickly cool down the
air inside the vehicle. The light on the button
comes on in recirculation.
2. Set the driver's and passenger's temperature. To find your comfort setting, start with a 23°C
(74°F) temperature setting and allow about
20 minutes for the system to regulate. Use the
driver or passenger temperature buttons to adjust
the temperature setting as necessary. If a
temperature setting of 15°C (60°F) is chosen, the
system remains at the maximum cooling setting.
If a temperature setting of 32°C (90°F) is chosen,
the system remains at the maximum heat setting.
Choosing either maximum setting will not cause
the vehicle to heat or cool any faster.
4-23
Page 242 of 626

Do not cover the solar sensor located on the top of the
instrument panel near the windshield. This sensor
regulates air temperature based on sun load. For more
information on the solar sensor, see“Sensors”later in
this section.
To avoid blowing cold air in cold weather, the system
delays turning the fan on until warm air is available. The
length of delay depends on the engine coolant
temperature. Pressing the fan switch overrides this
delay and changes the fan to a selected speed.
Manual Operation
D C(Fan Control): Press these buttons to increase or
decrease the fan speed.
Pressing either fan button while in automatic control
places the fan under manual control. The fan setting
remains displayed and the AUTO light turns off. The air
delivery mode remains under automatic control.
H G(Air Delivery Mode Control): Press these buttons
to change the direction of the airflow in the vehicle.
Repeatedly press either button until the desired mode
appears on the display. Pressing either mode button
while the system is off changes the air delivery mode
without turning the system on. Pressing either mode
button while in automatic control places the mode under
manual control. The air delivery mode setting is displayed and the
AUTO light turns off. The fan remains under automatic
control.
H(Vent):
Air is directed to the instrument panel
outlets.
)(Bi-Level): Air is divided between the instrument
panel and floor outlets. Some air is directed towards the
windshield and side window outlets.
6(Floor): Air is directed to the floor outlets, with some
to the windshield, side window outlets, and second row
floor outlets. In this mode, the system automatically
selects outside air.
-(Defog): This mode clears the windows of fog or
moisture. Air is directed to the windshield, floor outlets,
and side window vents. In this mode, the system turns
off recirculation and runs the air conditioning
compressor unless the outside temperature is close to
freezing. The recirculation mode cannot be selected
while in the defrost mode.
4-24