2010 CHEVROLET SILVERADO transmission oil
[x] Cancel search: transmission oilPage 7 of 626

Section 1 In Brief
Instrument Panel. . . . . . . . . . . . . . . . . . . . . . . . . . . . . . . . . . . 1-2
Instrument Panel (Base/Uplevel Version) . . . . . . . . 1-2
Instrument Panel (Premium Version) . . . . . . . . . . . . 1-4
Initial Drive Information . . . . . . . . . . . . . . . . . . . . . . . . . . . 1-6
Remote Keyless Entry (RKE) System . . . . . . . . . . . 1-6
Remote Vehicle Start . . . . . . . . . . . . . . . . . . . . . . . . . . . 1-6
Door Locks . . . . . . . . . . . . . . . . . . . . . . . . . . . . . . . . . . . . . 1-7
Windows . . . . . . . . . . . . . . . . . . . . . . . . . . . . . . . . . . . . . . . . 1-7
Seat Adjustment . . . . . . . . . . . . . . . . . . . . . . . . . . . . . . . . 1-9
Heated Seats . . . . . . . . . . . . . . . . . . . . . . . . . . . . . . . . . . 1-12
Head Restraint Adjustment . . . . . . . . . . . . . . . . . . . . 1-12
Safety Belt . . . . . . . . . . . . . . . . . . . . . . . . . . . . . . . . . . . . . 1-13
Sensing System for Passenger Airbag . . . . . . . . . 1-13
Mirror Adjustment . . . . . . . . . . . . . . . . . . . . . . . . . . . . . . 1-14
Steering Wheel Adjustment . . . . . . . . . . . . . . . . . . . . 1-16
Throttle and Brake Pedal Adjustment . . . . . . . . . . 1-16
Interior Lighting . . . . . . . . . . . . . . . . . . . . . . . . . . . . . . . . 1-17
Exterior Lighting . . . . . . . . . . . . . . . . . . . . . . . . . . . . . . . 1-18
Windshield Wiper/Washer . . . . . . . . . . . . . . . . . . . . . . 1-18
Climate Controls . . . . . . . . . . . . . . . . . . . . . . . . . . . . . . . 1-19
Transmission . . . . . . . . . . . . . . . . . . . . . . . . . . . . . . . . . . 1-21
Four-Wheel Drive . . . . . . . . . . . . . . . . . . . . . . . . . . . . . . 1-21 Vehicle Features
. . . . . . . . . . . . . . . . . . . . . . . . . . . . . . . . . . 1-24
Radio(s) . . . . . . . . . . . . . . . . . . . . . . . . . . . . . . . . . . . . . . . 1-24
Satellite Radio . . . . . . . . . . . . . . . . . . . . . . . . . . . . . . . . . 1-25
Portable Audio Devices . . . . . . . . . . . . . . . . . . . . . . . . 1-25
Steering Wheel Controls . . . . . . . . . . . . . . . . . . . . . . . 1-26
Bluetooth
®. . . . . . . . . . . . . . . . . . . . . . . . . . . . . . . . . . . . . 1-26
Navigation System . . . . . . . . . . . . . . . . . . . . . . . . . . . . . 1-26
Driver Information Center (DIC) . . . . . . . . . . . . . . . . 1-27
Cruise Control . . . . . . . . . . . . . . . . . . . . . . . . . . . . . . . . . 1-28
Rear Vision Camera (RVC) . . . . . . . . . . . . . . . . . . . . 1-28
Ultrasonic Parking Assist . . . . . . . . . . . . . . . . . . . . . . 1-28
Power Outlets . . . . . . . . . . . . . . . . . . . . . . . . . . . . . . . . . 1-29
Universal Remote System . . . . . . . . . . . . . . . . . . . . . 1-29
Sunroof . . . . . . . . . . . . . . . . . . . . . . . . . . . . . . . . . . . . . . . . 1-30
Performance and Maintenance . . . . . . . . . . . . . . . . . .1-31
StabiliTrak
®. . . . . . . . . . . . . . . . . . . . . . . . . . . . . . . . . . . . 1-31
Tire Pressure Monitor . . . . . . . . . . . . . . . . . . . . . . . . . . 1-32
Engine Oil Life System . . . . . . . . . . . . . . . . . . . . . . . . 1-32
Fuel E85 (85% Ethanol) . . . . . . . . . . . . . . . . . . . . . . . 1-33
Driving for Better Fuel Economy . . . . . . . . . . . . . . . 1-33
Roadside Assistance Program . . . . . . . . . . . . . . . . . 1-34
OnStar
®. . . . . . . . . . . . . . . . . . . . . . . . . . . . . . . . . . . . . . . 1-34
1-1
Page 33 of 626
Driver Information Center (DIC)
The DIC display is located at the bottom of the
instrument panel cluster. It shows the status of many
vehicle systems and enables access to the
personalization menu.
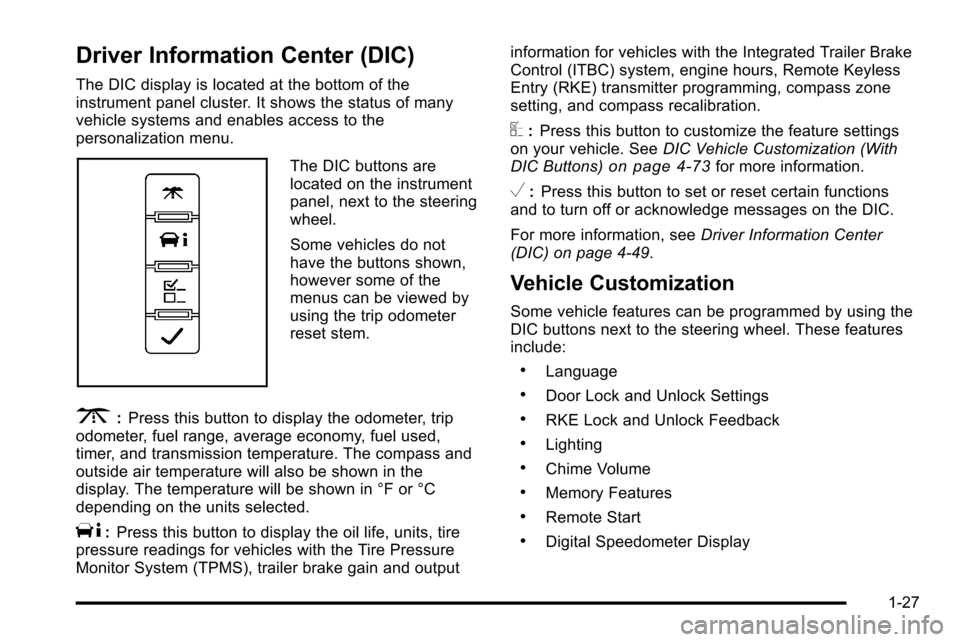
The DIC buttons are
located on the instrument
panel, next to the steering
wheel.
Some vehicles do not
have the buttons shown,
however some of the
menus can be viewed by
using the trip odometer
reset stem.
3:Press this button to display the odometer, trip
odometer, fuel range, average economy, fuel used,
timer, and transmission temperature. The compass and
outside air temperature will also be shown in the
display. The temperature will be shown in °F or °C
depending on the units selected.
T: Press this button to display the oil life, units, tire
pressure readings for vehicles with the Tire Pressure
Monitor System (TPMS), trailer brake gain and output information for vehicles with the Integrated Trailer Brake
Control (ITBC) system, engine hours, Remote Keyless
Entry (RKE) transmitter programming, compass zone
setting, and compass recalibration.
U:
Press this button to customize the feature settings
on your vehicle. See DIC Vehicle Customization (With
DIC Buttons)
on page 4‑73for more information.
V: Press this button to set or reset certain functions
and to turn off or acknowledge messages on the DIC.
For more information, see Driver Information Center
(DIC) on page 4‑49.
Vehicle Customization
Some vehicle features can be programmed by using the
DIC buttons next to the steering wheel. These features
include:
.Language
.Door Lock and Unlock Settings
.RKE Lock and Unlock Feedback
.Lighting
.Chime Volume
.Memory Features
.Remote Start
.Digital Speedometer Display
1-27
Page 162 of 626
Starting Procedure
1. With your foot off the accelerator pedal, turn theignition key to START. When the engine starts, let
go of the key. The idle speed will go down as your
engine gets warm. Do not race the engine
immediately after starting it. Operate the engine
and transmission gently to allow the oil to warm up
and lubricate all moving parts.
The vehicle has a Computer-Controlled Cranking
System. This feature assists in starting the engine
and protects components. If the ignition key is
turned to the START position, and then released
when the engine begins cranking, the engine will
continue cranking for a few seconds or until the
vehicle starts. If the engine does not start and the
key is held in START for many seconds, cranking
will be stopped after 15 seconds to prevent
cranking motor damage. To prevent gear damage,
this system also prevents cranking if the engine is
already running. Engine cranking can be stopped
by turning the ignition switch to the ACC/
ACCESSORY or LOCK/OFF position.
Notice: Cranking the engine for long periods of
time, by returning the key to the START position
immediately after cranking has ended, can overheat
and damage the cranking motor, and drain the
battery. Wait at least 15 seconds between each try,
to let the cranking motor cool down. 2. If the engine does not start after 5‐10 seconds,
especially in very cold weather (below 0°F or
−18°C), it could be flooded with too much gasoline.
Try pushing the accelerator pedal all the way to the
floor and holding it there as you hold the key in
START for up to 15 seconds. Wait at least
15 seconds between each try, to allow the cranking
motor to cool down. When the engine starts, let go
of the key and accelerator. If the vehicle starts
briefly but then stops again, do the same thing.
This clears the extra gasoline from the engine. Do
not race the engine immediately after starting it.
Operate the engine and transmission gently until
the oil warms up and lubricates all moving parts.
Notice: The engine is designed to work with the
electronics in the vehicle. If you add electrical parts
or accessories, you could change the way the
engine operates. Before adding electrical
equipment, check with your dealer. If you do not,
the engine might not perform properly. Any
resulting damage would not be covered by the
vehicle warranty.
3-24
Page 268 of 626
DIC Buttons
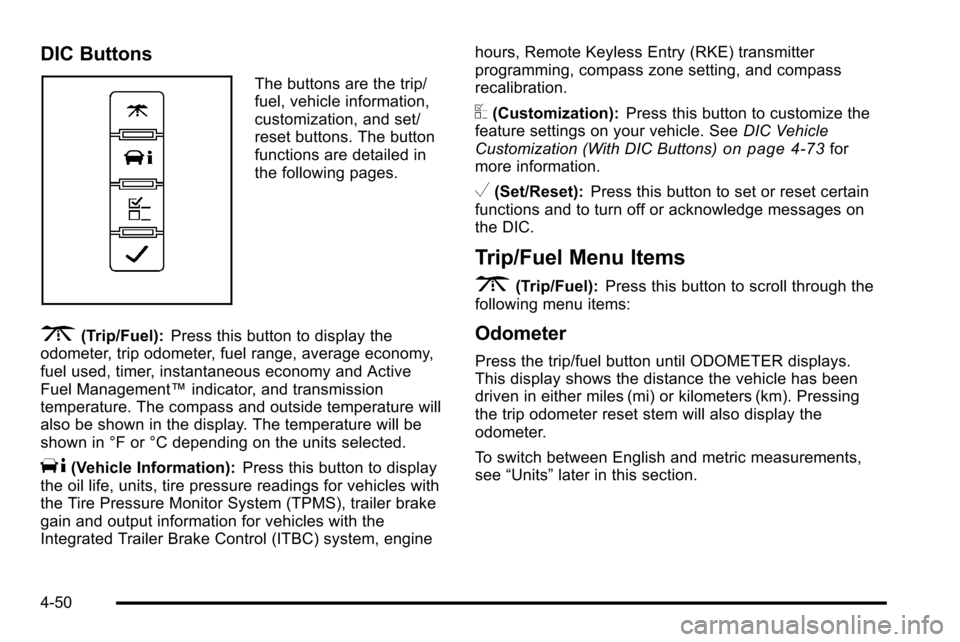
The buttons are the trip/
fuel, vehicle information,
customization, and set/
reset buttons. The button
functions are detailed in
the following pages.
3(Trip/Fuel):Press this button to display the
odometer, trip odometer, fuel range, average economy,
fuel used, timer, instantaneous economy and Active
Fuel Management™ indicator, and transmission
temperature. The compass and outside temperature will
also be shown in the display. The temperature will be
shown in °F or °C depending on the units selected.
T(Vehicle Information): Press this button to display
the oil life, units, tire pressure readings for vehicles with
the Tire Pressure Monitor System (TPMS), trailer brake
gain and output information for vehicles with the
Integrated Trailer Brake Control (ITBC) system, engine hours, Remote Keyless Entry (RKE) transmitter
programming, compass zone setting, and compass
recalibration.
U(Customization):
Press this button to customize the
feature settings on your vehicle. See DIC Vehicle
Customization (With DIC Buttons)
on page 4‑73for
more information.
V(Set/Reset): Press this button to set or reset certain
functions and to turn off or acknowledge messages on
the DIC.
Trip/Fuel Menu Items
3
(Trip/Fuel): Press this button to scroll through the
following menu items:
Odometer
Press the trip/fuel button until ODOMETER displays.
This display shows the distance the vehicle has been
driven in either miles (mi) or kilometers (km). Pressing
the trip odometer reset stem will also display the
odometer.
To switch between English and metric measurements,
see “Units” later in this section.
4-50
Page 274 of 626
Language
This display allows you to select the language in which
the DIC messages will appear. To select a language:1. Press the trip odometer reset stem until ODOMETER displays.
2. While in the ODOMETER display, press and hold the trip odometer reset stem for three seconds until
the currently set language displays.
3. Continue to press and hold the trip odometer reset stem to scroll through all of the available
languages.
The available selections are ENGLISH (default),
FRANCAIS (French), ESPANOL (Spanish), and
NO CHANGE.
4. Once the desired language is displayed, release the trip odometer reset stem to set your choice.
Engine Hours
To display the ENGINE HOURS, place the ignition in
LOCK/OFF or ACC/ACCESSORY, then press and hold
the trip odometer reset stem for four seconds while
viewing the ODOMETER. This display shows the total
number of hours the engine has run.
DIC Operation and Displays (Without
DIC Buttons)
If your vehicle does not have DIC buttons, the
information below explains the operation of this system.
The DIC has different displays which can be accessed
by pressing the trip odometer reset stem located on the
instrument panel cluster. Pressing the trip odometer
reset stem will also turn off, or acknowledge, DIC
messages.
The DIC displays trip and vehicle system information,
and warning messages if a system problem is detected.
If the vehicle does not have DIC buttons, you can use
the trip odometer reset stem to view the following
displays: language selection, trip odometer,
transmission temperature, trailer brake gain and output
information for vehicles with the Integrated Trailer Brake
Control (ITBC) system, compass zone setting, compass
recalibration, oil life, Tire Pressure Monitor System
(TPMS) programming for vehicles with the TPMS, and
Remote Keyless Entry (RKE) transmitter programming.
4-56
Page 276 of 626
Transmission Temperature
Press the trip odometer reset stem until TRANS TEMP
displays. This display shows the temperature of the
automatic transmission fluid in either degrees
Fahrenheit (°F) or degrees Celsius (°C).
Trailer Gain and Output
On vehicles with the Integrated Trailer Brake Control
(ITBC) system, the trailer brake display appears in the
DIC. Press the trip odometer reset stem until TRAILER
GAIN and OUTPUT display.
TRAILER GAIN shows the trailer gain setting. This
setting can be adjusted from 0.0 to 10.0 with either a
trailer connected or disconnected. To adjust this setting,
see“Integrated Trailer Brake Control System” under
Towing a Trailer
on page 5‑51for more information.
OUTPUT shows the power output to the trailer anytime
a trailer with electric brakes is connected. Output is
displayed in 0 to 10 bars. Dashes may appear in the
OUTPUT display. See “Integrated Trailer Brake Control
System” underTowing a Trailer
on page 5‑51for more
information.
Compass Zone Setting
This display allows for setting the compass zone. See
DIC Compasson page 4‑60for more information.
Compass Recalibration
This display allows for calibrating the compass. See
DIC Compasson page 4‑60for more information.
Oil Life
To access this display, the vehicle must be in P (Park).
Press the trip odometer reset stem until OIL LIFE
REMAINING displays. This display shows an estimate
of the oil's remaining useful life. If you see 99% OIL
LIFE REMAINING on the display, that means 99% of
the current oil life remains. The engine oil life system
will alert you to change the oil on a schedule consistent
with your driving conditions.
When the remaining oil life is low, the CHANGE
ENGINE OIL SOON message will appear on the
display. See “CHANGE ENGINE OIL SOON” underDIC
Warnings and Messages
on page 4‑63. You should
change the oil as soon as you can. See Engine Oilon
page 6‑18. In addition to the engine oil life system
monitoring the oil life, additional maintenance is
recommended in the Maintenance Schedule in this
manual. See Scheduled Maintenance
on page 7‑3for
more information.
4-58
Page 439 of 626
Following Distance
Stay at least twice as far behind the vehicle ahead as
you would when driving the vehicle without a trailer.
This can help to avoid heavy braking and sudden turns.
Passing
More passing distance is needed when towing a trailer.
The combination will not accelerate as quickly and is
longer so it is necessary to go much farther beyond the
passed vehicle before returning to the lane.
Backing Up
Hold the bottom of the steering wheel with one hand. To
move the trailer to the left, move that hand to the left. To
move the trailer to the right, move your hand to the
right. Always back up slowly and, if possible, have
someone guide you.
Making Turns
Notice:Making very sharp turns while trailering
could cause the trailer to come in contact with the
vehicle. The vehicle could be damaged. Avoid
making very sharp turns while trailering.
When turning with a trailer, make wider turns than
normal. Do this so the trailer will not strike soft
shoulders, curbs, road signs, trees or other objects.
Avoid jerky or sudden maneuvers. Signal well in
advance. If the trailer turn signal bulbs burn out, the arrows on the
instrument panel will still flash for turns. It is important to
check occasionally to be sure the trailer bulbs are still
working.
Driving On Grades
Reduce speed and shift to a lower gear
beforestarting
down a long or steep downgrade. If the transmission is
not shifted down, the brakes might get hot and no
longer work well.
Vehicles can tow in D (Drive). Shift the transmission to
a lower gear if the transmission shifts too often under
heavy loads and/or hilly conditions.
The tow/haul mode may be used if the transmission
shifts too often. See Tow/Haul Mode on page 3‑34.
When towing at high altitude on steep uphill grades,
consider the following: Engine coolant will boil at a
lower temperature than at normal altitudes. If the engine
is turned off immediately after towing at high altitude on
steep uphill grades, the vehicle may show signs similar
to engine overheating. To avoid this, let the engine run
while parked, preferably on level ground, with the
automatic transmission in P (Park) for a few minutes
before turning the engine off. If the overheat warning
comes on, see Engine Overheating on page 6‑34.
5-73
Page 441 of 626
Leaving After Parking on a Hill
1. Apply and hold the brake pedal.
2. Start the engine
3. Shift into a gear
4. Release the parking brake
5. Let up on the brake pedal.
6. Drive slowly until the trailer is clear of the chocks.
7. Stop and have someone pick up and store thechocks.
Maintenance When Trailer Towing
The vehicle needs service more often when pulling a
trailer. See this manual's Maintenance Schedule or
Index for more information. Things that are especially
important in trailer operation are automatic transmission
fluid, engine oil, axle lubricant, belts, cooling system
and brake system. It is a good idea to inspect these
before and during the trip.
Check periodically to see that all hitch nuts and bolts
are tight.
Trailer Wiring Harness
The vehicle is equipped with one of the following wiring
harnesses for towing a trailer or hauling a slide-in
camper.
Basic Trailer Wiring
All regular, extended cab and crew cab pickups have a
seven‐wire trailer towing harness.
For vehicles not equipped with heavy duty trailering, the
harness is secured to the vehicle's frame behind the
spare tire mount. The harness requires the installation
of a trailer connector, which is available through your
dealer.
If towing a light‐duty trailer with a standard four‐way
round pin connector, an adapter is available from your
dealer.
5-75