2010 CHEVROLET SILVERADO jump start
[x] Cancel search: jump startPage 191 of 626
Shifting Out of Park
This vehicle is equipped with an electronic shift lock
release system. The shift lock release is designed to:
.Prevent ignition key removal unless the shift lever
is in P (Park) with the shift lever button fully
released, and
.Prevent movement of the shift lever out of P (Park),
unless the ignition is in ON/RUN or ACC/
ACCESSORY and the regular brake pedal is
applied.
The shift lock release is always functional except in the
case of an uncharged or low voltage (less than 9 volt)
battery.
If the vehicle has an uncharged battery or a battery with
low voltage, try charging or jump starting the battery.
See Jump Starting
on page 6‑44for more information. To shift out of P (Park) use the following:
1. Apply the brake pedal.
2. Move the shift lever to the desired position.
If you still are unable to shift out of P (Park): 1. Ease the pressure on the shift lever.
2. While holding down the brake pedal, press the shift lever all the way into P (Park).
3. Move the shift lever to the desired position.
If you are still having a problem shifting, then have the
vehicle serviced soon.
Parking Over Things That Burn
{WARNING:
Things that can burn could touch hot exhaust
parts under the vehicle and ignite. Do not park
over papers, leaves, dry grass, or other things that
can burn.
3-53
Page 281 of 626
DIC Warnings and Messages
Messages are displayed on the DIC to notify the driver
that the status of the vehicle has changed and that
some action may be needed by the driver to correct the
condition. Multiple messages may appear one after
another.
Some messages may not require immediate action, but
you can press any of the DIC buttons on the instrument
panel or the trip odometer reset stem on the instrument
panel cluster to acknowledge that you received the
messages and to clear them from the display.
Some messages cannot be cleared from the DIC
display because they are more urgent. These
messages require action before they can be cleared.
You should take any messages that appear on the
display seriously and remember that clearing the
messages will only make the messages disappear, not
correct the problem.
The following are the possible messages that can be
displayed and some information about them.
If your vehicle has the DURAMAX
®Diesel engine, see
the DURAMAX Diesel manual for more information.
BATTERY LOW START VEHICLE
When the vehicle’ s battery is severely discharged, this
message will display and four chimes may sound. Start
the vehicle immediately. If the vehicle is not started and
the battery continues to discharge, the climate controls,
heated seats, and audio systems will shut off and the
vehicle may require a jump start. These systems will
function again after the vehicle is started.
CHANGE ENGINE OIL SOON
This message displays when the engine oil needs to be
changed. When you change the engine oil, be sure to
reset the CHANGE ENGINE OIL SOON message. See
Engine Oil Life System
on page 6‑20for information on
how to reset the message. See Engine Oilon
page 6‑18and Scheduled Maintenanceon page 7‑3for more information.
4-63
Page 445 of 626
Section 6 Service and Appearance Care
Service. . . . . . . . . . . . . . . . . . . . . . . . . . . . . . . . . . . . . . . . . . . . . 6-4
Accessories and Modifications . . . . . . . . . . . . . . . . . . 6-4
California Proposition 65 Warning . . . . . . . . . . . . . . . 6-5
California Perchlorate Materials Requirements . . . . . . . . . . . . . . . . . . . . . . . . . . . . . . . . . 6-5
Doing Your Own Service Work . . . . . . . . . . . . . . . . . . 6-5
Adding Equipment to the Outside of the Vehicle . . . . . . . . . . . . . . . . . . . . . . . . . . . . . . . . . . . . . . . . 6-6
Fuel . . . . . . . . . . . . . . . . . . . . . . . . . . . . . . . . . . . . . . . . . . . . . . . . . 6-6
Gasoline Octane . . . . . . . . . . . . . . . . . . . . . . . . . . . . . . . . 6-7
Gasoline Specifications . . . . . . . . . . . . . . . . . . . . . . . . . 6-7
California Fuel . . . . . . . . . . . . . . . . . . . . . . . . . . . . . . . . . . 6-8
Additives . . . . . . . . . . . . . . . . . . . . . . . . . . . . . . . . . . . . . . . . 6-8
Fuel E85 (85% Ethanol) . . . . . . . . . . . . . . . . . . . . . . . . . 6-9
Fuels in Foreign Countries . . . . . . . . . . . . . . . . . . . . . 6-11
Filling the Tank . . . . . . . . . . . . . . . . . . . . . . . . . . . . . . . . . 6-11
Filling a Portable Fuel Container . . . . . . . . . . . . . . . 6-13
Checking Things Under the Hood . . . . . . . . . . . . . . .6-14
Hood Release . . . . . . . . . . . . . . . . . . . . . . . . . . . . . . . . . 6-15
Engine Compartment Overview . . . . . . . . . . . . . . . . 6-16
Engine Oil . . . . . . . . . . . . . . . . . . . . . . . . . . . . . . . . . . . . . 6-18
Engine Oil Life System . . . . . . . . . . . . . . . . . . . . . . . . 6-20
Engine Air Cleaner/Filter . . . . . . . . . . . . . . . . . . . . . . . 6-21 Automatic Transmission Fluid (4-Speed
Transmission) . . . . . . . . . . . . . . . . . . . . . . . . . . . . . . . 6-23
Automatic Transmission Fluid (6-Speed Transmission) . . . . . . . . . . . . . . . . . . . . . . . . . . . . . . . 6-26
Cooling System . . . . . . . . . . . . . . . . . . . . . . . . . . . . . . . . 6-29
Engine Coolant . . . . . . . . . . . . . . . . . . . . . . . . . . . . . . . . 6-31
Engine Overheating . . . . . . . . . . . . . . . . . . . . . . . . . . . 6-34
Overheated Engine Protection
Operating Mode . . . . . . . . . . . . . . . . . . . . . . . . . . . . . 6-36
Engine Fan Noise . . . . . . . . . . . . . . . . . . . . . . . . . . . . . 6-37
Power Steering Fluid . . . . . . . . . . . . . . . . . . . . . . . . . . 6-37
Windshield Washer Fluid . . . . . . . . . . . . . . . . . . . . . . 6-38
Brakes . . . . . . . . . . . . . . . . . . . . . . . . . . . . . . . . . . . . . . . . . 6-39
Battery . . . . . . . . . . . . . . . . . . . . . . . . . . . . . . . . . . . . . . . . . 6-43
Jump Starting . . . . . . . . . . . . . . . . . . . . . . . . . . . . . . . . . . 6-44
Rear Axle . . . . . . . . . . . . . . . . . . . . . . . . . . . . . . . . . . . . . . . . . 6-48
Four-Wheel Drive . . . . . . . . . . . . . . . . . . . . . . . . . . . . . . . . . 6-50
Front Axle . . . . . . . . . . . . . . . . . . . . . . . . . . . . . . . . . . . . . . . . . 6-52
Noise Control System . . . . . . . . . . . . . . . . . . . . . . . . . . . . 6-53
Tampering with Noise Control System Prohibited . . . . . . . . . . . . . . . . . . . . . . . . . . . . . . . . . . . 6-53
Headlamp Aiming . . . . . . . . . . . . . . . . . . . . . . . . . . . . . . . . 6-54
6-1
Page 461 of 626

A.Engine Air Cleaner/Filter on page 6‑21.
B. Coolant Surge Tank and Pressure Cap. See Cooling System on page 6‑29.
C. Positive (+) Terminal. See Jump Starting
on
page 6‑44.
D. Battery on page 6‑43.
E. Engine Oil Fill Cap. See “When to Add Engine Oil”
under Engine Oil on page 6‑18.
F. Automatic Transmission Dipstick. See “Checking
the Fluid Level” underAutomatic Transmission
Fluid (4-Speed Transmission)
on page 6‑23or
Automatic Transmission Fluid (6-Speed
Transmission) on page 6‑26.
G. Remote Negative (−) Terminal (Out of View). See Jump Starting on page 6‑44. H. Engine Oil Dipstick (Out of View). See
“Checking
Engine Oil” underEngine Oil on page 6‑18.
I. Engine Cooling Fan. See Cooling System
on
page 6‑29.
J. Power Steering Fluid Reservoir. See Power
Steering Fluid on page 6‑37.
K. Brake Master Cylinder Reservoir. See “Brake
Fluid” under Brakes on page 6‑39.
L. Underhood Fuse Block on page 6‑122.
M. Windshield Washer Fluid Reservoir. See “Adding
Washer Fluid” underWindshield Washer Fluid
on
page 6‑38.
6-17
Page 487 of 626
Battery
If the vehicle is a Two‐mode Hybrid, see the Two‐mode
Hybrid manual for more information.
This vehicle has a maintenance free battery (or
batteries). Refer to the replacement number on the
original battery label when a new battery is needed.
SeeEngine Compartment Overview
on page 6‑16for
battery location.
{DANGER:
Battery posts, terminals, and related accessories
contain lead and lead compounds, chemicals
known to the State of California to cause cancer
and reproductive harm. Wash hands after
handling.
Vehicle Storage
{WARNING:
Batteries have acid that can burn you and gas
that can explode. You can be badly hurt if you are
not careful. See Jump Starting
on page 6‑44for
tips on working around a battery without
getting hurt.
Infrequent Usage: Remove the black, negative (−) cable
from the battery to keep the battery from running down.
Extended Storage: Remove the black, negative (−)
cable from the battery or use a battery trickle charger.
6-43
Page 488 of 626
Jump Starting
If the vehicle is a Two-mode Hybrid, see the Two-mode
Hybrid manual for more information.
If the vehicle's battery (or batteries) has run down, you
may want to use another vehicle and some jumper
cables to start your vehicle. Be sure to use the following
steps to do it safely.
{WARNING:
Batteries can hurt you. They can be dangerous
because:
.They contain acid that can burn you.
.They contain gas that can explode or ignite.
.They contain enough electricity to burn you.
If you do not follow these steps exactly, some or
all of these things can hurt you.
Notice: Ignoring these steps could result in costly
damage to the vehicle that would not be covered by
the warranty. Trying to start the vehicle by pushing or pulling it
will not work, and it could damage the vehicle.
1. Check the other vehicle. It must have a 12-volt battery with a negative ground system.
Notice: If the other vehicle's system is not a 12-volt
system with a negative ground, both vehicles can
be damaged. Only use vehicles with 12-volt systems
with negative grounds to jump start your vehicle.
2. If you have a vehicle with a diesel engine with two batteries, you should know before you begin that,
especially in cold weather, you may not be able to
get enough power from a single battery in another
vehicle to start your diesel engine. If your vehicle
has more than one battery, using the battery that is
closer to the starter will reduce electrical
resistance. This is located on the passenger side,
in the rear of the engine compartment.
3. Get the vehicles close enough so the jumper cables can reach, but be sure the vehicles are not
touching each other. If they are, it could cause an
unwanted ground connection. You would not be
able to start your vehicle, and the bad grounding
could damage the electrical systems.
6-44
Page 489 of 626
To avoid the possibility of the vehicles rolling, set
the parking brake firmly on both vehicles involved
in the jump start procedure. Put the automatic
transmission in P (Park) or a manual transmission
in Neutral before setting the parking brake. If you
have a four-wheel-drive vehicle, be sure the
transfer case is in a drive gear, not in Neutral.
Notice: If you leave the radio or other accessories
on during the jump starting procedure, they could
be damaged. The repairs would not be covered by
the warranty. Always turn off the radio and other
accessories when jump starting the vehicle.
4. Turn off the ignition on both vehicles. Unplug unnecessary accessories plugged into the
cigarette lighter or the accessory power outlets.
Turn off the radio and all the lamps that are not
needed. This will avoid sparks and help save both
batteries. And it could save the radio!
5. Open the hood on the other vehicle and locate the positive (+) and negative (−) terminal locations on
that vehicle.
The positive (+) terminal, is located under a red
plastic cover at the positive battery post. To
uncover the positive (+) terminal, open the red
plastic cover.
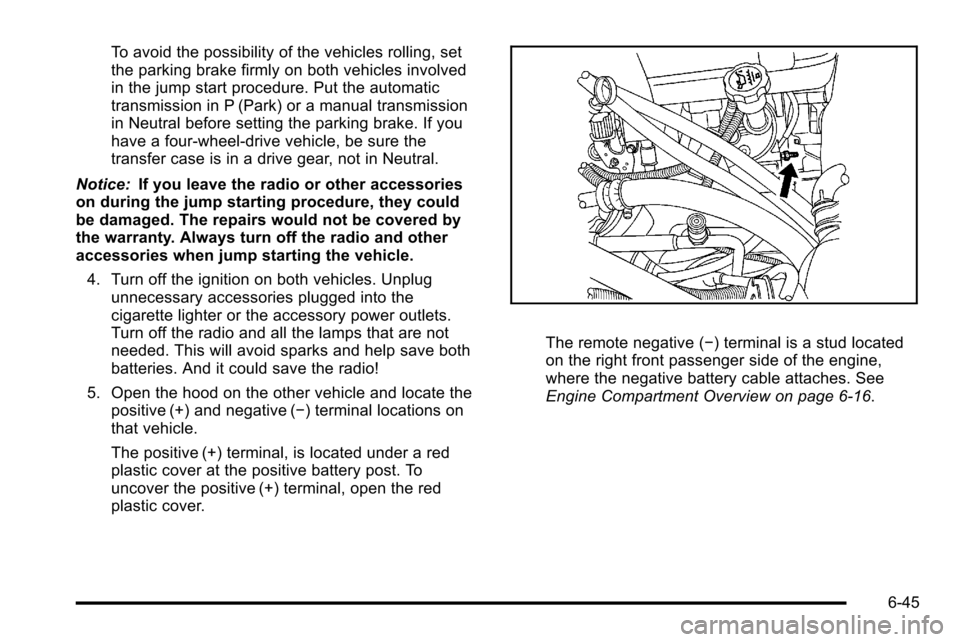
The remote negative (−) terminal is a stud located
on the right front passenger side of the engine,
where the negative battery cable attaches. See
Engine Compartment Overview on page 6‑16.
6-45
Page 491 of 626
6. Check that the jumper cables do not have loose ormissing insulation. If they do, you could get a
shock. The vehicles could be damaged too.
Before you connect the cables, here are some
basic things you should know. Positive (+) will go to
positive (+) or to a remote positive (+) terminal if
the vehicle has one. Negative (−) will go to a
heavy, unpainted metal engine part or to a remote
negative (−) terminal if the vehicle has one.
Do not connect positive (+) to negative (−) or you
will get a short that would damage the battery and
maybe other parts too. And do not connect the
negative (−) cable to the negative (−) terminal on
the dead battery because this can cause sparks.
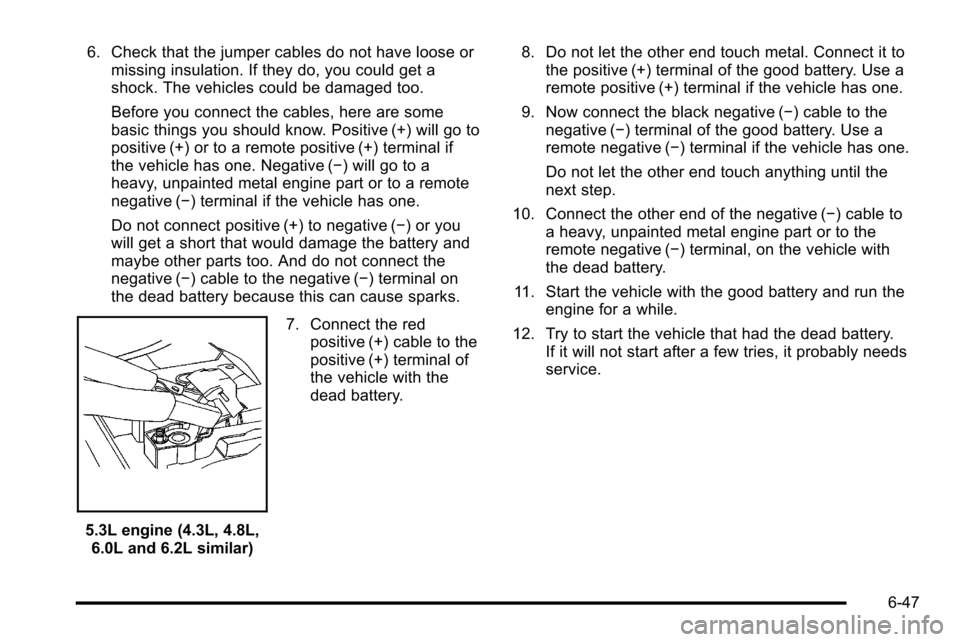
5.3L engine (4.3L, 4.8L,6.0L and 6.2L similar) 7. Connect the red
positive (+) cable to the
positive (+) terminal of
the vehicle with the
dead battery. 8. Do not let the other end touch metal. Connect it to
the positive (+) terminal of the good battery. Use a
remote positive (+) terminal if the vehicle has one.
9. Now connect the black negative (−) cable to the negative (−) terminal of the good battery. Use a
remote negative (−) terminal if the vehicle has one.
Do not let the other end touch anything until the
next step.
10. Connect the other end of the negative (−) cable to a heavy, unpainted metal engine part or to the
remote negative (−) terminal, on the vehicle with
the dead battery.
11. Start the vehicle with the good battery and run the engine for a while.
12. Try to start the vehicle that had the dead battery. If it will not start after a few tries, it probably needs
service.
6-47