2010 CHEVROLET EQUINOX radio
[x] Cancel search: radioPage 168 of 394
6-38 Infotainment System
If a CD, DVD, or MP3 disc is in the
Radio DVD slot, the remote control
Obutton can be used to turn on the
video screen display and start the
disc. The infotainment system can
also turn on the video screen
display. See CD/DVD Player
on
page 6‑21or the separate
navigation system manual for
more information.
Notice: Storing the remote
control in a hot area or in direct
sunlight can damage it, and the
repairs will not be covered by the
warranty. Storage in extreme cold
can weaken the batteries. Keep
the remote control stored in a
cool, dry place.
Remote Control Buttons
O(Power): Press to turn the
video screens on and off.
P(Illumination): Press to turn the
remote control backlight on. The
backlight times out after several
seconds if no other button is
pressed.
v(Title): Press to return to the
main menu of the DVD. This
function could vary for each disc.
y(Main Menu): Press to access
the DVD menu. The DVD menu is
different on every DVD. Use the
navigation arrows to move the
cursor. After making a selection
press the enter button. This button
only operates when using a DVD.
n,q,p,o(Menu Navigation
Arrows): Use the arrow buttons to
navigate through a menu.
r(Enter): Press to select the
highlighted choice in any menu.
z(Display Menu): Press to adjust
the brightness, screen display
mode, and display the
language menu.
q(Return): Press to exit the
current active menu and return to
the previous menu. This button
operates only when the display
menu or a DVD menu is active.
c(Stop): Press to stop playing,
rewinding, or fast forwarding a DVD.
Press twice to return to the
beginning of the DVD.
s(Play/Pause): Press to start
playing a DVD. Press to pause a
DVD while it is playing. Press again
to continue playing.
Depending on the infotainment
system in the vehicle, DVD
playback may be slowed down by
pressing
sthen[. Reverse slow
play by pressing
sthenr. Press
sagain to cancel slow play.
t(Previous Track/Chapter):
Press to go to the start of the
current track or chapter. Press again
to go to the previous track or
chapter. This button may not work
when the DVD is playing the
copyright information or the
previews.
Page 171 of 394
Infotainment System 6-41
Tips and Troubleshooting Chart (cont'd)
ProblemRecommended Action
The auxiliary source is running but
there is no picture or sound. Check that the RSE video screen is
in the auxiliary source mode by
pressing the AUX button on the
remote control.
Check the auxiliary input
connections at both devices.
Sometimes the wireless headphone
audio cuts out or buzzes. Check for obstructions, low
batteries, reception range, and
interference from cellular telephone
towers or by using a cellular
telephone in the vehicle.
Check that the headphones are on
correctly using the L (left) and R
(right) on the headphones.
Check that the headphones are
positioned properly with the
headband across the top of
the head.
I lost the remote and/or the
headphones. See your dealer for assistance.
The DVD is playing, but there is no
picture or sound. Check that the RSE video screen is
sourced to the DVD player by
pressing the AUX button on the
remote control.
DVD Display Error Messages
The DVD display error message
depends on which radio the vehicle
has. The video screen may display
one of the following:
Disc Load/Eject Error or
Mechanical Error:
There are disc
load or eject problems.
Disc Format Error or Unknown
Format: The disc is inserted with
the disc label wrong side up, or if
the disc is damaged.
Disc Region Error or Disc Error:
The disc is not from a correct
region.
No Disc Inserted: No disc is
present when the
ZEJECT or
MEM/DVD/AUX button is pressed
on the radio.
Page 172 of 394
6-42 Infotainment System
DVD Distortion
Video distortion can occur when
operating cellular phones, scanners,
CB radios, Global Position Systems
(GPS)*, two-way radios, mobile fax,
or walkie talkies.
It might be necessary to turn off the
DVD player when operating one of
these devices in or near the vehicle.
*Excludes the OnStar
®System.
Cleaning the RSE Seatback
Console
Use only a clean cloth dampened
with clean water to clean the RSE
seatback console surface.
Cleaning the Video Screen
Use only a clean cloth dampened
with clean water. Use care when
touching or cleaning the screen as
damage could result.
Phone
Bluetooth (Overview)
Vehicles with a Bluetooth system
can use a Bluetooth capable cell
phone with a Hands‐Free Profile to
make and receive phone calls. The
infotainment system and voice
recognition are used to control the
system. The system can be used
while the ignition is in ON/RUN or
ACC/ACCESSORY. The range of
the Bluetooth system can be up to
9.1 m (30 ft.). Not all phones support
all functions and not all phones work
with the Bluetooth system. See
www.gm.com/bluetooth for more
information about compatible
phones.
Bluetooth Controls
Use the buttons located on the
infotainment system and the
steering wheel to operate the
Bluetooth system.Steering Wheel Controls
b/g(Push To Talk):
Press to
answer incoming calls, to confirm
system information, and to start
voice recognition.
$/c(Mute/End Call): Press to
end a call, reject a call, or to cancel
an operation.
Infotainment System Controls
For information about how to
navigate the menu system using the
infotainment controls, see Operation
on page 6‑7.
5(Phone):Press to enter the
Phone main menu.
Voice Recognition
The voice recognition system uses
commands to control the system
and dial phone numbers.
Noise: The system may not
recognize voice commands if there
is too much background noise.
Page 173 of 394
Infotainment System 6-43
When to Speak:A tone sounds to
indicate that the system is ready for
a voice command. Wait for the tone
and then speak.
How to Speak: Speak clearly in a
calm and natural voice.
Audio System
When using the Bluetooth system,
sound comes through the vehicle's
front audio system speakers and
overrides the audio system. Use the
VOL/
Oknob during a call to
change the volume level. The
adjusted volume level remains in
memory for later calls. The system
maintains a minimum volume level.
Other Information
The Bluetooth®word mark and
logos are owned by the Bluetooth®
SIG, Inc. and any use of such marks
by General Motors is under license.
Other trademarks and trade names
are those of their respective owners.
See Radio Frequency Statement
on
page 12‑16for FCC information.
Bluetooth (Infotainment
Controls)
For information about how to
navigate the menu system using the
infotainment controls, see Operation
on page 6‑7.
Pairing
A Bluetooth enabled cell phone
must be paired to the Bluetooth
system first and then connected to
the vehicle before it can be used.
See the cell phone manufacturer
user guide for Bluetooth functions
before pairing the cell phone. If a
Bluetooth phone is not connected,
calls will be made using OnStar
®
Hands‐Free Calling, if available.
Refer to the OnStar Owner's Guide
for more information.
The pairing process can be started
by using the voice recognition
system or the controls on the
infotainment system. Pairing Information:
.Up to five cell phones can be
paired to the Bluetooth system.
.The pairing process is disabled
when the vehicle is moving.
.The Bluetooth system links with
the first available paired cell
phone in the order the phone
was paired.
.Only one paired cell phone can
be connected to the Bluetooth
system at a time.
.Pairing should only need to be
completed once, unless changes
to the pairing information have
been made or the phone is
deleted.
To link to a different paired phone,
see “Linking to a Different Phone”
later in this section.
Page 175 of 394
Infotainment System 6-45
Making a Call
Radio with CD
1. Press the
5/0button.
2. Enter the character sequence. See “Entering a Character
Sequence” inOperation
on
page 6‑7for more information.
3. Select Call to start dialing the number.
Radio with CD/DVD and MEM
1. Press the
5/0button.
2. Select Enter number.
3. Enter the character sequence. See “Entering a Character
Sequence” inOperation
on
page 6‑7for more information.
4. Select Call to start dialing the number.
Accepting or Declining a Call
When a call is received, the
infotainment system mutes and a
ring tone is heard in the vehicle.
Accepting a Call
Turn the MENU/SEL knob to
Answer and press the MENU/
SEL knob.
Declining a Call
Turn the MENU/SEL knob to
Decline and press the MENU/
SEL knob.
Call Waiting
Call waiting must be supported on
the bluetooth phone and enabled by
the wireless service carrier to work.
Accepting a Call
Turn the MENU/SEL knob to
Answer and press the MENU/
SEL knob. Declining a Call
Turn the MENU/SEL knob to
Decline and press the MENU/
SEL knob.
Switching Between Calls (Call
Waiting Calls Only)
To switch between calls:
1. Press the MENU/SEL knob.
2. Select Switch Call from
the menu.
Conference Calling
Conference calling and three way
calling must be supported on the
bluetooth phone and enabled by the
wireless service carrier to work.
To start a conference while in a
current call:
1. Press the MENU/SEL knob.
2. Select Enter Number.
Page 306 of 394
9-38 Vehicle Care
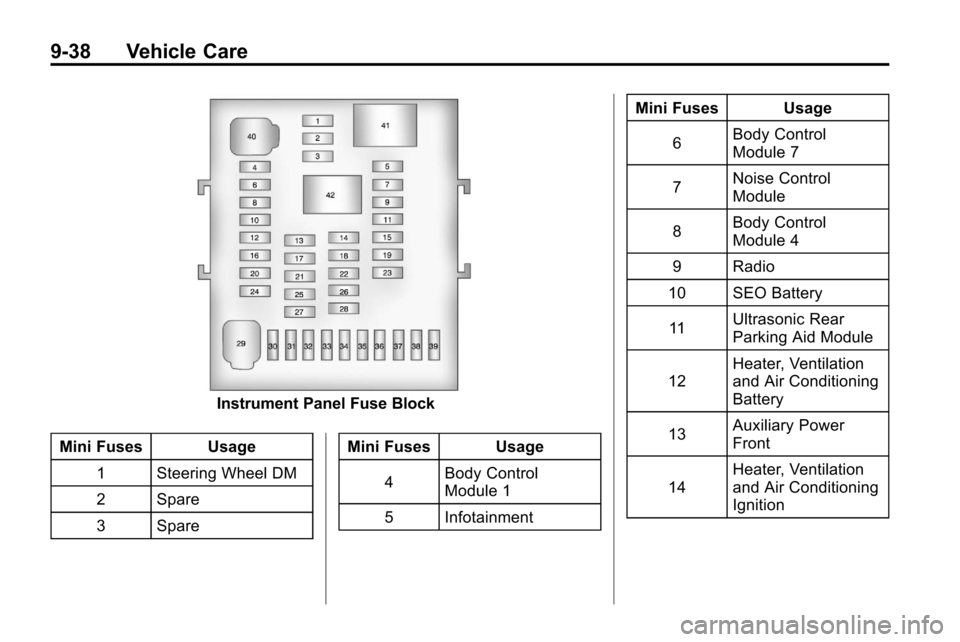
Instrument Panel Fuse Block
Mini Fuses Usage 1 Steering Wheel DM
2 Spare
3 Spare Mini Fuses Usage
4 Body Control
Module 1
5 Infotainment Mini Fuses Usage
6 Body Control
Module 7
7 Noise Control
Module
8 Body Control
Module 4
9 Radio
10 SEO Battery
11 Ultrasonic Rear
Parking Aid Module
12 Heater, Ventilation
and Air Conditioning
Battery
13 Auxiliary Power
Front
14 Heater, Ventilation
and Air Conditioning
Ignition
Page 315 of 394
Vehicle Care 9-47
For additional information
regarding how much weight your
vehicle can carry, and an
example of the Tire and Loading
Information label, seeVehicle
Load Limits
on page 8‑24. How
you load your vehicle affects
vehicle handling and ride
comfort. Never load your vehicle
with more weight than it was
designed to carry.
When to Check
Check your tires once a month
or more. Do not forget to check
the compact spare tire, if the
vehicle has one. The compact
spare should be at 60 psi
(420 kPa). For additional
information regarding the
compact spare tire, see
Compact Spare Tire
on
page 9‑68
. How to Check
Use a good quality pocket-type
gauge to check tire pressure.
You cannot tell if your tires are
properly inflated simply by
looking at them. Radial tires may
look properly inflated even when
they are under‐inflated. Check
the tire's inflation pressure when
the tires are cold. Cold means
your vehicle has been sitting for
at least three hours or driven no
more than 1.6 km (1 mile).
Remove the valve cap from the
tire valve stem. Press the tire
gauge firmly onto the valve to
get a pressure measurement.
If the cold tire inflation pressure
matches the recommended
pressure on the Tire and
Loading Information label, no
further adjustment is necessary.
If the inflation pressure is low,
add air until you reach the
recommended amount. If you overfill the tire, release air
by pushing on the metal stem in
the center of the tire valve.
Re‐check the tire pressure with
the tire gauge.
Be sure to put the valve caps
back on the valve stems. They
help prevent leaks by keeping
out dirt and moisture.
Tire Pressure Monitor
System
The Tire Pressure Monitor System
(TPMS) uses radio and sensor
technology to check tire pressure
levels. The TPMS sensors monitor
the air pressure in your vehicle's
tires and transmit tire pressure
readings to a receiver located in the
vehicle.
Each tire, including the spare (if
provided), should be checked
monthly when cold and inflated to
the inflation pressure recommended
by the vehicle manufacturer on the
vehicle placard or tire inflation
Page 316 of 394
9-48 Vehicle Care
pressure label. (If your vehicle has
tires of a different size than the size
indicated on the vehicle placard or
tire inflation pressure label, you
should determine the proper tire
inflation pressure for those tires.)
As an added safety feature, your
vehicle has been equipped with a
tire pressure monitoring system
(TPMS) that illuminates a low tire
pressure telltale when one or
more of your tires is significantly
under‐inflated.
Accordingly, when the low tire
pressure telltale illuminates, you
should stop and check your tires as
soon as possible, and inflate them
to the proper pressure. Driving on a
significantly under‐inflated tire
causes the tire to overheat and can
lead to tire failure. Under‐inflation
also reduces fuel efficiency and tire
tread life, and may affect the
vehicle's handling and stopping
ability.Please note that the TPMS is not a
substitute for proper tire
maintenance, and it is the driver's
responsibility to maintain correct tire
pressure, even if under‐inflation has
not reached the level to trigger
illumination of the TPMS low tire
pressure telltale.
Your vehicle has also been
equipped with a TPMS malfunction
indicator to indicate when the
system is not operating properly.
The TPMS malfunction indicator is
combined with the low tire pressure
telltale. When the system detects a
malfunction, the telltale will flash for
approximately one minute and then
remain continuously illuminated.
This sequence will continue upon
subsequent vehicle start‐ups as
long as the malfunction exists.
When the malfunction indicator is
illuminated, the system may not be
able to detect or signal low tire
pressure as intended. TPMS
malfunctions may occur for a variety
of reasons, including the installation
of replacement or alternate tires orwheels on the vehicle that prevent
the TPMS from functioning properly.
Always check the TPMS malfunction
telltale after replacing one or more
tires or wheels on your vehicle to
ensure that the replacement or
alternate tires and wheels allow the
TPMS to continue to function
properly.
See
Tire Pressure Monitor
Operation
on page 9‑49for
additional information.
Federal Communications
Commission (FCC) and
Industry Canada
See Radio Frequency Statementon
page 12‑16for information regarding
Part 15 of the Federal
Communications Commission (FCC)
Rules and RSS-210/211 of Industry
Canada.