Page 292 of 394

9-24 Vehicle Care
Battery
Refer to the replacement number on
the original battery label when a
new battery is needed.
{DANGER
Battery posts, terminals, and
related accessories contain lead
and lead compounds, chemicals
known to the State of California to
cause cancer and reproductive
harm. Wash hands after handling.
Vehicle Storage
{WARNING
Batteries have acid that can burn
you and gas that can explode.
You can be badly hurt if you are
not careful. SeeJump Starting
on
page 9‑69
for tips on working
around a battery without
getting hurt. Infrequent Usage: Remove the
black, negative (−) cable from the
battery to keep the battery from
running down.
Extended Storage: Remove the
black, negative (−) cable from the
battery or use a battery trickle
charger.
All-Wheel Drive
Transfer Case
When to Check and Change
Lubricant
Refer to the Maintenance Schedule
to determine how often to check the
lubricant and when to change it.
See
Scheduled Maintenance
on
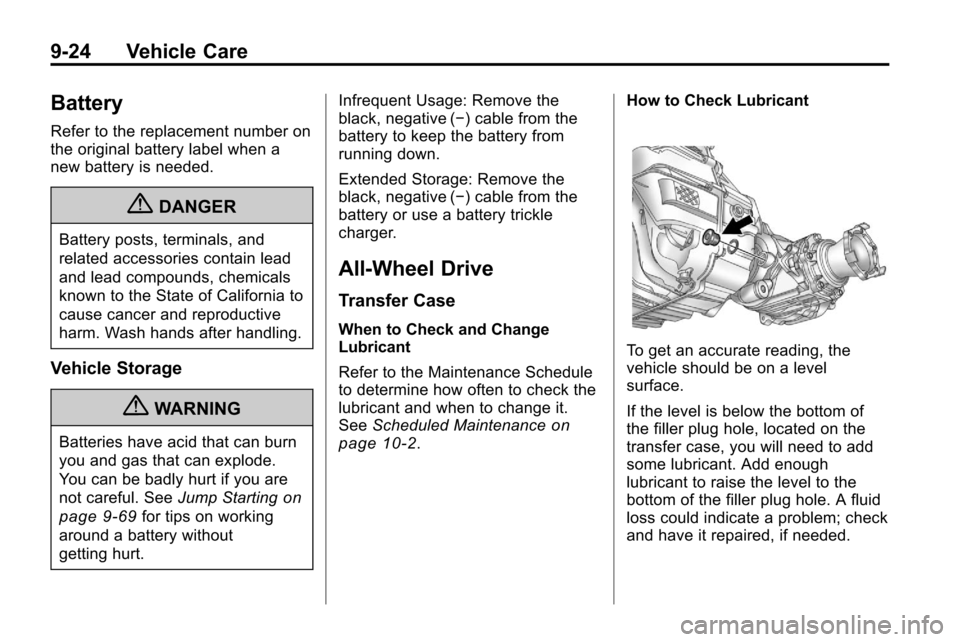
page 10‑2. How to Check Lubricant
To get an accurate reading, the
vehicle should be on a level
surface.
If the level is below the bottom of
the filler plug hole, located on the
transfer case, you will need to add
some lubricant. Add enough
lubricant to raise the level to the
bottom of the filler plug hole. A fluid
loss could indicate a problem; check
and have it repaired, if needed.
Page 338 of 394

9-70 Vehicle Care
1. The vehicle used to jump startmust have 12-volt battery with a
negative ground.
Notice: If the other vehicle's
system is not a 12-volt system
with a negative ground, both
vehicles can be damaged. Only
use vehicles with 12-volt systems
with negative grounds to jump
start your vehicle.
2. The vehicles should be close enough for the jumper cables to
reach, but the vehicles should
not be touching. Touching could
cause grounding and possible
electrical system damage.
Put both vehicles in P (Park)
and set the parking brake firmly.
3. Unplug accessories plugged into the cigarette lighter or the
accessory power outlet. Turn off
the radio and all lamps that are
not needed. Turn off the ignition
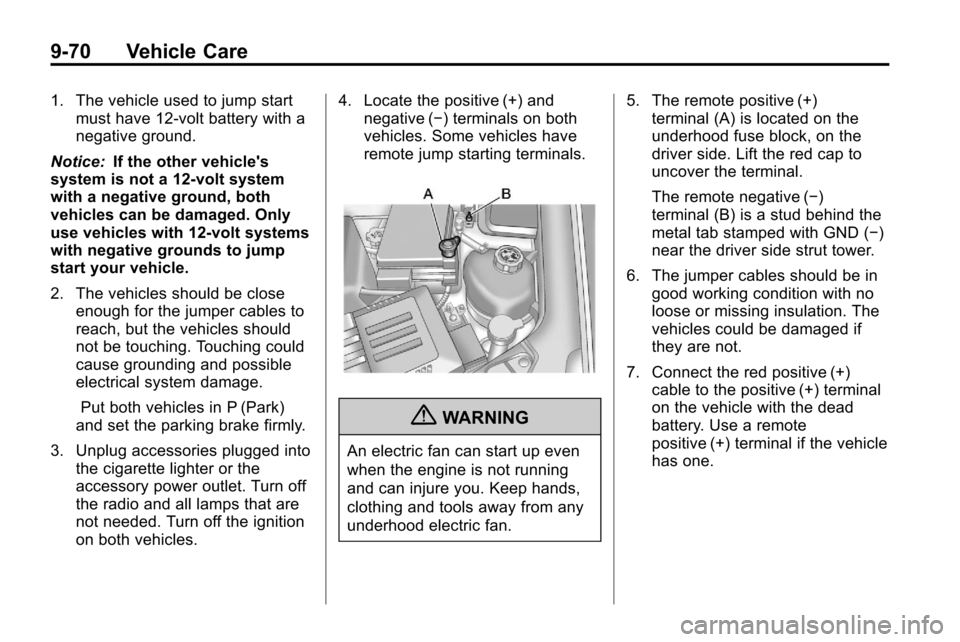
on both vehicles. 4. Locate the positive (+) and
negative (−) terminals on both
vehicles. Some vehicles have
remote jump starting terminals.
{WARNING
An electric fan can start up even
when the engine is not running
and can injure you. Keep hands,
clothing and tools away from any
underhood electric fan. 5. The remote positive (+)
terminal (A) is located on the
underhood fuse block, on the
driver side. Lift the red cap to
uncover the terminal.
The remote negative (−)
terminal (B) is a stud behind the
metal tab stamped with GND (−)
near the driver side strut tower.
6. The jumper cables should be in good working condition with no
loose or missing insulation. The
vehicles could be damaged if
they are not.
7. Connect the red positive (+) cable to the positive (+) terminal
on the vehicle with the dead
battery. Use a remote
positive (+) terminal if the vehicle
has one.
Page 339 of 394

Vehicle Care 9-71
8. Do not let the other end touchmetal. Connect it to the
positive (+) terminal of the good
battery. Use a remote
positive (+) terminal if the vehicle
has one.
9. Connect the black negative (−) cable to the negative (−) terminal
of the good battery. Use a
remote negative (−) terminal if
the vehicle has one.
Do not let the other end touch
anything until the next step. The
other end of the negative (−)
cable does not go to the dead
battery. It goes to a heavy,
unpainted metal engine part or
to a remote negative (−) terminal
on the vehicle with the dead
battery.
10. Connect the other end of the negative (−) cable away from
the dead battery, but not near
engine parts that move. 11. Start the vehicle with the good
battery and run the engine.
12. Press the unlock symbol on the remote keyless entry
transmitter to disarm the
security system, if equipped.
13. Try to start the vehicle that had the dead battery. If it will not
start after a few tries, it needs
service.
Notice: If the jumper cables are
connected or removed in the
wrong order, electrical shorting
may occur and damage the
vehicle. The repairs would not be
covered by the vehicle warranty.
Always connect and remove the
jumper cables in the correct
order, making sure that the
cables do not touch each other or
other metal.
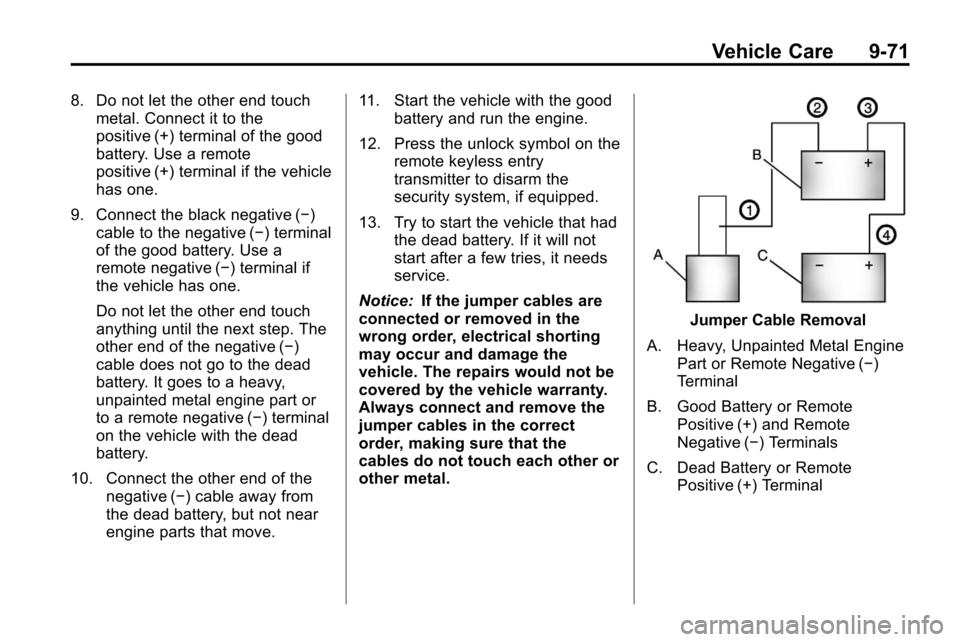
Jumper Cable Removal
A. Heavy, Unpainted Metal Engine Part or Remote Negative (−)
Terminal
B. Good Battery or Remote Positive (+) and Remote
Negative (−) Terminals
C. Dead Battery or Remote Positive (+) Terminal