2010 CHEVROLET EQUINOX headlamp
[x] Cancel search: headlampPage 217 of 394
Driving and Operating 8-13
Consider this as you approach a hill:
.Is there a constant incline,
or does the hill get sharply
steeper in places?
.Is there good traction on the
hillside, or will the surface cause
tire slipping?
.Is there a straight path up or
down the hill so you will not
have to make turning
maneuvers?
.Are there obstructions on the hill
that can block your path, such
as boulders, trees, logs, or ruts?
.What is beyond the hill? Is there
a cliff, an embankment, a
drop-off, a fence? Get out and
walk the hill if you do not know.
It is the smart way to find out.
.Is the hill simply too rough?
Steep hills often have ruts,
gullies, troughs, and exposed
rocks because they are more
susceptible to the effects of
erosion.
Driving Uphill
Once you decide it is safe to drive
up the hill:
.Use a low gear and get a firm
grip on the steering wheel.
.Get a smooth start up the hill
and try to maintain speed. Not
using more power than needed
can avoid spinning the wheels or
sliding.
{WARNING
Turning or driving across steep
hills can be dangerous. You could
lose traction, slide sideways, and
possibly roll over. You could be
seriously injured or killed. When
driving up hills, always try to go
straight up.
.Try to drive straight up the hill if
at all possible. If the path twists
and turns, you might want to find
another route.
.Ease up on the speed as you
approach the top of the hill.
.Attach a flag to the vehicle to be
more visible to approaching
traffic on trails or hills.
.Sound the horn as you approach
the top of the hill to let opposing
traffic know you are there.
.Use headlamps even during the
day to make the vehicle more
visible to oncoming traffic.
{WARNING
Driving to the top (crest) of a
hill at full speed can cause an
accident. There could be a
drop-off, embankment, cliff,
or even another vehicle. You
could be seriously injured or
killed. As you near the top of a
hill, slow down and stay alert.
Page 227 of 394
Driving and Operating 8-23
To save fuel, run the engine for only
short periods as needed to warm
the vehicle and then shut the engine
off and close the window most of
the way to save heat. Repeat this
until help arrives but only when you
feel really uncomfortable from the
cold. Moving about to keep warm
also helps.
If it takes some time for help to
arrive, now and then when you run
the engine, push the accelerator
pedal slightly so the engine runs
faster than the idle speed. This
keeps the battery charged to restart
the vehicle and to signal for help
with the headlamps. Do this as little
as possible to save fuel.If the Vehicle is Stuck
Slowly and cautiously spin the
wheels to free the vehicle when
stuck in sand, mud, ice, or snow.
If stuck too severely for the traction
system to free the vehicle, turn the
traction system off and use the
rocking method.
{WARNING
If the vehicle's tires spin at high
speed, they can explode, and you
or others could be injured. The
vehicle can overheat, causing an
engine compartment fire or other
damage. Spin the wheels as little
as possible and avoid going
above 55 km/h (35 mph) as
shown on the speedometer.
For information about using tire
chains on the vehicle, see Tire
Chains on page 9‑58.
Rocking the Vehicle to Get
it Out
Turn the steering wheel left and
right to clear the area around the
front wheels. Turn off any traction
system. Shift back and forth
between R (Reverse) and a forward
gear, spinning the wheels as little as
possible. To prevent transmission
wear, wait until the wheels stop
spinning before shifting gears.
Release the accelerator pedal while
shifting, and press lightly on the
accelerator pedal when the
transmission is in gear. Slowly
spinning the wheels in the forward
and reverse directions causes a
rocking motion that could free the
vehicle. If that does not get the
vehicle out after a few tries, it might
need to be towed out. If the vehicle
does need to be towed out, see
Towing the Vehicle on page 9‑72.
Page 269 of 394
Vehicle Care 9-1
Vehicle Care
General Information
General Information . . . . . . . . . . . 9-3
California Proposition65 Warning . . . . . . . . . . . . . . . . . . 9-3
California Perchlorate Materials Requirements . . . . . . . . . . . . . . . 9-3
Accessories and Modifications . . . . . . . . . . . . . . . . 9-4
Vehicle Checks
Doing Your OwnService Work . . . . . . . . . . . . . . . . 9-4
Hood . . . . . . . . . . . . . . . . . . . . . . . . . . 9-5
Engine Compartment Overview . . . . . . . . . . . . . . . . . . . . 9-6
Engine Cover . . . . . . . . . . . . . . . . . 9-9
Engine Oil . . . . . . . . . . . . . . . . . . . 9-10
Engine Oil Life System . . . . . . . 9-11
Automatic Transmission Fluid . . . . . . . . . . . . . . . . . . . . . . . 9-12 Engine Air Cleaner/Filter . . . . . 9-13
Cooling System . . . . . . . . . . . . . . 9-14
Engine Coolant . . . . . . . . . . . . . . 9-15
Engine Overheating . . . . . . . . . 9-18
Power Steering Fluid (2.4L
L4 Engine) . . . . . . . . . . . . . . . . . 9-20
Power Steering Fluid (3.0L V6 Engine) . . . . . . . . . . . . . . . . . 9-20
Washer Fluid . . . . . . . . . . . . . . . . 9-21
Brakes . . . . . . . . . . . . . . . . . . . . . . . 9-21
Brake Fluid . . . . . . . . . . . . . . . . . . 9-22
Battery . . . . . . . . . . . . . . . . . . . . . . . 9-24
All-Wheel Drive . . . . . . . . . . . . . . 9-24
Starter Switch Check . . . . . . . . 9-25
Automatic Transmission Shift Lock Control System
Check . . . . . . . . . . . . . . . . . . . . . . 9-25
Ignition Transmission Lock Check . . . . . . . . . . . . . . . . . . . . . . 9-25
Park Brake and P (Park) Mechanism Check . . . . . . . . . 9-26
Wiper Blade Replacement . . . 9-26
Headlamp Aiming
Headlamp Aiming . . . . . . . . . . . . 9-27
Bulb Replacement
Bulb Replacement . . . . . . . . . . . 9-30
Headlamps, Front Turn Signal, Sidemarker, and Parking
Lamps . . . . . . . . . . . . . . . . . . . . . . 9-30
Fog Lamps . . . . . . . . . . . . . . . . . . 9-31
Taillamps, Turn Signal, Sidemarker, Stoplamps,
and Back-Up Lamps . . . . . . . 9-32
License Plate Lamp . . . . . . . . . . 9-33
Replacement Bulbs . . . . . . . . . . 9-34
Electrical System
Fuses . . . . . . . . . . . . . . . . . . . . . . . . 9-34
Engine Compartment Fuse Block . . . . . . . . . . . . . . . . . . . . . . . 9-34
Instrument Panel Fuse Block . . . . . . . . . . . . . . . . . . . . . . . 9-37
Page 295 of 394
Vehicle Care 9-27
Rear Wiper Blade Replacement
To replace the rear wiper blade:
1. Lift the wiper arm from theliftgate glass until no further
movement is possible.
2. Hold the wiper arm at the tip with one hand and hold the wiper
blade at the tip with the
other hand.
3. Pull down on the wiper blade. The blade will pull away from
the arm.
4. Place the wiper blade into thewiper arm aligning the blade
attachment rivet with the arm
attachment.
5. Align the wiper blade with the arm and hold both ends of the
arm while gently squeezing until
the blade snaps into place.
Do not apply excessive force
during this operation.
Reposition the blade in the arm
and repeat, if blade is not
correctly positioned.
6. Place the wiper arm with the wiper blade attached back on
the liftgate glass.Headlamp Aiming
The headlamp aiming system has
been preset at the factory.
If the vehicle is damaged in an
accident, the aim of the headlamps
may be affected and adjustment
may be necessary.
It is recommended that a dealer
adjust the headlamps. To re-aim the
headlamps yourself, use the
following procedure.
The vehicle should be properly
prepared as follows. The vehicle:
.Should be placed so the
headlamps are 7.6 m (25 ft) from
a light colored wall.
.Must have all four tires on a
level surface which is level all
the way to the wall.
.Should be placed so it is
perpendicular to the wall or other
flat surface.
Page 296 of 394
9-28 Vehicle Care
.Should not have any snow, ice,
or mud on it.
.Should be fully assembled and
all other work stopped while
headlamp aiming is being
performed.
.Should be normally loaded with
a full tank of fuel and one person
or 75 kg (160 lbs) sitting on the
driver's seat.
.Tires should be properly inflated.
Headlamp aiming is done with the
vehicle's low-beam headlamps. The
high-beam headlamps will be
correctly aimed if the low-beam
headlamps are aimed properly. To adjust the vertical aim, do the
following:
1. Open the hood. See
Hood
on
page 9‑5for more information.
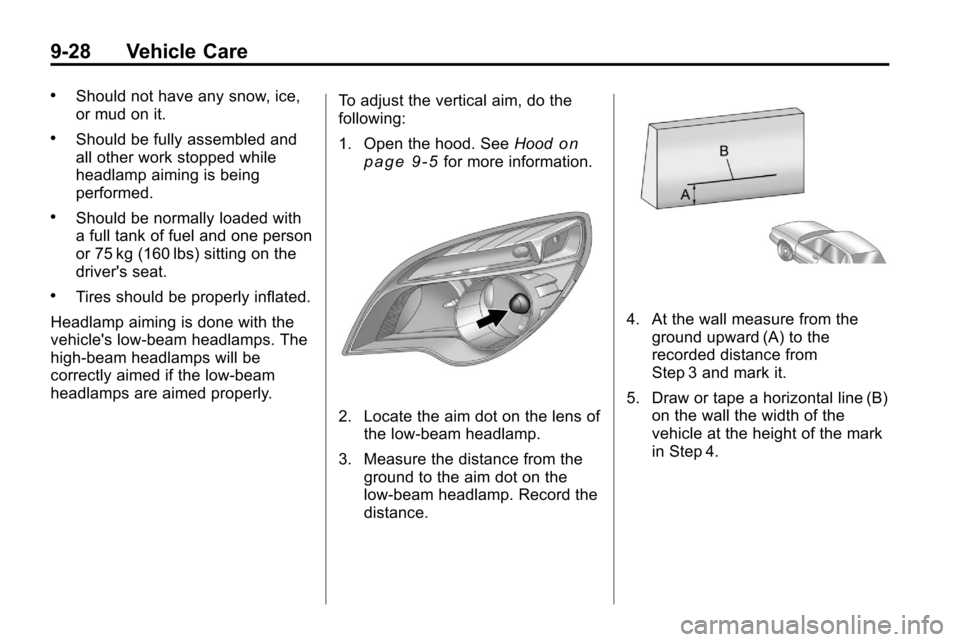
2. Locate the aim dot on the lens of the low‐beam headlamp.
3. Measure the distance from the ground to the aim dot on the
low‐beam headlamp. Record the
distance.
4. At the wall measure from the
ground upward (A) to the
recorded distance from
Step 3 and mark it.
5. Draw or tape a horizontal line (B) on the wall the width of the
vehicle at the height of the mark
in Step 4.
Page 297 of 394
Vehicle Care 9-29
Notice:Do not cover a headlamp
to improve beam cut-off when
aiming. Covering a headlamp may
cause excessive heat build-up
which may cause damage to the
headlamp.
6. Turn on the low-beam
headlamps and place a piece of
cardboard or equivalent in front
of the headlamp not being
adjusted. This allows only the
beam of light from the headlamp
being adjusted to be seen on the
flat surface.
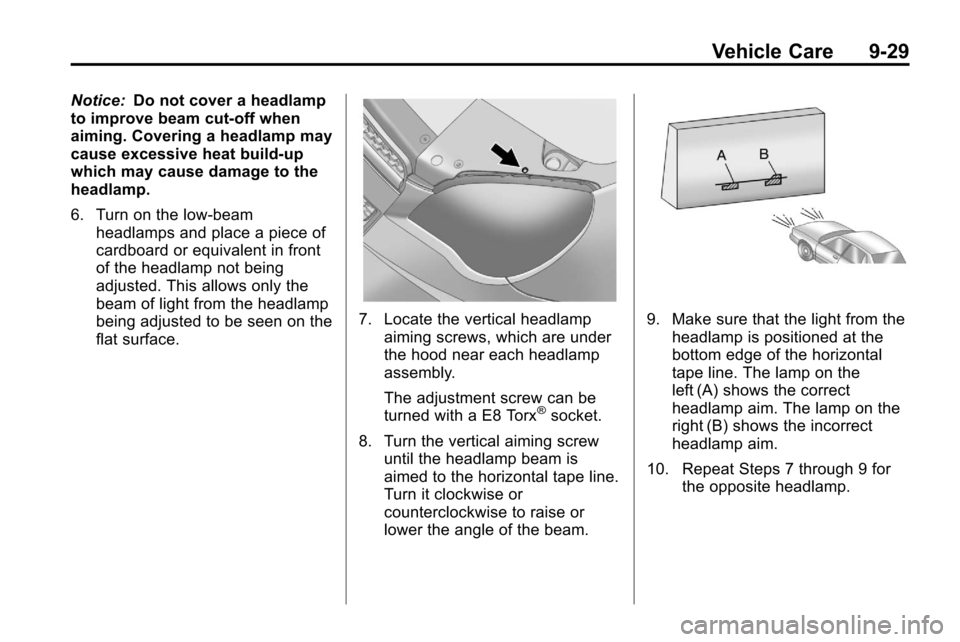
7. Locate the vertical headlampaiming screws, which are under
the hood near each headlamp
assembly.
The adjustment screw can be
turned with a E8 Torx
®socket.
8. Turn the vertical aiming screw until the headlamp beam is
aimed to the horizontal tape line.
Turn it clockwise or
counterclockwise to raise or
lower the angle of the beam.
9. Make sure that the light from theheadlamp is positioned at the
bottom edge of the horizontal
tape line. The lamp on the
left (A) shows the correct
headlamp aim. The lamp on the
right (B) shows the incorrect
headlamp aim.
10. Repeat Steps 7 through 9 for the opposite headlamp.
Page 298 of 394
9-30 Vehicle Care
Bulb Replacement
For the proper type of replacement
bulbs, seeReplacement Bulbson
page 9‑34.
For any bulb changing procedure
not listed in this section, contact
your dealer.
Headlamps, Front Turn
Signal, Sidemarker, and
Parking Lamps
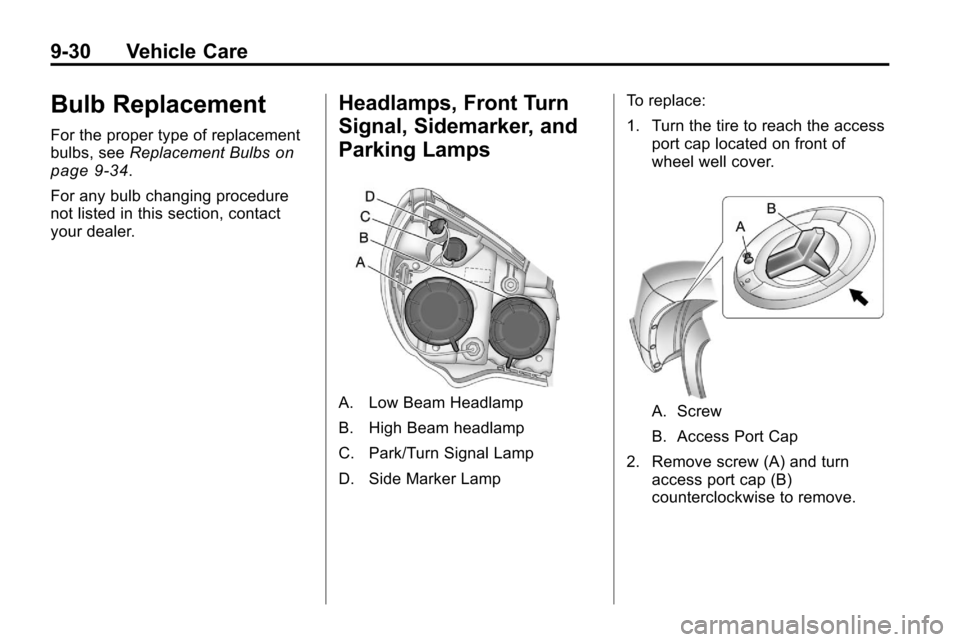
A. Low Beam Headlamp
B. High Beam headlamp
C. Park/Turn Signal Lamp
D. Side Marker Lamp To replace:
1. Turn the tire to reach the access
port cap located on front of
wheel well cover.A. Screw
B. Access Port Cap
2. Remove screw (A) and turn access port cap (B)
counterclockwise to remove.
Page 299 of 394
Vehicle Care 9-31
3. If replacing low/high headlampbulb, remove the dust cover cap
from the back of the headlamp
housing by turning the cap
counterclockwise.
4. Turn the bulb socket counterclockwise to remove from
lamp assembly.
5. Remove the bulb from the socket or disconnect bulb
assembly from harness
connector.
6. Install new bulb.
7. Reinstall the lamp socket to lamp assembly turning
clockwise.
8. Replace the dust cover cap on headlamps.
9. Reinstall the wheel well cover access port cap and secure by
installing screw.Fog Lamps
To replace one of these bulbs:
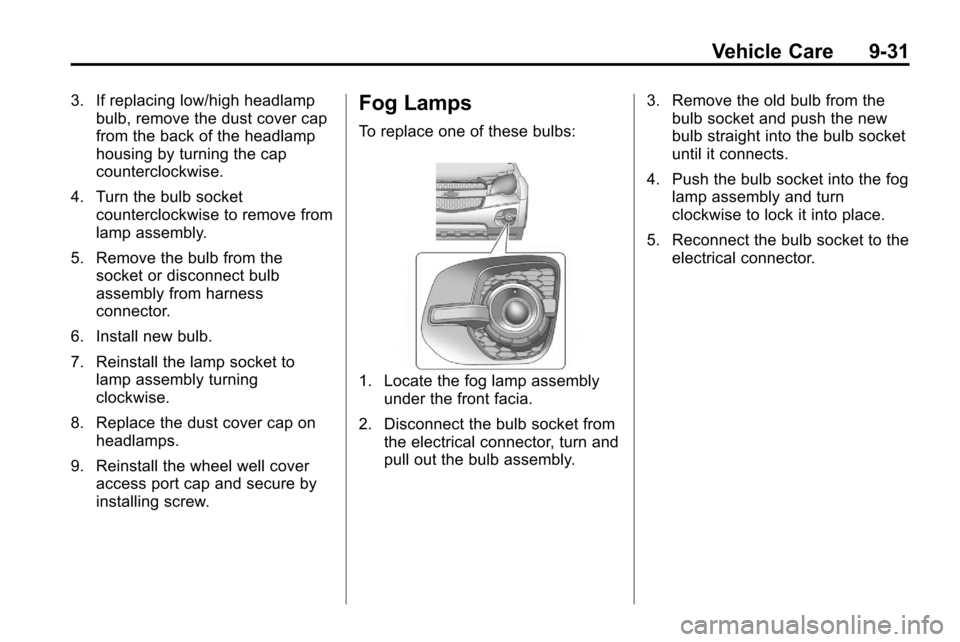
1. Locate the fog lamp assembly
under the front facia.
2. Disconnect the bulb socket from the electrical connector, turn and
pull out the bulb assembly. 3. Remove the old bulb from the
bulb socket and push the new
bulb straight into the bulb socket
until it connects.
4. Push the bulb socket into the fog lamp assembly and turn
clockwise to lock it into place.
5. Reconnect the bulb socket to the electrical connector.