2010 CHEVROLET CORVETTE tow
[x] Cancel search: towPage 7 of 472

Section 1 In Brief
Instrument Panel. . . . . . . . . . . . . . . . . . . . . . . . . . . . . . . . . . . 1-2
Initial Drive Information . . . . . . . . . . . . . . . . . . . . . . . . . . . 1-4
Remote Keyless Entry (RKE) System . . . . . . . . . . . 1-4
Door Locks . . . . . . . . . . . . . . . . . . . . . . . . . . . . . . . . . . . . . 1-5
Trunk Release . . . . . . . . . . . . . . . . . . . . . . . . . . . . . . . . . . 1-6
Windows . . . . . . . . . . . . . . . . . . . . . . . . . . . . . . . . . . . . . . . . 1-6
Seat Adjustment . . . . . . . . . . . . . . . . . . . . . . . . . . . . . . . . 1-7
Safety Belt . . . . . . . . . . . . . . . . . . . . . . . . . . . . . . . . . . . . . . 1-9
Sensing System for Passenger Airbag . . . . . . . . . 1-10
Mirror Adjustment . . . . . . . . . . . . . . . . . . . . . . . . . . . . . . 1-11
Steering Wheel Adjustment . . . . . . . . . . . . . . . . . . . . 1-12
Interior Lighting . . . . . . . . . . . . . . . . . . . . . . . . . . . . . . . . 1-13
Exterior Lighting . . . . . . . . . . . . . . . . . . . . . . . . . . . . . . . 1-13
Windshield Wiper/Washer . . . . . . . . . . . . . . . . . . . . . . 1-14
Climate Controls . . . . . . . . . . . . . . . . . . . . . . . . . . . . . . . 1-15
Transmission . . . . . . . . . . . . . . . . . . . . . . . . . . . . . . . . . . 1-15
Vehicle Features . . . . . . . . . . . . . . . . . . . . . . . . . . . . . . . . . . 1-16
Radio(s) . . . . . . . . . . . . . . . . . . . . . . . . . . . . . . . . . . . . . . . 1-16
Satellite Radio . . . . . . . . . . . . . . . . . . . . . . . . . . . . . . . . . 1-17 Portable Audio Devices . . . . . . . . . . . . . . . . . . . . . . . . 1-18
Steering Wheel Controls . . . . . . . . . . . . . . . . . . . . . . . 1-18
Bluetooth
®. . . . . . . . . . . . . . . . . . . . . . . . . . . . . . . . . . . . . 1-18
Navigation System . . . . . . . . . . . . . . . . . . . . . . . . . . . . . 1-19
Driver Information Center (DIC) . . . . . . . . . . . . . . . . 1-19
Cruise Control . . . . . . . . . . . . . . . . . . . . . . . . . . . . . . . . . 1-20
Power Outlets . . . . . . . . . . . . . . . . . . . . . . . . . . . . . . . . . 1-21
Roof Panel . . . . . . . . . . . . . . . . . . . . . . . . . . . . . . . . . . . . 1-21
Convertible . . . . . . . . . . . . . . . . . . . . . . . . . . . . . . . . . . . . 1-21
Performance and Maintenance . . . . . . . . . . . . . . . . . . 1-21
Traction Control System (TCS) . . . . . . . . . . . . . . . . 1-21
Towing . . . . . . . . . . . . . . . . . . . . . . . . . . . . . . . . . . . . . . . . . 1-22
Tire Pressure Monitor . . . . . . . . . . . . . . . . . . . . . . . . . . 1-22
Z06, Z16, and ZR1 Features . . . . . . . . . . . . . . . . . . . 1-23
Engine Oil Life System . . . . . . . . . . . . . . . . . . . . . . . . 1-24
Driving for Better Fuel Economy . . . . . . . . . . . . . . . 1-24
Battery . . . . . . . . . . . . . . . . . . . . . . . . . . . . . . . . . . . . . . . . . 1-24
Roadside Assistance Program . . . . . . . . . . . . . . . . . 1-25
OnStar
®. . . . . . . . . . . . . . . . . . . . . . . . . . . . . . . . . . . . . . . 1-25
1-1
Page 17 of 472

Mirror Adjustment
Exterior Mirrors
Controls for the outside power mirrors are located on
the driver door. 1. Move the top control to the left or right to select either the driver or passenger mirror.
2. Use the arrows located on the four-way control pad to move the mirror in the desired direction. Keep the control in the center position when not
adjusting either outside mirror.
Manually fold the mirrors inward to prevent damage
when going through an automatic car wash. To fold, pull
the mirror toward the vehicle. Push the mirror outward,
to return it to the original position.
Interior Mirror
Vehicles with an automatic dimming rearview mirror will
automatically reduce headlamp glare coming from
vehicles that are traveling behind you.
See
Automatic Dimming Rearview Mirror on page 3‑39.
1-11
Page 18 of 472

Steering Wheel Adjustment
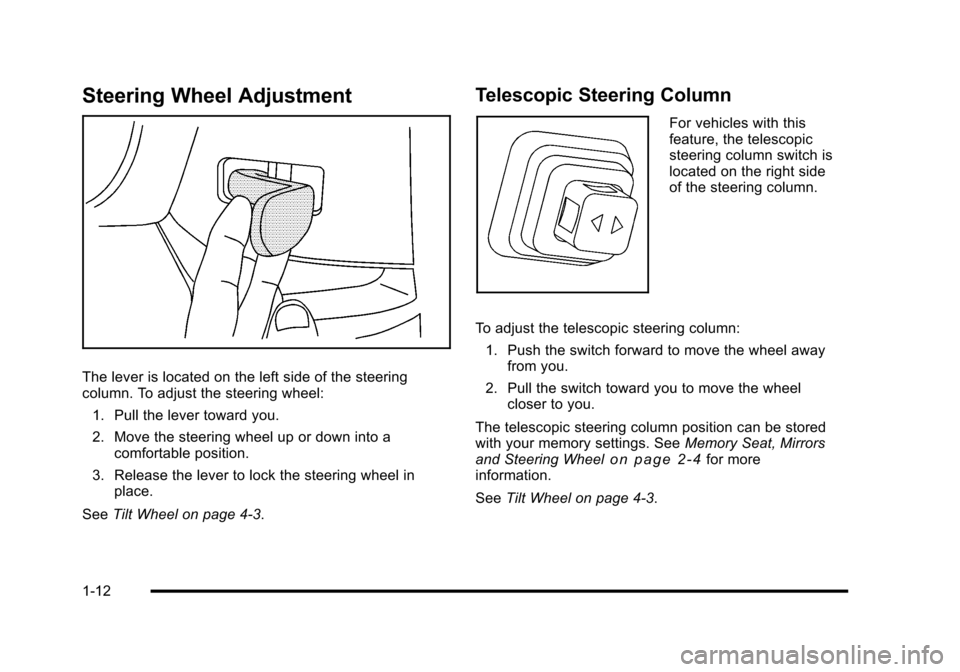
The lever is located on the left side of the steering
column. To adjust the steering wheel: 1. Pull the lever toward you.
2. Move the steering wheel up or down into a comfortable position.
3. Release the lever to lock the steering wheel in place.
See Tilt Wheel on page 4‑3.
Telescopic Steering Column
For vehicles with this
feature, the telescopic
steering column switch is
located on the right side
of the steering column.
To adjust the telescopic steering column: 1. Push the switch forward to move the wheel away from you.
2. Pull the switch toward you to move the wheel closer to you.
The telescopic steering column position can be stored
with your memory settings. See Memory Seat, Mirrors
and Steering Wheel
on page 2‑4for more
information.
See Tilt Wheel on page 4‑3.
1-12
Page 27 of 472

Power Outlets
The accessory power outlet can be used to connect
electrical equipment, such as a cellular phone.
The accessory power outlet is located inside the center
console storage compartment, on the forward left side.
To use the outlet, remove the tethered cap.
See Accessory Power Outlet(s) on page 4‑20.
Roof Panel
On vehicles with a removable roof panel, there are
three release latches. Two are located on the front of
the roof panel and the other is located on the back of
the roof panel. See Removing the Roof Panel
on
page 3‑54.
Until you are sure you can remove the roof panel by
yourself, have someone help you. Once removed, the
roof panel should always be stored properly in the rear
storage compartment.
For more information, see:
.Storing the Roof Panel on page 3‑56.
.Installing the Roof Panel on page 3‑58.
Convertible
If equipped, the convertible top can be lowered and
stowed under the tonneau cover behind the seats.
For step-by-step instructions, see Convertible Top
(Manual)
on page 3‑59or Convertible Top (Power)on
page 3‑66.
Performance and Maintenance
Traction Control System (TCS)
The traction control system limits wheel spin.
The system turns on automatically every time the
vehicle is started.
.To turn off traction control, press and releasedon
the console.
dilluminates and the appropriate
DIC message displays. See DIC Warnings and
Messages on page 4‑52.
.Press and release the button again to turn on
traction control.
See Traction Control System (TCS) on page 5‑6.
The vehicle has an Active Handling System that helps
maintain directional control of the vehicle in difficult
driving conditions. See Active Handling System
on
page 5‑8.
1-21
Page 28 of 472

The vehicle may have Competitive Driving Mode
(except ZR1), Performance Traction Management
(ZR1), and Launch Control systems designed to
allow increased performance while accelerating and
cornering. See Competitive Driving Mode on page 5‑9.
Towing
The vehicle was neither designed nor intended to be
towed with any of its wheels on the ground.
See Towing Your Vehicle
on page 5‑33and
Recreational Vehicle Towing on page 5‑33.
Tire Pressure Monitor
This vehicle may have a Tire Pressure Monitor
System (TPMS).
The Tire Pressure Monitor
alerts you when a
significant reduction in
pressure occurs in one or
more of the vehicle’s tires
by illuminating the low tire
pressure warning light on
the instrument cluster. The warning light will remain on until the tire pressure is
corrected. The proper tire pressures for your vehicle are
listed on the Tire and Loading Information label located
on the driver side center pillar (B pillar). See
Loading
the Vehicle
on page 5‑28.
You may notice during cooler conditions that the low tire
pressure warning light will appear when the vehicle is
first started and then turn off as you drive. This may be
an early indicator that your tire pressures are getting
low and the tires need to be inflated to the proper
pressure.
Note: The Tire Pressure Monitor can alert you about
low tire pressure, but it does not replace normal monthly
tire maintenance. It is the driver ’s responsibility to
maintain correct tire pressures.
See Tire Pressure Monitor System
on page 6‑72and
Tire Pressure Monitor Operation on page 6‑74.
1-22
Page 31 of 472

Roadside Assistance Program
U.S.:1-800-CHEV-USA (1-800-243-8872)
TTY Users: 1-888-889-2438
Canada: 1-800-268-6800
As the owner of a new Chevrolet, you are automatically
enrolled in the Roadside Assistance program. This
program provides technically trained advisors who are
available 24 hours a day, 365 days a year, minor repair
information or towing arrangements.
Roadside Assistance and OnStar
If you have a current OnStar subscription, press the
OnStar button and the current GPS location will be sent
to an OnStar Advisor who will assess your problem,
contact Roadside Assistance, and relay exact location
to get you the help you need.
Online Owner Center
The Online Owner Center is a complimentary service
that includes online service reminders, vehicle
maintenance tips, online owner manual, special
privileges and more.
Sign up today at:
www.gmownercenter.com/chevrolet (U.S.) or
www.gm.ca (Canada).
OnStar®
OnStar®uses several innovative technologies and live
advisors to provide a wide range of safety, security,
navigation, diagnostics, and calling services.
Automatic Crash Response
In a crash, built in sensors can automatically alert an
OnStar advisor who is immediately connected to the
vehicle to see if you need help.
1-25
Page 58 of 472

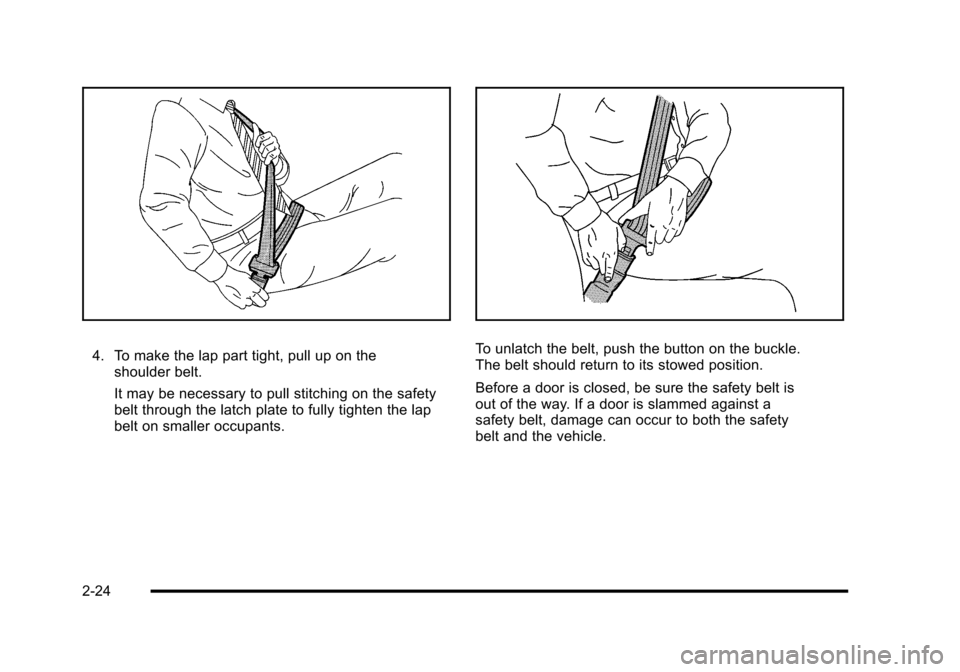
4. To make the lap part tight, pull up on the shoulder belt.
It may be necessary to pull stitching on the safety
belt through the latch plate to fully tighten the lap
belt on smaller occupants. To unlatch the belt, push the button on the buckle.
The belt should return to its stowed position.
Before a door is closed, be sure the safety belt is
out of the way. If a door is slammed against a
safety belt, damage can occur to both the safety
belt and the vehicle.
2-24
Page 77 of 472

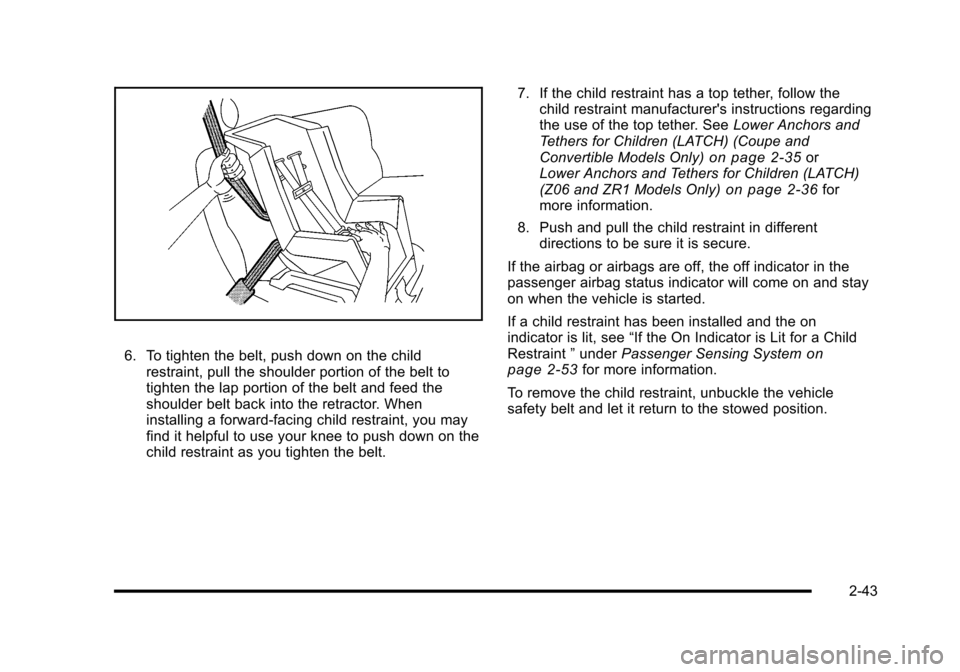
6. To tighten the belt, push down on the child restraint, pull the shoulder portion of the belt to
tighten the lap portion of the belt and feed the
shoulder belt back into the retractor. When
installing a forward-facing child restraint, you may
find it helpful to use your knee to push down on the
child restraint as you tighten the belt. 7. If the child restraint has a top tether, follow the
child restraint manufacturer's instructions regarding
the use of the top tether. See Lower Anchors and
Tethers for Children (LATCH) (Coupe and
Convertible Models Only)
on page 2‑35or
Lower Anchors and Tethers for Children (LATCH)
(Z06 and ZR1 Models Only)
on page 2‑36for
more information.
8. Push and pull the child restraint in different directions to be sure it is secure.
If the airbag or airbags are off, the off indicator in the
passenger airbag status indicator will come on and stay
on when the vehicle is started.
If a child restraint has been installed and the on
indicator is lit, see “If the On Indicator is Lit for a Child
Restraint ”under Passenger Sensing System
on
page 2‑53for more information.
To remove the child restraint, unbuckle the vehicle
safety belt and let it return to the stowed position.
2-43