Page 120 of 472
Retained Accessory Power (RAP)
These vehicle accessories can be used for up to
10 minutes after the engine is turned off:
.Audio System
.Power Windows
These features continue to work up to 10 minutes after
the engine is turned off or until either door is opened.
If a door is opened, the power windows and audio
system will shut off.
Starting the Engine
Move the shift lever to P (Park) or N (Neutral) for an
automatic transmission. For a manual transmission the
vehicle can be started in Neutral or any other gear as
long as the clutch pedal is pressed. To restart a vehicle
with a manual transmission when you are already
moving, use the Neutral position only. To restart a
vehicle with an automatic transmission when you
are already moving, use N (Neutral).
Notice: Do not try to shift to P (Park) if the vehicle
is moving. If you do, you could damage the
transmission. Shift to P (Park) only when the
vehicle is stopped.
The keyless access transmitter must be inside the
vehicle for the ignition to work. Cell phone chargers can interfere with the operation of
the Keyless Access System. Battery chargers should
not be plugged in when starting or turning off the
engine.
To start the vehicle, do the following:
1. For vehicles with an automatic transmission, with your foot on the brake pedal, press the
START button located on the instrument panel.
For vehicles with a manual transmission, you must
also press in the clutch pedal while pressing the
START button.
If there is not a keyless access transmitter in
the vehicle or if there is something causing
interference with it, the DIC will display NO FOBS
DETECTED. See DIC Warnings and Messages
on
page 4‑52for more information.
2. When the engine begins cranking, let go of the button and the engine cranks automatically until
it starts. If the battery in the keyless access
transmitter is weak, the DIC displays FOB
BATTERY LOW. You can still drive the vehicle.
See “Battery Replacement” underKeyless Access
System Operation
on page 3‑5for more
information. If the fob battery is dead, you need to
insert the fob into the fob slot to enable engine
starting. See “No Fobs Detected” underDIC
Warnings and Messages on page 4‑52.
3-24
Page 133 of 472
Parking Over Things That Burn
{WARNING:
Things that can burn could touch hot exhaust
parts under the vehicle and ignite. Do not park
over papers, leaves, dry grass, or other things that
can burn.
Engine Exhaust
{WARNING:
Engine exhaust contains Carbon Monoxide (CO)
which cannot be seen or smelled. Exposure to CO
can cause unconsciousness and even death.
Exhaust may enter the vehicle if:
.The vehicle idles in areas with poor ventilation
(parking garages, tunnels, deep snow that
may block underbody airflow or tail pipes).
.The exhaust smells or sounds strange or
different. (Continued)
WARNING: (Continued)
.The exhaust system leaks due to corrosion or
damage.
.The vehicle’s exhaust system has been
modified, damaged or improperly repaired.
.There are holes or openings in the
vehicle body from damage or after-market
modifications that are not completely sealed.
If unusual fumes are detected or if it is suspected
that exhaust is coming into the vehicle:
.Drive it only with the windows
completely down.
.Have the vehicle repaired immediately.
Never park the vehicle with the engine running in
an enclosed area such as a garage or a building
that has no fresh air ventilation.
3-37
Page 136 of 472
Compass Calibration
PressPonce to turn the compass display on or off.
If after several seconds the display does not show a
compass heading, there may be a strong magnetic
field interfering with the compass. Interference can be
caused by a magnetic antenna mount, note pad holder
or similar object. If the letter C or CAL appears in the
compass window, the compass needs calibration.
Depending on the mirror, in order to calibrate, CAL must
be displayed in the mirror compass windows. If CAL is
not displayed, press
Pfor several seconds or until
CAL is displayed.
If the compass has map lamps, it can be placed in
calibration mode by pressing and holding the left map
light button until a C appears on the compass display.
The mirror compass can be calibrated by driving the
vehicle in circles at 5 mph (8 km/h) or less until the
display reads a direction.
Compass Variance
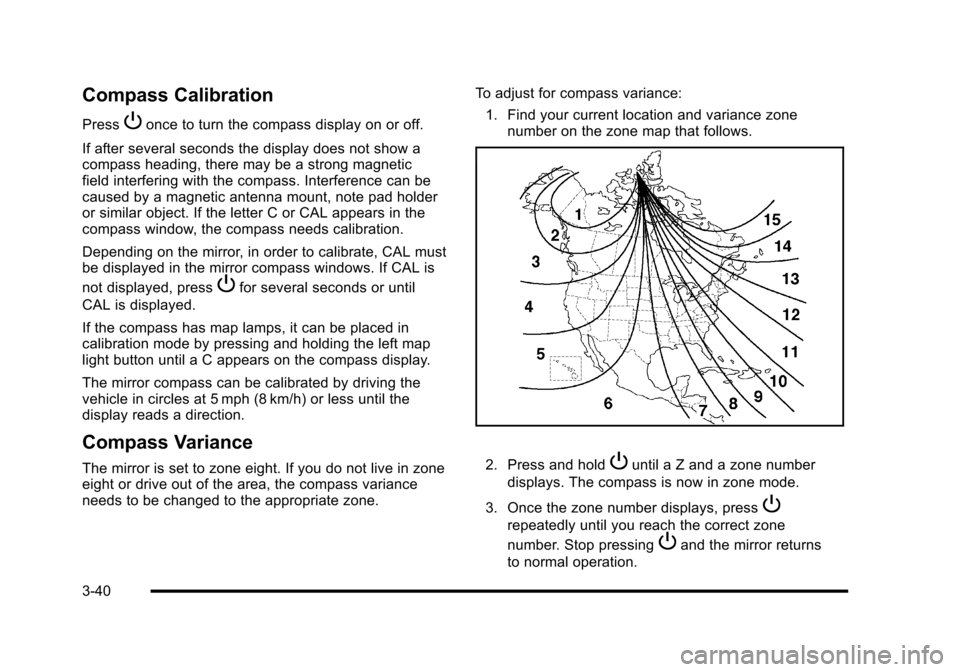
The mirror is set to zone eight. If you do not live in zone
eight or drive out of the area, the compass variance
needs to be changed to the appropriate zone. To adjust for compass variance:
1. Find your current location and variance zone number on the zone map that follows. 2. Press and holdPuntil a Z and a zone number
displays. The compass is now in zone mode.
3. Once the zone number displays, press
P
repeatedly until you reach the correct zone
number. Stop pressing
Pand the mirror returns
to normal operation.
3-40
Page 138 of 472
Outside Convex Mirror
{WARNING:
A convex mirror can make things, like other
vehicles, look farther away than they really are.
If you cut too sharply into the right lane, you could
hit a vehicle on the right. Check the inside mirror
or glance over your shoulder before changing
lanes.
The passenger side mirror is convex shaped. A convex
mirror's surface is curved so more can be seen from the
driver seat.
Outside Heated Mirrors
<(Rear Window Defogger): Press to heat the
mirrors.
See “Rear Window Defogger” underDual Automatic
Climate Control System
on page 4‑22for more
information.
Universal Home Remote
System
See Radio Frequency Statementon page 8‑20for information regarding Part 15 of the Federal
Communications Commission (FCC) Rules and
RSS-210/211 of Industry Canada.
The FCC Grant of Equipment Authorization
Certificate number is KOBFTE05A.
The Canadian Registration ID number
is 3521A-FTE05A.
3-42
Page 150 of 472
Roof Panel
On vehicles with a removable roof panel, follow the
procedures when removing or installing it.
Removing the Roof Panel
{WARNING:
Do not try to remove a roof panel while the vehicle
is moving. Trying to remove the roof panel while
the vehicle is moving could cause an accident.
The panel could fall into the vehicle and cause
you to lose control, or it could fly off and strike
another vehicle. You or others could be injured.
Remove the roof panel only when the vehicle is
parked. Until you are sure you can remove the panel alone,
have someone help you.
Notice:
If you drop or rest a roof panel on its edges,
the roof panel, paint and/or weatherstripping may
be damaged. Always place the roof panel in the
stowage receivers after removing it from the
vehicle.
1. Park on a level surface and set the parking brake. Shift an automatic transmission into P (Park).
Shift a manual transmission into N (Neutral).
2. Make sure the ignition is off.
3. Lower both sun visors.
4. Open the rear hatch and remove any items that may interfere with proper storage of the roof panel.
5. Lower the windows. There are two release latches on the front of the
roof panel and one rear release latch on the back
of the roof panel.
3-54
Page 156 of 472
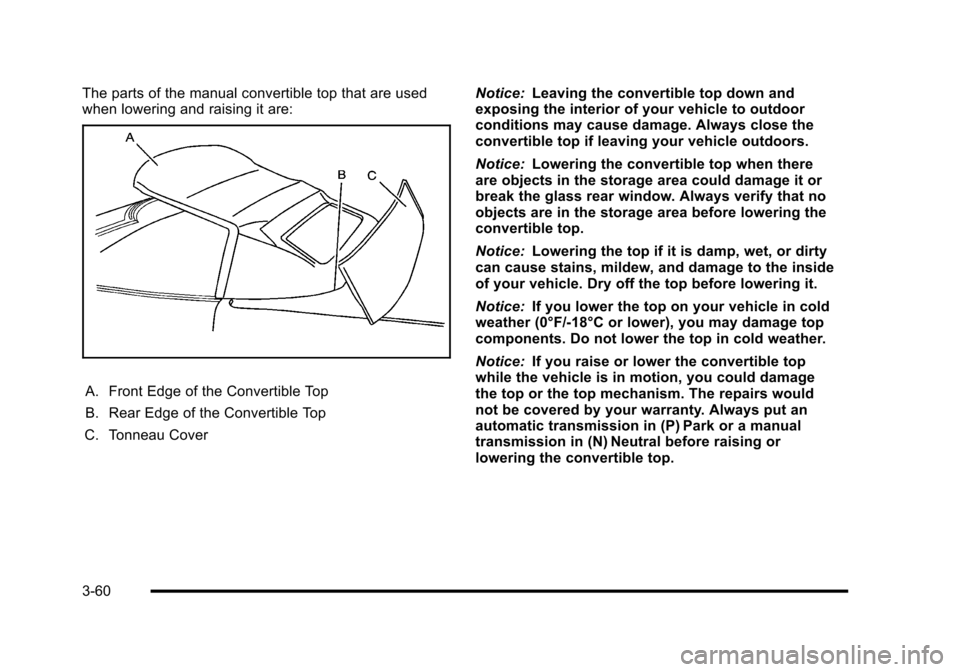
The parts of the manual convertible top that are used
when lowering and raising it are:
A. Front Edge of the Convertible Top
B. Rear Edge of the Convertible Top
C. Tonneau Cover Notice:
Leaving the convertible top down and
exposing the interior of your vehicle to outdoor
conditions may cause damage. Always close the
convertible top if leaving your vehicle outdoors.
Notice: Lowering the convertible top when there
are objects in the storage area could damage it or
break the glass rear window. Always verify that no
objects are in the storage area before lowering the
convertible top.
Notice: Lowering the top if it is damp, wet, or dirty
can cause stains, mildew, and damage to the inside
of your vehicle. Dry off the top before lowering it.
Notice: If you lower the top on your vehicle in cold
weather (0°F/-18°C or lower), you may damage top
components. Do not lower the top in cold weather.
Notice: If you raise or lower the convertible top
while the vehicle is in motion, you could damage
the top or the top mechanism. The repairs would
not be covered by your warranty. Always put an
automatic transmission in (P) Park or a manual
transmission in (N) Neutral before raising or
lowering the convertible top.
3-60
Page 160 of 472
9. Then move the top rearward to its fully-stored position.
10. After the top is stored, apply one even push on the center of the front edge (A) of the convertible top to
assure that the top is fully retracted.
11. Close the tonneau cover (B) by pressing down on it with a swift, firm motion.
Raising the Manual Convertible Top
1. Park on a level surface. Shift an automatictransmission into P (Park) and set the parking
brake. Shift a manual transmission into N (Neutral)
and set the parking brake.
2. Lower both windows.
3. Make sure the ignition is off.
4. Tilt the driver's seat forward and press the tonneau cover release button, or use the manual release
cable if battery power has been lost. See Step 6
under “Lowering the Manual Convertible Top”
earlier in this section.
After pressing the release button, the driver's
and passenger's door glass should retract to the
full-down position, if they have not already been
lowered.
5. Lift the tonneau cover.
3-64
Page 162 of 472
11. Pull the top front latch handle down and turn it counterclockwise to lock the convertible top.
Convertible Top (Power)
For care and cleaning of the convertible top see
Convertible Topon page 6‑97under “Service and
Appearance Care”. High pressure car washes may
cause water to enter the vehicle.
To operate the power convertible top use the
following steps.
Notice: Leaving the convertible top down and
exposing the interior of your vehicle to outdoor
conditions may cause damage. Always close the
convertible top if leaving your vehicle outdoors.
Notice: Lowering the convertible top when there are
objects in the storage area could damage it or break
the glass rear window. Always verify that no objects
are in the storage area before lowering the
convertible top.
3-66