2010 CHEVROLET CORVETTE window
[x] Cancel search: windowPage 163 of 472
Notice:Lowering the top if it is damp, wet, or dirty
can cause stains, mildew, and damage to the inside
of your vehicle. Dry off the top before lowering it.
Notice: If you lower the top on your vehicle in cold
weather (0°F/-18°C or lower), you may damage top
components. Do not lower the top in cold weather.
Notice: If you raise or lower the convertible top
while the vehicle is in motion, you could damage
the top or the top mechanism. The repairs would
not be covered by your warranty. Always put an
automatic transmission in (P) Park or a manual
transmission in (N) Neutral before raising or
lowering the convertible top.
Lowering the Power Convertible Top
1. Park on a level surface. Start the engine. Shift an automatic transmission into P (Park) and set the
parking brake. Shift a manual transmission into
N (Neutral), and set the parking brake.
2. Make sure the trunk is closed and the rear trunk partition in the rear storage area is in the fastened
upright position, and that no objects are forward of
the divider. See “Rear Trunk Partition” underRear
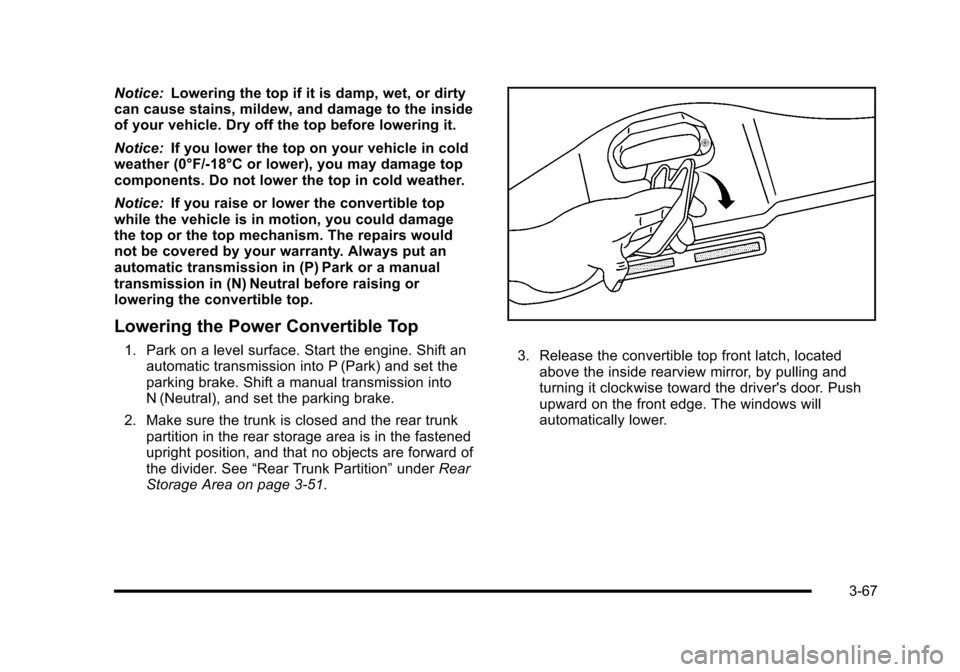
Storage Area on page 3‑51. 3. Release the convertible top front latch, located above the inside rearview mirror, by pulling and
turning it clockwise toward the driver's door. Push
upward on the front edge. The windows will
automatically lower.
3-67
Page 164 of 472
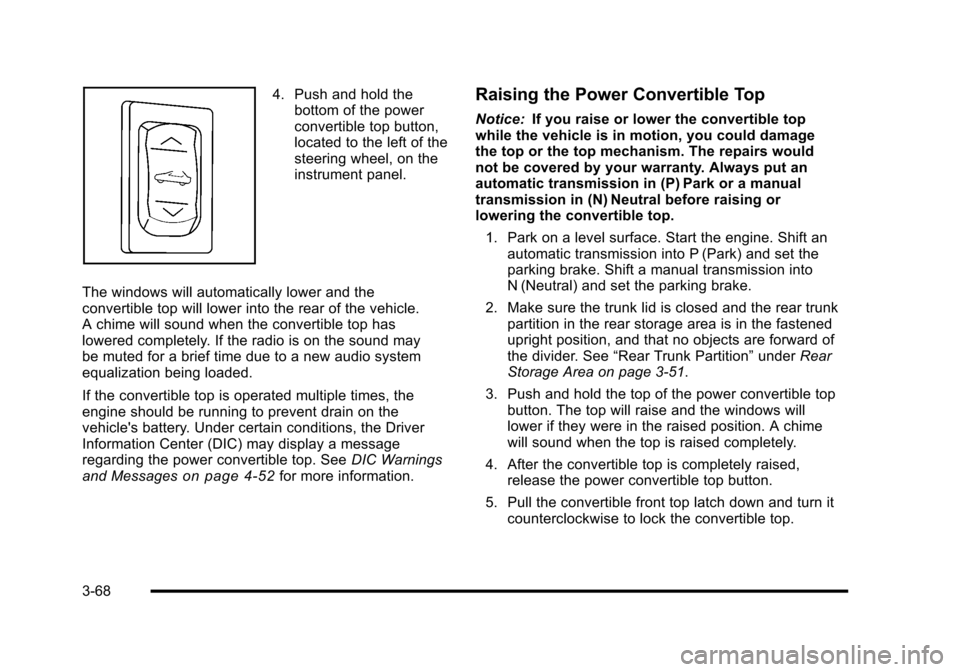
4. Push and hold the bottom of the power
convertible top button,
located to the left of the
steering wheel, on the
instrument panel.
The windows will automatically lower and the
convertible top will lower into the rear of the vehicle.
A chime will sound when the convertible top has
lowered completely. If the radio is on the sound may
be muted for a brief time due to a new audio system
equalization being loaded.
If the convertible top is operated multiple times, the
engine should be running to prevent drain on the
vehicle's battery. Under certain conditions, the Driver
Information Center (DIC) may display a message
regarding the power convertible top. See DIC Warnings
and Messages
on page 4‑52for more information.
Raising the Power Convertible Top
Notice: If you raise or lower the convertible top
while the vehicle is in motion, you could damage
the top or the top mechanism. The repairs would
not be covered by your warranty. Always put an
automatic transmission in (P) Park or a manual
transmission in (N) Neutral before raising or
lowering the convertible top.
1. Park on a level surface. Start the engine. Shift an automatic transmission into P (Park) and set the
parking brake. Shift a manual transmission into
N (Neutral) and set the parking brake.
2. Make sure the trunk lid is closed and the rear trunk partition in the rear storage area is in the fastened
upright position, and that no objects are forward of
the divider. See “Rear Trunk Partition” underRear
Storage Area on page 3‑51.
3. Push and hold the top of the power convertible top button. The top will raise and the windows will
lower if they were in the raised position. A chime
will sound when the top is raised completely.
4. After the convertible top is completely raised, release the power convertible top button.
5. Pull the convertible front top latch down and turn it counterclockwise to lock the convertible top.
3-68
Page 167 of 472
3. Use the wrench, located in the console, and turn the pressure release bolt counterclockwise
one revolution, to relieve pressure to the hydraulic
pump. This will allow you to manually raise the
convertible top.
4. Then follow the steps under raising the manual convertible top. See “Convertible Top (Manual)”
under Convertible Top (Manual)
on page 3‑59or
Convertible Top (Power) on page 3‑66
When power is restored to the vehicle, the hydraulic
bolt must be tightened, by turning it clockwise.
The power convertible top button can then be
used to lower or raise the convertible top. If the power convertible top is operated multiple times,
the engine should be running to prevent drain on the
vehicle's battery. Under certain conditions, the Driver
Information Center (DIC) may display a message
regarding the power top. See
DIC Warnings and
Messages
on page 4‑52for more information.
If the battery has been disconnected, the power
windows must be initialized for the power top to
operate. See Power Windows
on page 3‑17for
more information.
3-71
Page 174 of 472
Windshield Wipers
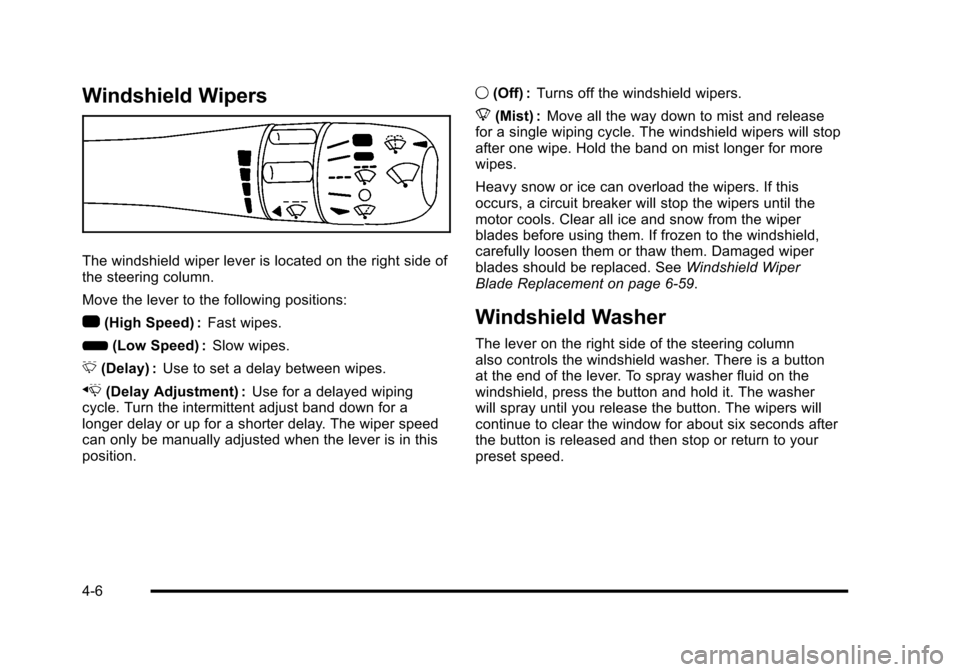
The windshield wiper lever is located on the right side of
the steering column.
Move the lever to the following positions:
1 (High Speed) : Fast wipes.
6 (Low Speed) : Slow wipes.
& (Delay) : Use to set a delay between wipes.
x (Delay Adjustment) : Use for a delayed wiping
cycle. Turn the intermittent adjust band down for a
longer delay or up for a shorter delay. The wiper speed
can only be manually adjusted when the lever is in this
position. 9
(Off) : Turns off the windshield wipers.
8 (Mist) : Move all the way down to mist and release
for a single wiping cycle. The windshield wipers will stop
after one wipe. Hold the band on mist longer for more
wipes.
Heavy snow or ice can overload the wipers. If this
occurs, a circuit breaker will stop the wipers until the
motor cools. Clear all ice and snow from the wiper
blades before using them. If frozen to the windshield,
carefully loosen them or thaw them. Damaged wiper
blades should be replaced. See Windshield Wiper
Blade Replacement on page 6‑59.
Windshield Washer
The lever on the right side of the steering column
also controls the windshield washer. There is a button
at the end of the lever. To spray washer fluid on the
windshield, press the button and hold it. The washer
will spray until you release the button. The wipers will
continue to clear the window for about six seconds after
the button is released and then stop or return to your
preset speed.
4-6
Page 190 of 472
Climate Controls
Dual Automatic Climate
Control System
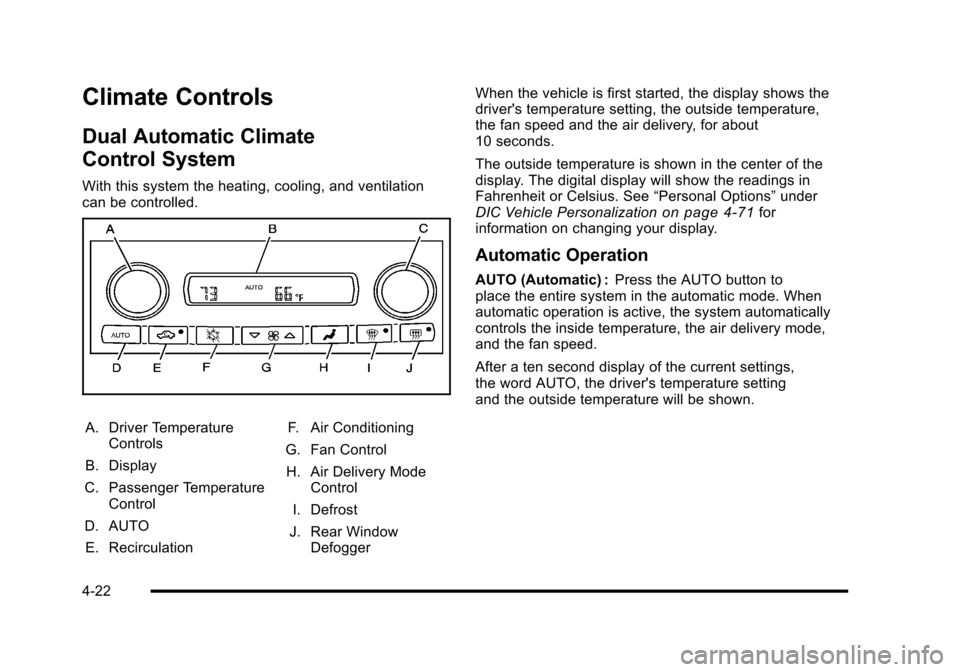
With this system the heating, cooling, and ventilation
can be controlled.
A. Driver Temperature Controls
B. Display
C. Passenger Temperature Control
D. AUTO E. Recirculation F. Air Conditioning
G. Fan Control H. Air Delivery Mode Control
I. Defrost
J. Rear Window Defogger When the vehicle is first started, the display shows the
driver's temperature setting, the outside temperature,
the fan speed and the air delivery, for about
10 seconds.
The outside temperature is shown in the center of the
display. The digital display will show the readings in
Fahrenheit or Celsius. See
“Personal Options”under
DIC Vehicle Personalization
on page 4‑71for
information on changing your display.
Automatic Operation
AUTO (Automatic) : Press the AUTO button to
place the entire system in the automatic mode. When
automatic operation is active, the system automatically
controls the inside temperature, the air delivery mode,
and the fan speed.
After a ten second display of the current settings,
the word AUTO, the driver's temperature setting
and the outside temperature will be shown.
4-22
Page 191 of 472
The system operates to reach the set temperature
as quickly as possible. The AUTO control system
works best with the windows up and the removable
roof installed or the convertible top up. 1. Press the AUTO button.
2. Adjust the temperature to a comfortable setting between 16°C (60°F) and 32°C (90°F). Choosing
the coldest or warmest temperature setting will
not cause the system to heat or cool any faster.
A setting of 23°C (73°F) is suggested.
In cold weather, the system will start at reduced
fan speeds to avoid blowing cold air into your
vehicle until warmer air is available. The system
starts out blowing air at the floor but may change
modes automatically as the vehicle warms up to
maintain the chosen temperature setting. The
length of time needed for warm up depends on the
outside temperature and the length of time that has
elapsed since the vehicle was last driven.
3. Wait for the system to regulate. This may take from 10 to 30 minutes. Then adjust the temperature,
if necessary.
Do not cover the solar sensor located in the center of
the instrument panel, near the windshield. For more
information on the solar sensor, see “Sensor”later in
this section.Manual Operation
Driver Power/Temperature : Press the driver
temperature knob to turn the climate control system off.
This is the only setting that completely shuts off the fan.
The digital display shows only the outside temperature.
The driver and the passenger set temperature and the
air intake mode can still be adjusted when the climate
control is off.
Passenger Power/Temperature : Press the passenger
temperature knob to turn the passenger's climate
control system on or off. Turn the knob to increase or
decrease the temperature for the passenger. If the
passenger's climate control system is off, the driver's
temperature knob will control the temperature for the
entire vehicle.
x 9 w (Fan) :Press to increase or decrease the fan
speed. The fan speed setting will appear in the display.
Pressing the arrows will delete AUTO from the digital
display. The fan graphics with the fan speed bars will be
shown. The AUTO button must be pressed to return to
the automatic fan control.
If the airflow seems low when the fan speed is at the
highest setting, the passenger compartment air filter
may need to be replaced. For more information, see
Passenger Compartment Air Filter
on page 4‑28and
Scheduled Maintenance on page 7‑3.
4-23
Page 192 of 472

N(Air Delivery Mode Control) : Press this button to
manually lock in the current air delivery setting and to
stop the automatic mode control. Pressing
Ndeletes
AUTO from the digital display and the mode graphics
will be shown. To change the setting, press
Nagain.
The AUTO button must be pressed to return to the
automatic mode selection.
To change the current mode, select one of the following:
H (Vent) : Air is directed to the instrument panel outlets,
with some air directed to the floor outlets.
% (Bi-Level) : Air is divided between the instrument
panel and floor outlets.
6 (Floor) : Air is directed to the floor outlets, with some
air directed to the windshield and side window defogger
outlets.
- (Floor/Defog) : This mode clears the windows of fog
or moisture. Air is directed to the windshield and the
floor outlets, with a small amount to the side window
outlets. In this mode, the system automatically turns
off the recirculation and runs the air-conditioning
compressor unless the outside temperature is at or
below freezing. The recirculation mode cannot be
selected while in the defog mode. 1(Defrost) :
This mode clears the windows of fog or
frost more quickly. Air is directed to the windshield,
with a small amount directed to the side window outlets.
The indicator light comes on and the digital display will
show the defrost mode symbol and fan speed when the
front defrost mode is being used. In this mode, the
system automatically turns off the recirculation and
runs the air-conditioning compressor, unless the
outside temperature is at or below freezing.
Recirculation cannot be selected while in the defrost
mode. Pressing
1again will return the system to the
last operating mode.
For severe ice conditions, turn the driver's temperature
knob to 32°C (90°F) while in defrost mode.
Do not drive the vehicle until all the windows are clear.
^ (Air Conditioning Off) : Press to turn the air
conditioning compressor off. Press AUTO to return
to automatic operation. When in AUTO, the air
conditioning compressor comes on automatically,
as needed.
Air conditioning does not operate at temperatures below
about 2°C to 4°C (35°F to 40°F). In temperatures above
4°C (40°F), the air conditioning cannot be turned off in
defrost and defog, as it helps to remove moisture from
the vehicle. It also helps to keep the windows clear.
4-24
Page 193 of 472
You may notice a slight change in engine performance
when the air-conditioning compressor shuts off and
turns on again. This is normal. The system is designed
to make adjustments to help with fuel economy while
still maintaining the selected temperature.
On hot days, open the windows to let hot inside air
escape; then close them. This helps to reduce the time
it takes for the vehicle to cool down. It also helps the
system to operate more efficiently.
For quick cool down on hot days press the AUTO
button and adjust the temperature to a cool, comfortable
setting. To achieve maximum cool down, do the
following: 1. Select
Hmode.
2. Press
?.
3. Select the a/c on.
4. Select the coolest temperature.
5. Select the highest fan speed. Using these settings together for long periods of time
may cause the air inside of your vehicle to become too
dry. To prevent this from happening, after the air in the
vehicle has cooled, turn the recirculation mode off.
The air conditioning system removes moisture from the
air, so a small amount of water might drip under the
vehicle while idling or after turning off the engine.
This is normal.
?
(Recirculation) : Press to turn the recirculation
mode on or off. An indicator light comes on to show
that recirculation is on. This mode prevents outside air
from entering your vehicle. It can be used to prevent
outside air and odors from entering your vehicle and
to help cool the air inside your vehicle more quickly.
Recirculation mode is not available in defrost or
defog mode.
4-25