2010 CHEVROLET CORVETTE power steering
[x] Cancel search: power steeringPage 137 of 472

Outside Power Mirrors
Controls for the outside power mirrors are located on
the driver door.
To adjust the mirrors: 1. Move the top selector control to the left or right to select either the driver or passenger mirror.
2. Use the arrows located on the four-way control pad to move the mirror in the desired direction.
3. Adjust each outside mirror so that a little of the vehicle and the area behind it can be seen. Keep the control in the center position when not
adjusting either outside mirror.
If the vehicle has the memory feature, a preferred mirror
position can be stored. See
Memory Seat, Mirrors and
Steering Wheel on page 2‑4.
Manually fold the mirrors inward to prevent damage
when going through an automatic car wash. To fold, pull
the mirror toward the vehicle. Push the mirror outward,
to return it to the original position.
Outside Automatic Dimming Mirror
If the vehicle has this feature, the driver side outside
mirror adjusts for the glare of headlamps behind you.
This feature is controlled by the on and off setting on
the inside rearview mirror.
3-41
Page 164 of 472
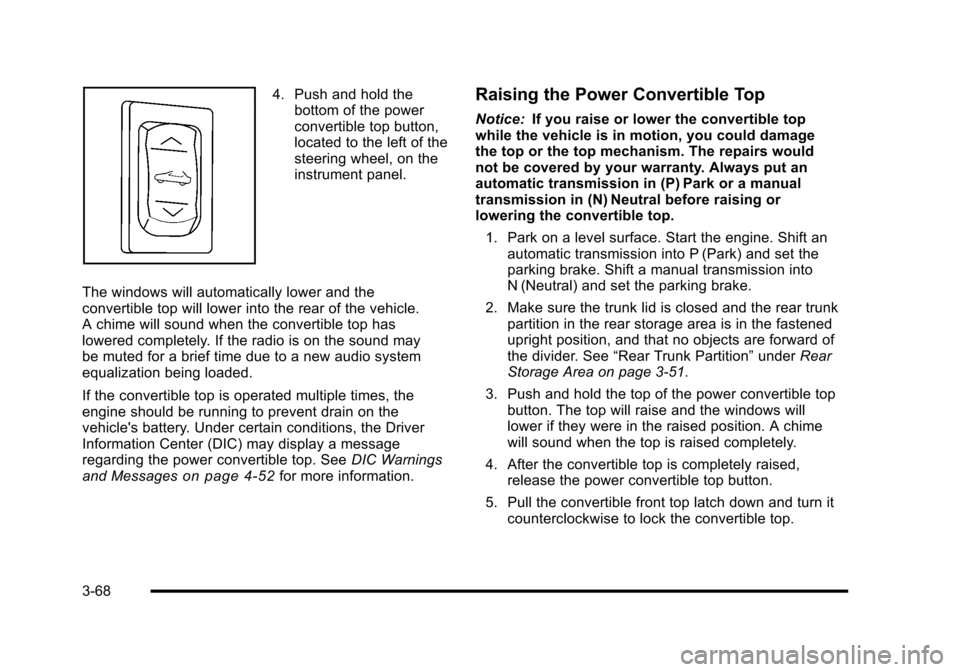
4. Push and hold the bottom of the power
convertible top button,
located to the left of the
steering wheel, on the
instrument panel.
The windows will automatically lower and the
convertible top will lower into the rear of the vehicle.
A chime will sound when the convertible top has
lowered completely. If the radio is on the sound may
be muted for a brief time due to a new audio system
equalization being loaded.
If the convertible top is operated multiple times, the
engine should be running to prevent drain on the
vehicle's battery. Under certain conditions, the Driver
Information Center (DIC) may display a message
regarding the power convertible top. See DIC Warnings
and Messages
on page 4‑52for more information.
Raising the Power Convertible Top
Notice: If you raise or lower the convertible top
while the vehicle is in motion, you could damage
the top or the top mechanism. The repairs would
not be covered by your warranty. Always put an
automatic transmission in (P) Park or a manual
transmission in (N) Neutral before raising or
lowering the convertible top.
1. Park on a level surface. Start the engine. Shift an automatic transmission into P (Park) and set the
parking brake. Shift a manual transmission into
N (Neutral) and set the parking brake.
2. Make sure the trunk lid is closed and the rear trunk partition in the rear storage area is in the fastened
upright position, and that no objects are forward of
the divider. See “Rear Trunk Partition” underRear
Storage Area on page 3‑51.
3. Push and hold the top of the power convertible top button. The top will raise and the windows will
lower if they were in the raised position. A chime
will sound when the top is raised completely.
4. After the convertible top is completely raised, release the power convertible top button.
5. Pull the convertible front top latch down and turn it counterclockwise to lock the convertible top.
3-68
Page 233 of 472
SERVICE TRACTION SYSTEM
If this message displays when you are driving, there is a
problem with the Traction Control System (TCS) and the
vehicle is in need of service. See your dealer/retailer.
When this message is displayed, the system will not
limit wheel spin. Adjust your driving accordingly.
The traction control system (TCS) warning light on the
instrument panel cluster will also turn on and a sound
will be heard.
When this message is displayed, the computer
controlled systems will not assist the driver in controlling
the vehicle. Have the system repaired by your dealer/
retailer as soon as possible. Adjust your driving
accordingly. See Traction Control System (TCS)
on
page 5‑6for more information.
To acknowledge the message, press the RESET button.
SERVICE TRANSMISSION
This message displays when there is a problem with the
transmission. See your dealer/retailer for service.
SERVICE VEHICLE SOON
This message displays and a sound will be heard when
there may be an electrical or another system problem
with the vehicle. Have your vehicle checked by your
dealer/retailer if this message keeps appearing.
SET PARK BRAKE FOR SEAT RECALL
If the vehicle has a manual transmission, this message
displays if you try to recall the memory positions when
the ignition is on and the parking brake is not set. If the
vehicle is on, you must set the parking brake in order
for the memory positions to recall. See Memory Seat,
Mirrors and Steering Wheel
on page 2‑4for more
information.
SET PARK BRAKE TO MOVE TOP
If the vehicle has a manual transmission, this message
displays and a sound will be heard if you try to operate
the power convertible top without first setting the
parking brake. Set the parking brake before trying to
operate the power convertible top. See Convertible Top
(Manual)
on page 3‑59or Convertible Top (Power)on
page 3‑66for more information.
SHIFT TO PARK
If the vehicle has an automatic transmission, this
message displays if the vehicle is not in P (Park) when
the engine is being turned off. The vehicle will be in
ACCESSORY Once the shift lever is moved to P (Park),
the vehicle will turn off.
4-65
Page 241 of 472
Press the OPTION button until AUTO MEMORY
RECALL appears on the display, then press the RESET
button to scroll through the following modes:
.YES
.NO (default)
If you choose YES, the driver's seat, the outside
rearview mirrors and the telescopic steering column,
if your vehicle has this feature, positions are recalled
when you turn the ignition on.
If you choose NO, this option will turn off.
When the mode you want is selected, press the
OPTION button to set your choice and advance
to the next personal option.
Auto Exit Recall : If your vehicle has the memory
package, you may have this option. This option allows
the driver's seat and telescopic steering column, if your
vehicle has this feature, to automatically move to the
current driver's exit position when one of the following
occurs:
.The vehicle is turned off or in Retained Accessory
Power (RAP) or accessory mode and the driver's
door is opened.
.The vehicle is turned off or in RAP and the unlock
button on the keyless access transmitter is
pressed. In order for the Auto Exit Recall feature to work on an
automatic transmission vehicle, the vehicle must be in
P (Park). On a manual transmission vehicle, the parking
brake must be set.
Press the OPTION button until AUTO EXIT RECALL
appears on the display, then press the RESET button to
scroll through the following modes:
.YES
.NO (default)
If you choose YES, when you turn the ignition off and
open the driver's door or press the unlock button on the
keyless access transmitter, the seat and the telescopic
steering wheel, if your vehicle has this feature, will
return to their stored exit positions for an easy exit
or an easy entrance when returning to the vehicle.
The seat and steering wheel will only return to the
stored driving position if you press the appropriate
memory button or activate the auto memory recall
feature.
If you choose NO, this option will turn off.
When the mode you want is selected, press the
OPTION button to set your choice and advance
to the next personal option.
4-73
Page 284 of 472
Braking in Emergencies
ABS allows the driver to steer and brake at the same
time. In many emergencies, steering can help more
than even the very best braking.
Brake Assist
This vehicle has a brake assist feature that responds to
emergency braking by generating additional pressure
and engaging the ABS. When this happens, the brake
pedal will feel easier to push. Just hold the brake pedal
down firmly and let the system work for you. You might
feel the brakes vibrate or notice some noise, but this is
normal. The brakes will return to normal operation after
the brake pedal is released.
Brake assist cannot compensate for unsafe driving
practices and braking effectiveness, itself, depends on
the condition of the road, tires, and brakes and
vehicle mass.
Traction Control System (TCS)
The vehicle has a Traction Control System (TCS) that
limits wheel spin. This is especially useful in slippery
road conditions. The system operates only if it senses
that the rear wheels are spinning too much or are
beginning to lose traction. When this happens, the
system works the rear brakes and reduces engine
power (by closing the throttle and managing engine
spark) to limit wheel spin.
The TRACTION SYSTEM ACTIVE message displays
on the Driver Information Center (DIC) when TCS is
limiting wheel spin. See DIC Warnings and Messages
on page 4‑52. The system may be heard or felt while it
is working, but this is normal.
If cruise control is being used when TCS begins to limit
wheel spin, the cruise control will automatically
disengage. Cruise control may be reengaged when
road conditions allow. See Cruise Control on page 4‑7.
5-6
Page 294 of 472
Steering
Power Steering
If power steering assist is lost because the engine stops
or the system is not functioning, the vehicle can be
steered but it will take more effort.
Magnetic Speed Variable Assist
Steering System
This system continuously adjusts the effort felt when
steering at all vehicle speeds. It provides ease when
parking, yet a firm, solid feel at highway speeds.
Steering Tips
It is important to take curves at a reasonable speed.
Traction in a curve depends on the condition of the tires
and the road surface, the angle at which the curve is
banked, and vehicle speed. While in a curve, speed is
the one factor that can be controlled.
If there is a need to reduce speed, do it before entering
the curve, while the front wheels are straight. Try to adjust the speed so you can drive through the
curve. Maintain a reasonable, steady speed. Wait to
accelerate until out of the curve, and then accelerate
gently into the straightaway.
Steering in Emergencies
There are times when steering can be more effective
than braking. For example, you come over a hill and
find a truck stopped in your lane, or a car suddenly pulls
out from nowhere, or a child darts out from between
parked cars and stops right in front of you. These
problems can be avoided by braking
—if you can stop
in time. But sometimes you cannot stop in time because
there is no room. That is the time for evasive
action —steering around the problem.
The vehicle can perform very well in emergencies
like these. First apply the brakes. See Braking
on
page 5‑4. It is better to remove as much speed as
possible from a collision. Then steer around the
problem, to the left or right depending on the
space available.
5-16
Page 313 of 472
Section 6 Service and Appearance Care
Service. . . . . . . . . . . . . . . . . . . . . . . . . . . . . . . . . . . . . . . . . . . . . 6-3
Accessories and Modifications . . . . . . . . . . . . . . . . . . 6-3
California Proposition 65 Warning . . . . . . . . . . . . . . . 6-4
California Perchlorate Materials Requirements . . . . . . . . . . . . . . . . . . . . . . . . . . . . . . . . . 6-4
Doing Your Own Service Work . . . . . . . . . . . . . . . . . . 6-5
Adding Equipment to the Outside of the Vehicle . . . . . . . . . . . . . . . . . . . . . . . . . . . . . . . . . . . . . . . . 6-5
Fuel . . . . . . . . . . . . . . . . . . . . . . . . . . . . . . . . . . . . . . . . . . . . . . . . . 6-6
Gasoline Octane . . . . . . . . . . . . . . . . . . . . . . . . . . . . . . . . 6-7
Gasoline Specifications . . . . . . . . . . . . . . . . . . . . . . . . . 6-7
California Fuel . . . . . . . . . . . . . . . . . . . . . . . . . . . . . . . . . . 6-7
Additives . . . . . . . . . . . . . . . . . . . . . . . . . . . . . . . . . . . . . . . . 6-8
Fuels in Foreign Countries . . . . . . . . . . . . . . . . . . . . . . 6-9
Filling the Tank . . . . . . . . . . . . . . . . . . . . . . . . . . . . . . . . . . 6-9
Filling a Portable Fuel Container . . . . . . . . . . . . . . . 6-12
Checking Things Under the Hood . . . . . . . . . . . . . . . 6-12
Hood Release . . . . . . . . . . . . . . . . . . . . . . . . . . . . . . . . . 6-13
Engine Compartment Overview . . . . . . . . . . . . . . . . 6-14
Engine Oil . . . . . . . . . . . . . . . . . . . . . . . . . . . . . . . . . . . . . 6-19
Engine Oil Life System . . . . . . . . . . . . . . . . . . . . . . . . 6-25
Engine Air Cleaner/Filter . . . . . . . . . . . . . . . . . . . . . . . 6-27
Automatic Transmission Fluid . . . . . . . . . . . . . . . . . . 6-31
Manual Transmission Fluid . . . . . . . . . . . . . . . . . . . . 6-31
Hydraulic Clutch . . . . . . . . . . . . . . . . . . . . . . . . . . . . . . . 6-31
Cooling System (Engine) . . . . . . . . . . . . . . . . . . . . . . 6-32 Cooling System (Intercooler) . . . . . . . . . . . . . . . . . . . 6-33
Engine Coolant . . . . . . . . . . . . . . . . . . . . . . . . . . . . . . . . 6-34
Engine Overheating . . . . . . . . . . . . . . . . . . . . . . . . . . . 6-38
Overheated Engine Protection
Operating Mode . . . . . . . . . . . . . . . . . . . . . . . . . . . . . 6-41
Power Steering Fluid . . . . . . . . . . . . . . . . . . . . . . . . . . 6-41
Windshield Washer Fluid . . . . . . . . . . . . . . . . . . . . . . 6-42
Brakes . . . . . . . . . . . . . . . . . . . . . . . . . . . . . . . . . . . . . . . . . 6-43
Battery . . . . . . . . . . . . . . . . . . . . . . . . . . . . . . . . . . . . . . . . . 6-49
Jump Starting . . . . . . . . . . . . . . . . . . . . . . . . . . . . . . . . . . 6-50
Rear Axle . . . . . . . . . . . . . . . . . . . . . . . . . . . . . . . . . . . . . . . . . 6-55
Headlamp Aiming . . . . . . . . . . . . . . . . . . . . . . . . . . . . . . . . 6-55
Bulb Replacement . . . . . . . . . . . . . . . . . . . . . . . . . . . . . . . . 6-56
High Intensity Discharge (HID) Lighting . . . . . . . . 6-56
Halogen Bulbs . . . . . . . . . . . . . . . . . . . . . . . . . . . . . . . . . 6-56
Headlamps, Front Turn Signal, and Parking Lamps . . . . . . . . . . . . . . . . . . . . . . . . . . . . . . . . . . . . . . . 6-56
Taillamps, Turn Signal, and Stoplamps . . . . . . . . 6-58
Replacement Bulbs . . . . . . . . . . . . . . . . . . . . . . . . . . . . 6-58
Windshield Replacement . . . . . . . . . . . . . . . . . . . . . . . . . 6-59
Windshield Wiper Blade Replacement . . . . . . . . . . . 6-59
Tires . . . . . . . . . . . . . . . . . . . . . . . . . . . . . . . . . . . . . . . . . . . . . . . 6-62
Winter Tires . . . . . . . . . . . . . . . . . . . . . . . . . . . . . . . . . . . . 6-63
Tire Sidewall Labeling . . . . . . . . . . . . . . . . . . . . . . . . . 6-64
Tire Terminology and Definitions . . . . . . . . . . . . . . . 6-66
6-1
Page 327 of 472

A. Clutch Master Cylinder Reservoir (If Equipped). See Hydraulic Clutch on page 6‑31.
B. Windshield Washer Fluid Reservoir. See “Adding
Washer Fluid” underWindshield Washer Fluid
on
page 6‑42.
C. Brake Fluid Reservoir. See “Brake Fluid”under
Brakes on page 6‑43.
D. Coolant Surge Tank and Pressure Cap. See Engine Coolant on page 6‑34.
E. Engine Air Cleaner/Filter on page 6‑27.
F. Power Steering Fluid Reservoir. See Power
Steering Fluid on page 6‑41. G. Engine Oil Fill Cap. See
“When to Add Engine Oil”
under Engine Oil on page 6‑19.
H. Engine Oil Dipstick. See “Checking Engine Oil”
under Engine Oil on page 6‑19.
I. Engine Compartment Fuse Block on page 6‑104.
J. Passenger Compartment Air Filter (Out of View). See Passenger Compartment Air Filter
on
page 4‑28.
K. Battery on page 6‑49.
6-15