Page 339 of 472
What to Do with Used Oil
Used engine oil contains certain elements that can be
unhealthy for your skin and could even cause cancer.
Do not let used oil stay on your skin for very long. Clean
your skin and nails with soap and water, or a good hand
cleaner. Wash or properly dispose of clothing or rags
containing used engine oil. See the manufacturer's
warnings about the use and disposal of oil products.
Used oil can be a threat to the environment. If you
change your own oil, be sure to drain all the oil from the
filter before disposal. Never dispose of oil by putting it in
the trash, pouring it on the ground, into sewers, or into
streams or bodies of water. Recycle it by taking it to a
place that collects used oil.
Engine Air Cleaner/Filter
See Engine Compartment Overviewon page 6‑14for
the location of the engine air cleaner/filter.
Notice: If you spray water into the engine air
cleaner/filter intake and water enters the engine
air cleaner/filter housing, you could damage your
vehicle's engine. The repairs would not be covered
by your warranty. Do not spray water into the
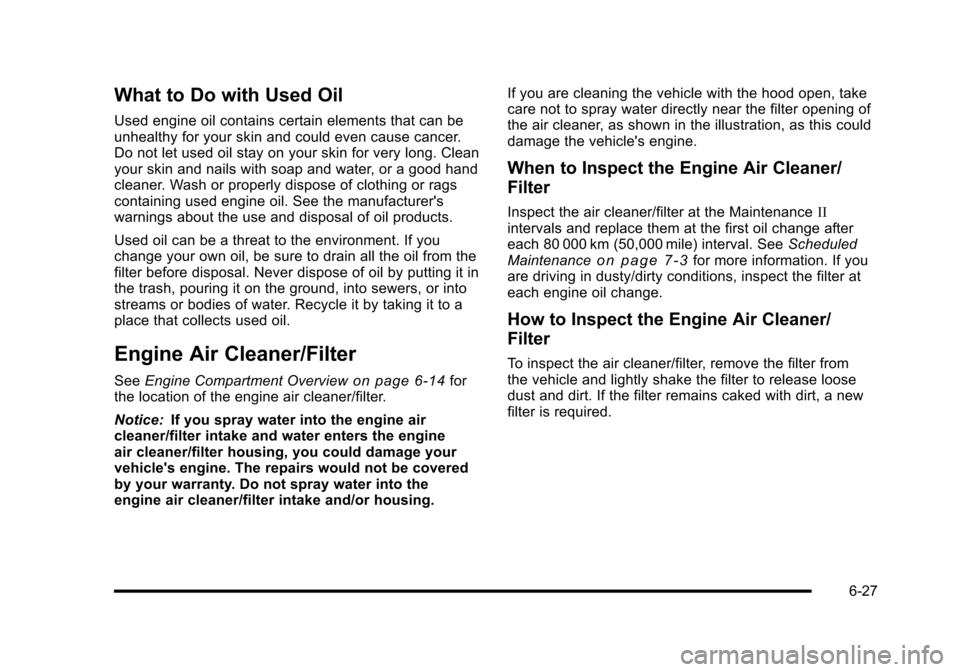
engine air cleaner/filter intake and/or housing. If you are cleaning the vehicle with the hood open, take
care not to spray water directly near the filter opening of
the air cleaner, as shown in the illustration, as this could
damage the vehicle's engine.
When to Inspect the Engine Air Cleaner/
Filter
Inspect the air cleaner/filter at the Maintenance
II
intervals and replace them at the first oil change after
each 80 000 km (50,000 mile) interval. See Scheduled
Maintenance
on page 7‑3for more information. If you
are driving in dusty/dirty conditions, inspect the filter at
each engine oil change.
How to Inspect the Engine Air Cleaner/
Filter
To inspect the air cleaner/filter, remove the filter from
the vehicle and lightly shake the filter to release loose
dust and dirt. If the filter remains caked with dirt, a new
filter is required.
6-27
Page 340 of 472
To inspect or replace the engine air cleaner/filter: 1. Open the hood. See Hood Release on page 6‑13.
6.2 L V8 Engine LS3 shown, 6.2 L V8 Engine LS9 and
7.0 L V8 Engine LS7 similar
A. Tube
B. Clamp
C. Duct
2. Remove the tube (A) from the air cleaner assembly.
3. Loosen the clamp (B) at the throttle body and remove the duct (C).
6.2 L V8 Engine LS3 shown, 6.2 L V8 Engine LS9 and 7.0 L V8 Engine LS7 similar
A. Mass Air Flow Sensor Connector
B. Connector Lock
4. Remove the connector lock (B) located at the bottom of the mass air flow sensor connector (A).
5. Press on the top and bottom of the mass air flow sensor connector (A) and remove.
6-28
Page 341 of 472
6.2 L V8 Engine LS36.2 L V8 Engine LS9 shown, 7.0 L V8 Engine LS7 similar
6. To access the air filter element, gently pull the air cleaner assembly upward until the fasteners are
released from the retainer pins in the upper
radiator support.
The LS3 engine has three retainer pins and the
LS7 and LS9 engines have two.
6-29
Page 342 of 472
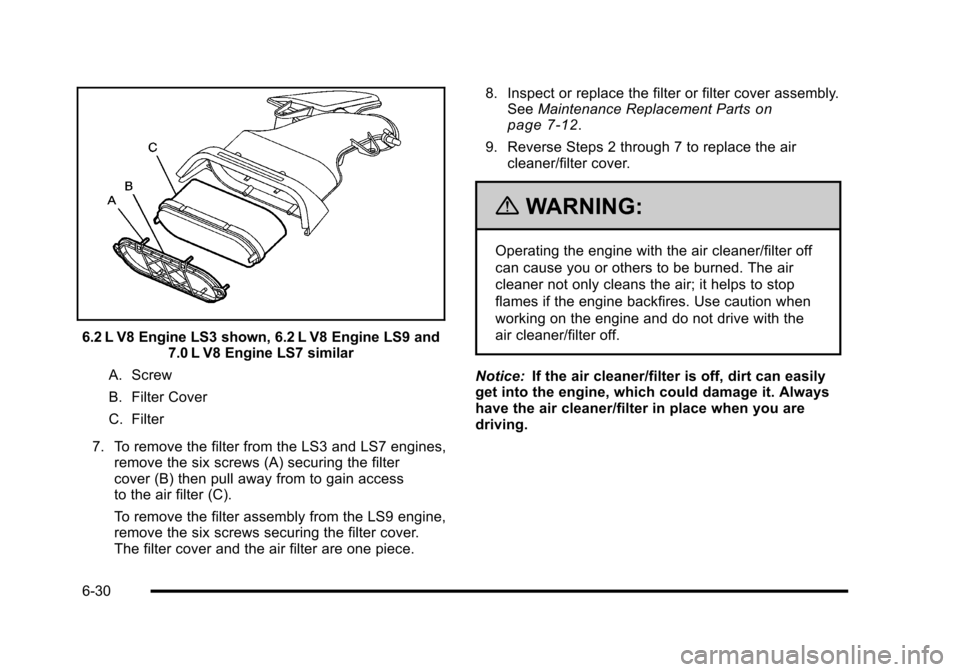
6.2 L V8 Engine LS3 shown, 6.2 L V8 Engine LS9 and 7.0 L V8 Engine LS7 similar
A. Screw
B. Filter Cover
C. Filter
7. To remove the filter from the LS3 and LS7 engines, remove the six screws (A) securing the filter
cover (B) then pull away from to gain access
to the air filter (C).
To remove the filter assembly from the LS9 engine,
remove the six screws securing the filter cover.
The filter cover and the air filter are one piece. 8. Inspect or replace the filter or filter cover assembly.
See Maintenance Replacement Parts
on
page 7‑12.
9. Reverse Steps 2 through 7 to replace the air cleaner/filter cover.
{WARNING:
Operating the engine with the air cleaner/filter off
can cause you or others to be burned. The air
cleaner not only cleans the air; it helps to stop
flames if the engine backfires. Use caution when
working on the engine and do not drive with the
air cleaner/filter off.
Notice: If the air cleaner/filter is off, dirt can easily
get into the engine, which could damage it. Always
have the air cleaner/filter in place when you are
driving.
6-30
Page 343 of 472
Automatic Transmission Fluid
How to Check Automatic Transmission
Fluid
It is not necessary to check the transmission fluid level.
A transmission fluid leak is the only reason for fluid
loss. If a leak occurs, take the vehicle to your dealer/
retailer service department and have it repaired as soon
as possible.
There is a special procedure for checking and changing
the transmission fluid. Because this procedure is
difficult, you should have this done at your dealer/
retailer service department. Contact your dealer/retailer
for additional information or the procedure can be found
in the service manual. To purchase a service manual,
see Service Publications Ordering Information
on
page 8‑16.
Notice: Use of the incorrect automatic transmission
fluid may damage the vehicle, and the damages may
not be covered by the vehicle's warranty. Always
use the automatic transmission fluid listed in
Recommended Fluids and Lubricants on page 7‑10. Change the fluid and filter at the intervals listed in
Scheduled Maintenance
on page 7‑3, and be sure
to use the fluid listed in Recommended Fluids and
Lubricants on page 7‑10.
Manual Transmission Fluid
It is not necessary to check the manual transmission
fluid level. A transmission fluid leak is the only reason
for fluid loss. If a leak occurs, take the vehicle to your
dealer/retailer service department and have it repaired
as soon as possible. See Recommended Fluids and
Lubricants
on page 7‑10for the proper fluid to use.
Hydraulic Clutch
It is not necessary to regularly check clutch fluid unless
you suspect there is a leak in the system. Adding fluid
will not correct a leak. A fluid loss in this system could
indicate a problem. Have the system inspected and
repaired.
6-31
Page 420 of 472
Capacities and Specifications
The following approximate capacities are given in English and metric conversions.
See Recommended Fluids and Lubricants
on page 7‑10for more information.
Application Capacities
Metric English
Air Conditioning Refrigerant R134a For the air conditioning system refrigerant charge
amount, see the refrigerant caution label located
under the hood. See your dealer/retailer for more information.
Cooling System
6.2L LS3 V8 Engine 11.3 L11.9 qt
6.2L LS9 V8 Supercharged Engine –Cooling System 12.0 L12.7 qt
6.2L LS9 V8 Supercharged Engine –Supercharger
Intercooler Cooling System 4.9 L
5.2 qt
7.0L LS7 V8 Engine 11.3 L11.9 qt
Engine Oil with Filter 6.2L LS3 V8 5.7 L6.0 qt
6.2L LS3 V8 with Z52 Dry Sump Oil System 9.9 L10.5 qt
6.2L LS9 V8 Supercharged Engine 9.9 L10.5 qt
7.0L LS7 V8 Engine 9.9 L10.5 qt
Fuel Tank 68.0 L18.0 gal
6-108
Page 426 of 472
.Tire wear inspection. SeeTire Inspection and
Rotation on page 6‑76.
.Fluids visual leak check (or every 12 months,
whichever occurs first). A leak in any system must
be repaired and the fluid level checked.
.Engine air cleaner filter inspection (vehicles
driven in dusty conditions only). See Engine Air
Cleaner/Filter on page 6‑27.
.Brake system inspection (or every 12 months,
whichever occurs first).
Maintenance II
.Perform all services described in Maintenance I.
.Steering and suspension inspection. Visual
inspection for damaged, loose, or missing parts
or signs of wear.
.Engine cooling system inspection. Visual
inspection of hoses, pipes, fittings, and clamps
and replacement, if needed.
.Windshield wiper blade inspection for wear,
cracking, or contamination and windshield and
wiper blade cleaning, if contaminated. See
Windshield and Wiper Blades
on page 6‑96.
Worn or damaged wiper blade replacement.
See Windshield Wiper Blade Replacement
on
page 6‑59.
.Body hinges and latches, key lock cylinders, any
folding seat hardware, and rear compartment,
hood, and console door hinges and latches
lubrication. See Recommended Fluids and
Lubricants
on page 7‑10. More frequent
lubrication may be required when vehicle is
exposed to a corrosive environment. Applying
silicone grease on weatherstrips with a clean cloth
makes them last longer, seal better, and not stick
or squeak.
.Restraint system component check. See Checking
the Restraint Systems on page 2‑60.
.Engine air cleaner filter inspection. See Engine Air
Cleaner/Filter on page 6‑27.
.Passenger compartment air filter replacement
(or every 12 months, whichever occurs first). More
frequent replacement may be required if vehicle is
driven regularly under dusty conditions.
Additional Required Services
At Each Fuel Stop
.Engine oil level check. See Engine Oilon
page 6‑19.
.Engine coolant level check. See Engine Coolanton page 6‑34.
.Windshield washer fluid level check. See
Windshield Washer Fluid on page 6‑42.
7-4
Page 427 of 472
Once a Month
.Tire inflation check. SeeInflation - Tire Pressureon page 6‑70.
.Tire wear inspection. See Tire Inspection and
Rotation on page 6‑76.
Once a Year
.Starter switch check. See Owner Checks and
Services on page 7‑8.
.Parking brake and automatic transmission P (Park)
mechanism check. See Owner Checks and
Services on page 7‑8.
.Automatic transmission shiftlock control system
check. See Owner Checks and Serviceson
page 7‑8.
.Engine cooling system and pressure cap pressure
check. Radiator and air conditioning condenser
outside cleaning. See Cooling System (Engine)
on
page 6‑32or Cooling System (Intercooler)on
page 6‑33.
.Exhaust system and nearby heat shields
inspection for loose or damaged components.
.Accelerator pedal check for damage, high effort,
or binding. Replace if needed.
Once Every Two Years
.Clutch hydraulic system drain, flush, and refill.
Service at a regular service interval (I or II) every
two years. This service can be complex; have your
dealer/retailer perform this service. See Hydraulic
Clutch on page 6‑31.
First Engine Oil Change After Every
40 000 km/25,000 Miles
.Fuel system inspection for damage or leaks.
.ZR1 Only: Engine air cleaner filter replacement.
See Engine Air Cleaner/Filter on page 6‑27.
7-5